In my previous blog on "How to evaluate a transimpedance amplifier, part 1", we looked at the OPA857 performance, but didn’t go in depth in explaining how those measurements were taken. Now that we’ve have established a reference, let’s work through the implementation.
To summarize, the main challenges to taking measurements with the OPA857 include:
- Transimpedance configuration
- Low input capacitance
- High output impedance
With a 20kW gain and a 1VPP output voltage swing the input current needs to be 50mAPP. Since the output voltage swing of the OPA857 is class A and the current flowing through a transimpedance is unipolar, the output common-mode voltage will need to be set appropriately.
The current source needs to be low capacitance, less than 1.5pF, to maintain the bandwidth. The output needs to be high output impedance to control the loading on the OPA857’s output. Since most of the test equipments we have are 50W input and output impedance, how do we resolve that problem while not impacting bandwidth, slew rate or distortion performance of the DUT (Device Under Test)?
This leads to individual solution for each measurement type.
The first measurement we will look at is the frequency response, or S21 parameter. For that we’ll use an HP 8753ES Network analyzer, a 30kHz to 6GHz S Parameter Network Analyzer. Both input and output are 50W impedance and AC-coupled. There are two ports in the back of the analyzer that allow controlling the DC voltage on either the input or output.
The two proposed signal chains to measure the OPA857 frequency response include:
- Using a high speed differential probe, see figure 1.
- Using a high speed buffer to isolate the network analyzer’s load, see figure 2.
Note that the Test_SD pin is set to a logic high (+3.3V) for the internal current source to operate properly. This implies that the DC voltage present on the Test_IN input will set the output voltage appearing on OUT and requires you implement the following procedure to ensure that the OPA857 operates optimally for an AC response.
- Minimize the AC signal.
- Set DC voltage at input such that the output voltage can swing around it preset common-mode voltage. For example, if the signal swing is 500mVPP, then the OUT DC voltage needs to be set to ≤1.4V. If this is not the case, the output swing will clip as the current in the class-A output stage runs out.
- After completion of #1, do not leave anything connected on the output. A probe lead or a voltage will add several pF to the load, altering the frequency response.
- Set the AC amplitude to the desired peak-peak output signal swing.

Figure 1: Circuit #1 using a fully differential probe to interface to the HP8753ES.

Figure 2: Circuit #2 using a BUF602 to interface to the HP8753ES.
The same approach is used to evaluate pulse response or any time domain measurement. Note however that since no resistor tolerance inside theOPA857 is better than ±15%, the setup will have to be calibrated device by device.
The approach described above will not work for measuring harmonic distortion, so how does this new problem get resolved?
The traditional approach for measuring harmonic distortion requires:
- A low distortion source
- A high dynamic range spectrum analyzer
The low distortion source is further improved by using a high order filter. The dynamic range of the spectrum analyzer can be improved by filtering the fundamental and measuring only the harmonics. The setup is shown in figure 3. The notch filter that can is placed after the DUT is omitted in this diagram.
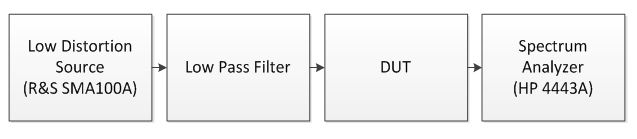
Figure 3: Traditional harmonic distortion bench measurement setup.
In the case of the OPA857, we have two problems. The first one is that the source is a voltage source and that the input signal requires a current source. The internal current source cannot be used here as it does not have sufficient linearity. So we will have to develop a low distortion current source to enable the measurement. The second problem is the interface to the spectrum analyzer. The output of the OPA857 is pseudo-differential and requires driving a light load, whereas the spectrum analyzer requires a single-ended input and expects 50W.
A current source has high output impedance. In our case, the current source will need to have low input capacitance as well, so it cannot be generated using transistor-based circuit as a large transistor will also have a high intrinsic capacitance, not considering the package and board layout parasitic. This limits the approach to using a voltage source and converting it to a current using a resistor. In order to ensure that the noise gain of the OPA857 is close to 1V/V, the same as the transimpedance configuration, the source capacitance is minimal and the resistance is large enough to approximate this.
The source capacitance is minimized by careful insertion of a series resistor on the inverting pin. Please refer to the OPA857 EVM for the layout.
In our case, the gain resistor is five times the value of the transimpedance gain, so for 20kΩ, the current source impedance is 100kΩ. It is a compromise as the noise gain is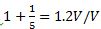 . This represents a degradation of ~1.6dB due to the loss in loop-gain in the measurement which would not be present in a transimpedance configuration.
The OPA857 is operating in an attenuator configuration, so a 0.5VPP on its output now requires 2.5VPP from the generator further increasing the non-linearity from the source.
Looking at the output of the OPA857, we need to measure the nominal 500Ω load and also measure the non-linearity of the amplifier as the load is decreased to 5kΩ. So, again the interface between the OPA857 and the spectrum analyzer is not purely resistive as there is too much attenuation of the signal and parasitic capacitance on the output after the resistance would limit the effective bandwidth. If an active element is inserted in the signal chain, its distortion must be 15dB better than the expected measurement to degrade the measurement by 0.1dB. This tends to be a relatively easy requirement at low frequency, but is quickly unmanageable as the frequency increases. The solution here is to use a DVGA developed for the telecommunication market as it provides sufficient gain to compensate for attenuation in the signal path, since those DVGAs have a 200Ω input impedance, as well as convert the pseudo differential signal to fully differential and have sufficient linearity up to the frequency of interest. A transformer on the output of the DVGA converts the amplified fully differential signal and converts it to the single-ended input the spectrum analyzer expects. We will have some attenuation losses here as well to match the 50Ω input impedance of the test equipment. Finally the signal chain on the output of the OPA857 will look like the diagram shown in figure 4.

Figure 4: OPA857 with PGA870 used to adapt the OPA857 load into the Spectrum Analyzer.
The PGA870 provides additional gain with high linearity minimizing the measured linearity degradation. Looking into the PGA870 datasheet, we see that operating at high gain (> +10dB), both the 2nd and the 3rd harmonic distortion is greater than 90dBc for a 2VPP output swing. This ensures that theOPA857 measurement is degraded by less than 0.1dB.
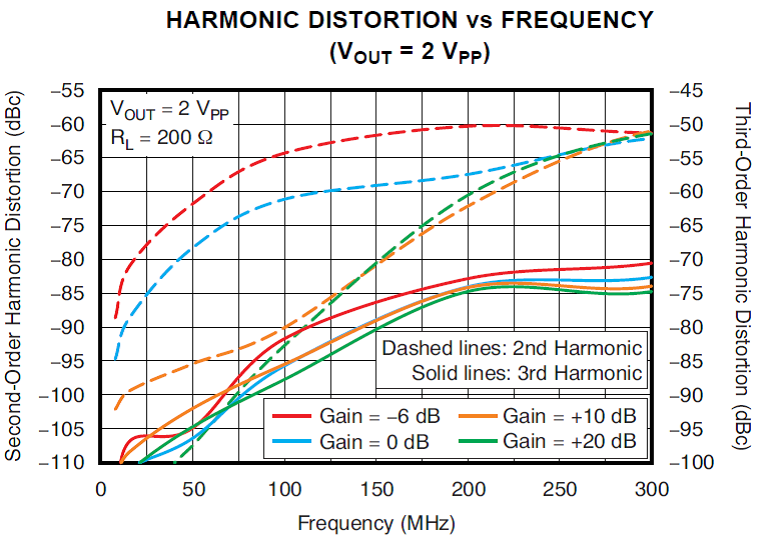
Figure 5: PGA870 Harmonic distortion for 200Ω load.
In this blog, I have shown the techniques used to measure most of the typical characteristic curves shown in the OPA857 datasheet. For application information or how to implement the OPA857, refer to the datasheet and EVM user guide.