1.Plist
1.1 了解沙盒
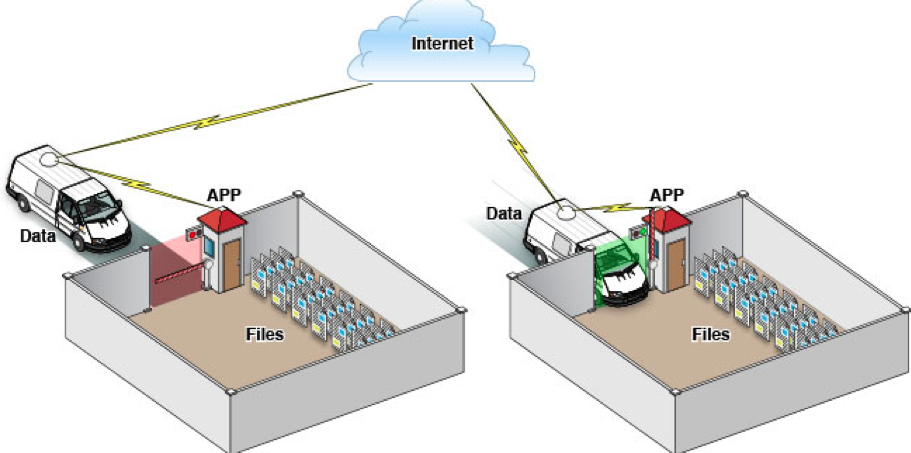
每个iOS应用都有自己的应用沙盒(应用沙盒就是文件系统目录),与其它文件系统隔离。应用必须呆在自己的沙盒里。其它应用不能访问该沙盒。
一个程序中所有的非代码文件都可以保存在沙盒中,例如 图像 图标 声音 映像 属性列表 文本文件等。
每个程序都有自己的沙盒存储空间
应用程序不能翻过自己的围墙去访问别的存储空间内容
应用程序请求的数据都要经过权限检测,假如条件不符合的话,不会被放行。
通过这张图只能从表层上理解sandbox是一种安全体系,应用程序的所有操作都要通过这个体系来执行,其中核心内容是:sandbox对应用程序执行各种操作的权限限制。
1.2 打开模拟器的沙盒目录
下面看看模拟器的沙盒文件夹在mac电脑上的什么位置。
文件都在个人用户名文件夹下的一个隐藏的文件夹里,中文叫做资源库,他的目录其实是Library
方法1、可以设置显示隐藏文件,然后在Finder下直接打开。设置查看隐藏文件的方法如下:打开终端,输入命名
显示Mac隐藏文件的命令:defaults write com.apple.finder AppleShowAllFiles -bool true
隐藏Mac隐藏文件的命令:defaults write com.apple.finder AppleShowAllFiles -bool false
输入完成后单击Enter健 退出终端 然后重新启动Finder就可以了
方法2 这种方法更方便,在Finder上点->前往->前往文件夹,输入/Users/username/Library/Application Support/iPhone Simulator/ 前往。
username这里写你的用户名。
1.3 沙盒的目录结构
默认情况下 每个沙盒含有三个文件夹:Documents,Library,和tmp。因为应用的沙盒机制,应用只能在几个目录下读写文件。
Documents: 苹果建议将程序中建立或者在程序中浏览到的文件数据保存在该目录下,iTunes备份或者恢复的时候 会包括此目录。
会备份数据,一般app数据不能保存在此目录下 否则会被拒绝。
Library:存储程序的默认设置货其它状态信息
Library/Caches 存放缓存文件 iTunes不会备份此目录 此目录下面文件夹不会再应用退出删除
下面包含两个目录Preferences:偏好设置 一般用来保存账号等, caches 专门用来处理缓存。
tmp 提供一个即时创建临时文件的地方。(数据随时会被删除)
iTunes在与iPhone同步时,备份所有的Documents和Library文件。
iPhone在重启时,会丢弃所有的tmp文件。
1.2 plist存储实例
如果对象是NSString、NSDictionary、NSArray、NSData、NSNumber等类型,就可以使用writeToFile:atomically:方法直接将对象写到属性列表文件中,下面是一个例子:在ViewDidLoad中存入数据,点击按钮取出数据:
- (void)viewDidLoad {
    [super viewDidLoad];
    //1. plistdemo
    //拼接完整的文件路径
    NSString *filePath = [self documentsPath];
    NSString *finalPath = [filePath stringByAppendingPathComponent:@"tian.plist"];
    NSLog(@"存文件%@",finalPath);
    //向plist中写入内容
    NSArray *plistData = @[@"1",@"2",@"3",@"4"];
    [plistData writeToFile:finalPath atomically:YES];


    UIButton *button = [UIButton buttonWithType:0];
    button.frame = CGRectMake(50, 50, 120, 50);
    button.backgroundColor = [UIColor blackColor];
    [button setTitle:@"读取数据" forState:UIControlStateNormal];
    [button addTarget:self action:@selector(dataFromPlist) forControlEvents:UIControlEventTouchUpInside];
    [self.view addSubview:button];

}

- (void)dataFromPlist {
    NSString *docPath = [self documentsPath];
    //文件路径
    NSString *filePath = [docPath stringByAppendingPathComponent:@"tian.plist"];
    NSArray *array = [NSArray arrayWithContentsOfFile:filePath];
    NSLog(@"plist中的数据%@",array);
}

- (NSString *)documentsPath {
    //存放内容
    //获取沙盒的Documents目录
    NSArray *paths = NSSearchPathForDirectoriesInDomains(NSDocumentDirectory, NSUserDomainMask, YES);
    NSString *documentsDirectory = [paths objectAtIndex:0];
    return documentsDirectory;
}
打印结果为:
2016-12-10 16:43:37.753 iOS 存储方式[4347:114966] plist中的数据(
    1,
    2,
    3,
    4
)
2.[b]NSUserDefaults(偏好设置)
用来保存应用程序的设置和属性,用户保存的数据,用户再次打开程序或者开机后这些数据仍然存在,NSUserDefaults可以存储的数据类型包括:NSData,NSString,NSNumber,NSDate,NSArray,NSDictionary.如果要存储其他类型,则需要转换为前面的类型,才能使用NSUserDefaults存储。很多iOS应用都支持偏好设置,比如保存用户名,密码,字体大小等设置。iOS提供了一套标准的解决方案来为应用假如偏好设置的功能。每个应用都有个NSUserDefaults实例,通过它来存取偏好设置 比如,保存用户名、字体大小、是否自动登录等。
NSUSerDefaults使用起来比较简单 下面是一个简单的例子:
- (void)userDefaultsDemo {
    NSUserDefaults *userDefaults = [NSUserDefaults standardUserDefaults];
    NSString *username = @"田小胖";
    NSDictionary *dict = @{@"userName":@"田小胖",@"userAge":@"18"};
    [userDefaults setObject:username forKey:@"userName"];
    [userDefaults setObject:dict forKey:@"userInfo"];
    [userDefaults synchronize];
}

- (void)getDataFromUserDefaults {
    NSUserDefaults *user = [NSUserDefaults standardUserDefaults];

    NSString *userName = [user objectForKey:@"userName"];

    NSDictionary *userinfo = [user objectForKey:@"userInfo"];

    NSLog(@"%@ and %@",userName,userinfo);
}
打印结果:
iOS 存储方式[4407:129112] 田小胖 and {
    userAge = 18;
    userName = "U7530U5c0fU80d6";
}
3.NSKeyedArchiver
归档(又名序列化),把对象转为字节码,以文件的形式存储到磁盘上;程序运行过程中或者当再次重写打开程序的时候,可以通过解归档(反序列化)还原这些对象。
归档方式
1.对Foundation框架中的对象进行归档
2.对自定义的内容进行归档
3.对自定义的对象进行归档
3.1对Foundation对象进行归档
//获得文件路径
NSString *documentPath = [NSSearchPathForDirectoriesInDomains(NSDocumentDirectory, NSUserDomainMask, YES) lastObject];
NSString *filePath = [documentPath stringByAppendingPathComponent:@"file.archiver"];

//归档(序列化)
NSArray *archiveAry = @[@"jereh",@"ios"];
if ([NSKeyedArchiver archiveRootObject: archiveAry toFile:filePath]) {
        NSLog(@"Archiver  success");
}

//解归档(反序列化)
NSArray *unArchiveAry = [NSKeyedUnarchiver unarchiveObjectWithFile:filePath];
NSLog(@"%@",unArchiveAry);
归档和解归档操作步骤简单
一次只能归档一个对象 如果是多个对象归档 需要分开进行
归档的对象是Foundation框架中对象
归档和解归档其中任意对象都需要归档和解归档整个文件
归档后的文件是加密的,所以归档文件的扩展名可以随意取
3.2对自定义对象进行归档
//获得文件路径
NSString *documentPath = [NSSearchPathForDirectoriesInDomains(NSDocumentDirectory, NSUserDomainMask, YES) lastObject];
NSString *filePath = [documentPath stringByAppendingPathComponent:@"file.archiver"];

//1. 使用NSData存放归档数据
NSMutableData *archiverData = [NSMutableData data];
//2. 创建归档对象
NSKeyedArchiver *archiver = [[NSKeyedArchiver alloc] initForWritingWithMutableData:archiverData];
//3. 添加归档内容 (设置键值对)
 [archiver encodeObject:@"jereh" forKey:@"name"];
 [archiver encodeInt:20 forKey:@"age"];
 [archiver encodeObject:@[@"ios",@"oc"] forKey:@"language"];
//4. 完成归档
 [archiver finishEncoding];
//5. 将归档的信息存储到磁盘上
if ([archiverData writeToFile:filePath atomically:YES]) {
     NSLog(@"archiver success");
}

//解归档
//1. 从磁盘读取文件,生成NSData实例
NSData *unarchiverData = [NSData dataWithContentsOfFile:filePath];
//2. 根据Data实例创建和初始化解归档对象
NSKeyedUnarchiver *unachiver = [[NSKeyedUnarchiver alloc] initForReadingWithData:unarchiverData];
//3. 解归档,根据key值访问
NSString *name = [unachiver decodeObjectForKey:@"name"];
int age = [unachiver decodeIntForKey:@"age"];
NSArray *ary = [unachiver decodeObjectForKey:@"language"];
NSLog(@"name=%@ age=%i ary=%@",name,age,ary);
3.3对自定义内容进行归档
Student.h
#import <Foundation/Foundation.h>

@interface Student : NSObject<NSCopying,NSCoding>

@property (nonatomic,copy) NSString *name;

@property (nonatomic,copy) NSString *age;

@property (nonatomic,assign) double weight;

@property (nonatomic,copy) NSString *hobby;

@property (nonatomic,copy) NSDictionary *others;


@end
Student.m
#import "Student.h"

#define knameKey @"name"
#define kageKey @"age"
#define kweightKey @"weight"
#define khobbyKey @"hobby"
#define kotherKey @"others"

@implementation Student

//归档
- (void)encodeWithCoder:(NSCoder *)aCoder {
    [aCoder encodeObject:_name forKey:knameKey];
    [aCoder encodeObject:_age forKey:kageKey];
    [aCoder encodeDouble:_weight forKey:kweightKey];
    [aCoder encodeObject:_hobby forKey:khobbyKey];
    [aCoder encodeObject:_others forKey:kotherKey];
}

//解档
-(id)initWithCoder:(NSCoder *)aDecoder {
    self = [super init];
    if (self) {
        _name = [aDecoder decodeObjectForKey:knameKey];
        _age = [aDecoder decodeObjectForKey:kageKey];
        _weight =  [aDecoder decodeDoubleForKey:kweightKey];
        _hobby =  [aDecoder decodeObjectForKey:khobbyKey];
        _others =  [aDecoder decodeObjectForKey:kotherKey];
    }

    return self;
}

- (id)copyWithZone:(NSZone *)zone {
    Student *copy = [[[self class] allocWithZone:zone] init];
    copy.name = [self.name copyWithZone:zone];
    copy.age = [self.age copyWithZone:zone];
    copy.weight = self.weight;
    copy.hobby = [self.hobby copyWithZone:zone];
    copy.others = [self.others copyWithZone:zone];

    return copy;
}


@end
归档解档代码:
- (void)archiverDemo {
    //获取文件存放的路径
    NSString *filePath = [[self documentsPath] stringByAppendingPathComponent:@"student.archiver"];

    //将数据归档
    Student *stu = [[Student alloc] init];
    stu.name = @"田小胖";
    stu.age = @"18";
    stu.weight = 68.0;
    stu.hobby = @"coder";
    stu.others = [NSDictionary dictionaryWithObjectsAndKeys:@"others",@"other", nil];
    //使用NSData存放归档的数据
    NSMutableData *data = [[NSMutableData alloc] init];
    NSKeyedArchiver *archiver = [[NSKeyedArchiver alloc] initForWritingWithMutableData:data];

    [archiver encodeObject:stu forKey:@"student"];

    [archiver finishEncoding];
    //将归档的信息存放到磁盘上
    [data writeToFile:filePath atomically:YES];

}
- (void)getDataFromArchiver {
    NSString *getDataPath = [[self documentsPath] stringByAppendingPathComponent:@"student.archiver"];
    //读取存放到磁盘上的NSData实例
    NSData *saveData = [NSData dataWithContentsOfFile:getDataPath];

    //创建解归档的对象
    NSKeyedUnarchiver *unArchiver = [[NSKeyedUnarchiver alloc] initForReadingWithData:saveData];

    Student *stu = [unArchiver decodeObjectForKey:@"student"];

    NSLog(@"%@ %@ %f %@ %@",stu.name,stu.age,stu.weight,stu.hobby,stu.others);

}
打印结果:
存储方式[644:22503] 田小胖 18 68.000000 coder {
    other = others;
}
以上是iOS中最常见的4种存储方式中的三种,还有一种比较复杂的数据库存储。将在后面的文章中介绍。希望会对看了此文的读者有所帮助。