目的:
1、thymeleaf模板
2、Freemarker模板
thymeleaf模板
thymeleaf 的优点:
支持html5标准,页面无须部署到servlet开发到服务器上,直接通过浏览器就能打开(有无网络都行)。
上代码案例:
pom文件中添加对应jar包依赖
        <dependency>
            <groupId>org.springframework.boot</groupId>
            <artifactId>spring-boot-starter-thymeleaf</artifactId>
        </dependency>
Spring Boot官方文档建议在开发时将缓存关闭,那就在application.yml文件中加入下面这行(正式环境还是要将缓存开启的,false关闭,true开启)
spring:
  thymeleaf:
    cache: false

后台代码:
先创建一个实体类User以便后面测试用
package com.huangting.springboot01.entity;
import lombok.Data;
/**
 * @author 黄大娘
 * @company dogsun公司
 * @create 2019-11-08 19:01
 */
@Data
public class User {
    private String uid;
    private String uname;

    public User() {

    }
    public User(String uid, String uname) {
        this.uid = uid;
        this.uname = uname;
    }
}
对应前端html页面,thymeleaf模板的后台操作
ThymeleafController
package com.huangting.springboot01.controller;
import com.huangting.springboot01.entity.User;
import org.springframework.stereotype.Controller;
import org.springframework.web.bind.annotation.RequestMapping;
import org.springframework.web.servlet.ModelAndView;

import java.util.ArrayList;
import java.util.List;

/**
 * @author 黄大娘
 * @company dogsun公司
 * @create 2019-11-08 11:17
 */
@Controller
@RequestMapping("/thymeleaf")
public class ThymeleafController {

    @RequestMapping("/list")
    public ModelAndView list(){
        ModelAndView andView=new ModelAndView();
        List list = new ArrayList();
        list.add(new User("1","大黄"));
        list.add(new User("2","大娘"));
        list.add(new User("3","大毛"));
        andView.addObject("userList",list);
        andView.addObject("name","ht");
        andView.addObject("msg","<span style = 'color:red;'>这个是html标签</span>");
        //跳转页面
        andView.setViewName("list");
        return andView;
    }

}
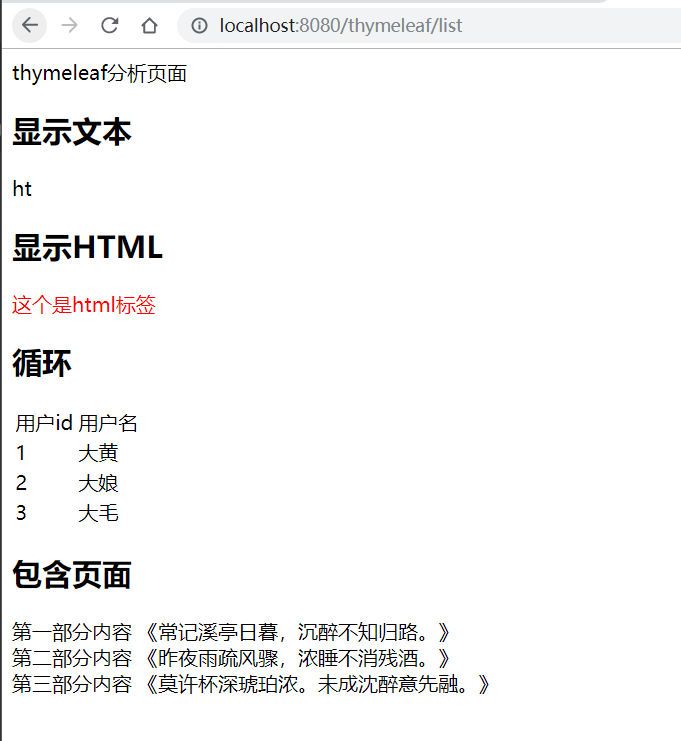
前端html页面,对应后台展示效果
list.html
<!DOCTYPE html>
<html xmlns:th="http://www.thymeleaf.org"> <!--一定要注意引用这个网站-->
<head>
    <meta charset="UTF-8">
    <title>thymeleaf分析页面</title>
</head>
<body>
thymeleaf分析页面
<h2>显示文本</h2>
<span th:text="${name}"></span>

<h2>显示HTML</h2>
<div th:utext="${msg}"></div>

<h2>循环</h2>
<table>
    <tr>
        <td>用户id</td>
        <td>用户名</td>
    </tr>
    <tr th:each="u:${userList}">
        <td th:text="${u.uid}"></td>
        <td th:text="${u.uname}"></td>
    </tr>
</table>
<h2>包含页面</h2>
<div th:include="common/head2 :: html"></div>
</body>
</html>
head2.html
<!DOCTYPE html>
<html xmlns:th="http://www.thymeleaf.org">
<head>
    <meta charset="UTF-8">
    <title>包含页面</title>
</head>
<body>
<div th:fragment="h1">
    第一部分内容
        《常记溪亭日暮,沉醉不知归路。》
</div>
<div th:fragment="h2">
    第二部分内容
        《昨夜雨疏风骤,浓睡不消残酒。》
</div>
<div th:fragment="h3">
    第三部分内容
        《莫许杯深琥珀浓。未成沈醉意先融。》
</div>
</body>
</html>
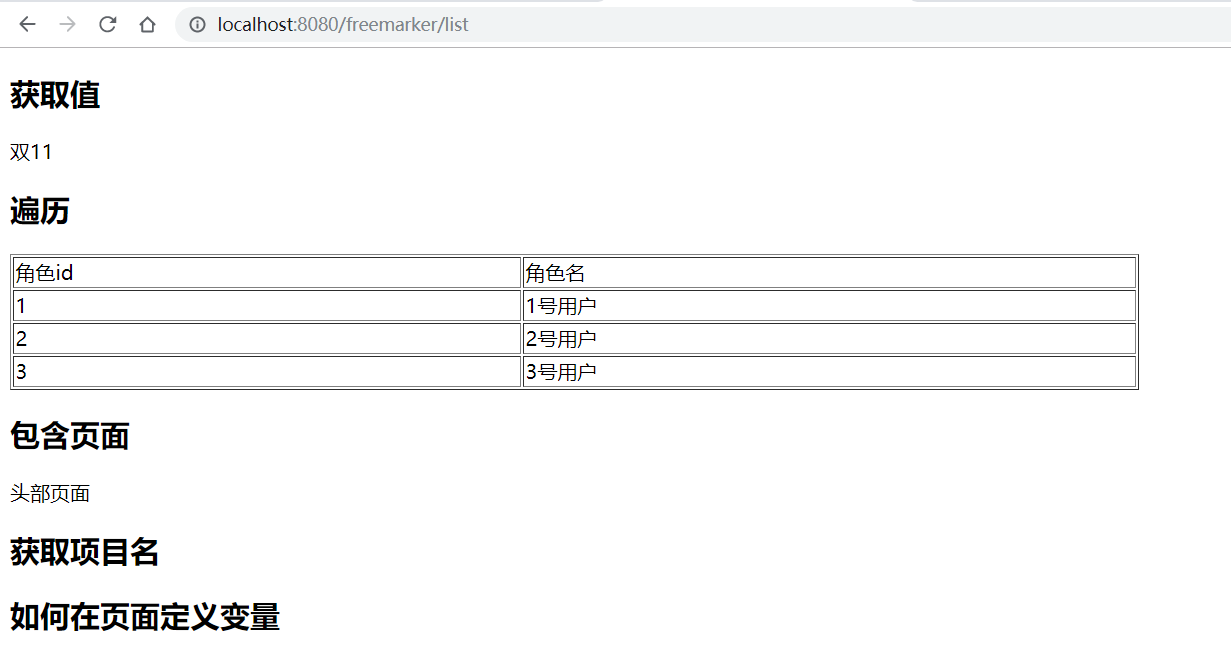
效果:
Freemarker模板
学习网站:(http://freemarker.foofun.cn/)
在pom中导入相关依赖
   <dependency>
    <groupId>org.springframework.boot</groupId>
    <artifactId>spring-boot-starter-freemarker</artifactId>
   </dependency>
application.yml文件的默认配置
spring:
  thymeleaf:
    cache: false
  freemarker:
    # 设置模板后缀名
    suffix: .ftl
    # 设置文档类型
    content-type: text/html
    # 设置页面编码格式
    charset: UTF-8
    # 设置页面缓存
    cache: false
    # 设置ftl文件路径,默认是/templates,为演示效果添加role
    template-loader-path: classpath:/templates/role
  mvc:
    static-path-pattern: /static/**
后台实体类Role类
package com.huangting.springboot01.entity;
import lombok.Data;
/**
 * @author 黄大娘
 * @company dogsun公司
 * @create 2019-11-08 19:46
 */
@Data
public class Role {
    private String rid;
    private String rname;
    public Role() {
    }
    public Role(String rid, String rname) {
        this.rid = rid;
        this.rname = rname;
    }
}
FreemarkerController
package com.huangting.springboot01.controller;
import com.huangting.springboot01.entity.Role;
import org.springframework.stereotype.Controller;
import org.springframework.web.bind.annotation.RequestMapping;
import org.springframework.web.servlet.ModelAndView;
import java.util.ArrayList;
import java.util.List;

/**
 * @author 黄大娘
 * @company dogsun公司
 * @create 2019-11-08 19:45
 */
@Controller
@RequestMapping("/freemarker")
public class FreemarkerController {
    @RequestMapping("/list")
    public ModelAndView list(){
        ModelAndView mv = new ModelAndView();
        mv.addObject("loginName","双11");
        List list = new ArrayList();
        list.add(new Role("1","1号用户"));
        list.add(new Role("2","2号用户"));
        list.add(new Role("3","3号用户"));
        mv.addObject("roleList",list);
        mv.setViewName("list");
        return mv;
    }
}
前端页面:
list.ftl
<!DOCTYPE html>
<html lang="en">
<head>
    <meta charset="UTF-8">
    <title>Freemarker</title>
</head>
<body>

<h2>获取值</h2>
${loginName!'未知'}

<h2>遍历</h2>
<table border="1px" width="60%">
    <tr>
        <td>角色id</td>
        <td>角色名</td>
    </tr>
    <#list roleList as role>
        <tr>
            <td>${role.rid}</td>
            <td>${role.rname}</td>
        </tr>
    </#list>
</table>

<h2>包含页面</h2>
<#include 'common/head.ftl' />
<#include 'common/global.ftl' />

<h2>获取项目名</h2>
${springMacroRequestContext.contextPath}

${ctx}

<h2>如何在页面定义变量</h2>
</body>
</html>
global.ftl
<#global ctx>
    ${springMacroRequestContext.contextPath}
</#global>
head.ftl
<!DOCTYPE html>
<html lang="en">
<head>
    <meta charset="UTF-8">
    <title>Title</title>
</head>
<body>
头部页面
</body>
</html>
效果: