一.背景
事件机制作为一种编程机制,在很多开发语言中都提供了支持,同时许多开源框架的设计中都使用了事件机制,比如SpringFramework。
在 Java 语言中,Java 的事件机制参与者有3种角色:
1.Event Source:具体的事件源,比如说,你在界面点击一个 button 按钮,那么这个按钮就是事件源,要想使按钮对某些事件进行响应,你就需要注册特定的监听器 listener,事件源将事件对象传递给所有注册的监听器;
2.Event Object:事件状态对象,用于监听器的相应的方法之中,作为参数;
3.Event Listener:事件监听器,当它监听到 event object 产生的时候,它就调用相应的方法进行处理;
上面3个角色就定义了事件机制的基本模型。
流程是:
1)首先我们将监听器对象注册给事件源对象,这样当事件触发时系统便可以通过事件源访问相应的监听器;

2)当事件源触发事件后,系统将事件的相关信息封装成相应类型的事件对象,并将其发送给注册到事件源的相应监听器;
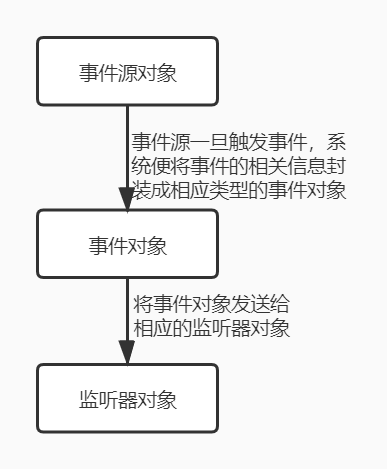
3)当事件对象发送给监听器后,系统调用监听器相应的事件处理方法对事件进行处理,也就是做出响应;

PS:监听器与事件源之间是“多对多”的关系。
下面对几个概念进行详细介绍:
1)事件源:事件最初由事件源产生,事件源可以是 Java Bean 或由生成事件能力的对象。在 Java 中,每一个组件会产生什么样的事件,已经被定义好了。或者说,对于任何一个事件来说,哪些组件可以产生它,已经是确定的了。
2)事件对象:在事件对象中最高层是 java.util.EventObject,所有事件状态对象都是继承该类的派生类,比如 Spring-context 的事件机制的根类为 ApplicationEvent,而 Apollo 配置中心的事件处理类 AppCreationEvent 是继承自 Spring 的;
除了 EventObject是在 util 包中,其它都在 java.awt、java.awt.event 包或 java.swing、java.swing.event 包中,比如有 AWTEvent、ActionEvent、AdjustmentEvent等等;
-
- EventObject:该类除了从 Object 类中继承下来的方法外还有一个 getSource 方法,其功能就是返回最初发生 Event 的对象;
public class EventObject implements java.io.Serializable {

    protected transient Object  source;

    public EventObject(Object source) {
        if (source == null)
            throw new IllegalArgumentException("null source");

        this.source = source;
    }

    public Object getSource() {
        return source;
    }

    public String toString() {
        return getClass().getName() + "[source=" + source + "]";
    }
}
- ApplicationEvent:
public abstract class ApplicationEvent extends EventObject {
    private static final long serialVersionUID = 7099057708183571937L;
    private final long timestamp = System.currentTimeMillis();

    public ApplicationEvent(Object source) {
        super(source);
    }

    public final long getTimestamp() {
        return this.timestamp;
    }
}
- AppCreationEvent:
public class AppCreationEvent extends ApplicationEvent {

  public AppCreationEvent(Object source) {
    super(source);
  }

  public App getApp() {
    Preconditions.checkState(source != null);
    return (App) this.source;
  }
}
- EventObject:该类除了从 Object 类中继承下来的方法外还有一个 getSource 方法,其功能就是返回最初发生 Event 的对象;
3) 监听器对象:监听器对象就是一个实现了特定监听器接口的类的实例,在监听器接口的最顶层接口是 java.util.EventListener,这个接口是所有事件侦听器接口必须扩展的标记接口。感到诧异的是这个接口完全是空的,里面没有任何的抽象方法的定义;
public interface EventListener {
}
事件监听器的接口命名方式为:XXListener,而且,在java中,这些接口已经被定义好了。用来被实现,它定义了事件处理器(即事件处理的方法原型,这个方法需要被重新实现)。例如:ActionListener接口、MouseListener接口、WindowListener接口等;
说了这么多,现在要回到正题来,说到 Spring 的事件机制,就得从 Spring 的容器开始说起,在 IOC 容器的启动过程,当所有的 bean 都已经初始化处理完成之后,Spring IOC 容器会有一个发布事件的动作。
public void refresh() throws BeansException, IllegalStateException {
        //来个锁,不然 refresh() 还没结束,你又来个启动或销毁容器的操作,那不就乱套了嘛
        synchronized (this.startupShutdownMonitor) {

                ..............
                //初始化容器的信息源
                initMessageSource();

                //初始化事件监听多路广播器
                initApplicationEventMulticaster();

                //是个空壳方法,在AnnotationApplicationContex上下文中没有实现,可能在spring后面的版本会去扩展。
                onRefresh();

                //注册监听器
                registerListeners();


                //对象的创建:初始化剩下所有的(非懒加载的)单实例对象
                finishBeanFactoryInitialization(beanFactory);

                //刷新完成工作,包括初始化LifecycleProcessor,发布刷新完成事件等
                finishRefresh();
        }
            .................
}
在 AbstractApplicationContext 类的 finishRefresh 方法,里面就会发布(广播)一条代表初始化结束的消息:
    protected void finishRefresh() {
        // Clear context-level resource caches (such as ASM metadata from scanning).
        clearResourceCaches();

        // Initialize lifecycle processor for this context.
        initLifecycleProcessor();

        // Propagate refresh to lifecycle processor first.
        getLifecycleProcessor().onRefresh();

        //发布(广播)一条消息,类型ContextRefreshedEvent代表Spring容器初始化结束
        publishEvent(new ContextRefreshedEvent(this));

        // Participate in LiveBeansView MBean, if active.
        LiveBeansView.registerApplicationContext(this);
    }
这样,当 Spring IOC 容器加载处理完相应的 bean 之后,也给我们提供了一个机会,可以去做一些自己想做的事情。这也是 Spring IOC 容器提供给外部扩展的地方,我们可以使用这个扩展机制,来实现一些特殊的业务需求。
比如让我们的 bean 实现 ApplicationListener 接口,这样当发布事件时, Spring 的 IOC 容器就会以容器中的实例对象作为事件源类,并从中找到事件的监听者,此时会执行相应的方法比如 onApplicationEvent(E event),我们的业务逻辑代码就会写在这个方法里面。这样我们的目的就可以达到了,但你这是可能会有一个疑问,这样的代码我们可以通过实现 InitializingBean 接口来实现啊,也会被 Spring 容器自动调用。但如果我们这时的需求是我们要做的事情,是必要要等到所有的 bean 都被处理完成之后再进行,此时 InitializingBean 接口就步合适了。(可查看下文案例3)
Spring 的事件机制是观察者设计模式的实现,通过 ApplicationEvent 和 ApplicationListener 接口,可以实现容器事件处理。
ApplicationListener 监听 ApplicationEvent 及其子类的事件:
public interface ApplicationListener<E extends ApplicationEvent> extends EventListener {

    void onApplicationEvent(E event);

}
如果容器中有一个监听器,每当容器发布事件时,监听器将自动被触发,当然这种事件机制必须需要程序显示的触发。
其中 Spring 有一些内置的事件,当完成某种操作时会发出某些事件动作。比如上文中的监听 ContextRefreshedEvent 事件,当所有的bean都初始化完成并成功装载后会触发该事件,实现 ApplicationListener<ContextRefreshedEvent> 接口可以收到监听动作,如何实现自己的业务逻辑。
下面是一些 Spring 的内置事件:
-
- ContextRefreshedEvent:ApplicationContext 被初始化或刷新时,该事件被发布。这也可以在 ConfigurableApplicationContext 接口中使用 refresh() 方法来发生。此处的初始化是指:所有的Bean 被成功装载,后置处理器 Bean 被检测并激活,所有 Singleton Bean 被预实例化,ApplicationContext 容器已就绪可用;【容器刷新完成所有 bean 都完全创建会发布这个事件】
- ContextStartedEvent:当使用 ConfigurableApplicationContext (ApplicationContext子接口)接口中的 start() 方法启动 ApplicationContext 时,该事件被发布。你可以调查你的数据库,或者你可以在接受到这个事件后重启任何停止的应用程序;
- ContextStoppedEvent:当使用 ConfigurableApplicationContext 接口中的 stop() 停止 ApplicationContext 时,发布这个事件。你可以在接受到这个事件后做必要的清理的工作;
-
ContextClosedEvent:当使用 ConfigurableApplicationContext 接口中的 close() 方法关闭 ApplicationContext 时,该事件被发布。一个已关闭的上下文到达生命周期末端,它不能被刷新或重启;【关闭容器会发布这个事件】
-
RequestHandledEvent:这是一个 web-specific 事件,告诉所有 bean HTTP 请求已经被服务。只能应用于使用 DispatcherServlet 的 Web 应用。在使用 Spring 作为前端的MVC控制器时,当Spring处理用户请求结束后,系统会自动触发该事件;
二.案例
1.简单实现自定义监听器,初步认识监听器:结合上篇文章案例,实现监听器监听 Spring 容器变化
@Configuration
public class MyApplicationListener implements ApplicationListener<ApplicationEvent> {
    //当容器发布此事件之后,方法触发
    @Override
    public void onApplicationEvent(ApplicationEvent event) {
        System.out.println("当前收到的事件:"+event);
    }
}
=========测试运行结果=========
[MyBeanDefinitionRegistryPostProcessor]postProcessBeanDefinitionRegistry--->bean的数量:11
十一月 03, 2020 10:17:59 下午 org.springframework.context.annotation.ConfigurationClassPostProcessor enhanceConfigurationClasses
信息: Cannot enhance @Configuration bean definition 'myBeanDefinitionRegistryPostProcessor' since its singleton instance has been created too early. The typical cause is a non-static @Bean method with a BeanDefinitionRegistryPostProcessor return type: Consider declaring such methods as 'static'.
[MyBeanDefinitionRegistryPostProcessor]postProcessBeanFactory--->bean的数量:12
[MyBeanFactoryPostProcessor]调用了postProcessBeanFactory
[MyBeanFactoryPostProcessor]当前beanFactory共有12个bean
[MyBeanFactoryPostProcessor]当前beanFactory有下面组件[org.springframework.context.annotation.internalConfigurationAnnotationProcessor, org.springframework.context.annotation.internalAutowiredAnnotationProcessor, org.springframework.context.annotation.internalCommonAnnotationProcessor, org.springframework.context.event.internalEventListenerProcessor, org.springframework.context.event.internalEventListenerFactory, extConfig, myApplicationListener, myBeanDefinitionRegistryPostProcessor, myBeanFactoryPostProcessor, myBeanPostProcessor, person, color]
PropertyValues: length=0
[MyBeanFactoryPostProcessor]postProcessBeanFactory方法中修改了name属性初始值了
PropertyValues: length=1; bean property 'name'
[MyBeanPostProcessor]后置处理器处理bean=【extConfig】开始
[MyBeanPostProcessor]后置处理器处理bean=【extConfig】完毕!
[MyBeanPostProcessor]后置处理器处理bean=【myApplicationListener】开始
[MyBeanPostProcessor]后置处理器处理bean=【myApplicationListener】完毕!
Person有参构造器:[name=张三,sex=男]
[Person]调用了BeanNameAware的setBeanName方法了:person
[Person]调用了BeanFactoryAware的setBeanFactory方法了:org.springframework.beans.factory.support.DefaultListableBeanFactory@e45f292: defining beans [org.springframework.context.annotation.internalConfigurationAnnotationProcessor,org.springframework.context.annotation.internalAutowiredAnnotationProcessor,org.springframework.context.annotation.internalCommonAnnotationProcessor,org.springframework.context.event.internalEventListenerProcessor,org.springframework.context.event.internalEventListenerFactory,extConfig,myApplicationListener,myBeanDefinitionRegistryPostProcessor,myBeanFactoryPostProcessor,myBeanPostProcessor,person,color]; root of factory hierarchy
[MyBeanPostProcessor]后置处理器处理bean=【person】开始
[Person]调用了Initailization的afterPropertiesSet方法了
[MyBeanPostProcessor]后置处理器处理bean=【person】完毕!
[MyBeanPostProcessor]后置处理器处理bean=【color】开始
[MyBeanPostProcessor]后置处理器处理bean=【color】完毕!
当前收到的事件:org.springframework.context.event.ContextRefreshedEvent[source=org.springframework.context.annotation.AnnotationConfigApplicationContext@2e817b38, started on Tue Nov 03 22:17:59 CST 2020]
Person [name=赵四, sex=null]
当前收到的事件:org.springframework.context.event.ContextClosedEvent[source=org.springframework.context.annotation.AnnotationConfigApplicationContext@2e817b38, started on Tue Nov 03 22:17:59 CST 2020]
[Person]调用了DisposableBean的destroy方法了
2.自定义发布一个事件,步骤如下:
1)实现一个监听器来监听某个事件(事件是实现了ApplicationEvent 及其子类的事件);
2)把监听器加入到容器中;
2)发布事件,只要容器有相关事件的发布,我们就能监听到这个事件;
    public static void main(String[] args) {
        AnnotationConfigApplicationContext context = new AnnotationConfigApplicationContext(ExtConfig.class);
        Person bean = context.getBean(Person.class);
        System.out.println(bean.toString());
        //发布事件
        context.publishEvent(new ApplicationEvent(new String("自定义事件")) {
            });
        context.close();
    }
=========测试运行结果=========
[MyBeanDefinitionRegistryPostProcessor]postProcessBeanDefinitionRegistry--->bean的数量:11
...............
[MyBeanPostProcessor]后置处理器处理bean=【color】完毕!
当前收到的事件:org.springframework.context.event.ContextRefreshedEvent[source=org.springframework.context.annotation.AnnotationConfigApplicationContext@2e817b38, started on Tue Nov 03 22:40:39 CST 2020]
Person [name=赵四, sex=null]
当前收到的事件:com.hrh.ext.ExtTest$1[source=自定义事件]
当前收到的事件:org.springframework.context.event.ContextClosedEvent[source=org.springframework.context.annotation.AnnotationConfigApplicationContext@2e817b38, started on Tue Nov 03 22:40:39 CST 2020]
[Person]调用了DisposableBean的destroy方法了
从上面的运行结果可以看出,我们在容器中添加了一个事件,当我们发布事件时,监听器会监听到事件并把事件的内容发布出来。
3.自定义监听器,实现容器的 bean都初始化后执行相应的操作,比如执行特定的方法:
1)自定义注解:
//该注解作用在类上
@Target(ElementType.TYPE)
@Retention(RetentionPolicy.RUNTIME)
public @interface BaseService {
}
2)两个测试 Mapper:
@Configuration
@BaseService
public class TaskScheduleJobMapper {
    public void initMapper() {
        System.out.println(">>>>> 【initMapper】Start job <<<<<");
    }
}


@Configuration
@BaseService
public class TaskScheduleJobTxlogMapper {
    public void initMapper() {
        System.out.println(">>>>> 【initMapper】Recording log <<<<<");
    }
}
3)测试系统入口:
public interface BaseInterface {
    public void init();
}

@Configuration
public class BaseInterfaceImpl implements BaseInterface {
    @Override
    public void init() {
        System.out.println("System start........");
    }
}
4)自定义监听器:
@Configuration
public class ApplicationContextListener implements ApplicationListener<ContextRefreshedEvent> {

    @Override
    public void onApplicationEvent(ContextRefreshedEvent contextRefreshedEvent) {
        // root application context
        if (null == contextRefreshedEvent.getApplicationContext().getParent()) {
            System.out.println(">>>>> Spring初始化完毕 <<<<<");
            // spring初始化完毕后,通过反射调用所有使用BaseService注解的initMapper方法
            Map<String, Object> baseServices =
                    contextRefreshedEvent.getApplicationContext().getBeansWithAnnotation(BaseService.class);
            for (Object service : baseServices.values()) {
                System.out.println(">>>>> {" + service.getClass().getName() + "}.initMapper():");
                try {
                    Method initMapper = service.getClass().getMethod("initMapper");
                    initMapper.invoke(service);
                } catch (Exception e) {
                    System.out.println("初始化BaseService的initMapper方法异常:" + e);
                    e.printStackTrace();
                }
            }
            // 系统入口初始化
            Map<String, BaseInterface> baseInterfaceBeans =
                    contextRefreshedEvent.getApplicationContext().getBeansOfType(BaseInterface.class);
            for (Object service : baseInterfaceBeans.values()) {
                System.out.println(">>>>> {" + service.getClass().getName() + "}.init()");
                try {
                    Method init = service.getClass().getMethod("init");
                    init.invoke(service);
                } catch (Exception e) {
                    System.out.println("初始化BaseInterface的init方法异常:" + e);
                    e.printStackTrace();
                }
            }
        }
    }
}


=======测试运行结果=======
[MyBeanDefinitionRegistryPostProcessor]postProcessBeanDefinitionRegistry--->bean的数量:14
................
[MyBeanPostProcessor]后置处理器处理bean=【color】开始
[MyBeanPostProcessor]后置处理器处理bean=【color】完毕!
>>>>> Spring初始化完毕 <<<<<
>>>>> {com.hrh.ext.TaskScheduleJobMapper$$EnhancerBySpringCGLIB$$6bfe7114}.initMapper():
>>>>> 【initMapper】Start job <<<<<
>>>>> {com.hrh.ext.TaskScheduleJobTxlogMapper$$EnhancerBySpringCGLIB$$7132ffe6}.initMapper():
>>>>> 【initMapper】Recording log <<<<<
>>>>> {com.hrh.ext.BaseInterfaceImpl$$EnhancerBySpringCGLIB$$f49a26ba}.init()
System start........
Person [name=赵四, sex=null]
[Person]调用了DisposableBean的destroy方法了
4.自定义事件及监听并进行发布
1)自定义事件:
public class EmailEvent extends ApplicationEvent {
    private String address;
    private String text;

    /**
     * Create a new {@code ApplicationEvent}.
     *
     * @param source the object on which the event initially occurred or with
     *               which the event is associated (never {@code null})
     */
    public EmailEvent(Object source) {
        super(source);
    }

    public EmailEvent(Object source, String address, String text) {
        super(source);
        this.address = address;
        this.text = text;
    }

    public String getAddress() {
        return address;
    }

    public void setAddress(String address) {
        this.address = address;
    }

    public String getText() {
        return text;
    }

    public void setText(String text) {
        this.text = text;
    }
}
2)自定义监听器监听自定义事件:
@Component
public class EmailListener implements ApplicationListener {
    @Override
    public void onApplicationEvent(ApplicationEvent event) {
        if (event instanceof EmailEvent) {

            EmailEvent emailEvent = (EmailEvent) event;
            System.out.println("邮件地址:" + emailEvent.getAddress());
            System.out.println("邮件内容:" + emailEvent.getText());
        } else {
            System.out.println("容器本身事件:" + event);
        }

    }
}
3)测试发布事件:
    public static void main(String[] args) {
        AnnotationConfigApplicationContext context = new AnnotationConfigApplicationContext(ExtConfig.class);

        Person bean = context.getBean(Person.class);
        System.out.println(bean.toString());
        //创建一个ApplicationEvent对象
        EmailEvent event = new EmailEvent("hello","249968839@qq.com","This is a event test");
        //主动触发该事件
        context.publishEvent(event);
        context.close();
    }
=======测试运行结果=======
[MyBeanDefinitionRegistryPostProcessor]postProcessBeanDefinitionRegistry--->bean的数量:15
.............
>>>>> Spring初始化完毕 <<<<<
>>>>> {com.hrh.ext.TaskScheduleJobMapper$$EnhancerBySpringCGLIB$$45955a2d}.initMapper():
>>>>> 【initMapper】Start job <<<<<
>>>>> {com.hrh.ext.TaskScheduleJobTxlogMapper$$EnhancerBySpringCGLIB$$4ac9e8ff}.initMapper():
>>>>> 【initMapper】Recording log <<<<<
>>>>> {com.hrh.ext.BaseInterfaceImpl$$EnhancerBySpringCGLIB$$e5b13f13}.init()
System start........
容器本身事件:org.springframework.context.event.ContextRefreshedEvent[source=org.springframework.context.annotation.AnnotationConfigApplicationContext@2e5d6d97, started on Fri Nov 06 22:55:23 CST 2020]
Person [name=赵四, sex=null]
容器本身事件:com.hrh.ext.ExtTest$1[source=自定义事件]
邮件地址:249968839@qq.com
邮件内容:This is a event test
容器本身事件:org.springframework.context.event.ContextClosedEvent[source=org.springframework.context.annotation.AnnotationConfigApplicationContext@2e5d6d97, started on Fri Nov 06 22:55:23 CST 2020]
[Person]调用了DisposableBean的destroy方法了
三.原理
上面说了几个案例,现在你应该知道怎么使用了吧,接下来通过 debug 代码来分析它的执行流程。
1.先来看看 ContextRefreshedEvent事件是怎么发布的,还是从熟悉的配方 refresh() 讲起,当容器刷新后,可以看到它调用了 finishRefresh() 来刷新执行事件:
public void refresh() throws BeansException, IllegalStateException {
        //来个锁,不然 refresh() 还没结束,你又来个启动或销毁容器的操作,那不就乱套了嘛
        synchronized (this.startupShutdownMonitor) {

                ..............
                //初始化容器的信息源
                initMessageSource();

                //初始化事件监听多路广播器
                initApplicationEventMulticaster();

                //是个空壳方法,在AnnotationApplicationContex上下文中没有实现,可能在spring后面的版本会去扩展。
                onRefresh();

                //注册监听器
                registerListeners();


                //对象的创建:初始化剩下所有的(非懒加载的)单实例对象
                finishBeanFactoryInitialization(beanFactory);

                //刷新完成工作,包括初始化LifecycleProcessor,发布刷新完成事件等
                finishRefresh();
        }
            .................
}
2.在 AbstractApplicationContext.finishRefresh 方法中就会发布(广播)一条代表初始化结束的消息:publishEvent(new ContextRefreshedEvent(this))
    protected void finishRefresh() {
        // Clear context-level resource caches (such as ASM metadata from scanning).
        clearResourceCaches();

        // Initialize lifecycle processor for this context.
        initLifecycleProcessor();

        // Propagate refresh to lifecycle processor first.
        getLifecycleProcessor().onRefresh();

        //发布(广播)一条消息,类型ContextRefreshedEvent代表Spring容器初始化结束
        publishEvent(new ContextRefreshedEvent(this));

        // Participate in LiveBeansView MBean, if active.
        LiveBeansView.registerApplicationContext(this);
    }
3.继续 publishEvent 方法会发现执行了getApplicationEventMulticaster().multicastEvent(applicationEvent, eventType) 来广播消息:
    public void publishEvent(ApplicationEvent event) {
        publishEvent(event, null);
    }

    protected void publishEvent(Object event, @Nullable ResolvableType eventType) {
        Assert.notNull(event, "Event must not be null");

        // Decorate event as an ApplicationEvent if necessary
        ApplicationEvent applicationEvent;
        if (event instanceof ApplicationEvent) {
            applicationEvent = (ApplicationEvent) event;//类型转换
        }
        else {
            applicationEvent = new PayloadApplicationEvent<>(this, event);
            if (eventType == null) {
                eventType = ((PayloadApplicationEvent<?>) applicationEvent).getResolvableType();
            }
        }

        // Multicast right now if possible - or lazily once the multicaster is initialized
        //初始化过程中的registerListeners方法会把earlyApplicationEvents设置为空,(早期事件,容器初始化时使用,可以忽略)
        if (this.earlyApplicationEvents != null) {
            this.earlyApplicationEvents.add(applicationEvent);
        }
        else {
            //执行广播消息
            getApplicationEventMulticaster().multicastEvent(applicationEvent, eventType);
        }

        // Publish event via parent context as well... 方便使用父类进行发布事件
        if (this.parent != null) {
            if (this.parent instanceof AbstractApplicationContext) {
                ((AbstractApplicationContext) this.parent).publishEvent(event, eventType);
            }
            else {
                this.parent.publishEvent(event);
            }
        }
    }
PS:publishEvent 方法是发布(广播)服务的核心能力,而它定义在 ApplicationEventPublisher 接口中,ApplicationContext接口继承了 ApplicationEventPublisher,所以 AbstractApplicationContext抽象类(ApplicationContext接口的实现类)就实现了该方法,也具有了发送广播的能力。
上面的 getApplicationEventMulticaster() 是什么东西呢?需要深入了解下,它的作用是获取事件的多播器(派发器),即将事件发送给多个监听器,让监听器执行相应的逻辑。
    private ApplicationEventMulticaster applicationEventMulticaster;
    ApplicationEventMulticaster getApplicationEventMulticaster() throws IllegalStateException {
        if (this.applicationEventMulticaster == null) {
            throw new IllegalStateException("ApplicationEventMulticaster not initialized - " +
                    "call 'refresh' before multicasting events via the context: " + this);
        }
        return this.applicationEventMulticaster;
    }
从上面的代码可以看出,applicationEventMulticaster是 AbstractApplicationContext 的私有成员变量,那么这个多播器(派发器)是怎么获取到的呢?在前面的 refresh 方法中有一个initApplicationEventMulticaster()方法,就是调用 AbstractApplicationContext.initApplicationEventMulticaster() 来初始化这个多播器(派发器)的:
    protected void initApplicationEventMulticaster() {
        ConfigurableListableBeanFactory beanFactory = getBeanFactory();
        //从bean工厂查找有没有一个bean为applicationEventMulticaster,如果有,从容器中拿出来
        if (beanFactory.containsLocalBean(APPLICATION_EVENT_MULTICASTER_BEAN_NAME)) {
            this.applicationEventMulticaster =
                    beanFactory.getBean(APPLICATION_EVENT_MULTICASTER_BEAN_NAME, ApplicationEventMulticaster.class);
            if (logger.isTraceEnabled()) {
                logger.trace("Using ApplicationEventMulticaster [" + this.applicationEventMulticaster + "]");
            }
        }
        else {
            //如果没有,则往容器中注册一个SimpleApplicationEventMulticaster,名字为applicationEventMulticaster,如果派发事件需要就可以使用了
            this.applicationEventMulticaster = new SimpleApplicationEventMulticaster(beanFactory);
            beanFactory.registerSingleton(APPLICATION_EVENT_MULTICASTER_BEAN_NAME, this.applicationEventMulticaster);
            if (logger.isTraceEnabled()) {
                logger.trace("No '" + APPLICATION_EVENT_MULTICASTER_BEAN_NAME + "' bean, using " +
                        "[" + this.applicationEventMulticaster.getClass().getSimpleName() + "]");
            }
        }
    }
4.说完了 getApplicationEventMulticaster(),再来说说 multicastEvent(),它的作用是派发事件,它是 ApplicationEventMulticaster接口的一个方法,所以它会调用实现类 SimpleApplicationEventMul
ticaster(上面注册的多播器)的multicastEvent 方法:
public interface ApplicationEventMulticaster {

    void multicastEvent(ApplicationEvent event, @Nullable ResolvableType eventType);

}
//public abstract class AbstractApplicationEventMulticaster implements ApplicationEventMulticaster
public class SimpleApplicationEventMulticaster extends AbstractApplicationEventMulticaster {
    @Override
    public void multicastEvent(final ApplicationEvent event, @Nullable ResolvableType eventType) {
        ResolvableType type = (eventType != null ? eventType : resolveDefaultEventType(event));
        Executor executor = getTaskExecutor();
        //根据消息类型取出对应的所有监听器
        for (ApplicationListener<?> listener : getApplicationListeners(event, type)) {
            //如果可以使用多线程执行,就使用多线程来异步派发事件,执行监听器的方法
            if (executor != null) {
                executor.execute(() -> invokeListener(listener, event));
            }
            else {
                invokeListener(listener, event);
            }
        }
    }
}
5.最后来看看 invokeListener 方法,它会拿到监听器来回调 MyApplicationListener. onApplicationEvent方法,然后控制台就输出了信息 :
    protected void invokeListener(ApplicationListener<?> listener, ApplicationEvent event) {
        ErrorHandler errorHandler = getErrorHandler();
        if (errorHandler != null) {
            try {
                doInvokeListener(listener, event);
            }
            catch (Throwable err) {
                errorHandler.handleError(err);
            }
        }
        else {
            doInvokeListener(listener, event);//执行
        }
    }
    private void doInvokeListener(ApplicationListener listener, ApplicationEvent event) {
        try {
            //回调onApplicationEvent
            listener.onApplicationEvent(event);
        }
        catch (ClassCastException ex) {
            String msg = ex.getMessage();
            if (msg == null || matchesClassCastMessage(msg, event.getClass())) {
                // Possibly a lambda-defined listener which we could not resolve the generic event type for
                // -> let's suppress the exception and just log a debug message.
                Log logger = LogFactory.getLog(getClass());
                if (logger.isTraceEnabled()) {
                    logger.trace("Non-matching event type for listener: " + listener, ex);
                }
            }
            else {
                throw ex;
            }
        }
    }
6.当再执行案例2的事件时,从AbstractApplicationContext. publishEvent()(上面第3步)开始执行,步骤还是multicastEvent派发事件 --> invokeListener回调执行 onApplicationEvent;
7.当容器关闭时,会调用doClose(),里面有个ContextClosedEvent事件,监听器监听到事件控制台就输出了信息:
    context.close();
    @Override
    public void close() {
        synchronized (this.startupShutdownMonitor) {
            doClose();
            // If we registered a JVM shutdown hook, we don't need it anymore now:
            // We've already explicitly closed the context.
            if (this.shutdownHook != null) {
                try {
                    Runtime.getRuntime().removeShutdownHook(this.shutdownHook);
                }
                catch (IllegalStateException ex) {
                    // ignore - VM is already shutting down
                }
            }
        }
    }
    protected void doClose() {
        // Check whether an actual close attempt is necessary...
        if (this.active.get() && this.closed.compareAndSet(false, true)) {
            if (logger.isDebugEnabled()) {
                logger.debug("Closing " + this);
            }

            LiveBeansView.unregisterApplicationContext(this);

            try {
                // Publish shutdown event.
                publishEvent(new ContextClosedEvent(this));
            }
            catch (Throwable ex) {
                logger.warn("Exception thrown from ApplicationListener handling ContextClosedEvent", ex);
            }

            // Stop all Lifecycle beans, to avoid delays during individual destruction.
            if (this.lifecycleProcessor != null) {
                try {
                    this.lifecycleProcessor.onClose();
                }
                catch (Throwable ex) {
                    logger.warn("Exception thrown from LifecycleProcessor on context close", ex);
                }
            }

            // Destroy all cached singletons in the context's BeanFactory.
            destroyBeans();

            // Close the state of this context itself.
            closeBeanFactory();

            // Let subclasses do some final clean-up if they wish...
            onClose();

            // Reset local application listeners to pre-refresh state.
            if (this.earlyApplicationListeners != null) {
                this.applicationListeners.clear();
                this.applicationListeners.addAll(this.earlyApplicationListeners);
            }

            // Switch to inactive.
            this.active.set(false);
        }
    }
8.上面在第4步中派发事件操作 getApplicationListeners 拿到了所有的监听器,那么容器中有哪些监听器呢?从第1步的 registerListeners() 可以看到,容器是先注册了多播器和监听器后才进行事件的发布,下面是监听器的注册:
    protected void registerListeners() {
        // Register statically specified listeners first.
        //从容器中拿到所有的监听器添加到多路派发器中,(最开始是没有的,跳过循环执行下面的步骤)
        for (ApplicationListener<?> listener : getApplicationListeners()) {
            getApplicationEventMulticaster().addApplicationListener(listener);
        }

        // Do not initialize FactoryBeans here: We need to leave all regular beans
        // uninitialized to let post-processors apply to them!
        //若容器中没有,即上面的遍历没有执行,则根据类型获取组件名称,然后根据组件名称获取对应的组件加入到多路派发器中
        String[] listenerBeanNames = getBeanNamesForType(ApplicationListener.class, true, false);
        for (String listenerBeanName : listenerBeanNames) {
            getApplicationEventMulticaster().addApplicationListenerBean(listenerBeanName);
        }

        // Publish early application events now that we finally have a multicaster...
        Set<ApplicationEvent> earlyEventsToProcess = this.earlyApplicationEvents;
        this.earlyApplicationEvents = null;
        if (earlyEventsToProcess != null) {
            for (ApplicationEvent earlyEvent : earlyEventsToProcess) {
                getApplicationEventMulticaster().multicastEvent(earlyEvent);
            }
        }
    }
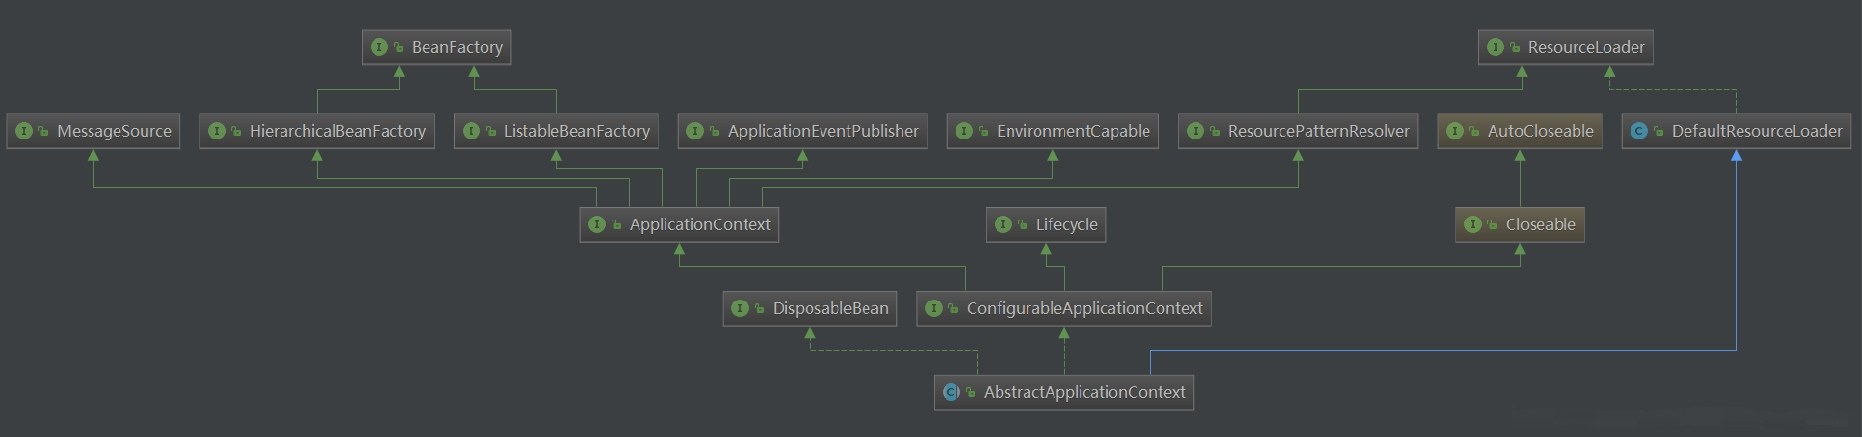
下面再来看看 getApplicationListeners 方法,发现它是 AbstractApplicationEventMulticaster 类的一个方法,所以在开始详解 getApplicationListeners 方法前,先来看看 AbstractApplicationEventMulticaster 类是一个起什么作用的类。

从上面类图可以看到 AbstractApplicationEventMulticaster 它实现了几个接口,它是一个事件派发器,上文第3点里面讲到的初始化派发器获取的 SimpleApplicationEventMulticaster 其实是继承自AbstractApplicationEventMulticaster 的。
在看下面的获取监听器源码前,我们先思考一个问题:监听器如何做到只监听指定类型的消息?如何要实现,有什么方式?
我们可以先猜测下:
1) 注册监听器的时候,将监听器和消息类型绑定;(该论证可查看下文 addApplicationListener 实现方法的解析)
2) 广播的时候,按照这条消息的类型去找指定了该类型的监听器,但不可能每条广播都去所有监听器里面找一遍,应该是说广播的时候会触发一次监听器和消息的类型绑定;
好了,接下来我们带着这些问题和猜测详细看看 getApplicationListeners 的源码:
public abstract class AbstractApplicationEventMulticaster
        implements ApplicationEventMulticaster, BeanClassLoaderAware, BeanFactoryAware {
    //创建监听器助手类,用于存放监听器集合,参数是否是预过滤监听器
    private final ListenerRetriever defaultRetriever = new ListenerRetriever(false);
    //ListenerCacheKey是基于事件类型和源类型的类作为key用来存储监听器助手
    final Map<ListenerCacheKey, ListenerRetriever> retrieverCache = new ConcurrentHashMap<>(64);

    @Nullable
    private ClassLoader beanClassLoader;//类加载器
    //互斥的监听器助手类
    private Object retrievalMutex = this.defaultRetriever;
    //监听器助手类(封装一组特定目标监听器的帮助类,允许有效地检索预过滤的监听器,此助手的实例按照时间类型和源类型缓存)
    private class ListenerRetriever {
        //存放事件监听器,有序、不可重复
        public final Set<ApplicationListener<?>> applicationListeners = new LinkedHashSet<>();
        //存放事件监听器bean名称,有序,不可重复
        public final Set<String> applicationListenerBeans = new LinkedHashSet<>();
        //是否预过滤监听器
        private final boolean preFiltered;

        public ListenerRetriever(boolean preFiltered) {
            this.preFiltered = preFiltered;
        }
        //获取事件监听器
        public Collection<ApplicationListener<?>> getApplicationListeners() {
            //创建一个指定大小的ApplicationListener监听器List集合
            List<ApplicationListener<?>> allListeners = new ArrayList<>(
                    this.applicationListeners.size() + this.applicationListenerBeans.size());
            allListeners.addAll(this.applicationListeners);
            //如果存放监听器bean name的集合不为空
            if (!this.applicationListenerBeans.isEmpty()) {
                //获取IOC容器工厂类
                BeanFactory beanFactory = getBeanFactory();
                for (String listenerBeanName : this.applicationListenerBeans) {
                    try {
                        //获取指定bean name的监听器实例
                        ApplicationListener<?> listener = beanFactory.getBean(listenerBeanName, ApplicationListener.class);
                        //判定如果是预过滤的监听器或者集合中不包含监听器实例则添加到集合中
                        if (this.preFiltered || !allListeners.contains(listener)) {
                            allListeners.add(listener);
                        }
                    }
                    catch (NoSuchBeanDefinitionException ex) {
                        // Singleton listener instance (without backing bean definition) disappeared -
                        // probably in the middle of the destruction phase
                    }
                }
            }
            if (!this.preFiltered || !this.applicationListenerBeans.isEmpty()) {
                AnnotationAwareOrderComparator.sort(allListeners);
            }
            return allListeners;
        }
    }
    //流程1:当所发布的事件类型和事件源类型与Map(retrieverCache)中的key匹配时,
    //将直接返回value中的监听器列表作为匹配结果,通常这发生在事件不是第一次发布时,能避免遍历所有监听器并进行过滤,
    //如果事件时第一次发布,则会执行流程2。
    protected Collection<ApplicationListener<?>> getApplicationListeners(
        ApplicationEvent event, ResolvableType eventType) {
        //事件源,事件最初发生在其上的对象
        Object source = event.getSource();
        //事件源class对象
        Class<?> sourceType = (source != null ? source.getClass() : null);
        //缓存的key有两个维度:消息来源+消息类型(关于消息来源可见ApplicationEvent构造方法的入参)
        //创建基于事件源和源类型的监听器助手cacheKey
        ListenerCacheKey cacheKey = new ListenerCacheKey(eventType, sourceType);

        // Quick check for existing entry on ConcurrentHashMap...
        // retrieverCache是ConcurrentHashMap对象(并发容器,使用锁分段来确保多线程下数据安全),所以是线程安全的,
        // ListenerRetriever中有个监听器的集合,并有些简单的逻辑封装,调用它的getApplicationListeners方法返回的监听类集合是排好序的(order注解排序)
        ListenerRetriever retriever = this.retrieverCache.get(cacheKey);
        //如果retrieverCache中找到对应的监听器集合,就立即返回了
        if (retriever != null) {
            return retriever.getApplicationListeners();
        }
        //如果类加载器为null,或者事件源在给定的类加载器上下文是安全的并且源类型为null或者源类型在指定上下文是安全的
        if (this.beanClassLoader == null ||
                (ClassUtils.isCacheSafe(event.getClass(), this.beanClassLoader) &&
                        (sourceType == null || ClassUtils.isCacheSafe(sourceType, this.beanClassLoader)))) {
            // Fully synchronized building and caching of a ListenerRetriever
            //锁定监听器助手对象,同步从ListenerRetriever监听器助手中获取指定的监听器
            synchronized (this.retrievalMutex) {
                //抢到锁之后再做一次判断,因为有可能在前面BLOCK的时候,另一个抢到锁的线程已经设置好了缓存,
                //即避免自己在BLOCK的时候其他线程已经将数据放入缓存了
                retriever = this.retrieverCache.get(cacheKey);
                if (retriever != null) {
                     //返回监听器助手中存储的监听器对象
                    return retriever.getApplicationListeners();
                }
                retriever = new ListenerRetriever(true);
                //retrieveApplicationListeners方法实际检索给定事件和源类型的监听器
                Collection<ApplicationListener<?>> listeners =
                        retrieveApplicationListeners(eventType, sourceType, retriever);//流程2
                //retriever放到缓存器中(更新缓存)
                this.retrieverCache.put(cacheKey, retriever);
                return listeners;
            }
        }
        else {
            // No ListenerRetriever caching -> no synchronization necessary
            // 无ListenerRetriever监听器助手 -> 无需同步缓存
            return retrieveApplicationListeners(eventType, sourceType, null);
        }
    }
}
从上面的源码可以看出:
1)在获取 ApplicationListener 的时候用到了缓存,同时有缓存更新和用锁来确保线程同步(双重判断也做了),这样如果在自定义广播时,如果多线程同时发广播,就不会有线程同步的问题了。
2)发送消息的时候根据类型去找所有对应的监听器,这样就可以实现自定义监听器只接收指定类型的消息。
3)在广播消息的时刻,如果某个类型的消息在缓存中找不到对应的监听器集合,就调用 retrieveApplicationListeners 方法去找出符合条件的所有监听器,然后放入这个集合中。
下面再详细看看 retrieveApplicationListeners:
    private Collection<ApplicationListener<?>> retrieveApplicationListeners(
            ResolvableType eventType, @Nullable Class<?> sourceType, @Nullable ListenerRetriever retriever) {
        //存放匹配的监听器的列表
        List<ApplicationListener<?>> allListeners = new ArrayList<>();
        Set<ApplicationListener<?>> listeners;
        Set<String> listenerBeans;
        //锁定监听器助手对象
        synchronized (this.retrievalMutex) {
            //获取监听器助手中存储的监听器对象,去重
            listeners = new LinkedHashSet<>(this.defaultRetriever.applicationListeners);
            //获取监听器助手中存储的监听器bean名称集合,去重
            listenerBeans = new LinkedHashSet<>(this.defaultRetriever.applicationListenerBeans);
        }

        // Add programmatically registered listeners, including ones coming
        // from ApplicationListenerDetector (singleton beans and inner beans).
        ////遍历所有的监听器
        for (ApplicationListener<?> listener : listeners) {
            //判断监听器是否匹配的逻辑在supportsEvent(listener, eventType, sourceType)中
            if (supportsEvent(listener, eventType, sourceType)) {
                //监听器助手类不为空,加入监听器助手类中的监听器集合中
                if (retriever != null) {
                    retriever.applicationListeners.add(listener);
                }
                //放入匹配的监听器列表中
                allListeners.add(listener);
            }
        }

        // Add listeners by bean name, potentially overlapping with programmatically
        // registered listeners above - but here potentially with additional metadata.
        //监听器助手中存储的监听器bean名称集合有值
        if (!listenerBeans.isEmpty()) {
            //获取IOC容器
            ConfigurableBeanFactory beanFactory = getBeanFactory();
            //遍历
            for (String listenerBeanName : listenerBeans) {
                try {
                    //判断监听器是否匹配的逻辑在supportsEvent(listener, eventType, sourceType)中
                    if (supportsEvent(beanFactory, listenerBeanName, eventType)) {
                        //获取指定bean name的监听器实例
                        ApplicationListener<?> listener =
                                beanFactory.getBean(listenerBeanName, ApplicationListener.class);
                        //如果匹配的监听器列表不包含上面获取的实例和符合supportsEvent的逻辑
                        if (!allListeners.contains(listener) && supportsEvent(listener, eventType, sourceType)) {
                            //监听器助手类不为空
                            if (retriever != null) {
                                //bean名称是单例,在容器中没有重复监听器
                                if (beanFactory.isSingleton(listenerBeanName)) {
                                    //加入监听器助手类中的监听器集合中
                                    retriever.applicationListeners.add(listener);
                                }
                                else {
                                    //去重,applicationListenerBeans是LinkedHashSet
                                    retriever.applicationListenerBeans.add(listenerBeanName);
                                }
                            }
                            //放入匹配的监听器列表中
                            allListeners.add(listener);
                        }
                    }
                    //监听器是否匹配的逻辑不在supportsEvent(listener, eventType, sourceType)中,从监听器助手类和匹配的监听器列表中移除
                    else {
                        // Remove non-matching listeners that originally came from
                        // ApplicationListenerDetector, possibly ruled out by additional
                        // BeanDefinition metadata (e.g. factory method generics) above.
                        Object listener = beanFactory.getSingleton(listenerBeanName);
                        if (retriever != null) {
                            retriever.applicationListeners.remove(listener);
                        }
                        allListeners.remove(listener);
                    }
                }
                catch (NoSuchBeanDefinitionException ex) {
                    // Singleton listener instance (without backing bean definition) disappeared -
                    // probably in the middle of the destruction phase
                }
            }
        }
        //监听器进行排序
        AnnotationAwareOrderComparator.sort(allListeners);
        if (retriever != null && retriever.applicationListenerBeans.isEmpty()) {
            retriever.applicationListeners.clear();
            retriever.applicationListeners.addAll(allListeners);
        }
        return allListeners;
    }
下面是 supportsEvent 的源码探究:
    //首先对原始的ApplicationListener进行一层适配器包装成GenericApplicationListener,
    //便于后面使用该接口中定义的方法判断监听器是否支持传入的事件类型或事件源类型
    protected boolean supportsEvent(
            ApplicationListener<?> listener, ResolvableType eventType, @Nullable Class<?> sourceType) {

        GenericApplicationListener smartListener = (listener instanceof GenericApplicationListener ?
                (GenericApplicationListener) listener : new GenericApplicationListenerAdapter(listener));
        return (smartListener.supportsEventType(eventType) && smartListener.supportsSourceType(sourceType));
    }

    public interface GenericApplicationListener extends ApplicationListener<ApplicationEvent>, Ordered {
        //判断是否支持该事件类型
        boolean supportsEventType(ResolvableType eventType);

        //判断是否支持该事件源类型,默认是true,也就是说事件源的类型通常对于判断匹配的监听器没有意义
        default boolean supportsSourceType(@Nullable Class<?> sourceType) {
            return true;
        }
    }
public class GenericApplicationListenerAdapter implements GenericApplicationListener, SmartApplicationListener {

    ......
    //监听器泛型的实际类型
    @Nullable
    private final ResolvableType declaredEventType;


    //判断监听器是否支持该事件类型,因为我们的监听器实例通常都不是SmartApplicationListener类型
    //eventType是发布的事件的类型
    @Override
    @SuppressWarnings("unchecked")
    public boolean supportsEventType(ResolvableType eventType) {
        if (this.delegate instanceof SmartApplicationListener) {
            Class<? extends ApplicationEvent> eventClass = (Class<? extends ApplicationEvent>) eventType.resolve();
            return (eventClass != null && ((SmartApplicationListener) this.delegate).supportsEventType(eventClass));
        }
        else {
        //this.declaredEventType.isAssignableFrom(eventType)当以下两种情况返回true
        //    1.declaredEventType和eventType类型相同
        //    2.declaredEventType是eventType的父类型
        //只要监听器泛型的实际类型和发布的事件类型一样或是它的父类型,则该监听器将被成功匹配。
            return (this.declaredEventType == null || this.declaredEventType.isAssignableFrom(eventType));
        }
    }
}
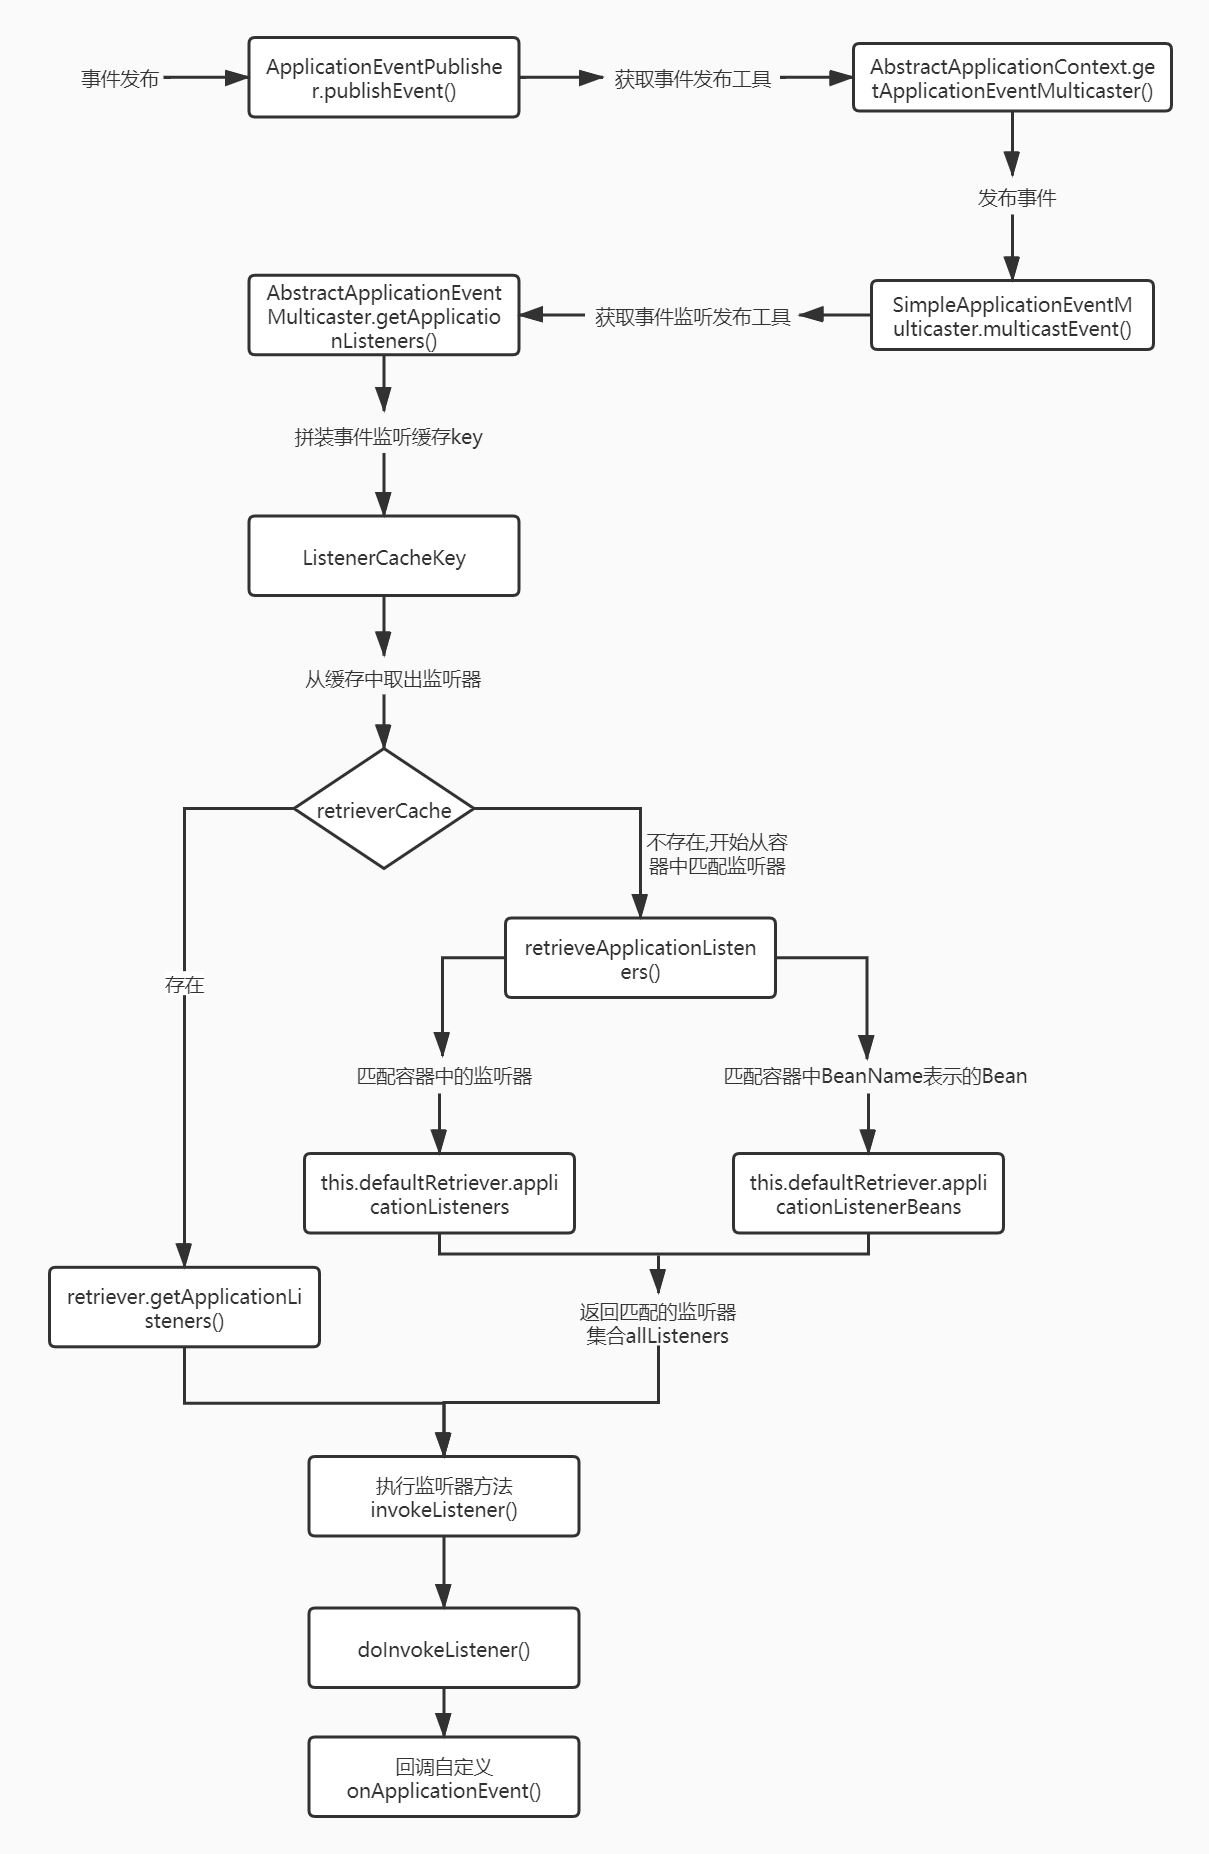
9.下面是流程总结图:
四.扩展
1.从上面的案例中可以看到,只要 bean 继承 ApplicationEvent,然后使用容器的 publishEvent 就可以发布事件了(类似上文案例4),那么还有其他的方式使 bean 具有跟容器一样具有发布事件的能力吗?
答案当然是有的,比如 ApplicationEventPublisherAware 这个接口就可以使 bean 具有发布事件的能力。下面是该接口的源码:
public interface ApplicationEventPublisherAware extends Aware {

    void setApplicationEventPublisher(ApplicationEventPublisher applicationEventPublisher);

}
我们可以创建一个bean,实现了 ApplicationEventPublisherAware 接口,那么该 bean 的 setApplicationEventPublisher 方法就会被调用,通过该方法可以接收到 ApplicationEventPublisher 类型的入参,借助这个 ApplicationEventPublisher 就可以发消息了;
比如下面的案例:
1)接口:
public interface UserEventRegisterService {
    /**
     * 发布事件,注册用户
     */
    void register();
}
2)接口实现:
@Service
public class UserEventRegisterServiceImpl implements UserEventRegisterService {
    @Resource
    private ApplicationEventPublisher applicationEventPublisher;

    @Override
    public void register() {
        User user = new User();
        user.setId(1);
        user.setName("张三");
        user.setSex("男");
        applicationEventPublisher.publishEvent(user);
        System.out.println("结束。");
    }
}
3)自定义监听器:可以使用 @EventListener 注解来实现自定义监听器(该注解下文详细介绍)
@Component
public class UserEventListener {
    @EventListener(condition = "#user.id != null")//监听当用户id不为空的事件
    public void handleEvent(User user){
        try {
            Thread.sleep(5000);
        } catch (InterruptedException e) {
            e.printStackTrace();
        }
        System.out.println("监听器监听到的信息:"+user);
    }
}
4)配置类:
@ComponentScan("com.hrh.ext")
@Configuration
public class ExtConfig {

}
5)测试:
    public static void main(String[] args) {
        AnnotationConfigApplicationContext context = new AnnotationConfigApplicationContext(ExtConfig.class);
        UserEventRegisterService service = context.getBean(UserEventRegisterService.class);
        service.register();
        context.close();
    }
======运行结果======
监听器监听到的信息:User [id=1, name=张三, sex=男]
结束。
2.监听器是如何加入到容器中的呢?我们从容器 refresh 刷新开始看起,发现在 refresh 里面有 prepareBeanFactory(beanFactory) 方法,为所有bean准备了一个后置处理器 ApplicationListenerDetector:
public void refresh() throws BeansException, IllegalStateException {
        synchronized (this.startupShutdownMonitor) {
            // Prepare this context for refreshing.
            prepareRefresh();

            // Tell the subclass to refresh the internal bean factory.
            ConfigurableListableBeanFactory beanFactory = obtainFreshBeanFactory();

            // Prepare the bean factory for use in this context.
            prepareBeanFactory(beanFactory);

            .........
        }
}
protected void prepareBeanFactory(ConfigurableListableBeanFactory beanFactory) {
    ..........

    // Register early post-processor for detecting inner beans as ApplicationListeners.
    beanFactory.addBeanPostProcessor(new ApplicationListenerDetector(this));

    ..........
}
接下来再看看 ApplicationListenerDetector类的源码,由于它是一个后置处理器(不清楚后置处理器的可查看上篇文章,开头有简单介绍),所以它有 postProcessBeforeInitialization 和 postProcessAfterInitialization 两个方法,这两个方法在对所有的 bean 进行实例化后进行拦截操作:
    private final transient AbstractApplicationContext applicationContext;

    private final transient Map<String, Boolean> singletonNames = new ConcurrentHashMap<>(256);
    @Override
    public Object postProcessBeforeInitialization(Object bean, String beanName) {
        return bean;
    }

    @Override
    public Object postProcessAfterInitialization(Object bean, String beanName) {
        //如果bean是ApplicationListener类型
        if (bean instanceof ApplicationListener) {
            // potentially not detected as a listener by getBeanNamesForType retrieval
            //判断bean在不在并发容器中
            Boolean flag = this.singletonNames.get(beanName);
            if (Boolean.TRUE.equals(flag)) {
                // singleton bean (top-level or inner): register on the fly
                //注册监听器,其实就是保存在成员变量applicationEventMulticaster的成员变量defaultRetriever的集合applicationListeners中
                this.applicationContext.addApplicationListener((ApplicationListener<?>) bean);
            }
            else if (Boolean.FALSE.equals(flag)) {
                if (logger.isWarnEnabled() && !this.applicationContext.containsBean(beanName)) {
                    // inner bean with other scope - can't reliably process events
                    logger.warn("Inner bean '" + beanName + "' implements ApplicationListener interface " +
                            "but is not reachable for event multicasting by its containing ApplicationContext " +
                            "because it does not have singleton scope. Only top-level listener beans are allowed " +
                            "to be of non-singleton scope.");
                }
                this.singletonNames.remove(beanName);
            }
        }
        return bean;
    }
    public void addApplicationListener(ApplicationListener<?> listener) {
        Assert.notNull(listener, "ApplicationListener must not be null");
        if (this.applicationEventMulticaster != null) {
            this.applicationEventMulticaster.addApplicationListener(listener);
        }
        this.applicationListeners.add(listener);
    }
如上所示,如果当前 bean 实现了 ApplicationListener 接口,就会调用 this.applicationContext.addApplicationListener 方法将当前 bean 注册到 applicationContext 的监听器集合中,后面有广播就直接找到这些监听器,调用每个监听器的 onApplicationEvent 方法;
接下来详细看看 addApplicationListener 方法,它的实现方法在 AbstractApplicationEventMulticaster 类中:
@Override
public void addApplicationListener(ApplicationListener<?> listener) {
    //锁定监听器助手对象
    synchronized (this.retrievalMutex) {
        // Explicitly remove target for a proxy, if registered already,
        // in order to avoid double invocations of the same listener.
        // 如果已经注册,则显式删除已经注册的监听器对象
        // 为了避免调用重复的监听器对象
        Object singletonTarget = AopProxyUtils.getSingletonTarget(listener);
        if (singletonTarget instanceof ApplicationListener) {
            //如果因为AOP导致创建了监听类的代理,那么就要在注册列表中清除代理类
            this.defaultRetriever.applicationListeners.remove(singletonTarget);
        }
        //把监听器加入集合defaultRetriever.applicationListeners中,这是个LinkedHashSet实例
        this.defaultRetriever.applicationListeners.add(listener);
        //清空监听器助手缓存Map
        this.retrieverCache.clear();
    }
}
在上面可以看到,如果对象是由 AOP生成的代理类,需要清除,是因为 AOP 是通过代理技术实现的,此时可能通过 CGLIB 生成了监听类的代理类,此类的实例如果被注册到监听器集合中,那么广播时按照消息类型就会取出两个监听器实例来,到时就是一个消息被两个实例消费了,因此需要先清理掉代理类。
同时也论证了一个观点:所谓的注册监听器,其实就是把 ApplicationListener 的实现类放入一个LinkedHashSet的集合,此处没有任何与消息类型相关的操作,因此,监听器注册的时候并没有将消息类型和监听器绑定;
3.异步监听事件案例:正常的事件通知是 ContextRefreshedEvent --> EmailEvent --> ContextClosedEvent
//开启异步支持
@EnableAsync
@Component
public class EmailListener implements ApplicationListener {
    @Async//异步执行
    @Override
    public void onApplicationEvent(ApplicationEvent event) {
        if (event instanceof EmailEvent) {

            EmailEvent emailEvent = (EmailEvent) event;
            System.out.println("邮件地址:" + emailEvent.getAddress());
            System.out.println("邮件内容:" + emailEvent.getText());
        } else {
            System.out.println("容器本身事件:" + event);
        }
        //通过线程名称区别
        System.out.println(event+ ":" + Thread.currentThread().getName());
    }
}
=======测试运行结果:从下面的运行结果可以看出是异步执行了=======
邮件地址:249968839@qq.com
邮件内容:This is a event test
com.hrh.ext.EmailEvent[source=hello]:SimpleAsyncTaskExecutor-2
容器本身事件:org.springframework.context.event.ContextClosedEvent[source=org.springframework.context.annotation.AnnotationConfigApplicationContext@2e5d6d97, started on Mon Nov 09 22:29:09 CST 2020]
容器本身事件:org.springframework.context.event.ContextRefreshedEvent[source=org.springframework.context.annotation.AnnotationConfigApplicationContext@2e5d6d97, started on Mon Nov 09 22:29:09 CST 2020]
org.springframework.context.event.ContextRefreshedEvent[source=org.springframework.context.annotation.AnnotationConfigApplicationContext@2e5d6d97, started on Mon Nov 09 22:29:09 CST 2020]:SimpleAsyncTaskExecutor-1
org.springframework.context.event.ContextClosedEvent[source=org.springframework.context.annotation.AnnotationConfigApplicationContext@2e5d6d97, started on Mon Nov 09 22:29:09 CST 2020]:SimpleAsyncTaskExecutor-3
5.Spring事务监听机制---使用 @TransactionalEventListener 处理数据库事务提交成功后再执行操作
在项目中,往往需要执行数据库操作后,发送消息或事件来异步调用其他组件执行相应的操作,例如:用户注册后发送激活码、配置修改后发送更新事件等。
但是,数据库的操作如果还未完成,此时异步调用的方法查询数据库发现没有数据,这就会出现问题。
如下面伪代码案例:
void saveUser(User u) {
    //保存用户信息
    userDao.save(u);
    //触发保存用户事件
    applicationContext.publishEvent(new SaveUserEvent(u.getId()));
}

@EventListener
void onSaveUserEvent(SaveUserEvent event) {
    //获取事件中的信息(用户id)
    Integer id = event.getEventData();
    //查询数据库,获取用户(此时如果用户还未插入数据库,则返回空)
    User u = userDao.getUserById(id);
    //这里可能报空指针异常!
    String phone = u.getPhoneNumber();
    MessageUtils.sendMessage(phone);
}
为了解决上述问题,Spring为我们提供了两种方式: @TransactionalEventListener 注解 和 事务同步管理器 TransactionSynchronizationManager,以便我们可以在事务提交后再触发某一事件。
@TransactionalEventListener 注解的使用案例:只有当前事务提交之后,才会执行事件监听器的方法
//phase默认为AFTER_COMMIT,共有四个枚举:BEFORE_COMMIT,AFTER_COMMIT,AFTER_ROLLBACK,AFTER_COMPLETION
@TransactionalEventListener(phase = TransactionPhase.AFTER_COMMIT)
void onSaveUserEvent(SaveUserEvent event) {
    Integer id = event.getEventData();
    User u = userDao.getUserById(id);
    String phone = u.getPhoneNumber();
    MessageUtils.sendMessage(phone);
}
TransactionSynchronizationManager 的使用案例:@TransactionalEventListener底层下面这样来实现的
@EventListener
void onSaveUserEvent(SaveUserEvent event) {
    TransactionSynchronizationManager.registerSynchronization(new TransactionSynchronizationAdapter() {
        @Override
        public void afterCommit() {
            Integer id = event.getEventData();
            User u = userDao.getUserById(id);
            String phone = u.getPhoneNumber();
            MessageUtils.sendMessage(phone);
        }
    });
}