Zeppelin-在flink和spark集群的安装
该教程主要面向Zeppelin的入门者。不需要太多的关于 Linux, git, 或其它工具的基础知识。如果你按照这里的方法逐项执行,就可以将 Zeppelin 正常运行起来。
安装Zeppelin为Flink/Spark集群模式
本教程假定用户有一个新的机器环境 (物理机或 virtual 均可, 最小安装 Ubuntu 14.04.3 Server)。
注意: 虚拟机的大小至少16GB,以免出现磁盘空间不够导致安装失败。
软件要求
采用最小安装, 下面几个程序需要在安装Zeppelin、Flink 和 Spark之前安装:
- git
- openssh-server
- OpenJDK 7
- Maven 3.1+
安装 git, openssh-server和 OpenJDK 7 可以使用apt 包管理器来完成。
git
命令行键入:
sudo apt-get install git
openssh-server
sudo apt-get install openssh-server
OpenJDK 7
sudo apt-get install openjdk-7-jdk openjdk-7-jre-lib
使用Ubuntu 16.04: 安装 openjdk-7 必须加上 repository( Source),如下:
sudo add-apt-repository ppa:openjdk-r/ppa
sudo apt-get update
sudo apt-get install openjdk-7-jdk openjdk-7-jre-lib
Maven 3.1+
Zeppelin 要求 maven 版本 3.x以上。该版本在系统库中为 2.x, 因此 maven 需要手动安装。
首先,清除现存的 maven各个版本:
sudo apt-get purge maven maven2
下载 maven 3.3.9 二进制软件:
wget "http://www.us.apache.org/dist/maven/maven-3/3.3.9/binaries/apache-maven-3.3.9-bin.tar.gz"
解压缩并放到 /usr/local 目录:
tar -zxvf apache-maven-3.3.9-bin.tar.gz
sudo mv ./apache-maven-3.3.9 /usr/local
创建一个符号链接,在 /usr/bin 中:
sudo ln -s /usr/local/apache-maven-3.3.9/bin/mvn /usr/bin/mvn
安装 Zeppelin
这里提供一个Zeppelin的源码安装快速步骤,详细步骤请阅读 Zeppelin Installation Guide。
命令行,Clone Zeppelin 源代码:
git clone https://github.com/apache/zeppelin.git
进入 Zeppelin 根目录:
cd zeppelin
打包 Zeppelin:
mvn clean package -DskipTests -Pspark-1.6 -Dflink.version=1.1.3 -Pscala-2.10
-DskipTests 跳过 build tests。
-Pspark-1.6 指定maven采用 Spark 1.6进行构建。因为 Zeppelin有自己的Spark interpreter,版本必须与连接的Spark服务保持一致。
-Dflink.version=1.1.3 指定 maven 采用Flink 版本 1.1.3进行构建。
--Pscala-2.10 指定 maven 使用 Scala v2.10进行构建。
注意: 你可以包含额外的build flags,如: -Ppyspark 或 -Psparkr。详细的参考: the build section of github for more details.
注意: 你可以构建任何在Zeppelin Profile中可用的Spark版本,关键是要选择一致的版本进行构建。
注意: 关于build失败. 安装过Zeppe超过30次,我可以告诉你,有时候构建失败找不出原因。在没有编辑任何代码的情况下,可能因为某些原因build就失败了。很多时候,maven试图下载时失败。
如果构建失败,下面是一些解决方法的提示:
- 查看 logs.
- 重试 (再次运行 mvn clean package -DskipTests -Pspark-1.6 )
- 如果下载失败,等待一些时间后再下载。有时如果 server 不可用,就只能等待。
- 确认你的步骤都是正确的。
- 向社区请求帮助。到 here 并且加入用户邮件列表。确保将build output (everything that happened in the console) 的输出包含在你的消息中。
启动Zeppelin服务
bin/zeppelin-daemon.sh start
使用 ifconfig 来确认 host machine's IP 地址。如果不熟悉, 可以参考 here。
打开浏览器,本机输入地址 http://127.0.0.1:8080, 如果不在本机访问(同一个网段)可以通过命令 ifconfig获得服务器的IP地址。
查看 Zeppelin tutorial 获取Zeppelin的基本用法。建议你花一些时间查看一下 Zeppelin 安装时自带的notebook例子,可以快速熟悉基本的notebook功能。
Flink 测试
创建一个新的 notebook ,名称为 "Flink Test",复制下面的代码到里面:
%flink  // let Zeppelin know what interpreter to use.

val text = benv.fromElements("In the time of chimpanzees, I was a monkey",   // some lines of text to analyze
"Butane in my veins and I'm out to cut the junkie",
"With the plastic eyeballs, spray paint the vegetables",
"Dog food stalls with the beefcake pantyhose",
"Kill the headlights and put it in neutral",
"Stock car flamin' with a loser in the cruise control",
"Baby's in Reno with the Vitamin D",
"Got a couple of couches, sleep on the love seat",
"Someone came in sayin' I'm insane to complain",
"About a shotgun wedding and a stain on my shirt",
"Don't believe everything that you breathe",
"You get a parking violation and a maggot on your sleeve",
"So shave your face with some mace in the dark",
"Savin' all your food stamps and burnin' down the trailer park",
"Yo, cut it")

/*  The meat and potatoes:
        this tells Flink to iterate through the elements, in this case strings,
        transform the string to lower case and split the string at white space into individual words
        then finally aggregate the occurrence of each word.

        This creates the count variable which is a list of tuples of the form (word, occurances)

counts.collect().foreach(println(_))  // execute the script and print each element in the counts list

*/
val counts = text.flatMap{ _.toLowerCase.split("\W+") }.map { (_,1) }.groupBy(0).sum(1)

counts.collect().foreach(println(_))  // execute the script and print each element in the counts list
按Enter+Shift运行,确保 Zeppelin Flink interpreter 工作正确,如果有问题到菜单的interpreter进行设置。
Spark 测试
创建一个notebook,名称为 "Spark Test" ,复制下面的代码进去:
%spark // let Zeppelin know what interpreter to use.

val text = sc.parallelize(List("In the time of chimpanzees, I was a monkey",  // some lines of text to analyze
"Butane in my veins and I'm out to cut the junkie",
"With the plastic eyeballs, spray paint the vegetables",
"Dog food stalls with the beefcake pantyhose",
"Kill the headlights and put it in neutral",
"Stock car flamin' with a loser in the cruise control",
"Baby's in Reno with the Vitamin D",
"Got a couple of couches, sleep on the love seat",
"Someone came in sayin' I'm insane to complain",
"About a shotgun wedding and a stain on my shirt",
"Don't believe everything that you breathe",
"You get a parking violation and a maggot on your sleeve",
"So shave your face with some mace in the dark",
"Savin' all your food stamps and burnin' down the trailer park",
"Yo, cut it"))


/*  The meat and potatoes:
        this tells spark to iterate through the elements, in this case strings,
        transform the string to lower case and split the string at white space into individual words
        then finally aggregate the occurrence of each word.

        This creates the count variable which is a list of tuples of the form (word, occurances)
*/
val counts = text.flatMap { _.toLowerCase.split("\W+") }
                 .map { (_,1) }
                 .reduceByKey(_ + _)

counts.collect().foreach(println(_))  // execute the script and print each element in the counts list
按Enter+Shift运行,确保 Zeppelin Flink interpreter 工作正确,如果有问题到菜单的interpreter进行设置。
最后, 停止Zeppelin daemon服务。从系统的命令窗口输入并回车执行:
bin/zeppelin-daemon.sh stop
安装集群
Flink 集群
现在预编译代码
如果可能,建议您从源码进行构建,不仅可以获得最新的功能,还能了解项目的最新进展和代码的结构,定制自己特定环境的版本。为了便于演示,这里直接下载编译好的版本。
下载使用 wget
wget "http://mirror.cogentco.com/pub/apache/flink/flink-1.1.3/flink-1.1.3-bin-hadoop24-scala_2.10.tgz"
tar -xzvf flink-1.1.3-bin-hadoop24-scala_2.10.tgz
将下载 Flink 1.1.3, 与 Hadoop 2.4兼容。这个版本不需要安装 Hadoop ,但如果使用 Hadoop, 将上面的 24 改为对应的版本。
启动 Flink 集群:
flink-1.1.3/bin/start-cluster.sh
从源码构建
如果希望从源码编译构建Flink, 下面是快捷指南。 改变构建工具和版本可能带来不稳定性。例如, Java8 和 Maven 3.0.3 建议用于编译 Flink, 但是目前不适合用于 Zeppelin 的构建(版本在快速更新中,以后可能就适合了). 查看 Flink Installation guide 获得更多的细节指南。
返回到目录, 这里假设是 $HOME. 复制 Flink 项目源码, 检出版本 release-1.1.3-rc2, 然后编译。
cd $HOME
git clone https://github.com/apache/flink.git
cd flink
git checkout release-1.1.3-rc2
mvn clean install -DskipTests
启动 Flink 集群,使用 stand-alone 模式:
build-target/bin/start-cluster.sh
确保集群成功启动。
在浏览器中, 输入URL地址 http://127.0.0.1:8082 ,可以看到Flink 的Web-UI。在左侧导航栏点击 'Task Managers' 。确保至少有一个Task Manager打开。
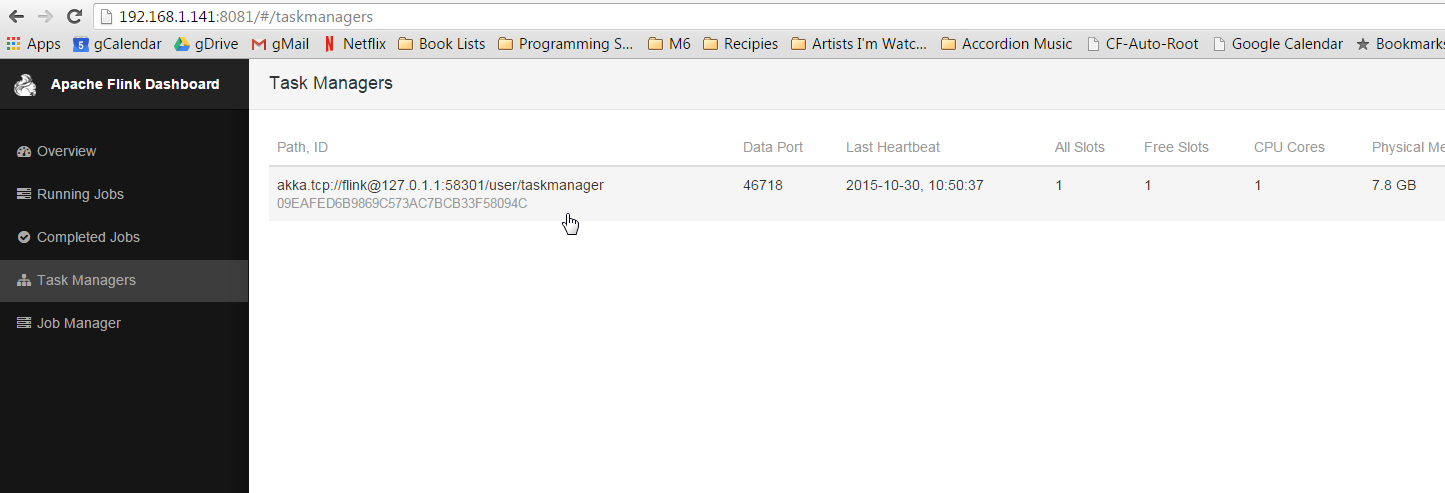
如果task managers没有出现, 重新启动一下 Flink 集群,方法如下:
(if binaries) flink-1.1.3/bin/stop-cluster.sh flink-1.1.3/bin/start-cluster.sh
(if built from source) build-target/bin/stop-cluster.sh build-target/bin/start-cluster.sh
Spark 1.6 集群
下载预编译软件包
如果可能,建议从源码编译。这里为了便于演示,采用直接下载编译好的软件包。
下载使用 wget
wget "http://d3kbcqa49mib13.cloudfront.net/spark-1.6.3-bin-hadoop2.6.tgz"
tar -xzvf spark-1.6.3-bin-hadoop2.6.tgz
mv spark-1.6.3-bin-hadoop2.6 spark
上面的命令会下载Spark 1.6.3, 与Hadoop 2.6兼容。 本安装包工作时不需要安装Hadoop,但如果使用 Hadoop, 需要将版本号 2.6 改变为你的对应版本。
从源码编译
Spark 是一个比较大的项目, 将耗费较长的时间下载和编译,中间可能会遇到像Flink编译时同样的问题而失败。参考 Spark Installation 获得更多的细节的指南。
返回到下载目录,这里假设是 $HOME. 复制 Spark源代码, 检出分支 branch-1.6, 然后进行build。
注意: 这里检出 1.6 只是因为这是本文写作时的 Zeppelin profile 支持的版本。你需要构建对应于Spark的相应版本。如果使用 Spark 2.0, 下面的例子 word count 需要修改为Spark 2.0 兼容。
cd $HOME
Clone, check out, 以及 build Spark 1.6.x,脚本命令如下:
git clone https://github.com/apache/spark.git
cd spark
git checkout branch-1.6
mvn clean package -DskipTests
启动 Spark集群
返回到 $HOME 目录.
cd $HOME
启动Spark 集群,使用stand-alone 模式。如果不使用默认端口8080,通过 webui-port 参数制定服务端口 (Zeppelin的webui-port服务端口)。
spark/sbin/start-master.sh --webui-port 8082
注意: 为什么使用 --webui-port 8082? 这个是题外话,在后面再去解释。
打开浏览器,导航到 http://yourip:8082 确保 Spark master 已经运行,显示信息如下。
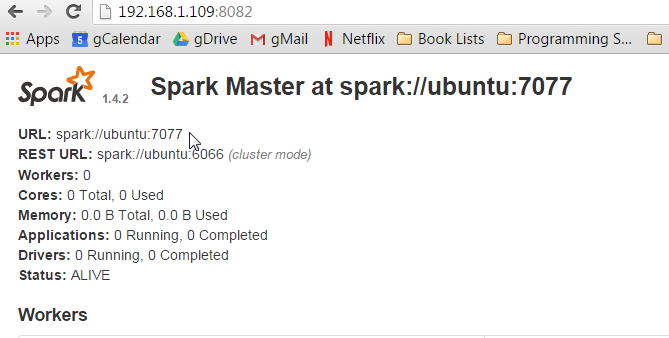
页面上方显示 URL地址: spark://yourhost:7077, 这是Spark Master访问的URI, 在后续的操作中将会用到。
使用这个URI启动一个Spark的slave节点:
spark/sbin/start-slave.sh spark://yourhostname:7077
返回 Zeppelin daemon启动的主目录:
cd $HOME

zeppelin/bin/zeppelin-daemon.sh start
配置 Interpreters
打开浏览器,导航到 Zeppelin 的web-ui,地址为:http://yourip:8080.
回到 Zeppelin web-ui ( http://yourip:8080),点击右上方的 anonymous 将打开下拉菜单, 选择 Interpreters 进入解释器的配置页面。
在 Spark 一节, 右上方点击 edit 按钮(铅笔图标)。 然后,编辑 Spark 的 master 域。 从 local[*] 改为上面的URI,上面的是 spark://ubuntu:7077。
点击 Save (保存)更新参数, 然后在询问是否需要重启interpreter时点击 OK。
现在滚动页面到 Flink 一节。点击edit按钮,将 host 的值从 local 改为 localhost. 点击 Save 保存。
重新打开 examples ,然后重新运行。 (屏幕上方点击 play 按钮,或者在每一paragraph点击play按钮来运行,或者按Enter+Shift组合键)。
你可以去检查 Flink 和 Spark 的webui界面 (譬如上面的 http://yourip:8081, http://yourip:8082, http://yourip:8083),可以看到任务在集群上运行。
题外话-关于服务的端口
为什么要用 'something like', 而不是精确的 web-ui 端口呢?因为这依赖于你启动时的设置。Flink 和 Spark 将缺省启动web-ui 在端口8080, 如果被占用就寻找下一个可用的端口。
因为 Zeppelin 第一个启动,缺省将占用端口 8080。当 Flink 启动时, 将试图使用端口 8080, 如果不可用,则使用下一个,如 8081。Spark 的 webui界面分为 master 和 slave, 启动时将试图绑定端口 8080,但该端口已经被Zeppelin占用), 然后将使用8081 (但已被 Flink的 webui占用), 然后使用 8082。
如果一切完全如上述运行, webui的端口将会是 8081 和 8082。但是,如果运行了其他程序或者启动过程由其它的集群管理程序控制,情况可能就与预期的不同,尤其是在启动大量节点的情况下。
可以通过启动参数来指定webui服务绑定的端口 (在启动 Flink 和 Spark时,在命令行加上参数 --webui-port <port> ,这里 <port> 为webui使用的端口。 也可以在配置文件中指定端口,具体方法参考官方网站文档,这里不再赘述。