当前基于kafaka最新版 kafka_2.12-2.2.1.tgz 进行配置 。
官网地址:http://kafka.apache.org/intro
kafka的一些基础知识 参考:http://www.hechunbo.com/index.php/archives/140.html
最新版 kafka_2.12-2.2.1.tgz 进行配置 。单机生产者消费者图解配配置,多机模拟配置。以及文件读写配置,经验掌握,集成zookeeper不用再安装
-
配置java环境安装jdk
-
解压kafaka
[root@localhost hcb]# tar -zxvf kafka_2.12-2.2.1.tgz -C /usr/local -
启动zookeeper .因为最新版 已经包含有zookeeper 所以不用另外安装了
[root@localhost kafka_2.12-2.2.1]# bin/zookeeper-server-start.sh config/zookeeper.properties [2019-06-22 17:47:49,667] INFO Reading configuration from: config/zookeeper.properties (org.apache.zookeeper.server.quorum.QuorumPeerConfig) -
重新开一个连接 。输入jps 发现多了一个进程
[root@localhost ~]# jps 3136 Jps 2842 QuorumPeerMain -
启动kafka
[root@localhost kafka_2.12-2.2.1]# ./bin/kafka-server-start.sh config/server.properties [2019-06-22 17:51:18,786] INFO Registered kafka:type=kafka.Log4jController MBean (kafka.utils.Log4jControllerRegistration$) [2019-06-22 17:51:20,624] INFO starting (kafka.server.KafkaServer) -
再开一个连接 输入jps查看当前运行的进程
发现多了一个kafka[root@localhost ~]# jps 3504 Jps 2842 QuorumPeerMain 3147 Kafka -
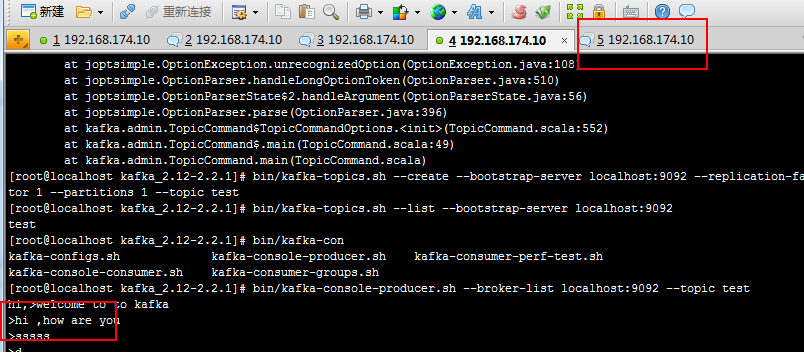
创建一个topic
[root@localhost kafka_2.12-2.2.1]# bin/kafka-topics.sh --create --bootstrap-server localhost:9092 --replication-factor 1 --partitions 1 --topic test [root@localhost kafka_2.12-2.2.1]# -
查看topic消息
[root@localhost kafka_2.12-2.2.1]# bin/kafka-topics.sh --list --bootstrap-server localhost:9092 test -
发送消息 到test
[root@localhost kafka_2.12-2.2.1]# bin/kafka-console-producer.sh --broker-list localhost:9092 --topic test hi,>welcome to to kafka >hi ,how are you -
消费者取消息
[root@localhost kafka_2.12-2.2.1]#  bin/kafka-console-consumer.sh --bootstrap-server localhost:9092 --topic test --from-beginning
hi,welcome to to kafka
hi ,how are you
生产者发送消息以后,消费者有通知 ,
-
进行多台机子测试
因为我们是单台机子,所以把配置文件复制两份,更改端口和id配置进行第二台,第三台的模拟[root@localhost ~]# cd /usr/local/kafka_2.12-2.2.1/ [root@localhost kafka_2.12-2.2.1]# cp config/server.properties config/server-1.properties [root@localhost kafka_2.12-2.2.1]# cp config/server.properties config/server-2.properties修改第二台机子的配置
vi config/server-1.properties
log.dirs=/tmp/kafka-logs-1
listeners=PLAINTEXT://:9093
broker.id=1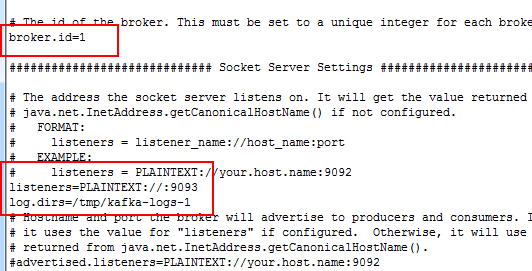
修改第三台机子
vi config/server-2.properties
log.dirs=/tmp/kafka-logs-2
listeners=PLAINTEXT://:9094
broker.id=2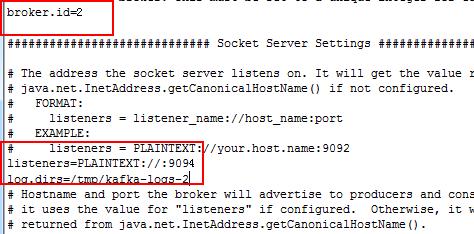
-
启动新模拟的两台服务器
[root@localhost kafka_2.12-2.2.1]# bin/kafka-server-start.sh config/server-1.properties
[2019-06-22 18:23:56,237] INFO Registered kafka:type=kafka.Log4jController MBean (kafka.utils.Log4jControllerRegistration$)
新开连接 继续启动第三台,顺便查看下当前的进程 。发现有两个kafka存在了
[root@localhost ~]# jps
4370 ConsoleProducer
2842 QuorumPeerMain
5642 Jps
3147 Kafka
4955 ConsoleConsumer
5278 Kafka
[root@localhost ~]# cd /usr/local/kafka_2.12-2.2.1/
^C[root@localhost kafka_2.12-2.2.1]# bin/kafka-server-start.sh config/server-2.properties
[2019-06-22 18:27:31,947] INFO Registered kafka:type=kafka.Log4jController MBean (kafka.utils.Log4jControllerRegistration$)
新开一个连接 ,查看下当前进程 ,三个kafka正常启动了
[root@localhost ~]# jps 4370 ConsoleProducer 6307 Jps 2842 QuorumPeerMain 3147 Kafka 4955 ConsoleConsumer 5948 Kafka 5278 Kafka -
创建一个带有备份的topic
[root@localhost kafka_2.12-2.2.1]# bin/kafka-topics.sh --create --bootstrap-server localhost:9092 --replication-factor 3 --partitions 1 --topic my-replication-topic -
查看哪个borke【kafka服务器】在工作
[root@localhost kafka_2.12-2.2.1]# bin/kafka-topics.sh --describe --bootstrap-server localhost:9092 --topic my-replication-topic
Topic:my-replication-topic	PartitionCount:1	ReplicationFactor:3	Configs:segment.bytes=1073741824
	Topic: my-replication-topic	Partition: 0	Leader: 1	Replicas: 1,2,0	Isr: 1,2,0
leader:哪个broker在读写
replicas:当前可以正常工作的kafka集群。当leader挂掉时会自动替补
isr:同步消息的列表集合
-
查看我们之前创建的topic消息
当时我们只有一个kafka服务器。可以看只leader是0,替被和备份的都是0,
[root@localhost kafka_2.12-2.2.1]# bin/kafka-topics.sh --describe --bootstrap-server localhost:9092 --topic test Topic:test PartitionCount:1 ReplicationFactor:1 Configs:segment.bytes=1073741824 Topic: test Partition: 0 Leader: 0 Replicas: 0 Isr: 0 -
在新的topic中发布新的消息
[root@localhost kafka_2.12-2.2.1]# bin/kafka-console-producer.sh --broker-list localhost:9092 --topic my-replication-topic >message one >message two -
消费者去获取消息
[root@localhost kafka_2.12-2.2.1]# bin/kafka-console-consumer.sh --bootstrap-server localhost:9092 --from-beginning --topic my-replication-topic message one message two -
检查当前的leader
[root@localhost kafka_2.12-2.2.1]# bin/kafka-topics.sh --describe --bootstrap-server localhost:9092 --topic my-replication-topic Topic:my-replication-topic PartitionCount:1 ReplicationFactor:3 Configs:segment.bytes=1073741824 Topic: my-replication-topic Partition: 0 Leader: 1 Replicas: 1,2,0 Isr: 1,2,0 -
模拟leader1挂掉以后的状态
把leader1关掉
检查leader1的进程
ps aux 显示用户当前的所有进程 。并根据grep后面的内容进行搜索
用kill杀死相关进程
[root@localhost kafka_2.12-2.2.1]# ps aux | grep server-1.properties root 5278 3.5 20.5 3232460 205560 pts/5 Sl+ 18:23 1:06 /usr/local/jdk1.8.0_211/bin/java -Xmx1G [root@localhost kafka_2.12-2.2.1]# kill -9 5278 -
再次检查当前topic的消息
发现leader已经从1变成了2.
[root@localhost kafka_2.12-2.2.1]# bin/kafka-topics.sh --describe --bootstrap-server localhost:9092 --topic my-replication-topic Topic:my-replication-topic PartitionCount:1 ReplicationFactor:3 Configs:segment.bytes=1073741824 Topic: my-replication-topic Partition: 0 Leader: 2 Replicas: 1,2,0 Isr: 2,0 -
使用kafka connect 导入导出数据
souce connector 从text.txt读取文件 ,把内容发送到connect-test., sink connector 从conect-test读写消息
[root@localhost kafka_2.12-2.2.1]# bin/connect-standalone.sh config/connect-standalone.properties config/connect-file-source.properties  config/connect-file-sink.properties
[2019-06-22 19:05:55,493] INFO Kafka Connect standalone worker initializing ... (org.apache.kafka.connect.cli.ConnectStandalone:67)
进行jps分发现多了一个ConnectStandalone的进程
[root@localhost ~]# jps
4370 ConsoleProducer
9478 Jps
9160 ConnectStandalone
2842 QuorumPeerMain
3147 Kafka
4955 ConsoleConsumer
5948 Kafka
显示文件内容
more 命令类似 cat ,不过会以一页一页的形式显示,更方便使用者逐页阅读,
[root@localhost kafka_2.12-2.2.1]# more test.sink.txt
foo
bar
使用消费者控制 台显示
[root@localhost kafka_2.12-2.2.1]# bin/kafka-console-consumer.sh --bootstrap-server localhost:9092 --topic connect-test --from-beginning
{"schema":{"type":"string","optional":false},"payload":"foo"}
{"schema":{"type":"string","optional":false},"payload":"bar"}
继续测试
生产者进行消息追加
[root@localhost kafka_2.12-2.2.1]# echo -e "foo
barddddaaaaaaaadddd1223" > test.txt
[root@localhost kafka_2.12-2.2.1]# echo -e "foo
barddddaaaaaaaadddd1223
ew append" > test.txt
消费者进行实时显示
[root@localhost kafka_2.12-2.2.1]# bin/kafka-console-consumer.sh --bootstrap-server localhost:9092 --topic connect-test --from-beginning
{"schema":{"type":"string","optional":false},"payload":"foo"}
{"schema":{"type":"string","optional":false},"payload":"bar"}
{"schema":{"type":"string","optional":false},"payload":"dddd"}
{"schema":{"type":"string","optional":false},"payload":"aaaaaaad"}
{"schema":{"type":"string","optional":false},"payload":"dd"}
^[[A^[[A^[[B{"schema":{"type":"string","optional":false},"payload":"1\2\2\3"}
{"schema":{"type":"string","optional":false},"payload":"ew append"}