/**
author: lihaibo
URL:http://www.cnblogs.com/horizonli/p/5321770.html
*/
下面是干货
【第一部分 安装】
环境:ubuntu 14.04
gitlab包:gitlab-ce_7.14.3-ce.1_amd64.deb
1. 安装配置依赖项
sudo apt-get install curl openssh-server ca-certificates postfix
(如果已经安装了Postfix来发送邮件请在安装期间选择 'Internet Site' . 你也可以用Sendmail或者 使用自定义的SMTP服务器来代替Postfix. 如果希望使用 Exim, 请 把它当做SMTP来配置.)
2. 添加并安装GitLab软件包
curl -LJO http://mirror.tuna.tsinghua.edu.cn/gitlab-ce/ubuntu/pool/trusty/main/g/gitlab-ce/gitlab-ce-XXX.deb
(在浏览器中输入http://mirror.tuna.tsinghua.edu.cn/gitlab-ce/ubuntu/pool/trusty/main/g/gitlab-ce就能看到要选择的gitlab版本软件 XXX表示版本号,
我用的是gitlab-ce_7.14.3-ce.1_amd64.deb)
dpkg -i gitlab-ce-XXX.deb                         #在安装的过程中会有一个让其输入主机名称,这时候如果不想设置名称,可以直接设置为IP地址,以方便登录
                             #如果设置为了主机名称,在自己本机(hosts)中或者DNS中要添加对服务器名称的dns解析。
示例:
#上面的那个命令安装完成后会显示如下的提示:
gitlab: GitLab should be reachable at http://ubuntu   #这个http://ubuntu就是待会要登录的gitlab主页,所以需要将其主机的解析加入到hosts文件中,
                               #如果上面命令中填的是IP,则不用添加到hosts中
gitlab: Otherwise configure GitLab for your system by editing /etc/gitlab/gitlab.rb file
gitlab: And running reconfigure again.
gitlab:
gitlab: For a comprehensive list of configuration options please see the Omnibus GitLab

readme
gitlab: https://gitlab.com/gitlab-org/omnibus-gitlab/blob/master/README.md
gitlab:
It looks like GitLab has not been configured yet; skipping the upgrade script.
3. 配置和使用GitLab
sudo gitlab-ctl reconfigure
4. 在浏览器访问GitLab主机名
如果安装gitlab的linux主机IP是192.168.0.10或者ubuntu(ubuntu为gitlab服务器的名字),就在浏览器中输入192.168.0.10或者http://ubuntu,刷新一次,会让输入新的root密码。登录成功。如下图:

5.gitlab的一般使用
创建用户
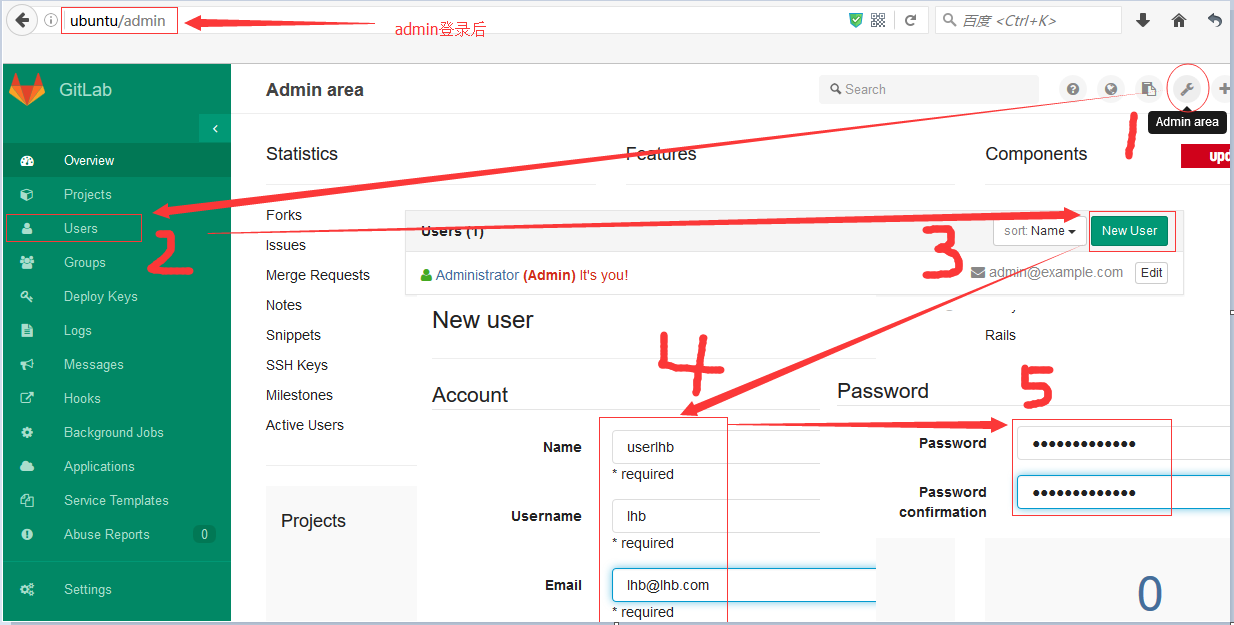
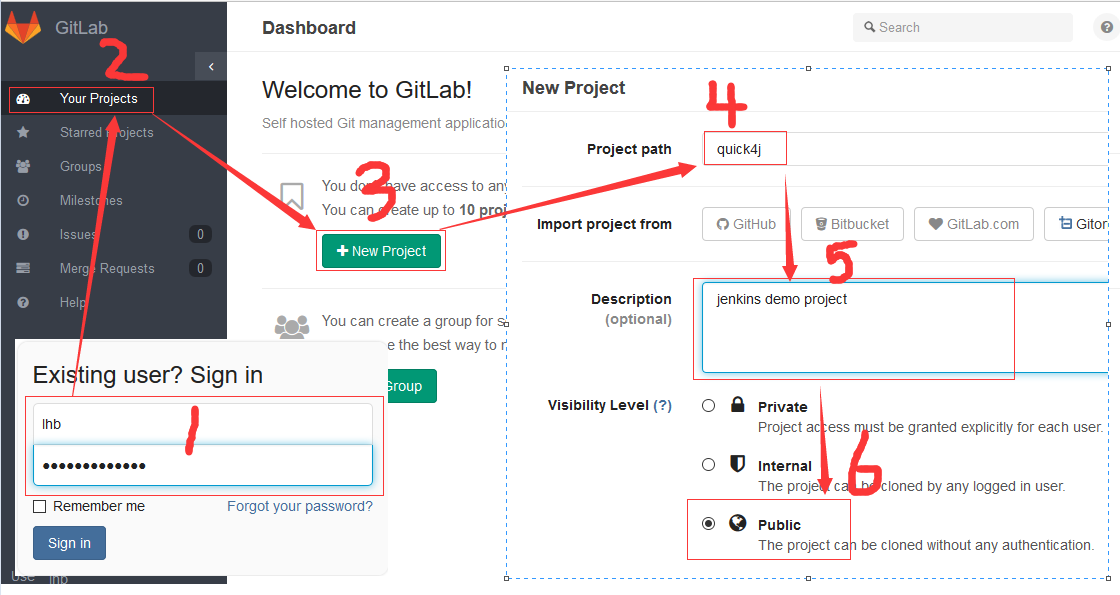
创建project
第二部分 安装过程的问题解决
==================【安装过程的一些问题总结】===========
1.安装过程中如果需要翻qiang怎么办?
如果遇到这种情况,最好的方式就是翻墙。
其次可以参考这篇文章http://www.360doc.com/content/15/0603/14/21631240_475362133.shtml(需自行测试,结果自行负责)
2.忘记了gitlab的登录用户密码?
使用root用户输入下面的命令
1 root@ubuntu:~# gitlab-rails console production
等一会后会出现一个提示符:输入
irb(main):001:0> u = User.where(id:1).first #id: 后面的数字可以更改为其他数字进行查询
当我查询到id=2的时候,发现了我自己定义的用户 name=lhb (上面第五步中创建的用户):
1 irb(main):003:0> u = User.where(id:2).first
2 => #<User id: 2, email: "lhb@lhb.com", encrypted_password: "$2a$10$tQDpBEmPDiURBZANES/EBOjhZQSnaaHPjjyifoTmWXZ...", reset_password_token: "130bf1320e41004ed28d7093738a56b62543edd2ec1f34c12d...", reset_password_sent_at: "2016-03-25 16:21:26", remember_created_at: nil, sign_in_count: 0, current_sign_in_at: nil, last_sign_in_at: nil, current_sign_in_ip: nil, last_sign_in_ip: nil, created_at: "2016-03-25 16:21:26", updated_at: "2016-03-25 16:47:46", name: "lhb", admin: true, projects_limit: 0, skype: "", linkedin: "", twitter: "", authentication_token: "ppCXaBYk1q3AT4KTwZts", theme_id: 2, bio: nil, failed_attempts: 4, locked_at: nil, username: "lhb", can_create_group: false, can_create_team: false, state: "active", color_scheme_id: 1, notification_level: 1, password_expires_at: nil, created_by_id: 1, last_credential_check_at: nil, avatar: nil, confirmation_token: nil, confirmed_at: "2016-03-25 16:21:26", confirmation_sent_at: nil, unconfirmed_email: nil, hide_no_ssh_key: false, website_url: "", notification_email: "lhb@lhb.com", hide_no_password: false, password_automatically_set: false, location: nil, encrypted_otp_secret: nil, encrypted_otp_secret_iv: nil, encrypted_otp_secret_salt: nil, otp_required_for_login: false, otp_backup_codes: nil, public_email: "", dashboard: 0, project_view: 0, consumed_timestep: nil, layout: 0, hide_project_limit: false, unlock_token: nil, otp_grace_period_started_at: nil, ldap_email: false, external: true>
修改lhb用户名密码:
1 irb(main):008:0> u.password = 'password'                  #更新password为你需要的密码
2 => "password"
3 irb(main):009:0> u.password_confirmation = 'password'       #更新password为你需要的密码
4 => "passwrod"
保存更改:
1 irb(main):010:0> u.save!                        #符号(!)一定要加上
2 => true
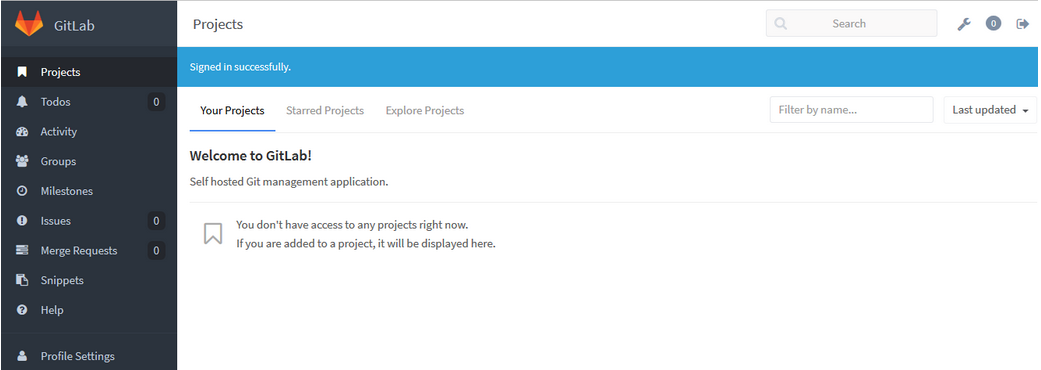
测试更改了密码的用户:

登录成功后的界面
>>>>>>>>>>>>>>>>>>>>>>>>>>参考
https://about.gitlab.com/downloads/
http://gitlab.cc/downloads/
http://roland.kierkels.net/git/reset-your-gitlab-root-password-from-a-terminal/
http://www.360doc.com/content/15/0603/14/21631240_475362133.shtml