
(点击图片可进入试玩)
本篇文章为第二部分内容,这篇文章将具体介绍游戏的实现,这篇文章的的主要内容有:
3、创建工程与场景
4、玩家分数管理
5、开始界面
6、游戏界面
三、创建工程与场景
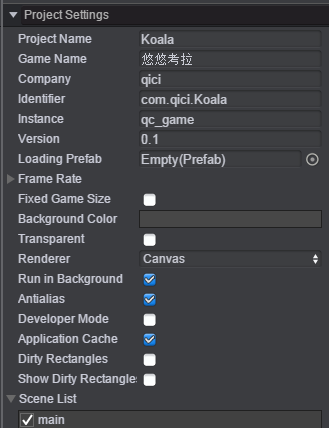
创建工程Koala和空的主场景main,设置如下:
游戏入口与游戏初始化
在Scripts文件夹下创建文件:Koala.js。代码如下:


 1 var Koala = qc.Koala = {
 2     ui : {},
 3     logic : {},
 4
 5     // 游戏对象
 6     game : null,
 7
 8     // 游戏宽度
 9     GAMEWIDTH : 640
10
11 };
12
13 Koala.initLogic = function(excel, game) {
14
15     // 设置游戏对象引用
16     this.game = game;
17
18     // 设置游戏帧率为60帧
19     game.time.frameRate = 60;
20
21 };
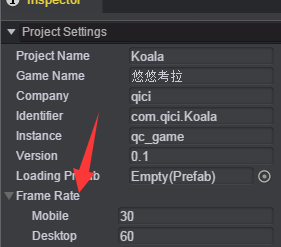
此脚本定义了名字空间,用于记录全局数据。游戏入口中,记录了game的实例。并将帧率限定为60帧(默认在手机下为30帧),这句代码也可以不用写,我们可以在Project/Settings中设置,如下图:
四、玩家分数管理
创建脚本:Scripts/logic/Me.js,脚本代码如下:
 1 var Me = qc.Koala.logic.Me = function() {
 2     // 当前关卡
 3     this.level = 1;
 4
 5     // 当前分数
 6     this._score = 0;
 7
 8     // 历史最高分
 9     this._best = 0;
10
11     // 游戏是否结束
12     this.isDie = false;
13
14     // 游戏是否暂停
15     this.paused = false;
16
17     // 用户相关信息
18     this.token = '';
19     this.rid = '';
20     this.userInfo = null;
21     this.channel = '';
22 };
23
24 Me.prototype = {};
25 Me.prototype.constructor = Me;
26
27 Object.defineProperties(Me.prototype, {
28     'score' : {
29         get : function() { return this._score; },
30         set : function(v) {
31             if (this._score === v) return;
32             this._score = v;
33
34             this.best = v;
35
36             qc.Koala.onScoreChange.dispatch(v);
37         }
38     },
39
40     'best' : {
41         get : function() { return this._best; },
42         set : function(v) {
43             if (this._best >= v) return;
44             this._best = v;
45
46             var key = 'best_' + this.rid;
47             qc.Koala.game.storage.set(key, v);
48         }
49     }
50 });
51
52 Me.prototype.reset = function() {
53     this.level = 1;
54     this.score = 0;
55
56     this.isDie = false;
57     this.paused = false;
58 };
59
60 /**
61  * 加分
62  * @param  {number} score - 增量
63  */
64 Me.prototype.addScore = function(score) {
65     if (typeof score !== 'number' || score <= 0) return;
66
67     this.score = this._score + score;
68 };
69
70 /**
71  * 校正最高分
72  */
73 Me.prototype.adjustBest = function () {
74     if (!this.userInfo) return;
75
76     var score = this.userInfo.scorers;
77     this.readFromStorage();
78     if (score > this._best)
79         this.best = score;
80 };
81
82 /**
83  * 读取记录
84  */
85 Me.prototype.readFromStorage = function () {
86     var key = 'best_' + this.rid;
87     var best = qc.Koala.game.storage.get(key);
88     if (best) this.best = best;
89 };
90
91 /**
92  * 保存记录
93  */
94 Me.prototype.saveToStorage = function () {
95     qc.Koala.game.storage.save();
96 };
Me类维护了两个数据:score(当前玩家的分数)、best(玩家的历史最高分)
实例化Me类
打开Koala.js脚本,在initLogic方法中,加入代码:
 1 Koala.initLogic = function(excel, game) {
 2
 3     // 设置游戏对象引用
 4     this.game = game;
 5
 6     // 设置游戏帧率为60帧
 7     game.time.frameRate = 60;
 8
 9     // 游戏相关数据逻辑类
10     this.logic.me = new qc.Koala.logic.Me();
11 }
五、开始界面
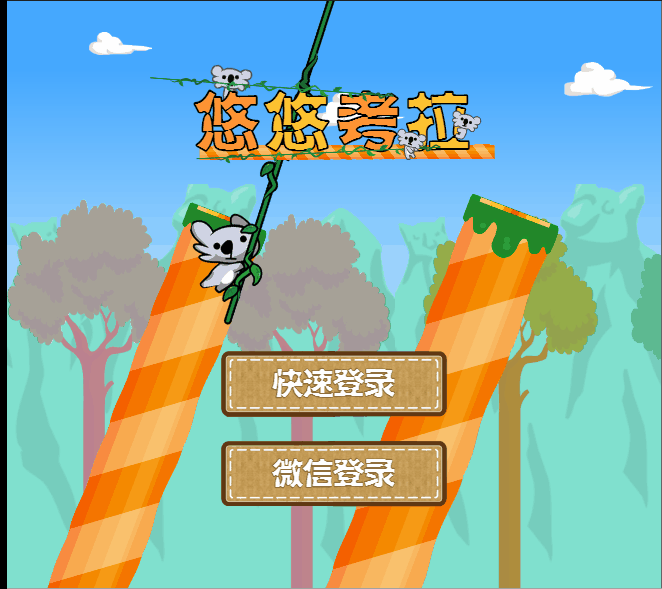
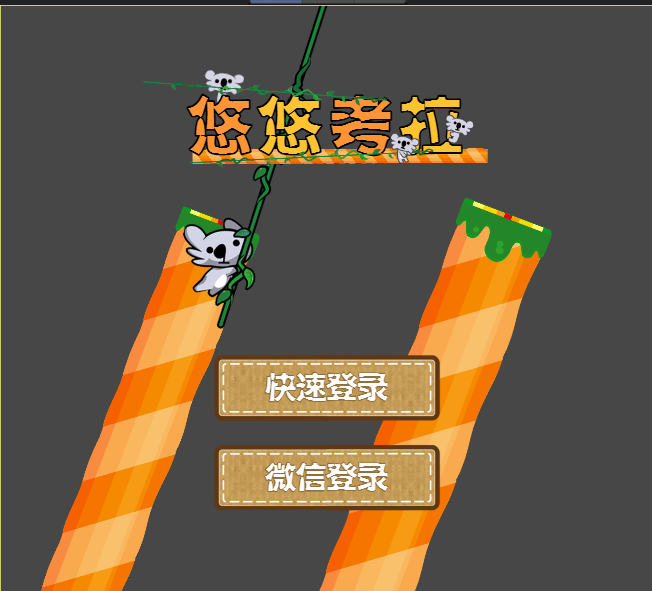
在游戏还没开始时,我构思的登录界面应该是,有两个登录按钮,一个是用于快速登录按钮,另一个是提供微信登录的按钮,以及其它的一些界面元素,效果图如下:
现在我讲下该登录的界面实现。先说背景界面。
5.1背景界面
背景界面由蓝天、白云、山峰及树组成。
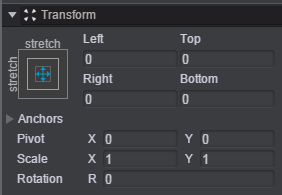
蓝天背景:首先在引擎编辑器的Hierarchy面板创建一个UIRoot节点取名"游戏背景",在"游戏背景"节点下创建一个Image节点取名"蓝天背景",我想让这个节点图片铺满整个屏幕,所以我设置该节点的属性如下:
白云区域:游戏运行时,为了让游戏更逼真一点,就想让云在天空中一直漂浮,在设计中使用三朵云让它们循环移动。为了使游戏能够在各种不同分辨率的屏幕下能正常显示,我是这么做的,首先是在"游戏背景"节点下创建一个Empty Node取名"白云区域",向上对齐左右拉伸,属性值设置如下:

将三朵云挂载到"白云区域"节点下,由于方法类似,我只以其中的一朵云作为讲解,首先在"白云区域"节点下创建一个Image取名为"白云1",在运行时,三朵云循环移动我采用引擎提供的TweenPosition动画,挂载完成后如下所示:
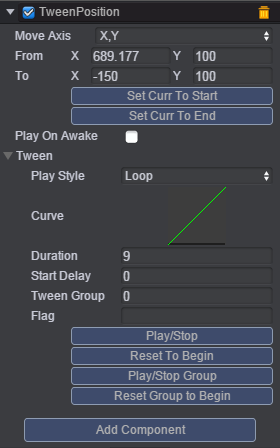
TweenPosition动画的属性From值为从哪个位置开始,To值为到哪个位置,play Style设置为Loop(循环移动),Duration持续的时间为9秒,更多Tween动画可查看官方文档《Tween动画》。
在讲山峰区域之前,我先要讲下预制:在场景中可以很容易创建游戏对象并设置属性,但当有大量相同的游戏对象需要在场景中复用就成了问题,但该引擎提供了预制类型资源,可以完整保存游戏对象属性、组件及其子孙对象。预制相当于模板,可用于在场景中创建新出的游戏对象实例,达到复用的效果。在游戏中,我在"山峰区域"节点下需要三个同样的节点,故使用预制,在后续讲的树区域也需要用到预制。
山峰区域:在"山峰区域"节点下创建一个Image节点取名"mountain",需要把山峰节点放到屏幕的左下位置,将该节点拖入到"prefab"文件夹,即完成预制的制作,在游戏中,三个山峰是一个接连一个,为的是在游戏场景移动时产生连贯的效果,在代码中已经设置了山与山的距离,第一个山峰节点的属性值设置如下:
树区域:树预制的制作与山峰预制一样,这里就不一一讲述了。
此时,我们已经把背景界面搭建起来了,可是在运行时,我们需要云移动、产生山峰预制、树预制,这些就交给代码来执行吧。在Scripts/ui文件下创建脚本:Background.js,代码如下:
  1 var Background = qc.defineBehaviour('qc.Koala.ui.Background', qc.Behaviour, function() {
  2     // 动画播放距离
  3     this.tweenDistance = 0;
  4
  5     // 山与山之间的距离
  6     this.mountainDistance = 635;
  7
  8     // 树与树之间的距离
  9     this.treeDistance = 340;
 10
 11     this.mountains = [];
 12
 13     this.trees = [];
 14
 15     this.treeIcons = [ 'tree_1.bin', 'tree_2.bin', 'tree_3.bin' ];
 16 }, {
 17     // 云列表
 18     clouds : qc.Serializer.NODES,
 19     // 山峰区域
 20     mountainRect : qc.Serializer.NODE,
 21     // 山峰预制
 22     mountainPrefab : qc.Serializer.PREFAB,
 23     // 树区域
 24     treeRect : qc.Serializer.NODE,
 25     // 树预制
 26     treePrefab : qc.Serializer.PREFAB
 27 });
 28
 29 Background.prototype.awake = function() {
 30
 31     this.addListener(this.game.world.onSizeChange, function() {
 32         this.initMountain();
 33         this.initTree();
 34     }, this);
 35
 36     this.game.timer.add(1000, this.init, this);
 37 };
 38
 39 Background.prototype.init = function () {
 40     this.clouds.forEach(function(cloud) {
 41         var s = cloud.getScript('qc.TweenPosition');
 42         s.from.setTo(cloud.parent.width, s.from.y);
 43         s.resetToBeginning();
 44         s.play();
 45         cloud.visible = true;
 46     }, this);
 47
 48     // 初始化山
 49     this.initMountain();
 50
 51     // 初始化树
 52     this.initTree();
 53 };
 54
 55 /**
 56  * 初始化山
 57  * @method qc.Koala.ui.Background#initMountain
 58  */
 59 Background.prototype.initMountain = function () {
 60     var mountainCount = Math.ceil(this.gameObject.width / this.mountainDistance) + 1,
 61         count = mountainCount - this.mountains.length;
 62     if (count <= 0) return;
 63     this._createMountain(count);
 64 };
 65
 66 /**
 67  * 创建山
 68  * @method createMountain
 69  * @param  {number} count - 要创建的个数
 70  */
 71 Background.prototype._createMountain = function (count) {
 72     while (count--) {
 73         var m = this.game.add.clone(this.mountainPrefab, this.mountainRect);
 74         m.x = this.mountainDistance * this.mountains.length;
 75         this.mountains.push(m);
 76     }
 77 };
 78
 79 /**
 80  * 初始化树
 81  * @method qc.Koala.ui.Background#initTree
 82  */
 83 Background.prototype.initTree = function () {
 84     var treeCount = Math.ceil(this.gameObject.width / this.treeDistance) + 1,
 85         count = treeCount - this.trees.length;
 86     if (count <= 0) return;
 87     this._createTree(count);
 88 };
 89
 90 /**
 91  * 创建树
 92  * @method qc.Koala.ui.Background#createTree
 93  * @param  {number}   count - 创建个数
 94  */
 95 Background.prototype._createTree = function (count) {
 96     while (count--) {
 97         var t = this.game.add.clone(this.treePrefab, this.treeRect);
 98         t.x = this.treeDistance * this.trees.length;
 99         this.trees.push(t);
100
101         var icon = this.treeIcons[qc.Koala.Math.random(0, this.treeIcons.length - 1)];
102         this.game.assets.load(
103             'treeIcon_' + this.trees.length,
104             'Assets/texture/' + icon,
105             (function(texture) {
106                 this.texture = texture;
107             }).bind(t)
108         );
109         t.height += qc.Koala.Math.random(-10, 40);
110     }
111 };
将该脚本挂载到"游戏背景"节点上,并将对应的节点拖入到对应的属性值,如下图所示:

至此,我们已经把背景界面弄好了,但我想把登录界面与背景界面分离出来,故我在Hierarchy面板另创建一个UIRoot取名为"界面",将登录界面节点挂载到"界面"节点。现在我们需要弄按钮显示及其它的一些界面显示,除去背景界面,效果图如下:
5.2欢迎界面
首先在"界面"节点下创建一个Empty Node取名为"欢迎界面",目的是将上图中显示的界面元素都挂载到该节点下,"欢迎界面"的属性设置如下:

左边柱子:在游戏中,使用了大量柱子对象,故我们可以把柱子做成预制,前面已经讲述了如何制作预制,这里就不一一赘述。需要说明的是,柱子由柱子躯干与柱头所组成,这样做的目的是,在游戏中,我们根据等级相应的改变柱子的粗细。将做好的柱子预制拖入到"欢迎界面"节点下取名"左边柱子",柱子是倾斜的,我们可以设置它的Rotation值,节点属性值设置如下:

其余的界面元素创建类似,就不一一介绍了,更多的界面布局也可以参考《界面布局》。此时,我们的开始界面已经完成了,可是当我们点击快速登录、或者微信登录按钮时,我们需要做相应的操作。这些就交给代码做吧!创建脚本Welcome.js,该脚本主要功能是监听按钮是否按下,如微信登录按钮按下时,则做微信登录处理,代码如下,需要说明的是代码中有微信API函数,暂时不用去管它,后续会讲述。
 1 var Welcome = qc.defineBehaviour('qc.Koala.ui.Welcome', qc.Behaviour, function() {
 2 }, {
 3     // 快速登录按钮
 4     quickBtn : qc.Serializer.NODE,
 5     // 微信登录按钮
 6     wechatBtn : qc.Serializer.NODE,
 7     // 配置文件
 8     config : qc.Serializer.EXCELASSET,
 9     // 登录提示区域
10     loginMask : qc.Serializer.NODE
11 });
12
13 Welcome.prototype.awake = function() {
14     // 初始化逻辑脚本
15     qc.Koala.initLogic(this.config, this.game);
16
17     // 监听快速登录事件
18     this.addListener(this.quickBtn.onClick, this._onStart, this);
19
20     // 监听微信登录按钮点击事件
21     this.addListener(this.wechatBtn.onClick, this._wechatLogin, this);
22
23     // 监听正在登录中事件
24     this.addListener(qc.Koala.onLogining, this._logining, this);
25
26     // 监听登录失败事件
27     this.addListener(qc.Koala.onLoginFail, this._loginFail, this);
28
29     // 监听登录成功事件
30     this.addListener(qc.Koala.onLogin, this.hide, this);
31
32     // 获取微信插件对象
33     var wx = this.getScript('qc.QcWeChat');
34
35     // 设置快速登录按钮的可见情况
36     this.quickBtn.visible = !wx.isWeChat();
37
38     // 重新布局按钮
39     this.quickBtn.parent.getScript('qc.TableLayout').rebuildTable();
40
41     // 监听开始登录事件
42     this.addListener(wx.onStartLogin, function() {
43         qc.Koala.onLogining.dispatch();
44     }, this);
45
46     // 设置微信登陆结果监听
47     this.addListener(wx.onLogin, function(flag) {
48         if (flag === "success") {
49             this._loginSuccess();
50         }
51         else {
52             // 派发登录失败事件
53             qc.Koala.onLoginFail.dispatch();
54         }
55     }, this);
56
57 };
58
59 Welcome.prototype._onStart = function() {
60     qc.Koala.onStart.dispatch();
61     this.hide();
62 };
63
64 Welcome.prototype._wechatLogin = function () {
65     //微信登陆
66     this.getScript('qc.QcWeChat').login();
67 };
68
69 /**
70  * 微信登录成功回调
71  */
72 Welcome.prototype._loginSuccess = function () {
73     var wx = this.getScript('qc.QcWeChat');
74     if (wx.user) {
75         qc.Koala.logic.me.token = wx.user.token;
76         qc.Koala.logic.me.rid = wx.user.rid;
77         qc.Koala.logic.me.userInfo = wx.user;
78     }
79     // 设置为微信渠道
80     qc.Koala.logic.me.channel = "weixin";
81
82     // 开始游戏
83     this._onStart();
84
85     // 校正最高分
86     qc.Koala.logic.me.adjustBest();
87 };
88
89 Welcome.prototype._logining = function () {
90     this.loginMask.visible = true;
91 };
92
93 Welcome.prototype._loginFail = function () {
94     this.loginMask.visible = false;
95 };
96
97 Welcome.prototype.hide = function() {
98     this.gameObject.visible = false;
99 };
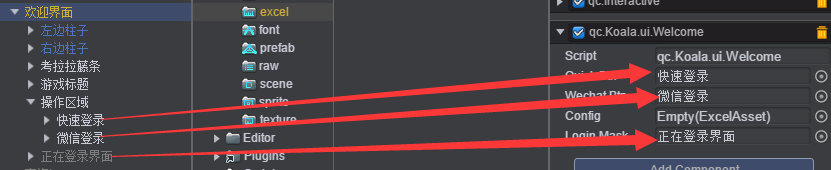
把该脚本挂载到"欢迎界面"节点上,并将对应的节点拖入到对应的属性上,需要说明的是,Config属性值为游戏数据配置表,暂时我们可以不去管它,在后续我们配置的Excel表,需要拖入到该属性值中,如下图所示:
需要说明的是该游戏在手机端运行时,有"微信登录"功能,故需要创建微信脚本(目前引擎已经有微信插件,可直接挂载),在Scripts/wx文件夹下创建两个脚本分别是QcWx.js与QcWeChat.js,其中QcWx.js为微信接口类可用于微信分享、录音、扫一扫等功能。代码如下:
  1 // version 03.2
  2 var QCWX = qc.QCWX = function() {
  3     var self = this;
  4
  5     self.title = '';
  6     self.imgUrl = '';
  7     self.desc = '';
  8     self.url = '';
  9     self.sign = null;
 10     self.ready = false;
 11     self.debug = false;
 12 };
 13 QCWX.prototype = {};
 14 QCWX.prototype.constructor = QCWX;
 15
 16 /**
 17  * 初始化微信接口
 18  */
 19 QCWX.prototype.init = function(sign, callback) {
 20     var self = this;
 21     self.sign = sign;
 22
 23     // 不支持微信接口?
 24     if (!window.wx) {
 25         return;
 26     }
 27     wx.config({
 28         debug: self.debug,
 29         appId: sign.appId,
 30         timestamp: sign.timeStamp,
 31         nonceStr: sign.nonceStr,
 32         signature: sign.signature,
 33         jsApiList: [
 34             'onMenuShareTimeline', 'onMenuShareQQ', 'onMenuShareQZone', 'onMenuShareAppMessage', 'onMenuShareWeibo',
 35             'startRecord', 'stopRecord', 'onVoiceRecordEnd', 'playVoice', 'pauseVoice', 'stopVoice', 'onVoicePlayEnd',
 36             'uploadVoice', 'downloadVoice', 'chooseImage', 'previewImage', 'uploadImage', 'downloadImage',
 37             'translateVoice', 'getNetworkType', 'openLocation', 'getLocation', 'closeWindow', 'scanQRCode'
 38         ]
 39     });
 40
 41     wx.ready(function() {
 42         // 标记下已经初始化完毕了
 43         self.ready = true;
 44         if (callback) callback();
 45     });
 46 };
 47
 48 /**
 49  * 分享接口
 50  */
 51 QCWX.prototype.share = function(shareSignal) {
 52     var self = this;
 53     if (!self.ready) {
 54         console.error('尚未初始化完成');
 55         return;
 56     }
 57
 58     var body = {
 59         title: self.title,
 60         desc: "",
 61         trigger: function() {
 62             if (!shareSignal) return;
 63             shareSignal.dispatch(body);
 64             body.link = qc.qcWeChat.shareLink + qc.qcWeChat.shareDir;
 65         }
 66     };
 67
 68     //alert(JSON.stringify(body));
 69
 70     // 分享到朋友圈
 71     wx.onMenuShareTimeline(body);
 72
 73     // 分享给朋友
 74     wx.onMenuShareAppMessage(body);
 75
 76     // 分享到QQ
 77     wx.onMenuShareQQ(body);
 78
 79     // 分享到腾讯微博
 80     wx.onMenuShareWeibo(body);
 81
 82     // 分享到QQ空间
 83     wx.onMenuShareQZone(body);
 84 };
 85
 86 /**
 87  * 拍照或从手机相册中选图
 88  * @param {number} count - 图片的数量
 89  */
 90 QCWX.prototype.chooseImage = function(count, sizeType, sourceType, callback) {
 91     var self = this;
 92     if (!self.ready) {
 93         console.error('尚未初始化完成');
 94         return;
 95     }
 96
 97     if (!sizeType) sizeType = ['original', 'compressed'];
 98     if (!sourceType) sourceType = ['album', 'camera'];
 99
100     wx.chooseImage({
101         count: count,
102         sizeType: sizeType,
103         sourceType: sourceType,
104         success: function(res) {
105             if (callback) callback(res.localIds);
106         }
107     });
108 };
109
110 /**
111  * 预览图片
112  */
113 QCWX.prototype.previewImage = function(current, urls) {
114     var self = this;
115     if (!self.ready) {
116         console.error('尚未初始化完成');
117         return;
118     }
119
120     current = current || '';
121     urls = urls || [];
122     wx.previewImage({
123         current: current,
124         urls: urls
125     });
126 };
127
128 /**
129  * 上传图片,有效期为3天
130  */
131 QCWX.prototype.uploadImage = function(localId, isShowProgressTips, callback) {
132     var self = this;
133     if (!self.ready) {
134         console.error('尚未初始化完成');
135         return;
136     }
137     wx.uploadImage({
138         localId: localId,
139         isShowProgressTips: isShowProgressTips ? 1 : 0,
140         success: function(res) {
141             if (callback) callback(res.serverId);
142         }
143     });
144 };
145
146 /**
147  * 下载图片
148  */
149 QCWX.prototype.downloadImage = function(serverId, isShowProgressTips, callback) {
150     var self = this;
151     if (!self.ready) {
152         console.error('尚未初始化完成');
153         return;
154     }
155     wx.downloadImage({
156         serverId: serverId,
157         isShowProgressTips: isShowProgressTips ? 1 : 0,
158         success: function(res) {
159             if (callback) callback(res.localId);
160         }
161     });
162 };
163
164 /**
165  * 开始录音
166  */
167 QCWX.prototype.startRecord = function() {
168     var self = this;
169     if (!self.ready) {
170         console.error('尚未初始化完成');
171         return;
172     }
173     wx.startRecord();
174 };
175
176 /**
177  * 停止录音
178  */
179 QCWX.prototype.stopRecord = function(callback) {
180     var self = this;
181     if (!self.ready) {
182         console.error('尚未初始化完成');
183         return;
184     }
185     wx.stopRecord({
186         success: function(res) {
187             if (callback) callback(res.localId);
188         }
189     });
190 };
191
192 /**
193  * 监听录音自动停止
194  */
195 QCWX.prototype.onVoiceRecordEnd = function(callback) {
196     var self = this;
197     if (!self.ready) {
198         console.error('尚未初始化完成');
199         return;
200     }
201     wx.onVoiceRecordEnd({
202         complete: function(res) {
203             if (callback) callback(res.localId);
204         }
205     });
206 };
207
208 /**
209  * 播放语音
210  */
211 QCWX.prototype.playVoice = function(localId) {
212     var self = this;
213     if (!self.ready) {
214         console.error('尚未初始化完成');
215         return;
216     }
217     wx.playVoice({
218         localId: localId
219     });
220 };
221
222 /**
223  * 暂停播放语音
224  */
225 QCWX.prototype.pauseVoice = function(localId) {
226     var self = this;
227     if (!self.ready) {
228         console.error('尚未初始化完成');
229         return;
230     }
231     wx.pauseVoice({
232         localId: localId
233     });
234 };
235
236 /**
237  * 暂停播放语音
238  */
239 QCWX.prototype.stopVoice = function(localId) {
240     var self = this;
241     if (!self.ready) {
242         console.error('尚未初始化完成');
243         return;
244     }
245     wx.stopVoice({
246         localId: localId
247     });
248 };
249
250 /**
251  * 监听语音播放完毕
252  */
253 QCWX.prototype.onVoicePlayEnd = function(callback) {
254     var self = this;
255     if (!self.ready) {
256         console.error('尚未初始化完成');
257         return;
258     }
259     wx.onVoicePlayEnd({
260         success: function (res) {
261             if (callback) callback(res.localId);
262         }
263     });
264 };
265
266 /**
267  * 上传语音,有效期为3天
268  */
269 QCWX.prototype.uploadVoice = function(localId, isShowProgressTips, callback) {
270     var self = this;
271     if (!self.ready) {
272         console.error('尚未初始化完成');
273         return;
274     }
275     wx.uploadVoice({
276         localId: localId,
277         isShowProgressTips: isShowProgressTips ? 1 : 0,
278         success: function(res) {
279             if (callback) callback(res.serverId);
280         }
281     });
282 };
283
284 /**
285  * 下载语音
286  */
287 QCWX.prototype.downloadVoice = function(serverId, isShowProgressTips, callback) {
288     var self = this;
289     if (!self.ready) {
290         console.error('尚未初始化完成');
291         return;
292     }
293     wx.downloadVoice({
294         serverId: serverId,
295         isShowProgressTips: isShowProgressTips ? 1 : 0,
296         success: function(res) {
297             if (callback) callback(res.localId);
298         }
299     });
300 };
301
302 /**
303  * 语音识别
304  */
305 QCWX.prototype.translateVoice = function(localId, isShowProgressTips, callback) {
306     var self = this;
307     if (!self.ready) {
308         console.error('尚未初始化完成');
309         return;
310     }
311     wx.translateVoice({
312         localId: localId,
313         isShowProgressTips: isShowProgressTips ? 1 : 0,
314         success: function(res) {
315             if (callback) callback(res.translateResult);
316         }
317     });
318 };
319
320 /**
321  * 获取网络状态:2g 3g 4g wifi
322  */
323 QCWX.prototype.getNetworkType = function(callback) {
324     var self = this;
325     if (!self.ready) {
326         console.error('尚未初始化完成');
327         return;
328     }
329     wx.getNetworkType({
330         success: function(res) {
331             if (callback) callback(res.networkType);
332         }
333     });
334 };
335
336 /**
337  * 查看位置
338  */
339 QCWX.prototype.openLocation = function(lat, lng, name, address, scale, infoUrl) {
340     var self = this;
341     if (!self.ready) {
342         console.error('尚未初始化完成');
343         return;
344     }
345     lat = lat || 0;
346     lng = lng || 0;
347     scale = scale || 1;
348     name = name || '';
349     address = address || '';
350     infoUrl = infoUrl || '';
351     wx.openLocation({
352         latitude: lat,
353         longitude: lng,
354         name: name,
355         address: address,
356         scale: scale,
357         infoUrl: infoUrl
358     });
359 };
360
361 /**
362  * 获取当前位置
363  * @param {string} type - 'wgs84'(默认),'gcj02'(火星坐标)
364  * 返回的结果中,包含如下信息:
365  *   latitude
366  *   longitude
367  *   speed
368  *   accuracy
369  */
370 QCWX.prototype.getLocation = function(type, callback) {
371     var self = this;
372     if (!self.ready) {
373         console.error('尚未初始化完成');
374         return;
375     }
376     type = type || 'wgs84';
377     wx.getLocation({
378         type: type,
379         success: callback
380     });
381 };
382
383 /**
384  * 微信扫一扫
385  */
386 QCWX.prototype.scanQRCode = function(needResult, callback) {
387     var self = this;
388     if (!self.ready) {
389         console.error('尚未初始化完成');
390         return;
391     }
392     wx.scanQRCode({
393         needResult: needResult,
394         scanType: ["qrCode","barCode"],
395         success: function(res) {
396             if (callback) callback(res.resultStr);
397         }
398     });
399 };
400
401 /**
402  * 关闭当前网页
403  */
404 QCWX.prototype.closeWindow = function() {
405     var self = this;
406     if (!self.ready) {
407         console.error('尚未初始化完成');
408         return;
409     }
410     wx.closeWindow();
411 };
412
413 /**
414  * 微信支付
415  */
416 QCWX.prototype.chooseWXPay = function() {
417     // 后续增加
418 };
而QcWeChat.js脚本的主要功能是微信登录、配置游戏服务器存放的域名、获取登录用户的信息等,脚本代码如下:
  1 var QcWeChat = qc.defineBehaviour('qc.QcWeChat', qc.Behaviour, function() {
  2     var self = this;
  3
  4     qc.qcWeChat = this;
  5
  6     /**
  7      * @property {string} shareAppId - 用于分享的微信公众号的appid
  8      */
  9     self.shareAppId = '';
 10
 11     /**
 12      * @property {string} gameName - 游戏名字
 13      */
 14     self.gameName = '';
 15
 16     /**
 17      * @property {string} wxAppId - 用于登录的微信公众号的appid
 18      */
 19     self.wxAppId = '';
 20
 21     /**
 22      * @property {string} webAppId - 网站应用的appid
 23      */
 24     self.webAppId = '';
 25
 26     /**
 27      * @property {string} domain
 28      *  域名(存放php文件的域名地址,例如:http://engine.zuoyouxi.com/wx/)
 29      *  域名最后面以 '/' 结束
 30      */
 31     self.domain = '';
 32
 33     /**
 34      * @property {string} gameDomain
 35      *   游戏服务器存放的域名(即放game_client文件的域名地址)
 36      *   例如: http://engine.zuoyouxi.com/teris/
 37      */
 38     self.gameDomain = '';
 39
 40     /**
 41      * @property {string} extendParams
 42      *   微信登录时的扩展参数,格式为json字符串,可用于传递一些自定义信息
 43      *   例如: {"game":1}
 44      */
 45     self.extendParams = '';
 46
 47     /**
 48      * @property {boolean} redirectCurrentUrl
 49      *   = true:使用游戏页直接换取code。当在微信公众号后台配置了游戏域名(gameDomain)为回调地址时采用
 50      *   = false:使用this.domain + 'code.php'作为接收code的回调页,之后再跳转到本页面。当微信公众号后台配置的是domain时采用
 51      *            这种情况下,游戏的域名和公众号后台配置的可以是不一样的,并且多个游戏可以共用一个公众号的信息。缺点是浏览器会有两次跳转
 52      */
 53     self.redirectCurrentUrl = true;
 54
 55     /**
 56      * @property {boolean} debug - 微信接口的debug是否打开,在发布时一定要关闭哦
 57      */
 58     self.debug = false;
 59
 60     /**
 61      * 微信分享的接口实例
 62      */
 63     self.wx = new qc.QCWX();
 64     window.QcWx = self.wx;
 65
 66     /**
 67      * @property {qc.Signal} onInitWx - 初始化微信成功
 68      */
 69     self.onInitWx = new qc.Signal();
 70
 71     /**
 72      * @property {qc.Signal} onStartLogin - 开始登录的事件
 73      */
 74     self.onStartLogin = new qc.Signal();
 75
 76     /**
 77      * @property {qc.Signal} onLogin - 登录成功/失败的事件
 78      */
 79     self.onLogin = new qc.Signal();
 80
 81     /**
 82      * @property {qc.Signal} sessionExpired - 会话过期的事件
 83      */
 84     self.sessionExpired = new qc.Signal();
 85
 86     /**
 87      * @type {qc.Signal} onShare - 用户点击分享的事件
 88      */
 89     self.onShare = new qc.Signal();
 90
 91     /**
 92      * @property {object} user - 微信的用户信息
 93      * @readonly
 94      */
 95     self.user = null;
 96
 97     /**
 98      * @property {string} status - 当前的登录状态
 99      *   loggingIn - 登录中
100      *   loggedIn - 已登录
101      *   expired - 会话过期
102      */
103     self.status = '';
104
105     /**
106      * @property {string} shareLink - 分享链接地址
107      */
108     self.shareLink = "";
109
110     /**
111      * @property {object} _shareBody - 分享的内容
112      */
113     self._shareBody = null;
114
115     /**
116      * @property {boolean} shareSignSuccess - 获取分享签名状态
117      */
118     self.shareSignSuccess = false;
119
120     /**
121      * @property {string} shareDir - 分享链接的目录
122      */
123     self.shareDir = "";
124
125 }, {
126     gameName: qc.Serializer.STRING,
127     shareAppId: qc.Serializer.STRING,
128     wxAppId: qc.Serializer.STRING,
129     webAppId: qc.Serializer.STRING,
130     domain: qc.Serializer.STRING,
131     gameDomain: qc.Serializer.STRING,
132     shareDir: qc.Serializer.STRING,
133     redirectCurrentUrl: qc.Serializer.BOOLEAN,
134     debug: qc.Serializer.BOOLEAN
135 });
136 //QcWeChat.__menu = 'Plugins/QcWeChat';
137
138 // 初始化处理
139 QcWeChat.prototype.awake = function() {
140     // 请求签名信息
141     var self = this;
142     if (!self.domain) return;
143
144     var url = self.domain + 'index.php?cmd=sign&appid=' + self.shareAppId + '&url=' + encodeURIComponent(window.location.href);
145     self.game.log.trace('开始请求微信分享的签名信息:{0}', url);
146     qc.AssetUtil.get(url, function(r) {
147         self.game.log.trace('获取签名成功:' + r);
148         self.parseSign(r);
149     }, function() {
150         console.error('获取签名信息失败');
151     });
152
153     // 加载js库
154     self.loadWXLib();
155
156     // 获取code
157     self._code = this.getParam('code');
158
159     self._state = this.getParam('state');
160     if (self._code && (self.isWeChat() || this.game.device.desktop)) {
161         // 请求换取token,如果失败需要重新请求登录
162         self.status = 'loggingIn';
163         self.game.timer.add(1, function() {
164             self.requestToken(self._code);
165         });
166     }
167 };
168
169 // 析构的处理
170 QcWeChat.prototype.onDestroy = function() {
171     if (this.timer) {
172         this.game.timer.remove(this.timer);
173     }
174 };
175
176 /**
177  * 请求微信登录
178  */
179 QcWeChat.prototype.login = function() {
180     //if (this.isWeChat()) {
181     if (!this.game.device.desktop) {
182         this.loginInWX();
183         return;
184     }
185     this.loginInWeb();
186 };
187
188 /**
189  * 调用微信授权
190  * @private
191  */
192 QcWeChat.prototype._gotoAuth = function() {
193     var url = '',
194         redirectUri = window.location.origin + window.location.pathname;
195     if (this.redirectCurrentUrl) {
196         url = "https://open.weixin.qq.com/connect/oauth2/authorize?" +
197             "appid=" + this.wxAppId +
198             "&redirect_uri=" + encodeURIComponent(redirectUri) +
199             "&response_type=code&scope=snsapi_userinfo&state=weixin#wechat_redirect";
200     }
201     else {
202         // 跳转到code.php页面,再跳转回本页面
203         url = "https://open.weixin.qq.com/connect/oauth2/authorize?" +
204             "appid=" + this.wxAppId +
205             "&redirect_uri=" + encodeURIComponent(this.domain + 'code.php') +
206             "&response_type=code&scope=snsapi_userinfo" +
207             "&state=" + encodeURIComponent(redirectUri) +
208             "#wechat_redirect";
209     }
210     window.location.href = url;
211 }
212 // 微信内登陆
213 QcWeChat.prototype.loginInWX = function() {
214     // 如果在微信浏览器上
215     if (this.isWeChat()) {
216         this.requestToken(this._code);
217         return;
218     }
219     this._gotoAuth();
220 };
221
222 // 微信外登录
223 QcWeChat.prototype.loginInWeb = function() {
224     var url = '',
225         redirectUri = window.location.origin + window.location.pathname;
226     if (this.redirectCurrentUrl) {
227         url = "https://open.weixin.qq.com/connect/qrconnect?" +
228             "appid=" + this.webAppId +
229             "&redirect_uri=" + encodeURIComponent(redirectUri) +
230             "&response_type=code&scope=snsapi_login&state=pc#wechat_redirect";
231     }
232     else {
233         // 跳转到code.php页面,再跳转回本页面
234         url = "https://open.weixin.qq.com/connect/qrconnect?" +
235             "appid=" + this.webAppId +
236             "&redirect_uri=" + encodeURIComponent(this.domain + 'code.php') +
237             "&response_type=code&scope=snsapi_login" +
238             "&state=" + encodeURIComponent(redirectUri) +
239             "#wechat_redirect";
240     }
241     window.location.href = url;
242 };
243
244 // 解析签名信息
245 QcWeChat.prototype.parseSign = function(r) {
246     var self = this;
247     var sign = JSON.parse(r);
248     self.timeStamp = sign.timestamp;
249     self.nonceStr = sign.nonceStr;
250     self.signature = sign.signature;
251     self.shareLink = sign.shareLink;
252     //window.QcWx.shareLink = self.shareLink;
253
254     if (!self.jweixin) {
255         // 微信接口尚未载入,延迟继续检测
256         self.game.timer.add(500, function() {
257             self.parseSign(r);
258         });
259         return;
260     }
261
262     // 调用微信的初始化接口
263     self.game.log.trace('开始初始化微信接口');
264     self.wx.debug = self.debug;
265     self.wx.init({
266         timeStamp: self.timeStamp,
267         nonceStr: self.nonceStr,
268         signature: self.signature,
269         appId: self.shareAppId
270     }, function() {
271         self.game.log.trace('初始化微信接口完成。');
272         self.shareSignSuccess = true;
273         self.wx.share(self.onShare);
274         self.onInitWx.dispatch();
275     });
276 };
277
278 // 动态加载wx的库
279 QcWeChat.prototype.loadWXLib = function() {
280     var self = this;
281     var src = "http://res.wx.qq.com/open/js/jweixin-1.0.0.js";
282     var js = document.createElement('script');
283     js.onerror = function() {
284         console.error('加载jweixin库失败');
285     };
286     js.onload = function() {
287         // 标记加载完成了
288         self.game.log.trace('微信接口下载完成');
289         self.jweixin = true;
290     };
291     js.setAttribute('src', src);
292     js.setAttribute('type', 'text/javascript');
293     document.getElementsByTagName('head')[0].appendChild(js);
294 };
295
296 // 当前是否运行在微信客户端
297 QcWeChat.prototype.isWeChat = function() {
298     var ua = window.navigator.userAgent.toLowerCase();
299     return ua.match(/MicroMessenger/i) == 'micromessenger';
300 };
301
302 // 获取url的参数
303 QcWeChat.prototype.getParam = function(key) {
304     var r = new RegExp("(\?|#|&)" + key + "=([^&#]*)(&|#|$)");
305     var m = location.href.match(r);
306     return decodeURIComponent(!m ? "" : m[2]);
307 };
308
309 // 使用code换取token
310 QcWeChat.prototype.requestToken = function(code) {
311     //this.gameName = "Koala";
312     var self = this,
313         url = self.gameDomain + "login03.php?code=" + code + "&gameName=" + self.gameName;
314     //if (!self.isWeChat()) url += "&web=1";
315     if (this.game.device.desktop) url += "&web=1";
316
317     self.onStartLogin.dispatch();
318     qc.AssetUtil.get(url, function(r) {
319         var data = JSON.parse(r);
320         if (data.error) {
321             if (data.errorCode && data.errorCode == 301) {
322                 // 跳转到授权页面
323                 if (self.game.device.desktop) {
324                     self.loginInWeb();
325                     return;
326                 }
327                 self._gotoAuth();
328                 return;
329             }
330
331             // 换取token失败,重新请求登录
332             self.game.log.error('换取token失败,重新请求登录');
333             // 登陆失败 不重新登陆
334             //self.login();
335             self.onLogin.dispatch("fail");
336             return;
337         }
338
339         // 登录成功了,抛出事件
340         self.game.log.trace('登录成功:{0}', r);
341         self.status = 'loggedIn';
342         self.user = data;
343         self.onLogin.dispatch("success");
344
345         // 定期刷新access_token,并保持会话
346         self.timer = self.game.timer.loop(5 * 60000, self.refreshToken, self);
347     }, function(r) {
348         self.onLogin.dispatch("fail");
349     });
350 };
351
352 // 刷新token
353 QcWeChat.prototype.refreshToken = function() {
354     var self = this,
355         url = self.gameDomain + "refresh.php";
356     //if (!self.isWeChat()) url += "?web=1";
357     if (this.game.device.desktop) url += "?web=1";
358     qc.AssetUtil.get(url, function(r) {
359         var data = JSON.parse(r);
360         if (data.error) {
361             // 刷新token失败了,抛出事件
362             self.status = 'expired';
363             self.game.timer.remove(self.timer);
364             delete self.timer;
365             self.sessionExpired.dispatch();
366             return;
367         }
368
369         // 成功了,啥也不用处理
370         self.game.log.trace('刷新Access Token成功。');
371     });
372 };
将该脚本挂载到"欢迎界面"节点,挂载完成后如下图所示:
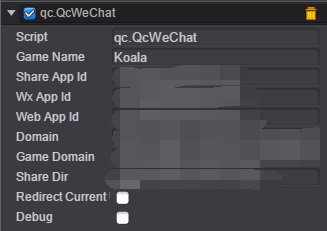
其中Share App Id为用于分享的微信公众号的appid,Wx App Id 为用于登录的微信公众号的appid,Web App Id为网站应用的appid,Domain为域名,Game Domain为游戏服务器存放的域名,更多详细信息可查看《微信》。
六、游戏界面
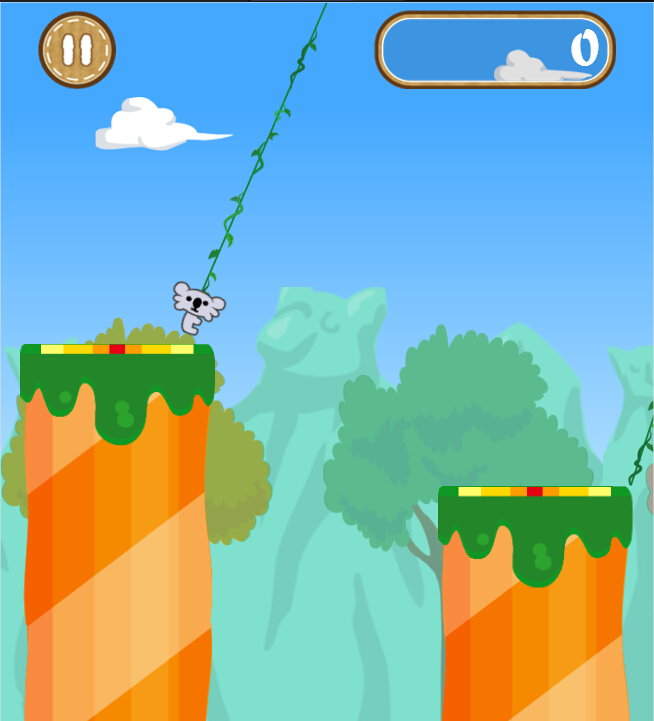
在前面我们已经搭建好了开始界面,接下来我们需要进入游戏界面。游戏界面我是这样构思的,游戏运行时,在登录界面(即欢迎界面),游戏界面是不显示的,点击"快速登录"按钮才让游戏界面显示出来,此时相应的将开始界面隐藏。这个比较好实现,只要设置对象的visible属性即可完成。首先我们来介绍游戏界面的布局,游戏界面的效果图如下:
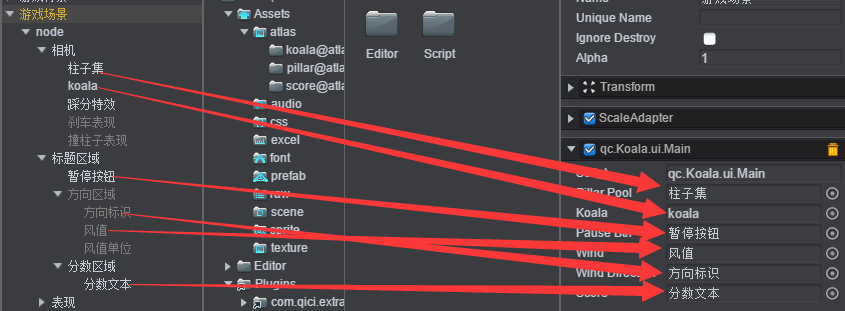
为了与"游戏场景"节点及"登录界面(欢迎界面)"节点分离出来,我又新创建了一个UIRoot节点取名"游戏场景","游戏场景"节点下的子节点如下所示:

在"游戏场景"节点下创建node/相机,node节点与相机节点(node与相机节点都是Empty Node)的节点属性值设置如下:
下图分别为node节点与相机节点的属性值:


这样做的目的是,悠悠考拉是一个无尽的虚拟世界,世界的宽度不限。在游戏中,为了让考拉一直处于屏幕中,即屏幕一直跟随考拉,此时采用相机。在游戏界面的效果图我们可以看到有柱子、秋千、考拉、暂停按钮及得分显示区域。下面一一介绍:
6.1 柱子
柱子:根据策划要求,在悠悠考拉游戏中,有关卡概念,在不同的关卡,柱子的粗细是不同的,并且考拉跳的柱子(跳台)高度也不尽相同,而且考拉跳到柱子上时有个得分区域,降落离中心区域越近就得分越高。如果将这些数据配置在程序中的话,将不便于修改及查看,故我将这些数据配置在Excel表格中,需要说明的是,我在Excel表格中配置了两张sheet表,分别为config、pillar表,其中config中的配置的柱子数据为默认数据,pillar表中的数据为关卡数据会根据config中默认数据作相应改变,具体如表所示:
config表:

表中#为注释,其余数据按字面意思即可知道,需要说明的是pillarTopMin是指三根柱子的父亲节点(游戏中我使用三根柱子循环移动),pillarTopMax是指跳台的高度(即考拉降落的柱子),pillarHeadIcon是指柱帽默认图片资源名称。
pillar表:
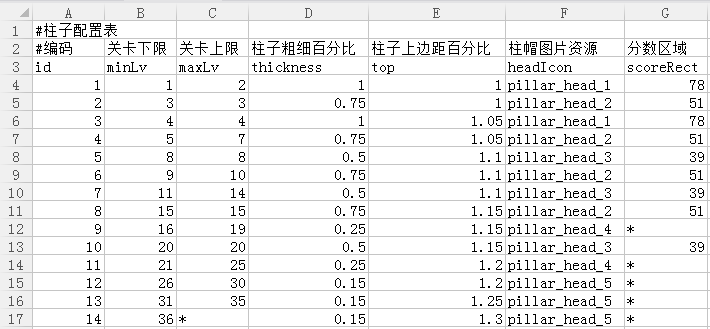
其中minLv与maxLv为关卡等级,看字面意思应该可以理解。thickness为柱子粗细百分比,在游戏中,是这样计算的,比如关卡等级为3级,则柱子的宽度为0.75*200(config表中的柱子默认宽度),而top表示柱子上边距百分比,如关卡等级为3级,则跳台的高度为1*510(config表中的跳台默认高度),而headIcon为柱帽对应柱子粗细的图片资源名称,scoreRect为得分区域。
配置了这些数据后,我们需要将这些数据利用代码读取出来并存放到数组中,以便我们在游戏中读取。首先解析config sheet表数据,在Scripts/logic文件夹下创建脚本:Config.js,代码如下:
 1 var Config = qc.Koala.logic.Config = function(excel) {
 2     if (!excel) {
 3         excel = qc.Koala.game.assets.load('config');
 4     }
 5
 6     var sheet = excel.findSheet('config');
 7     if (sheet) {
 8         sheet.rows.forEach(function(row) {
 9             var val = row.value;
10             if (row.type === 'number')
11                 val *= 1;
12             this[row.key] = val;
13         }, this);
14     }
15 };
然后我们也需要解析pillar sheet表数据,在Scripts/login文件夹下创建脚本:Pillar.js,代码如下:
 1 var PillarInfo = function(row) {
 2     this.id = row.id * 1;
 3     this.minLv = row.minLv * 1;
 4     this.maxLv = row.maxLv * 1 || Infinity;
 5     this.thickness = row.thickness * 1;
 6     this.top = row.top * 1;
 7     this.headIcon = row.headIcon;
 8     this.scoreRect = row.scoreRect * 1 || Infinity;
 9 };
10
11 var Pillar = qc.Koala.logic.Pillar = function(excel) {
12     // 柱子信息列表
13     this.infoList = [];
14
15     // 关卡与柱子粗细值对应表
16     this.infoMap = {};
17
18     if (!excel) {
19         excel = qc.Koala.game.assets.load('config');
20     }
21
22     var sheet = excel.findSheet('pillar');
23     if (sheet) {
24         sheet.rows.forEach(function(row) {
25             this.infoList.push(new PillarInfo(row));
26         }, this);
27     }
28 };
将Pillar类与Config类实例化,在入口脚本Koala.js的Koala.initLogic方法中加入代码,如下:
 1 Koala.initLogic = function(excel, game) {
 2
 3     // 设置游戏对象引用
 4     this.game = game;
 5
 6     // 设置游戏帧率为60帧
 7     game.time.frameRate = 60;
 8
 9     // 初始化系统配置
10     this.logic.config = new qc.Koala.logic.Config(excel);
11
12     // 游戏相关数据逻辑类
13     this.logic.me = new qc.Koala.logic.Me();
14
15     // 柱子相关逻辑类
16     this.logic.pillar = new qc.Koala.logic.Pillar(excel);
17
18 };
根据策划要求,希望在游戏中能够模拟现实世界,考拉在荡秋千的时候会有风速,风速对考拉的速度是会有影响的,而且随着关卡的不同其风速也不相同,故我们也可以将这些数据配置到Excel表中,如下:

表中的数据不难理解,由表中配置的数据我们可知,在关卡等级1-3级是没有风速的,其它等级风速则是随着关卡等级的越大相应增大。此时我们也需要创建脚本用于解析风速(wind sheet表),在Scripts/logic文件夹下创建脚本:Wind.js,代码如下:
 1 var WindInfo = function(row) {
 2     this.id = row.id * 1;
 3     this.minLv = row.minLv * 1;
 4     this.maxLv = row.maxLv * 1 || Infinity;
 5     this.minWind = row.minWind * 1;
 6     this.maxWind = row.maxWind * 1;
 7 };
 8
 9 var Wind = qc.Koala.logic.Wind = function(excel) {
10     // 风力信息列表
11     this.infoList = [];
12
13     // 风力范围速查表
14     this.infoMap = {};
15
16     if (!excel) {
17         excel = qc.Koala.game.assets.load('config');
18     }
19
20     var sheet = excel.findSheet('wind');
21     if (sheet) {
22         sheet.rows.forEach(function(row) {
23             this.infoList.push(new WindInfo(row));
24         }, this);
25     }
26 };
同样地,我们也需要在入口脚本Koala.js的Koala.initLogic方法中加入代码,将Wind类实例化,代码如下:
 1 Koala.initLogic = function(excel, game) {
 2
 3     // 设置游戏对象引用
 4     this.game = game;
 5
 6     // 设置游戏帧率为60帧
 7     game.time.frameRate = 60;
 8
 9     // 初始化系统配置
10     this.logic.config = new qc.Koala.logic.Config(excel);
11
12     // 游戏相关数据逻辑类
13     this.logic.me = new qc.Koala.logic.Me();
14
15     // 柱子相关逻辑类
16     this.logic.pillar = new qc.Koala.logic.Pillar(excel);
17
18     // 风力值逻辑类
19     this.logic.wind = new qc.Koala.logic.Wind(excel);
20
21 };
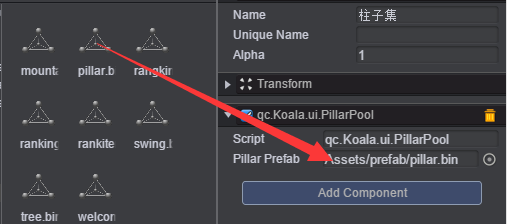
在前面我们将柱子做成了预制,此时可以直接拿来用,游戏中使用三个柱子循环移动位置。在"相机"节点下创建一个Empty Node取名"柱子集",游戏中产生的柱子将直接挂载该节点下。需要说明的是游戏时秋千与柱子是成对出现的,故我们也可以将秋千弄成预制,秋千的预制取名为"swing"。思路是,在创建柱子的同时也创建秋千,故我们可以在柱子及秋千上分别挂载脚本。需要说明的是,将Config类、Pillar类实例化后,我们可以在入口脚本中的Koala.initLogic方法中添加一个事件派发this.onLogicReady.dispatch(),而相应地我们可以在"柱子集"节点上挂载一个脚本,用于监听事件派发,创建柱子,脚本代码如下:
 1 // 柱子池
 2 var PillarPool = qc.defineBehaviour('qc.Koala.ui.PillarPool', qc.Behaviour, function() {
 3     this.pillarList = [];
 4 }, {
 5     // 柱子预制
 6     pillarPrefab : qc.Serializer.PREFAB
 7 });
 8
 9 PillarPool.prototype.awake = function() {
10     this.addListener(qc.Koala.onLogicReady, this._init, this);
11 };
12
13 /**
14  * 初始化柱子
15  */
16 PillarPool.prototype._init = function() {
17     // 设置柱子池高度
18     this.gameObject.top = qc.Koala.logic.config.pillarTopMin;
19
20     var prePillar = null;
21     for (var i = 0; i < 3; i++) {
22         var pillar = this.pillarList[i] || this.createPillar();
23         if (prePillar) {
24             pillar.init(prePillar, i);
25         }
26         else {
27             pillar.init(null, i);
28         }
29         prePillar = pillar;
30         this.pillarList[i] = pillar;
31     }
32
33     qc.Koala.onPillarReady.dispatch(this.pillarList);
34 };
35
36 /**
37  * 创建柱子
38  */
39 PillarPool.prototype.createPillar = function() {
40     var node = this.game.add.clone(this.pillarPrefab, this.gameObject);
41     return node.getScript('qc.Koala.ui.Pillar');
42 };
将该脚本挂载到"柱子集"节点上,将柱子预制拖入对对应属性值,如下图:
柱子预制脚本:我们在上面的柱子配置表可以看出不同的关卡等级,柱子的粗细不尽相同,故我们可以创建一个脚本用于在不同的关卡等级正确的显示柱子,在Scripts/ui文件夹下创建脚本:Pillar.js,该脚本的主要功能是初始化柱子本身及创建秋千对象,代码如下:
 1 // 柱子类
 2 var Pillar = qc.defineBehaviour('qc.Koala.ui.Pillar', qc.Behaviour, function() {
 3     this.swing = null;
 4
 5     // 分数区域
 6     this.scoreRect = Infinity;
 7 }, {
 8     // 秋千预制
 9     swingPrefab : qc.Serializer.PREFAB,
10     // 柱子背景
11     bg : qc.Serializer.NODE,
12     // 柱头
13     head : qc.Serializer.NODE
14 });
15
16 /**
17  * 初始化柱子
18  * @param  {number} start - 上一个柱子的x轴坐标
19  */
20 Pillar.prototype.init = function(prePillar, level) {
21     // 获取柱子的宽度和上边距信息
22     var info = qc.Koala.logic.pillar.getInfo(level);
23     this.gameObject.width = info.thickness;
24
25     // 初始化分数区域
26     this.scoreRect = info.scoreRect;
27
28     // 初始化柱子背景
29     this.initBg(info.thickness);
30
31     // 初始化柱帽
32     this.initHead(info.headIcon);
33
34     // 设置柱子的上边距和左边距
35     this.gameObject.y = info.top - this.gameObject.parent.y;
36     if (prePillar == null) {
37         this.gameObject.x = 0;
38     }
39     else {
40         this.gameObject.x = prePillar.gameObject.x + qc.Koala.GAMEWIDTH - this.gameObject.width;
41         this.gameObject.y += prePillar.gameObject.y;
42     }
43
44     // 创建秋千对象
45     if (!this.swing)
46         this.swing = this.createSwing();
47
48     // 初始化秋千
49     this.initSwing();
50 };
51
52 /**
53  * 初始化柱子背景
54  * @param  {number} width - 柱子宽度
55  */
56 Pillar.prototype.initBg = function (width) {
57     var nativeWidth = this.bg.nativeSize.width,
58         ratio = width / nativeWidth,
59         bottom = this.bg.parent.height * (1 - ratio),
60         right = nativeWidth * (1 - ratio);
61     this.bg.scaleX = this.bg.scaleY = ratio;
62     this.bg.bottom = -bottom;
63     this.bg.right = -right;
64 };
65
66 /**
67  * 初始化柱帽图片资源
68  * @param  {string} headIcon - 柱帽图片资源名称
69  */
70 Pillar.prototype.initHead = function (headIcon) {
71     this.head.frame = headIcon + '.png';
72 };
73
74 /**
75  * 创建秋千对象
76  * @return {qc.Koala.ui.Swing}
77  */
78 Pillar.prototype.createSwing = function() {
79     var node = this.game.add.clone(this.swingPrefab, this.gameObject.parent.parent);
80     return node.getScript('qc.Koala.ui.Swing');
81 };
82
83 /**
84  * 初始化秋千
85  */
86 Pillar.prototype.initSwing = function() {
87     this.swing.init(this);
88 };
将该脚本挂载到柱子预制上,并将秋千预制拖入到对应的属性,其中Bg、Head为柱子躯干及柱头,如下图:

可是我们刚才配置的柱子数据全部保存在Scripts/logic文件夹中的Pillar类中,在Scripts/ui文件夹下的Pillar.js怎么才能获取正确的柱子信息呢?我们可以这样做,在Scripts/logic文件夹中的Pillar类中加入方法,通过Scripts/ui文件夹下Pillar.js提供的参数level从而查询配置表返回相应关卡等级的柱子信息,代码如下:
 1 var PillarInfo = function(row) {
 2     this.id = row.id * 1;
 3     this.minLv = row.minLv * 1;
 4     this.maxLv = row.maxLv * 1 || Infinity;
 5     this.thickness = row.thickness * 1;
 6     this.top = row.top * 1;
 7     this.headIcon = row.headIcon;
 8     this.scoreRect = row.scoreRect * 1 || Infinity;
 9 };
10
11 var Pillar = qc.Koala.logic.Pillar = function(excel) {
12     // 柱子信息列表
13     this.infoList = [];
14
15     // 关卡与柱子粗细值对应表
16     this.infoMap = {};
17
18     if (!excel) {
19         excel = qc.Koala.game.assets.load('config');
20     }
21
22     var sheet = excel.findSheet('pillar');
23     if (sheet) {
24         sheet.rows.forEach(function(row) {
25             this.infoList.push(new PillarInfo(row));
26         }, this);
27     }
28 };
29
30 /**
31  * 获取柱子粗细值
32  * @return {number}
33  */
34 Pillar.prototype.getInfo = function(level) {
35     var info = this.infoMap[level];
36     if (!info) {
37         var p = this._find(level);
38         info = {
39             thickness : qc.Koala.logic.config.pillarWidth,
40             top : qc.Koala.logic.config.pillarTopMin,
41             headIcon : qc.Koala.logic.config.pillarHeadIcon,
42             scoreRect : Infinity
43         };
44         if (p) {
45             info.thickness *= p.thickness;
46             info.top = p.top * qc.Koala.logic.config.pillarTopMax;
47             info.headIcon = p.headIcon;
48             info.scoreRect = p.scoreRect;
49         }
50         this.infoMap[level] = info;
51     }
52     return info;
53 };
54
55 /**
56  * 遍历获取柱子粗细百分比
57  * @param  {number} level - 关卡数
58  * @return {number}
59  */
60 Pillar.prototype._find = function(level) {
61     for (var i = 0, len = this.infoList.length; i < len; i++) {
62         var info = this.infoList[i];
63         if (level < info.minLv)
64             continue;
65         if (level >= info.minLv && level <= info.maxLv)
66             return info;
67     }
68     return null;
69 };
6.2 秋千
秋千:在游戏中,当考拉还没有抓住秋千时,秋千是有一个初始的状态。考拉抓住秋千时,秋千要做摇摆运动,摇摆运动我们可以使用引擎提供的TweenRotation动画,效果图分别如下所示:
考拉没有抓住秋千时,秋千的状态效果图:
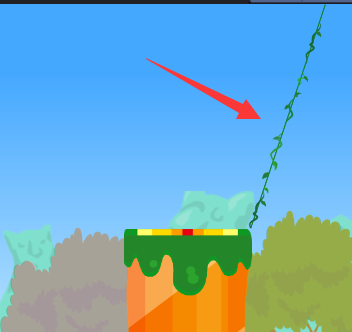
考拉抓住秋千时,秋千的效果图:

为了实现这两种效果,我们可以根据秋千对应的柱子确定秋千的位置及旋转的角度。首先挂载一个TweenRotation动画,如下图所示:
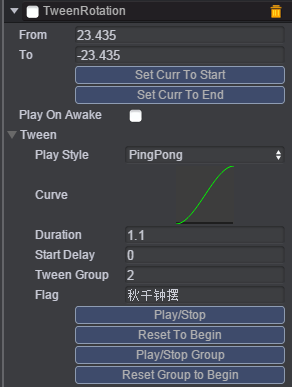
该TweenRotation动画主要的功能是让秋千做摇摆运动,其中From值与To值是根据秋千对应的柱子所决定的,设置其Play Style为PingPong(来回播放),持续时间是1.1秒,更多关于Tween动画属性可参看《Tween动画》。
为了实现上述的效果,我们可以通过脚本来控制,在Scripts/ui文件夹下创建脚本:Swing.js,将该脚本挂载到"swing"节点上,脚本代码如下:
 1 var Swing = qc.defineBehaviour('qc.Koala.ui.Swing', qc.Behaviour, function() {
 2     // 秋千最大摆角
 3     this._maxRotation = 0;
 4
 5     // 方向
 6     this.direction = 1;
 7
 8     this.deltaRotation = Math.PI / 180 * 5;
 9
10     this.beginRotation = 0;
11 }, {
12 });
13
14 Object.defineProperties(Swing.prototype, {
15     /**
16      * 秋千最大摆角
17      * @type {number}
18      */
19     maxRotation : {
20         get : function() { return this._maxRotation; },
21         set : function(v) {
22             if (this._maxRotation === v) return;
23
24             this._maxRotation = v;
25
26             var s = this.gameObject.getScript('qc.TweenRotation');
27             s.from = v;
28             s.to = -v;
29         }
30     }
31 });
32
33 /**
34  * 初始化
35  */
36 Swing.prototype.awake = function() {
37     var s = this.gameObject.getScript('qc.TweenRotation');
38     this.addListener(s.onLoopFinished, this._onSwingFinished, this);
39 };
40
41 /**
42  * 钟摆循环结束后,更新方向值
43  */
44 Swing.prototype._onSwingFinished = function() {
45     this.direction *= -1;
46 };
47
48 /**
49  * 初始化秋千
50  * @param  {qc.Koala.ui.Pillar} pillar - 柱子对象
51  */
52 Swing.prototype.init = function(pillar) {
53     this.gameObject.anchoredX = pillar.gameObject.x;
54     this.gameObject.y = pillar.gameObject.y;
55
56     // 计算三角形的宽高
57     var height = pillar.gameObject.parent.y;
58     var width = qc.Koala.GAMEWIDTH * 0.5 - pillar.gameObject.width;
59
60     // 计算秋千最大摆角
61     this.beginRotation = Math.atan(width / height);
62
63     this.maxRotation = this.beginRotation + this.deltaRotation;
64
65     this.gameObject.height = Math.sqrt(width * width + height * height);
66
67     // 重置秋千位置
68     this.reset();
69 };
70
71 /**
72  * 播放钟摆动画
73  * @param  {boolean} con - 是否从上一次暂停的地方开始播放
74  */
75 Swing.prototype.play = function(con) {
76     if (!con)
77         qc.Tween.resetGroupToBeginning(this.gameObject, 2);
78     qc.Tween.playGroup(this.gameObject, 2);
79 };
80
81 /**
82  * 停止钟摆动画
83  */
84 Swing.prototype.stop = function () {
85     qc.Tween.stopGroup(this.gameObject, 2);
86 };
87
88 /**
89  * 回到起点
90  */
91 Swing.prototype.reset = function() {
92     qc.Tween.stopGroup(this.gameObject, 2);
93     qc.Tween.resetGroupToBeginning(this.gameObject, 2);
94     this.gameObject.rotation = this.beginRotation;
95
96     this.direction = 1;
97 };
把柱子和秋千弄完后,我们此时就需要请出悠悠考拉游戏的主角登场了。在"相机"节点下创建一个Sprite节点取名"koala",该节点的位置是不固定的,因为在游戏中,随着柱子位置的不同,koala的位置也不同。后续在代码中会讲明。我们需要创建一个脚本:用于管理考拉的帧动画(前面我们已经讲述了制作考拉在游戏中的各种动作),在Scripts/ui下创建一个脚本:Koala.js,将该节点挂载到"koala"节点,代码如下所示:
 1 var Koala = qc.defineBehaviour('qc.Koala.ui.Koala', qc.Behaviour, function() {
 2     // 秋千对象
 3     this.swingScript = null;
 4
 5     // 考拉当前播放的动作
 6     this.currAnimation = 'stand';
 7 }, {
 8     // 相机节点
 9     camera : qc.Serializer.NODE,
10     // 特效节点
11     effect : qc.Serializer.NODE,
12     // 文本
13     labelImg : qc.Serializer.NODE,
14     // 分数
15     scoreImg : qc.Serializer.NODE,
16     // 死亡效果图片
17     dieImg : qc.Serializer.NODE,
18     // 刹车效果图片
19     brakeImg : qc.Serializer.NODE
20 });
21
22 /**
23  * 站立
24  */
25 Koala.prototype.stand = function() {
26     this.currAnimation = 'stand';
27     this.gameObject.playAnimation('stand');
28 };
29
30 /**
31  * 走
32  */
33 Koala.prototype.walk = function() {
34     // 隐藏刹车效果
35     this.brakeImg.visible = false;
36
37     this.labelImg.getScript('qc.TweenAlpha').onFinished.removeAll(this);
38
39     this.currAnimation = 'walk';
40     this.gameObject.playAnimation('walk');
41
42     var s = this.gameObject.getScript('qc.TweenPosition');
43     s.onFinished.addOnce(this.take, this);
44     s.resetToBeginning();
45     s.play();
46 };
47
48 /**
49  * 拿秋千
50  */
51 Koala.prototype.take = function() {
52     // 拿秋千动作结束后处理
53     this.gameObject.onFinished.addOnce(function() {
54         // 设置考拉在秋千上的位置
55         this.gameObject.parent = this.swingScript.gameObject;
56         this.gameObject.anchoredX = 0;
57         this.gameObject.anchoredY = 0;
58         this.gameObject.rotation = 0;
59
60         // 设置考拉状态
61         this.swing();
62
63         // 派发拿起秋千事件
64         qc.Koala.onSwingTake.dispatch();
65     }, this);
66
67     this.currAnimation = 'take';
68     // 播放拿秋千动作
69     this.gameObject.playAnimation('take');
70 };
71
72 /**
73  * 荡秋千
74  */
75 Koala.prototype.swing = function() {
76     if (qc.Koala.logic.me.paused) return;
77     this.swingScript.play(true);
78     this.currAnimation = 'swing';
79     this.gameObject.playAnimation('swing');
80 };
81
82 /**
83  * 放开秋千
84  */
85 Koala.prototype.away = function() {
86     this.gameObject.switchParent(this.camera);
87     this.gameObject.rotation = 0;
88
89     this.currAnimation = 'away';
90     this.gameObject.playAnimation('away');
91 };
标题区域:标题区域由暂停按钮、方向区域、分数区域所组成;在"node"节点下创建一个Empty Node取名"标题区域",为了让在该节点下的子节点在不同分辨率显示时,都能够正常显示。将该节点设置为向上对齐左右拉伸,故设置该节点的属性值如下:

在"标题区域"节点下依次创建暂停按钮节点、方向区域节点信息(其中方向区域由方向标识、风值、风值单位节点所构成)、分数区域节点信息。创建好后,效果图如下:

怎样得分:根据策划要求,考拉成功降落在跳台上时,作相应的加分,这里的相应加分,是在前面的柱子pillar sheet配置表中,我们配置了scoreRect(得分区域),如果考拉降落到柱子上时,离柱子中心区域越近则得分越高,而且策划还要求要有加分图标及特效效果,同样地我们也可以将这些数据配置到前面的Excel表中,在前面的Excel表中加入一个sheet表命名score,配置的数据如下:
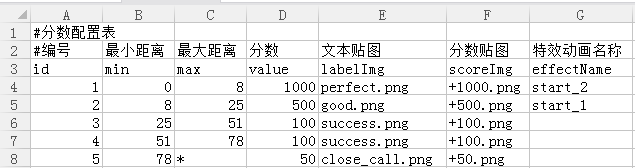
其中表格中的min与max表示考拉成功降落时离柱子中心的距离从而做相应的加分及贴图,其中labelImg、scoreImg为图片资源的名称,而effectName为特效动画名称。同样地我们也需要创建一个脚本用于解析该表,在Scripts/logic文件夹下创建脚本:Score.js,脚本代码如下:
 1 var ScoreInfo = function(row) {
 2     this.id = row.id * 1;
 3     this.min = row.min * 1;
 4     this.max = row.max * 1;
 5     this.value = row.value * 1;
 6
 7     this.scoreImg = row.scoreImg;
 8     this.labelImg = row.labelImg;
 9
10     this.effectName = row.effectName;
11 };
12
13 var Score = qc.Koala.logic.Score = function(excel) {
14     // 分数信息列表
15     this.infoList = [];
16
17     // 默认的分数信息
18     this.defaultInfo = null;
19
20     if (!excel) {
21         excel = qc.Koala.game.assets.load('config');
22     }
23
24     var sheet = excel.findSheet('score');
25     if (sheet) {
26         sheet.rows.forEach(function(row) {
27             this.infoList.push(new ScoreInfo(row));
28         }, this);
29     }
30 };
实例化Score类,在入口脚本Koala.js的Koala.initLogic方法中加入代码,如下:
 1 Koala.initLogic = function(excel, game) {
 2
 3     // 设置游戏对象引用
 4     this.game = game;
 5
 6     // 设置游戏帧率为60帧
 7     game.time.frameRate = 60;
 8
 9     // 初始化系统配置
10     this.logic.config = new qc.Koala.logic.Config(excel);
11
12     // 游戏相关数据逻辑类
13     this.logic.me = new qc.Koala.logic.Me();
14
15     // 柱子相关逻辑类
16     this.logic.pillar = new qc.Koala.logic.Pillar(excel);
17
18     // 风力值逻辑类
19     this.logic.wind = new qc.Koala.logic.Wind(excel);
20
21     // 分数相关逻辑类
22     this.logic.score = new qc.Koala.logic.Score(excel);
23
24     // 分享相关逻辑类
25     this.logic.share = new qc.Koala.logic.Share(excel);
26
27     // 派发脚本准备就绪事件
28     this.onLogicReady.dispatch();
29 };
可是我们在游戏中怎么去获取分数呢?我们可以在Score类中提供一个接口,该接口会返回玩家所得的分数,代码如下:
 1 /**
 2  * 获取分数
 3  * @param  {number} distance - 考拉降落点到柱子中心的距离
 4  * @param  {number} scoreRect - 柱子的分数区域
 5  * @return {number}
 6  */
 7 Score.prototype.getScore = function(distance, scoreRect) {
 8     console.log('scoreRect:',scoreRect);
 9     // 如果超出分数区域,则返回游戏最小分
10     if (distance > scoreRect) {
11         if (!this.defaultInfo)
12             this.defaultInfo = {
13                 value : qc.Koala.logic.config.minScore,
14                 labelImg : qc.Koala.logic.config.labelImg,
15                 scoreImg : qc.Koala.logic.config.scoreImg
16             };
17         return this.defaultInfo;
18     }
19
20     // 通过距离计算得分
21     var info = null;
22     for (var i = 0, len = this.infoList.length; i < len; i++) {
23         info = this.infoList[i];
24         if (distance > info.min && distance <= info.max)
25             break;
26     }
27     return info;
28 };
游戏界面中的大部分节点都已经创建好了,可是怎么让考拉松手时与柱子发生碰撞呢?怎么让屏幕一直跟着考拉呢?怎么让游戏背景也跟着移动呢?。。。。等等等,接下来我就一一讲述。
物理表现:在虚拟世界中,考拉有自己的位置,水平和垂直方向上的速度。在游戏中,考拉在秋千上做钟摆运动,点击屏幕时考拉松手,需要计算它的垂直速度与水平速度,需要说明的是代码中的qc.Koala.logic.config.g是个常量,我将这个数据配置到config sheet表中,代码如下:
 1 /**
 2  * 监听点击事件
 3  */
 4 Main.prototype.onClick = function() {
 5     // 禁止交互
 6     this.gameObject.interactive = false;
 7
 8     // 关卡数加1
 9     qc.Koala.logic.me.level++;
10
11     // 计算考拉下落高度
12     var rotation = this.swing.gameObject.rotation,
13         cos = Math.cos(rotation),
14         sin = Math.sin(rotation),
15         radius = this.swing.gameObject.height,
16         h = radius * (cos - Math.cos(this.swing.maxRotation));
17
18     // 计算横向及纵向速度
19     var dir = this.swing.direction,
20         v0 = Math.sqrt(2 * qc.Koala.logic.config.g * h) * dir,
21         vx0 = v0 * cos + this.windValue,
22         vy0 = v0 * sin;
23
24
25     // 获取考拉脚本对象
26     var koalaScript = this.koala.getScript('qc.Koala.ui.Koala');
27     // 考拉放手
28     koalaScript.away();
29
30     // 获取跳台对象
31     var pool = this.pillarPool.getScript('qc.Koala.ui.PillarPool');
32     this._step = pool.getStep();
33
34     // 考拉做抛物线运动
35     this.drop(vx0, vy0);
36 };
37
38 /**
39  * 考拉脱离缰绳开始掉落
40  * @param  {number} vx0 - x方向初始速度
41  * @param  {number} vy0 - y方向初始速度
42  */
43 Main.prototype.drop = function(vx0, vy0) {
44     // 循环定时器刷新考拉位置
45     this.dropTimer = this.game.timer.loop(0, function() {
46         if (qc.Koala.logic.me.paused)
47             return;
48         // 计算纵向速度
49         var t = this.game.time.deltaTime * 0.001;
50         vy0 = vy0 + qc.Koala.logic.config.g * t;
51
52         // 考拉掉落处理
53         this._onDrop(vx0, vy0, t);
54     }, this);
55 };
56
57 /**
58  * 考拉掉落帧处理
59  * @param  {number} vx0 - 横向速度
60  * @param  {number} vy0 - 纵向速度
61  * @param  {number} t - 俩帧之间的时间间隔
62  */
63 Main.prototype._onDrop = function (vx0, vy0, t) {
64     // 计算横向和纵向偏移值
65     var preY = this.koala.y,
66         deltaX = vx0 * t,
67         deltaY = vy0 * t;
68
69     // 设置考拉位置
70     this.koala.x += deltaX;
71     this.koala.y += deltaY;
72
73     // 调整相机位置
74     this.adjustCamera(deltaX, deltaY);
75
76     // 检测碰撞
77     var result = this._checkCollide(preY);
78     if (result !== 0) {
79         // 移除定时器
80         this.game.timer.remove(this.dropTimer);
81         this.dropTimer = null;
82
83         // 成功跳到下一个站台
84         if (result === 1) {
85             this._onStep();
86         }
87
88         // 游戏结束
89         if (result < 0) {
90             this.gameOver(result);
91         }
92     }
93 };
视野移动:在游戏中,为了让考拉一直处于屏幕中,即屏幕一直跟随考拉,此时采用相机,做法是:将柱子、考拉及秋千全部挂载到相机节点下,当考拉脱离缰绳开始掉落时,利用考拉的相对位移从而去调整相机位置,代码如下:
 1  1 /**
 2  2  * 调整相机位置
 3  3  * @param  {number} deltaX - x轴偏移值
 4  4  * @param  {number} deltaY - y轴偏移值
 5  5  */
 6  6 Main.prototype.adjustCamera = function(deltaX, deltaY) {
 7  7     var camera = this.pillarPool.parent,
 8  8         step = this._step.gameObject;
 9  9     console.log('camera.x:',camera.x);
10 10     console.log('camera.y:',camera.y);
11 11     camera.x -= deltaX;
12 12     if (camera.y - deltaY < -step.y)
13 13         camera.y = -step.y;
14 14     else
15 15         camera.y -= deltaY;
16 18     // 派发调整相机位置事件
17 19     qc.Koala.onAdjustCamera.dispatch(new qc.Point(deltaX, deltaY));
18 20 };
游戏背景:在游戏中,游戏背景由白云、山、树组成,为了呈现动态效果,白云由三朵白云构成循环移动,而山、树则是根据相机的位置调整而调整。我们可以这样做,当相机调整了位置时,相应地派发一个事件,让事件接受者相应地调整山、树的位置。此时我们需要在入口脚本Koala.js代码中创建一个事件(需要说明的是,在后续的处理中,用到了很多的事件如分数改变事件、开始登录事件、游戏暂停事件、游戏结束事件等。由于事件较多,在后续的代码中我可能不会处处提到,它们的创建事件、派发事件、接收事件是一致的原理),所以,我将游戏中要用到的事件全部创建出来,读者们也可以需要用哪个事件就相应地添加哪个事件,代码如下:
 1 var Koala = qc.Koala = {
 2     ui : {},
 3     logic : {},
 4
 5     // 游戏对象
 6     game : null,
 7
 8     // 游戏宽度
 9     GAMEWIDTH : 640,
10
11     // 逻辑脚本准备就绪事件
12     onLogicReady : new qc.Signal(),
13
14     // 柱子创建完成
15     onPillarReady : new qc.Signal(),
16
17     // 游戏开始事件
18     onStart : new qc.Signal(),
19
20     // 考拉拿起秋千事件
21     onSwingTake : new qc.Signal(),
22
23     // 游戏结束事件
24     onGameOver : new qc.Signal(),
25
26     // 游戏分数发生变化事件
27     onScoreChange : new qc.Signal(),
28
29     // 游戏暂停事件
30     onPause : new qc.Signal(),
31
32     // 继续游戏事件
33     onContinue : new qc.Signal(),
34
35     // 调整相机事件
36     onAdjustCamera : new qc.Signal(),
37
38     // 相机做Tween动画事件
39     onTweenCamera : new qc.Signal(),
40
41     // 显示排行榜事件
42     showRanking : new qc.Signal(),
43
44     // 排行榜关闭事件
45     onRankingClose : new qc.Signal(),
46
47     // 登录成功事件
48     onLogin : new qc.Signal(),
49
50     // 登录中事件
51     onLogining : new qc.Signal(),
52
53     // 登录失败事件
54     onLoginFail : new qc.Signal(),
55
56     // 显示关注页面事件
57     showFollowMsg : new qc.Signal(),
58
59     // 显示分享提示页面事件
60     showShareMsg : new qc.Signal()
61 };
此时,相机已经改变了位置也派发了一个事件,我们可以在Background.js加入事件监听,从而改变山、树的位置,代码如下:
 1 var Background = qc.defineBehaviour('qc.Koala.ui.Background', qc.Behaviour, function() {
 2     // 动画播放距离
 3     this.tweenDistance = 0;
 4
 5     // 山与山之间的距离
 6     this.mountainDistance = 635;
 7
 8     // 树与树之间的距离
 9     this.treeDistance = 340;
10
11     this.mountains = [];
12
13     this.trees = [];
14
15     this.treeIcons = [ 'tree_1.bin', 'tree_2.bin', 'tree_3.bin' ];
16 }, {
17     // 云列表
18     clouds : qc.Serializer.NODES,
19     // 山峰区域
20     mountainRect : qc.Serializer.NODE,
21     // 山峰预制
22     mountainPrefab : qc.Serializer.PREFAB,
23     // 树区域
24     treeRect : qc.Serializer.NODE,
25     // 树预制
26     treePrefab : qc.Serializer.PREFAB
27 });
28
29 Background.prototype.awake = function() {
30     // 监听调整相机事件
31     this.addListener(qc.Koala.onAdjustCamera, this._adjust, this);
32
33 };
34
35 /**
36  * 调整山和树的位置
37  * @param  {qc.Point} delta - 调整的距离
38  */
39 Background.prototype._adjust = function(delta) {
40     var x = delta.x, y = delta.y,
41         width = this.gameObject.width;
42
43     // 更新山的位置
44     var mX = x * qc.Koala.logic.config.mountainCoef,
45         mY = y * qc.Koala.logic.config.mountainCoef,
46         mLen = this.mountains.length;
47     this.mountains.forEach(function(m, index) {
48         m.x -= mX;
49         if (m.x <= -this.mountainDistance)
50             m.x += this.mountainDistance * mLen;
51     }, this);
52
53     // 更新树的位置
54     var tX = x * qc.Koala.logic.config.treeCoef,
55         tY = y * qc.Koala.logic.config.treeCoef,
56         treeLen = this.trees.length;
57     this.trees.forEach(function(t, index) {
58         t.x -= tX;
59         if (t.x <= -this.treeDistance)
60             t.x += this.treeDistance * treeLen;
61     }, this);
62 };
碰撞检测:考拉松手下降的同时,需要做碰撞检测以检测它是否成功的站到柱子上,有下面几种情况:
一、考拉碰到柱子左边缘,结束游戏;
二、考拉超出游戏边界,结束游戏;
三、考拉成功落到柱子上,则相应处理;
代码如下:
 1 /**
 2  * 检测考拉是否可以站在平台上
 3  * @param  {number} preY - 考拉移动前的y轴位置
 4  * @return {number} 返回值定义如下
 5  *          1:落在跳台上;
 6  *         -1:超出游戏边界;
 7  *         -2:碰到跳台的左边缘;
 8  *          0:还在掉落
 9  */
10 Main.prototype._checkCollide = function(preY) {
11     var x = this.koala.x,
12         y = this.koala.y,
13         step = this._step.gameObject;
14
15     // 判断是否落到跳台上
16     if (x > step.x &&
17         x < step.x + step.width &&
18         preY <= step.y + step.parent.y &&
19         y >= step.y + step.parent.y)
20         return 1;
21
22     // 超出游戏边界,因为相机有跟着考拉在动,所以在这边不需要判断游戏屏幕x轴方向超边
23     if (y > this.gameObject.height + this.koala.height - this.pillarPool.parent.y)
24         return -1;
25
26     // 判断与跳台左边缘碰撞
27     if (x > step.x &&
28         x < step.x + step.width &&
29         preY > step.y + step.parent.y)
30         return -2;
31
32     return 0;
33 };
当考拉成功跳到柱子上时,我们需要更新柱子的位置(因为如果不更新柱子的位置,柱子将跟随相机到屏幕外边),代码如下:
 1 /**
 2  * 考拉成功跳到下一个站台后处理
 3  */
 4 Main.prototype._onStep = function() {
 5     var koalaScript = this.koala.getScript('qc.Koala.ui.Koala');
 6     koalaScript.fall(this._step);
 7
 8     // 矫正柱子的位置
 9     this.adjustPillar();
10
11     // 下一个跳台
12     var pool = this.pillarPool.getScript('qc.Koala.ui.PillarPool');
13     pool.next();
14
15     // 重置秋千
16     this.swing.reset();
17
18     // 更新考拉当前所在跳台和当前正在使用的秋千
19     this.startStep = this._step;
20     this.swing = this._step.swing;
21
22     // 重新获取风力值
23     this.initWind();
24 };
25 /**
26  * 跳到跳台上后,调整柱子位置
27  */
28 Main.prototype.adjustPillar = function() {
29     var camera = this.pillarPool.parent,
30         s = camera.getScript('qc.TweenPosition'),
31         step = this._step.gameObject,
32         p = new qc.Point(-step.x - camera.parent.width * 0.5, -step.y);
33     s.to = p.clone();
34     s.setCurrToStartValue();
35     s.resetToBeginning();
36     s.play();
37
38     p.subtract(s.from.x, s.from.y);
39     qc.Koala.onTweenCamera.dispatch(p);
40 };
当考拉成功降落在柱子上时,我们也需要做加分并显示在屏幕上,并飘分,如果踩中得分区域的中心点的话还会播放特效,播放特效的位置我们可以根据考拉的位置而确定,在Scripts/ui文件夹下的Koala.js中加入如下代码:
 1 /**
 2  * 掉落在跳台上
 3  * @param  {qc.Koala.ui.Pillar} pillar - 柱子对象
 4  */
 5 Koala.prototype.fall = function(pillar) {
 6     // 设置下一个秋千对象引用
 7     this.swingScript = pillar.swing;
 8
 9     // 矫正考拉在柱子上的位置,防止陷到柱子里面去
10     this.gameObject.y = pillar.gameObject.y + pillar.gameObject.parent.y;
11
12     // 将考拉挂载在柱子上
13     this.gameObject.switchParent(pillar.gameObject);
14
15     // 显示刹车效果
16     this.brakeImg.parent = this.gameObject.parent;
17     this.brakeImg.x = this.gameObject.x;
18     this.brakeImg.y = this.gameObject.y;
19     this.brakeImg.visible = true;
20
21     this.currAnimation = 'fall';
22     // 播放动作
23     this.gameObject.playAnimation('fall');
24
25     // 更新考拉走路曲线参数
26     this.updateTween(pillar);
27
28     // 加分数
29     var distance = Math.abs(this.gameObject.anchoredX);
30
31         scoreInfo = qc.Koala.logic.score.getScore(distance, pillar.scoreRect);
32     qc.Koala.logic.me.addScore(scoreInfo.value);
33
34     this.playEffect(scoreInfo.effectName);
35
36     this.playLabel(scoreInfo);
37
38     qc.Tween.resetGroupToBeginning(this.labelImg, 1);
39     qc.Tween.playGroup(this.labelImg, 1);
40
41     this.currAnimation = 'walk';
42 };
43
44 /**
45  * 播放文字效果
46  * @param  {object} info - 分数对象
47  */
48 Koala.prototype.playLabel = function (info) {
49     this.scoreImg.frame = info.scoreImg;
50     this.scoreImg.resetNativeSize();
51     this.labelImg.frame = info.labelImg;
52     this.labelImg.resetNativeSize();
53
54     this.labelImg.getScript('qc.TweenAlpha').onFinished.addOnce(this.walk, this);
55 };
56
57 /**
58  * 播放特效
59  * @param  {string} effectName - 动画名称
60  */
61 Koala.prototype.playEffect = function (effectName) {
62     if (!effectName) return;
63
64     this.effect.parent = this.gameObject.parent;
65     this.effect.x = this.gameObject.x;
66     this.effect.y = this.gameObject.y;
67
68     this.effect.playAnimation(effectName);
69 };
将上述代码整合到一个脚本,在Scripts/ui文件夹下创建脚本:Main.js,脚本代码如下:
  1 var Main = qc.defineBehaviour('qc.Koala.ui.Main', qc.Behaviour, function() {
  2     // 风值
  3     this.windValue = 0;
  4
  5     // 掉落事件控制器
  6     this.dropTimer = null;
  7
  8     // 跳台对象
  9     this._step = null;
 10
 11     // 秋千对象
 12     this.swing = null;
 13 }, {
 14     // 柱子池
 15     pillarPool : qc.Serializer.NODE,
 16     // 考拉节点
 17     koala : qc.Serializer.NODE,
 18     // 暂停按钮
 19     pauseBtn : qc.Serializer.NODE,
 20     // 风值
 21     wind : qc.Serializer.NODE,
 22     // 风向
 23     windDirection : qc.Serializer.NODE,
 24     // 分数节点
 25     score : qc.Serializer.NODE
 26 });
 27
 28 /**
 29  * 初始化
 30  */
 31 Main.prototype.awake = function() {
 32     var self = this;
 33     var camera = this.pillarPool.parent;
 34
 35     // 监听柱子初始化完成事件
 36     this.addListener(qc.Koala.onPillarReady, this._onPillarReady, this);
 37
 38     // 监听游戏开始事件
 39     this.addListener(qc.Koala.onStart, this.restart, this);
 40
 41     // 监听分数改变事件
 42     this.addListener(qc.Koala.onScoreChange, this.updateScore, this);
 43
 44     // 在游戏开始钱禁止交互
 45     this.gameObject.interactive = false;
 46
 47     // 考拉拿起秋千时,启动交互
 48     this.addListener(qc.Koala.onSwingTake, function() {
 49         this.gameObject.interactive = true;
 50     }, this);
 51
 52     //// 初始化游戏逻辑脚本
 53     //qc.Koala.initLogic(this.config, this.game);
 54
 55     // 分数文本中间值,用于TweenProperty组件使用
 56     this.score._tempText = 0;
 57     Object.defineProperties(this.score, {
 58         'tempText' : {
 59             get : function() { return this._tempText; },
 60             set : function(v) {
 61                 if (this._tempText === v) return;
 62
 63                 this._tempText = v;
 64                 this.text = Math.floor(v) + '';
 65             }
 66         }
 67     });
 68 };
 69
 70 /**
 71  * 柱子准备完毕后处理
 72  * @param  {array} pillarList - 柱子列表
 73  */
 74 Main.prototype._onPillarReady = function(pillarList) {
 75     this.startStep = pillarList[0];
 76     this.swing = this.startStep.swing;
 77
 78     var s = this.koala.getScript('qc.Koala.ui.Koala');
 79     s.init(this.startStep);
 80 };
 81
 82
 83 /**
 84  * 重新开始游戏
 85  */
 86 Main.prototype.restart = function() {
 87     // 重置逻辑脚本
 88     qc.Koala.resetLogic();
 89
 90     // 如果掉落还没结束,则强制移除掉落的循环控制器
 91     if (this.dropTimer) {
 92         this.game.timer.remove(this.dropTimer);
 93         this.dropTimer = null;
 94     }
 95
 96     // 监听相机位置调整完成事件
 97     var camera = this.pillarPool.parent,
 98         s = camera.getScript('qc.TweenPosition');
 99     s.onFinished.addOnce(this.start, this);
100
101     // 重置相机位置
102     this.resetCamera();
103
104     // 显示游戏界面
105     this.show();
106 };
107
108 /**
109  * 开始游戏
110  * @param  {boolean} reset - 是否重置游戏
111  */
112 Main.prototype.start = function (reset) {
113     // 是否重新开始游戏
114     if (reset === true) {
115         this.restart();
116         return;
117     }
118
119     // 启动暂停按钮交互
120     this.pauseBtn.interactive = true;
121
122     // 更新风值
123     this.initWind();
124
125     // 重置柱子列表
126     var pool = this.pillarPool.getScript('qc.Koala.ui.PillarPool');
127     pool.reset();
128
129     // 考拉开始走
130     var koalaScript = this.koala.getScript('qc.Koala.ui.Koala');
131     koalaScript.walk();
132 };
133
134 /**
135  * 更新分数文本
136  * @param  {number} score - 当前分数
137  */
138 Main.prototype.updateScore = function (score) {
139     var s = this.score.getScript('qc.TweenProperty');
140     s.setCurrToStartValue();
141     s.to = score;
142     qc.Tween.resetGroupToBeginning(this.score, 1);
143     qc.Tween.playGroup(this.score, 1);
144 };
145
146 /**
147  * 初始化风值
148  */
149 Main.prototype.initWind = function() {
150     var windObj = qc.Koala.logic.wind.getWind(qc.Koala.logic.me.level);
151     this.windValue = windObj.value * windObj.direction;
152     this.wind.text = windObj.value + '';
153
154     this.wind.parent.visible = windObj.value !== 0;
155     this.windDirection.rotation = Math.PI * (windObj.direction - 1) * 0.5;
156 };
157
158 /**
159  * 监听点击事件
160  */
161 Main.prototype.onClick = function() {
162     // 禁止交互
163     this.gameObject.interactive = false;
164
165     // 关卡数加1
166     qc.Koala.logic.me.level++;
167
168     // 计算考拉下落高度
169     var rotation = this.swing.gameObject.rotation,
170         cos = Math.cos(rotation),
171         sin = Math.sin(rotation),
172         radius = this.swing.gameObject.height,
173         h = radius * (cos - Math.cos(this.swing.maxRotation));
174
175     // 计算横向及纵向速度
176     var dir = this.swing.direction,
177         v0 = Math.sqrt(2 * qc.Koala.logic.config.g * h) * dir,
178         vx0 = v0 * cos + this.windValue,
179         vy0 = v0 * sin;
180
181
182     // 获取考拉脚本对象
183     var koalaScript = this.koala.getScript('qc.Koala.ui.Koala');
184     // 考拉放手
185     koalaScript.away();
186
187     // 获取跳台对象
188     var pool = this.pillarPool.getScript('qc.Koala.ui.PillarPool');
189     this._step = pool.getStep();
190
191     // 考拉做抛物线运动
192     this.drop(vx0, vy0);
193 };
194
195 /**
196  * 考拉脱离缰绳开始掉落
197  * @param  {number} vx0 - x方向初始速度
198  * @param  {number} vy0 - y方向初始速度
199  */
200 Main.prototype.drop = function(vx0, vy0) {
201     // 循环定时器刷新考拉位置
202     this.dropTimer = this.game.timer.loop(0, function() {
203         if (qc.Koala.logic.me.paused)
204             return;
205         // 计算纵向速度
206         var t = this.game.time.deltaTime * 0.001;
207         vy0 = vy0 + qc.Koala.logic.config.g * t;
208
209         // 考拉掉落处理
210         this._onDrop(vx0, vy0, t);
211     }, this);
212 };
213
214 /**
215  * 考拉掉落帧处理
216  * @param  {number} vx0 - 横向速度
217  * @param  {number} vy0 - 纵向速度
218  * @param  {number} t - 俩帧之间的时间间隔
219  */
220 Main.prototype._onDrop = function (vx0, vy0, t) {
221     // 计算横向和纵向偏移值
222     var preY = this.koala.y,
223         deltaX = vx0 * t,
224         deltaY = vy0 * t;
225
226     // 设置考拉位置
227     this.koala.x += deltaX;
228     this.koala.y += deltaY;
229
230     // 调整相机位置
231     this.adjustCamera(deltaX, deltaY);
232
233     // 检测考拉位置
234     var result = this._checkCollide(preY);
235     if (result !== 0) {
236         // 移除定时器
237         this.game.timer.remove(this.dropTimer);
238         this.dropTimer = null;
239
240         // 成功跳到下一个站台
241         if (result === 1) {
242             this._onStep();
243         }
244
245         // 游戏结束
246         if (result < 0) {
247             this.gameOver(result);
248         }
249     }
250 };
251
252 /**
253  * 考拉成功跳到下一个站台后处理
254  */
255 Main.prototype._onStep = function() {
256     var koalaScript = this.koala.getScript('qc.Koala.ui.Koala');
257     koalaScript.fall(this._step);
258
259     // 矫正柱子的位置
260     this.adjustPillar();
261
262     // 下一个跳台
263     var pool = this.pillarPool.getScript('qc.Koala.ui.PillarPool');
264     pool.next();
265
266     // 重置秋千
267     this.swing.reset();
268
269     // 更新考拉当前所在跳台和当前正在使用的秋千
270     this.startStep = this._step;
271     this.swing = this._step.swing;
272
273     // 重新获取风力值
274     this.initWind();
275 };
276
277 /**
278  * 检测考拉是否可以站在平台上
279  * @param  {number} preY - 考拉移动前的y轴位置
280  * @return {number} 返回值定义如下
281  *          1:落在跳台上;
282  *         -1:超出游戏边界;
283  *         -2:碰到跳台的左边缘;
284  *          0:还在掉落
285  */
286 Main.prototype._checkCollide = function(preY) {
287     var x = this.koala.x,
288         y = this.koala.y,
289         step = this._step.gameObject;
290
291     // 判断是否落到跳台上
292     if (x > step.x &&
293         x < step.x + step.width &&
294         preY <= step.y + step.parent.y &&
295         y >= step.y + step.parent.y)
296         return 1;
297
298     // 超出游戏边界,因为相机有跟着考拉在动,所以在这边不需要判断游戏屏幕x轴方向超边
299     if (y > this.gameObject.height + this.koala.height - this.pillarPool.parent.y)
300         return -1;
301
302     // 判断与跳台左边缘碰撞
303     if (x > step.x &&
304         x < step.x + step.width &&
305         preY > step.y + step.parent.y)
306         return -2;
307
308     return 0;
309 };
310
311 /**
312  * 调整考拉位置
313  */
314 Main.prototype.adjustKoala = function() {
315     var step = this._step.gameObject;
316     if (this.koala.y > step.y &&
317         this.koala.y < step.y + this.koala.height)
318         this.koala.y = step.y;
319 };
320
321 /**
322  * 跳到跳台上后,调整柱子位置
323  */
324 Main.prototype.adjustPillar = function() {
325     var camera = this.pillarPool.parent,
326         s = camera.getScript('qc.TweenPosition'),
327         step = this._step.gameObject,
328         p = new qc.Point(-step.x - camera.parent.width * 0.5, -step.y);
329     s.to = p.clone();
330     s.setCurrToStartValue();
331     s.resetToBeginning();
332     s.play();
333
334     p.subtract(s.from.x, s.from.y);
335     qc.Koala.onTweenCamera.dispatch(p);
336 };
337
338 /**
339  * 调整相机位置
340  * @param  {number} deltaX - x轴偏移值
341  * @param  {number} deltaY - y轴偏移值
342  */
343 Main.prototype.adjustCamera = function(deltaX, deltaY) {
344     var camera = this.pillarPool.parent,
345         step = this._step.gameObject;
346     camera.x -= deltaX;
347     if (camera.y - deltaY < -step.y)
348         camera.y = -step.y;
349     else
350         camera.y -= deltaY;
351
352     // 派发调整相机位置事件
353     qc.Koala.onAdjustCamera.dispatch(new qc.Point(deltaX, deltaY));
354 };
355
356 /**
357  * 重置相机位置
358  */
359 Main.prototype.resetCamera = function () {
360     var camera = this.pillarPool.parent,
361         s = camera.getScript('qc.TweenPosition');
362     s.to = new qc.Point(-camera.parent.width * 0.5, 0);
363     s.setCurrToStartValue();
364     s.resetToBeginning();
365     s.play();
366 };
367
368 /**
369  * 显示界面
370  */
371 Main.prototype.show = function () {
372     this.gameObject.visible = true;
373 };
将该脚本挂载到"游戏场景"节点,并将对应的节点拖入到对应的属性中,如下图:
到此,游戏界面的元素与脚本就已经讲了大部分了,下一篇文章我将讲述游戏暂停、游戏结束等功能的处理。