Java的Object类
 public class Object {
        public final native void notify();

        public final native void notifyAll();

        public final native void wait(long timeout) throws InterruptedException;
    }
调用这些方法的当前线程必须拥有此对象监视器,否则将会报java.lang.IllegalMonitorStateException exception
wait;
Object的wait方法有三个重载方法,其中一个方法wait() 是无限期(一直)等待,直到其它线程调用notify或notifyAll方法唤醒当前的线程;另外两个方法wait(long timeout) 和wait(long timeout, int nanos)允许传入 当前线程在被唤醒之前需要等待的时间,timeout为毫秒数,nanos为纳秒数。
wait():释放占有的对象锁,线程进入等待池,释放cpu,而其他正在等待的线程即可抢占此锁,获得锁的线程即可运行程序。
而sleep()不同的是,线程调用此方法后,会休眠一段时间,休眠期间,会暂时释放cpu,但并不释放对象锁。也就是说,在休眠期间,其他线程依然无法进入此代码内部。休眠结束,线程重新获得cpu,执行代码。
wait()和sleep()最大的不同在于wait()会释放对象锁,而sleep()不会!
notify:
notify方法只唤醒一个等待(对象的)线程并使该线程开始执行。
调用notify()后,并不会立即释放锁,而是继续执行当前代码,直到synchronized中的代码全部执行完毕,才会释放对象锁。JVM则会在等待的线程中调度一个线程去获得对象锁,执行代码。
需要注意的是,wait()和notify()必须在synchronized代码块中调用。
所以如果有多个线程等待一个对象,这个方法只会唤醒其中一个线程,选择哪个线程取决于操作系统对多线程管理的实现。
notifyAll:
notifyAll 会唤醒所有等待(对象的)线程,尽管哪一个线程将会第一个处理取决于操作系统的实现。
这些方法可以使用于“生产者-消费者”问题,消费者是在队列中等待对象的线程,生产者是在队列中释放对象并通知其他线程的线程。
demo:
public class Main {
    public static void main(String[] args) {
        Message msg = new Message("process it");
        Waiter waiter = new Waiter(msg);
        new Thread(waiter,"waiterThread").start();

        Waiter waiter1 = new Waiter(msg);
        new Thread(waiter1, "waiter1Thread").start();

        Notifier notifier = new Notifier(msg);
        new Thread(notifier, "notifierThread").start();
        System.out.println("All the threads are started");
    }
}
class Message {
    private String msg;
    public Message(String str){
        this.msg=str;
    }
    public String getMsg() {
        return msg;
    }
    public void setMsg(String str) {
        this.msg=str;
    }
}

class Waiter implements Runnable{
    private Message msg;
    public Waiter(Message m){
        this.msg=m;
    }

    @Override
    public void run() {
        String name = Thread.currentThread().getName();
        synchronized (msg) {
            try{
                System.out.println(name+" waiting to get notified at time:"+System.currentTimeMillis());
                msg.wait();
            }catch(InterruptedException e){
                e.printStackTrace();
            }
            System.out.println(name+" waiter thread got notified at time:"+System.currentTimeMillis());
            //process the message now
            System.out.println(name+" processed: "+msg.getMsg());
        }
    }
}

class Notifier implements Runnable {
    private Message msg;

    public Notifier(Message msg) {
        this.msg = msg;
    }

    @Override
    public void run() {
        String name = Thread.currentThread().getName();
        System.out.println(name+" started");
        try {
            Thread.sleep(1000);
            synchronized (msg) {
                msg.setMsg(name+" Notifier work done");
                msg.notify();
                // msg.notifyAll();
            }
        } catch (InterruptedException e) {
            e.printStackTrace();
        }
    }
}


All the threads are started
waiter1Thread waiting to get notified at time:1480592377675
waiterThread waiting to get notified at time:1480592377677
notifierThread started
waiter1Thread waiter thread got notified at time:1480592378685
waiter1Thread processed: notifierThread Notifier work done
Notifier中的run方法改成msg.notifyAll();
Result:
All the threads are started
waiter1Thread waiting to get notified at time:1480592533780
waiterThread waiting to get notified at time:1480592533780
notifierThread started
waiterThread waiter thread got notified at time:1480592534782
waiterThread processed: notifierThread Notifier work done
waiter1Thread waiter thread got notified at time:1480592534782
waiter1Thread processed: notifierThread Notifier work done
一个通知线程,3个等待线程:
public class Main {
    private String flag[] = { "true" };
    public static void main(String[] args) {
        System.out.println("Main Thread Run!");
        Main test = new Main();
        System.nanoTime();
        NotifyThread notifyThread =test.new NotifyThread("notify01");
        WaitThread waitThread01 = test.new WaitThread("waiter01");
        WaitThread waitThread02 = test.new WaitThread("waiter02");
        WaitThread waitThread03 = test.new WaitThread("waiter03");
        notifyThread.start();
        waitThread01.start();
        waitThread02.start();
        waitThread03.start();
    }

    class NotifyThread extends Thread{
        public NotifyThread(String name) {
            super(name);
        }
        public void run() {
            try {
                sleep(3000);//推迟3秒钟通知
            } catch (InterruptedException e) {
                e.printStackTrace();
            }
            synchronized (flag) {
                flag[0] = "false";
                flag.notifyAll();
            }
        }
    }

    class WaitThread extends Thread {
        public WaitThread(String name) {
            super(name);
        }

        public void run() {
            synchronized (flag) {
                while (flag[0] != "false") {
                    System.out.println(getName() + " begin waiting!");
                    long waitTime = System.currentTimeMillis();
                    try {
                        flag.wait();
                    } catch (InterruptedException e) {
                        e.printStackTrace();
                    }
                    waitTime = System.currentTimeMillis() - waitTime;
                    System.out.println("wait time :" + waitTime);
                }
                System.out.println(getName() + " end waiting!");
            }
        }
    }
}
Main Thread Run!
waiter01 begin waiting!
waiter02 begin waiting!
waiter03 begin waiting!
wait time :2999
waiter03 end waiting!
wait time :2999
waiter02 end waiting!
wait time :2999
waiter01 end waiting!
=====================================================================================
wait和sleep的demo:
public class Main {
    public static void main(String[] args) {
        new Thread(new Thread1()).start();
        try {
            Thread.sleep(5000);
        } catch (Exception e) {
            e.printStackTrace();
        }
        new Thread(new Thread2()).start();
    }

    private static class Thread1 implements Runnable{
        @Override
        public void run(){
            synchronized (Main.class) {
                System.out.println("enter thread1...");
                System.out.println("thread1 is waiting...");
                try {
                    //调用wait()方法,线程会放弃对象锁,进入等待此对象的等待锁定池
                    Main.class.wait();
                } catch (Exception e) {
                    e.printStackTrace();
                }
                System.out.println("thread1 is going on ....");
                System.out.println("thread1 is over!!!");
            }
        }
    }
    private static class Thread2 implements Runnable{
        @Override
        public void run(){
            synchronized (Main.class) {
                System.out.println("enter thread2....");
                System.out.println("thread2 is sleep....");
                //只有针对此对象调用notify()方法后本线程才进入对象锁定池准备获取对象锁进入运行状态。
                Main.class.notify();
                //==================
                //区别
                //如果我们把代码:Main.class.notify();给注释掉,即Main.class调用了wait()方法,但是没有调用notify()
                //方法,则线程永远处于挂起状态。
                try {
                    //sleep()方法导致了程序暂停执行指定的时间,让出cpu该其他线程,
                    //但是他的监控状态依然保持者,当指定的时间到了又会自动恢复运行状态。
                    //在调用sleep()方法的过程中,线程不会释放对象锁。
                    Thread.sleep(5000);
                } catch (Exception e) {
                    e.printStackTrace();
                }
                System.out.println("thread2 is going on....");
                System.out.println("thread2 is over!!!");
            }
        }
    }
}
enter thread1...
thread1 is waiting...
enter thread2....
thread2 is sleep....
thread2 is going on....
thread2 is over!!!
thread1 is going on ....
thread1 is over!!!
wait,notify的使用,线程同步唤醒
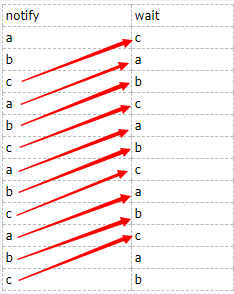
package com.qhong;

/**
 * Created by Administrator on 2017/7/4 0004.
 */
public class MyThreadPrinter2 implements Runnable {

    private String name;
    private Object prev;
    private Object self;

    private MyThreadPrinter2(String name, Object prev, Object self) {
        this.name = name;
        this.prev = prev;
        this.self = self;
    }

    @Override
    public void run() {
        int count = 10;
        while (count > 0) {
            synchronized (prev) {
                synchronized (self) {
                    System.out.print(name);
                    count--;

                     self.notify();
                }
                try {
                    prev.wait();
                } catch (InterruptedException e) {
                    e.printStackTrace();
                }
            }

        }
    }

    public static void main(String[] args) throws Exception {
        Object a = new Object();
        Object b = new Object();
        Object c = new Object();
        MyThreadPrinter2 pa = new MyThreadPrinter2("A", c, a);
        MyThreadPrinter2 pb = new MyThreadPrinter2("B", a, b);
        MyThreadPrinter2 pc = new MyThreadPrinter2("C", b, c);


        new Thread(pa).start();
        Thread.sleep(1000);  //确保按顺序A、B、C执行
        new Thread(pb).start();
        Thread.sleep(1000);
        new Thread(pc).start();
        Thread.sleep(1000);
    }
}
Output:
ABCABCABCABCABCABCABCABCABCABC
Thread.sleep(100)是保证ABC的执行顺序
在这个例子中,可以深刻的体现出wait不仅是阻塞线程,更体现wait释放锁对象。
比如是4轮,第一轮的abc是有Thread.sleep来控制的,这个时候只有锁对象c是被释放的,锁对象a阻塞线程B,锁对象b阻塞线程C
第二轮,a的prev是c,所以是可以运行的,并且在这一步释放锁对象a,锁对象c注释线程A
................
就这样一轮一轮的控制,虽然想通了,但是让我写还是想不出来的,挺繁琐!
有是一个demo
package com.qhong.thread;


public class MyWaitNotify{

    MonitorObject myMonitorObject = new MonitorObject();
    boolean wasSignalled = false;

    public void doWait(){
        synchronized(myMonitorObject){
            while(!wasSignalled){
                try{
                    myMonitorObject.wait();
                } catch(InterruptedException e){...}
            }
            //clear signal and continue running.
            wasSignalled = false;
        }
    }

    public void doNotify(){
        synchronized(myMonitorObject){
            wasSignalled = true;
            myMonitorObject.notify();
        }
    }
}

class MonitorObject{}
代码比较简单,但是要注意下面的说明,有好几个概念以前没注意:
1、不管是等待线程还是唤醒线程都在同步块里调用wait()和notify()。这是强制性的!一个线程如果没有持有对象锁,将不能调用wait(),notify()或者notifyAll()。否则,会抛出IllegalMonitorStateException异常。
2、一旦线程调用了wait()方法,它就释放了所持有的监视器对象上的锁。这将允许其他线程也可以调用wait()或者notify()。
3、为了避免丢失信号,必须把它们保存在信号类里。如上面的wasSignalled变量。
4、假唤醒:由于莫名其妙的原因,线程有可能在没有调用过notify()和notifyAll()的情况下醒来。这就是所谓的假唤醒(spurious wakeups)。为了防止假唤醒,保存信号的成员变量将在一个while循环里接受检查,而不是在if表达式里。这样的一个while循环叫做自旋锁。
5、不要在字符串常量或全局对象中调用wait()。即上面MonitorObject不能是字符串常量或是全局对象。每一个MyWaitNotify的实例都拥有一个属于自己的监视器对象,而不是在空字符串上调用wait()/notify()。
http://www.cnphp6.com/archives/62258
http://blog.csdn.net/luoweifu/article/details/46664809
http://developer.51cto.com/art/201508/487488.htm