Java基础篇
1—12 常识
1.文件夹以列表展示,显示扩展名,在地址栏显示全路径
2.javac编译 java运行
3.java开发环境
java编辑器 ( integrated development environment) IDE 集成开发环境
常见的Jbuilder、eclipse
4.double d1,d2,d3=0.123 //不表示d1 d2 d3都是0.123
5.程序执行过程中 对内存的处理 将内存分成4个区域 code segment 、 data segment 、stack 、heap
print和println的区别 println表示此处换行打印
shift+table键的使用 :批量修改缩进/Alt+/开启自动提示
代码不够健壮 只完成了功能 对于用户输入的很多情况没有考虑
方法(method)中的return 代表方法返回 执行到return 表示方法结束
属性 attribute 就是成员变量
哪些类 类的属性和方法 类与类之间的关系
web service和soa 究竟谁赢了(显然是web service赢了)
约定俗称的命名规则:
类名首字母大写 方法名和变量名首字母小写 运用驼峰标识(每个单词首字母大写)
包命名方式 package 公司名称倒过来就行 com.xxx.test
访问控制符 或者叫权限修饰符
继承关键字 extends
人机交互方式:一种是通过图形界面,一种是通过命令行(即cmd)
常用dos命令
dir
cd 回到根目录
cd. . 回到上级目录
md 文件名 新建目录
cd 目录名 进到指定目录
Java两大核心机制—JVM和GC,有了各平台版本的JVM(如UNIX平台版本、Linux平台版本),java代码在可以一次编译,运行在多个平台上。
10%-3=1 对负数取模可忽略不计,结果仍为正
-10%3=-1 被模的数为负数,结果为负
-10%-3=-1
&&
|| 短路与 短路或 如果前边的判断为真或为假 则后边的不进行判断
从键盘读取用户输入,使用Scanner类中的方法:
import java.util.Scanner; 第一步导入Scanner类
public class TestScanner{
public static void main(String[] args) {
Scanner scanner = new Scanner(System.in); 第二步声明一个Scanner对象
System.out.println("Please enter number1");
int a;
a = scanner.nextInt(); 第三步使用nextInt()方法
}
case 10:
case 9:
10和9这两个标签,可以共用一个代码块
/*
*输入2013年的某个月份和日期,例如month=4 day=21
*经过程序计算,打印出输入的月份和日期是2013年的第几天
*TestSwitch.java
*/
System.out.println(); //直接可以打印换行
break continue的用法
int[] a =null 数组a的声明
System.out.println(a.length) 在未分配内存空间时 使用数组的属性 会报空指针异常
a=new int[10] 为数组a分配内存空间
多维数组
int t[][] = new int[4][]
t[0] = new int[5]
t[1] = new int[3]
方法(即函数)中,可以写
return;
但是这行代码之后的代码都不会被执行
类的实例化
Person p = new Person()
p1和p2是Person的两个对象,操作任何一个的(非静态)成员变量都不会对另一个产生影响。
对象的生命周期:

匿名对象
new Person().shout();
出现在:只使用一次,经常将匿名对象作为实参传递给一个函数调用。
信息的封装和隐藏
将属性声明为私有的(private),再提供公开的(public) 方法:getXXX和setXXX方法来操作成员变量。
构造器与类同名且没有返回值(连void都没有)。
方法的重载
在同一个类中允许存在多个同名的方法
方法名不同,返回值类型可以相同也可以不同,参数列表(个数或类型)不一样。
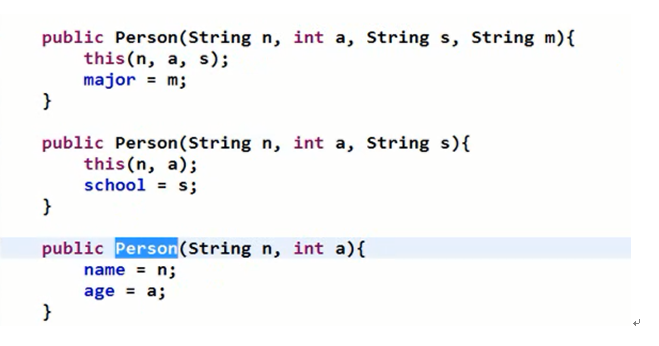
13 this关键字
this是对调用当前方法的那个当前对象的引用
this的用途:指代的是当前对象
1 在一般的方法中可以通过this来引用当前对象的成员(方法、属性)
2 通过this() 调用重载的构造器,需要注意的是,这行代码必须放在重载构造器的第一行。
14参数传递
基本数据类型的参数传递和引用类型的参数传递 两者区分
16 继承
extends关键字
注意:子类不能继承父类私有(private)的成员和方法:不能直接访问。
构造器的继承在Super关键字中讲解。
17 访问权限
Private 仅在类的内部访问
Defalut 仅在包的内部访问
Protected 在子类中该属性可以被访问,可以跨包访问
Public 访问权限最高,无论是否在一个包内,是否是子类,都可以访问
18 方法的重写和覆盖
28 异常
Java运行过程中发生的异常事件可以分为两类:
Error:JVM系统内部错误(无能为力)
Exception:其他因编程错误或偶然的外在因素导致的一般性问题(可以避免),例如:
空指针
访问不存在的文件
网络异常
ArithmeticException:被除数为0的异常
ArrayIndexOutOfBoundsException:数组下边越界异常
ClassCastException:类型转换异常
NullPointerException:空指针异常,引用指向null,但是使用了这个引用的属性或方法
Java采用异常处理机制,将异常处理的程序代码集中在一起,与正常的程序代码分开,使得程序简洁易维护。
抓抛模型
抛出(throw)捕获(catch)
一个异常回到main(),main()也不进行处理的话,程序会中止
我们通常可以处理Exception,而对Error无能为力
29 处理异常
try....catch...finally...
在捕获异常时 注意父类参数
可以有多个catch
问题:如果一个语句块中有两种异常,并且也写了两个catch来捕获不同类型的异常,那么这两个catch都会进去吗?还是,有多个catch的情况,只要有一个捕获到了,后边的catch都不进去了?
finally语句始终会被执行
运行时异常和编译时异常
IO异常属于编译时异常
30 声明抛出异常
使用throws关键字声明抛出异常(抛出即不做处理,由调用者处理)
throws方法抛出的异常可以是方法中出现的异常的类型或其父类类型
throws可以声明抛出多个类型的异常,多个异常使用逗号分隔
运行时异常不需要使用throws关键字声明抛出
重写方法不能抛出比重写范围更大的异常
31 人工抛出异常
使用throw关键字,人工手动抛出异常的步骤:
1 创建一个异常类对象
RuntimeException ex = new RuntimeException();
2 把异常类对象抛出去
throw ex;
自定义的异常类:
1 通常继承自RuntimeException(可以继承Exception)
2 自定义的异常类就是用来被人工抛出的
32 Collection接口
1 创建一个Collection接口的对象
Collection collection = new ArrayList()
2 Collection重要方法说明
2.1 添加
collection.add(new Person())
Collection collection2 = new AyyayList()
collection2.add(new Person())
collection.addall(collection2)
System.out.println(collection.size())
2.2 用于访问集合的方法:
获取集合的长度:size()
对集合进行遍历的方法:iterator()可以得到对应的Iterator接口对象
Iterator:迭代器
获取Iterator接口对象
使用while循环和Iterator对象遍历结合中的每一个元素,具体使用Iterator接口的hasNext()和nex() 方法
Iterrator iterator = collection.iterator()
while(iterator.hasNext()){
Object obj = iterator.next();
System.out.println(obj)
}
2.3 移除集合中的元素
remove():移除某一个指定的对象,通过equals()方法比较集合中是否存在该元素,以及是否能成功移除
removeAll()
clear():使集合中的元素置空
2.4 用于检测集合的方法
retains()
retainsAll()
isEmpty()
2.5 其他方法
toArray()
T [] to Array(T[]):涉及到泛型,后面再讲
equals():比较两个集合是否相等
hashCode()
使用增强for循环的方式对集合进行遍历
for(Object obj:collection){
System.out.println(obj)
}
33 Set接口
是collection的子接口,Set集合不允许包含相同元素,比较是否相同使用equals()
HashSet
1.1 基本特征
不能保证元素的排列顺序
HashSet不是线程安全的
集合元素可以是null
对于HashSet:如果两个对象通过equals() 方法返回true,这两个对象的hashcode值也应该相同
LinkedHashSet
按插入顺序排序
34 TreeSet
自然排序和定制排序
自然排序
1 如果使用TreeSet()无参数的构造器创建一个TreeSet对象,则要求放入其中的元素的类必须实现Comparable接口,所以,在其中不能放入null元素
2 必须放入相同类的对象,否则会发生类型转换异常
3 两个对象通过Comparable接口compareTo(Object obj)方法的返回值来比较大小,并进行升序排序
4 当需要把一个对象放入TreeSet中,重写该对象对应的equals()方法时,应保证该方法与compareTo(Object obj)方法有一致的结果
定制排序
1 创建TreeSet对象时,传入Comparator接口的实现类
Set set2 = new TreeSet(comparator); //comparator已经实现了Comparator接口,并重写了其中的compare方法
要求:Comparator接口的compare方法的返回值和两个元素的equals()方法具有一致的返回值
35 List
list有序、可重复
以下为4种排序方法
//iterator遍历
Iterator iterator = list.iterator();
while(iterator.hasNext()){
System.out.println(iterator.next());
}
//for增强遍历
for(Object obj:list){
System.out.println(obj);
}
//for遍历
for(int i = 0 ; i < list.size(); i ++){
System.out.println(list.get(i));
}
//ListIterator遍历
ListIterator lit = list.listIterator();
while(lit.hasNext()){
System.out.println(lit.next());
}
Arrays.asList(new Person("MM",30),new Person("NN",40))
36 Map
Key Value
Key不允许重复
//给map添加元素:put或put(map)
map.put("1", new Person("AA",12));
map.put("1", new Person("BB",25));
map.put("2", new Person("CC",36));
map.put("3", new Person("DD",42));
map.put("4", new Person("EE",68));
/*
//从map中取出元素(遍历)
//先取出键,再根据键取出值
Set keyset = map.keySet();
for(Object key:keyset){
Object value = map.get(key);
System.out.println(key + ":" + value);
}
//直接取出值集合
Collection values = map.values();
for(Object val:values){
System.out.println(val);
}
//直接取出键值对
for(Map.Entry<String, Object> entry:map.entrySet()){
String key = entry.getKey();
Object value = entry.getValue();
System.out.println(key + ":" + value);
}
*/
//移除元素
map.remove("5");
//工具方法:size() contains() isEmpty()
System.out.println(map.size());
System.out.println(map.containsKey("1"));
System.out.println(map.isEmpty());
37 Collections工具类和Enumeration
使用collections的sort方法对List中的元素进行排序
Collections.sort(list, new Comparator(){
public int compare(Object o1, Object o2) {
Person p1 = (Person) o1;
Person p2 = (Person) o2;
return p1.getAge() - p2.getAge();
}
});
}
//获取线程安全的List对象,使用synchronizedList()
List list2 = Collections.synchronizedList(new ArrayList());
//对Enumeration对象进行遍历
Enumeration names = Collections.enumeration(list);
while(names.hasMoreElements()){
Object obj = names.nextElement();
System.out.println(obj);
}
38 泛型
不使用泛型的两个问题:
1 放入集合中的可以是任何类型
2 取出时需要进行强制类型转换
使用泛型 可以解决这个问题 不是任意类型的list 而是一个Person类型的list
List<Person> persons = new ArrayList();
Person [] personArray = persons.toArray(new Person[0]);
Map<String,Person> personMap = new HashMap<String,Person>();
personMap.put("111", persons.get(0));
personMap.put("222", persons.get(1));
personMap.put("333", persons.get(2));
personMap.put("444", persons.get(3));
personMap.put("555", persons.get(4));
for(Map.Entry<String, Person> entry: personMap.entrySet()){
System.out.println(entry.getKey() + ": " + entry.getValue());
}
39 定义泛型
public class Dao<T>{
public T get(Integer id){
T result = null;
return result;
}
public void save(T entity){
}
}
40 继承与泛型
String为Object类型的子类,则String[] 也是Object[] 的子类;
Object [] obj = new String[]{"11","22"};
但,String为Object类型的子类,List<String>并不是List<Object>的子类
List<String> strlist = Arrays.asList("AA","SS");
List<Object> objlist = strlist;
//编译时会提示cannot convert from List<String> to List<Object>
泛型通配符
List<Student> stus = new ArrayList<Student>();
stus.add(new Student("AA",12,"zhengdaUniversity"));
printPersonInfo(stus);
}
public static void printPersonInfo(List<? extends Person> persons){
for(Person person:persons){
System.out.println(person);
}
}
41 泛型方法
把指定类型的数组中的元素放入到指定类型的集合中
泛型方法:在方法声明时,同时声明泛型,在方法的返回值,参数列表以及方法中都可以使用泛型类型
42 枚举类
枚举类:一个类的对象是有限且固定的;因此不能在类的外部创建类的对象;类内部的属性都是常量;在类的内部创建对象,但需要在类的外部能够访问到该对象,而且不能被修改
private Season(String name,String desc){
this.name = name;
this.desc = desc;
}
private final String name;
private final String desc;
public static final Season SPRING = new Season("春天","春风又绿江南岸");
public static final Season SUMMER = new Season("夏天","春风又绿江南岸");
public static final Season FALL = new Season("秋天","春风又绿江南岸");
public static final Season WINTER = new Season("冬天","春风又绿江南岸");
也可以使用enum关键字来定义枚举类
public enum Season2 {
//必须在枚举类的第一行写出有哪些枚举值
SPRING("春天","春天好美啊"),
SUMMER("夏天 ","夏天很美"),
FALL("秋天","秋天很美"),
WINTER("冬天","冬天很冷");
private final String name;
private final String desc;
43 注解
@Override
@Deprecated
@SuppressWarnings
自定义Annotation
1 使用@interface定义注解
2 使用类似于接口方法声明的方式来定义注解的属性;其中返回值为属性的类型,方法名为属性的名称
提取Annotation信息
在反射内容时讲解
44 IO
File类
public class IOTest {

    @Test
    public void testFile() throws IOException {
        //新建一个文件对象,该文件应已被创建
        File file = new File("hello.txt");
        //访问文件的名字
        String name = file.getName();
        System.out.println(name);
        //访问文件的绝对路径
        String path = file.getAbsolutePath();
        System.out.println(path);
        //将文件剪切到其他地方
//        file.renameTo(new File("d:\hello.txt"));
        //文件监测相关方法
        System.out.println(file.exists());
        File dir = new File("HaHa");  //新建目录对象,该目录应事先已创建
        System.out.println(dir.isFile());

        //获取文件的常规信息
        System.out.println(file.length());

        //文件操作
        File file2 = new File("abcd.txt");  //新建文件
        file2.createNewFile();
    }

}
还可以通过mkDir()方法新建目录
IO流的分类
InputStream&Reader
InputStream和Reader是所有输入流的基类
    @Test
    public void testInputStream() throws IOException {
        //创建一个字节输入流
        InputStream in = new FileInputStream("hello.txt");
        //读取文件内容
        //.1读取一个字节,效率很低 -1表示读到文件结尾
//        int result = in.read();
//        while(result != -1){
//            System.out.print((char)result);
//            result = in.read();
//        }

        //.2一次读取一组字符
        byte [] buffer = new byte[10];
        int len = 8;

        //返回读取的字节数,若为-1表示读到文件的结尾
//        while((len = in.read(buffer)) != -1){
//            //这样读 可能会出现错误 有可能最后不够8个字符
////            for(byte b:buffer){
//            //这样读可以避免以上错误
//            for(int i = 0; i < len; i++){
//                System.out.print((char)buffer[i]);
//            }
//        }

        //.3 把内容读取到字节数组的部分连续的元素中
        byte [] result = new byte[1024*10];
        //2表示读取in这个字节流从头开始的2个字符,result是被读取后存放字节的数组,0表示从result的起始位置开始存放
        in.read(result, 0, 2);
        for(int i = 0; i < result.length; i++){
            System.out.print((char)result[i]);
        }

    in.close();   //关闭流文件

  }
@Test
    public void testReader() throws IOException {
        Reader reader = new FileReader("hello.txt");

        char[] buffer  = new char[10];
        int len = 10;

        while((len = reader.read(buffer)) != -1){
            for(int i = 0 ;i < len; i++){
                System.out.print(buffer[i]);
            }
        }

        reader.close();

    }
OutputStream&文件复制
OutputStream和Writer,是所有输出流的基类
@Test
    public void testOutputStream() throws IOException {
        //输出字节流 abcd.txt应已经创建
        OutputStream out = new FileOutputStream("abcd.txt");
        //需要写入的字符
        String content = "www.test.com.hahahahhahah.hahahah.hahahhahahhahahahahhahahahhahahah";

        byte[] buffer = new byte[10]; //这里的buffer只声明了10个字节,但发现可以容纳任意字节
        //将字符转换成字节
        buffer = content.getBytes();
        //下面的写法也可以
//        for(int i = 0 ; i < buffer.length; i++){
//            out.write(buffer[i]);
//        }
        //直接这样就可以写入
        out.write(buffer);
        //写入一部分字符
        out.write(buffer, 0, 10);

        out.close();

    }
/*
     * 利用字节输入输出流,完成hello.txt文件的复制,将该文件复制为hello2.txt
     * 除文本文件外,还可以复制二进制文件;字符流只能处理文本文件
     * */
    @Test
    public void testCopyFile() throws IOException {
        //.1创建定位到hello.txt的文件输入流
        InputStream in = new FileInputStream("hello.txt");
        //.2创建定位到hello2.txt的文件输出流
        OutputStream out = new FileOutputStream("hello2.txt");
        //.3创建一个byte数组,用于读写文件
        byte [] buffer = new byte[1024*10];
        int len = 0;
        //.4读写文件
        while((len = in.read(buffer)) != -1){
            out.write(buffer,0,len);
        }
        //.5关闭流资源
        in.close();
        out.close();
    }
利用字符输入输出流,完成hello.txt文件的复制,将该文件复制为hello2.txt
public class IOTest2 {

    @Test
    public void testCopyFile() throws IOException {
        //.1 声明输入输出流
        Reader in = new FileReader("hello.txt");
        Writer out = new FileWriter("hello2.txt");

        //.2 创建一个字符数组
        char [] buffer = new char[10];

        //.3 利用循环读取源文件,并向目标文件写入
        //.4 注意使用的写入方法:write(cbuf, off, len)
        //而不能直接使用write(cbuf)
        int len = 0;
        //in.reader()返回读取到的字符的个数,到达结尾时返回-1
        while((len = in.read(buffer)) != -1){
            out.write(buffer, 0, len);
        }

        //.5 关闭流资源
        in.close();
        out.close();

    }
}
缓冲流
BufferedInputStream和BufferedOutputStream
BufferedReader和BufferedWriter
/*
     * 复制hello.txt到hello3.txt*/
    @Test
    public void testBufferedReaderAndBufferedWriter() throws IOException{
        //.1 创建BufferedReader和BufferedWriter
        Reader in = new FileReader("hello.txt");
        BufferedReader bufferedReader = new BufferedReader(in);

        Writer out = new FileWriter("hello3.txt");
        BufferedWriter bufferedWriter = new BufferedWriter(out);

        //.2 进行读写操作
        String buffer = null;

      int i = 0 ;

        while((buffer = bufferedReader.readLine()) != null){
            if (i != 0) {
                bufferedWriter.write("
");
            }
            bufferedWriter.write(buffer);
            i++;
        }

        //.3 关闭流:只需要关闭包装流,节点流会会在内部关闭
        bufferedReader.close();
        bufferedWriter.close();
    }
    /*
     * 利用BufferedInputStream和BufferedOutputStream完成
     * hello.txt到hello4.txt的复制*/
    @Test
    public void testBufferedInputStreamAndBufferedOutputStream() throws IOException{
        InputStream inputStream = new FileInputStream("hello.txt");
        BufferedInputStream bufferedInputStream = new BufferedInputStream(inputStream);
        OutputStream outputStream = new FileOutputStream("hello4.txt");
        BufferedOutputStream bufferedOutputStream = new BufferedOutputStream(outputStream);

        byte [] buffer = new byte[10];
        int len = 0 ;

        while((len = bufferedInputStream.read(buffer)) != -1){
            bufferedOutputStream.write(buffer, 0, len);
        }

        bufferedInputStream.close();
        bufferedOutputStream.close();
    }
转换流
InputStreamReader和OutputStreamWriter
    /*
     * 利用转换流InputStreamReader*/
    @Test
    public void testInputStreamReader() throws IOException{
        //指向文档的字节流
        InputStream in = new FileInputStream("hello.txt");
        //把上面的流转换为字符流
        Reader reader = new InputStreamReader(in);
        //把字符流转换为带缓冲的字符流
        BufferedReader bufferedReader = new BufferedReader(reader);

        String str = null;
        while((str = bufferedReader.readLine()) != null){
            System.out.println(str);
        }

        //关闭
        in.close();
        reader.close();
        bufferedReader.close();
    }
    /*
     * 先创建两个字节输入输出流:分别指向:hello.txt hello5.txt
     * 然后再转为字符输入输出流
     * 再转为带缓冲的字符输入输出流
     *
     * 完成文件的复制*/
    @Test
    public void testOutputStreamWriter() throws IOException{
        InputStream in = new FileInputStream("hello.txt");
        OutputStream out = new FileOutputStream("hello5.txt");

        Reader reader = new InputStreamReader(in);
        Writer writer = new OutputStreamWriter(out);

        BufferedReader bufferedReader = new BufferedReader(reader);
        BufferedWriter bufferedWriter = new BufferedWriter(writer);

        String buffer = null;
        int i = 0;

        while((buffer = bufferedReader.readLine()) != null){
            if (i != 0) {
                bufferedWriter.write("
");
            }
            bufferedWriter.write(buffer);
            i++;
        }

        bufferedReader.close();
        bufferedWriter.close();
    }
对象流
ObjectInputStream和ObjectOutputStream
.1)序列化需要实现Serializable接口
.2)类A下的某个字段是引用类型,引用的是类B,则类B必须实现Serializable接口,否则类A不能被序列化
在实际开发中,框架中已包含了此部分代码,不需要我们自己写
public class Person implements Serializable {

    /**
     * 类的版本号,用于对象的序列化,具体用于读取对象时比对硬盘上对象的版本和
     * 程序中对象的版本是否一致,若不一致读取失败,并抛出异常
     */
    private static final long serialVersionUID = 1L;
往硬盘文件写内容
@Test
    public void testSerializable() throws IOException {
        Person person = new Person("Lily",26);

        OutputStream outputStream = new FileOutputStream("hello.txt");
        ObjectOutputStream objectOutputStream = new ObjectOutputStream(outputStream);

        objectOutputStream.writeObject(person);

        outputStream.close();
        objectOutputStream.close();
    }
从硬盘文件读取
@Test
    public void testOnjectInputStream() throws IOException, ClassNotFoundException {
        InputStream inputStream = new FileInputStream("hello.txt");
        ObjectInputStream objectInputStream = new ObjectInputStream(inputStream);

        Object obj = objectInputStream.readObject();
        System.out.print(obj);

        objectInputStream.close();
        inputStream.close();

    }
RandomAccessFile类
RandomAccessFile及可以读取文件内容,也可向文件输入内容
@Test
    public void testRandomAccessFile() throws IOException {
        //.1创建一个RandomAccessFile对象
        RandomAccessFile randomAccessFile = new RandomAccessFile("hello.txt", "rw");
        //.3读取文件内容
        String str = null;
        while((str = randomAccessFile.readLine()) != null){
            System.out.println(str);
        }
        //设置指针位置,会覆盖从指针开始位置的待增加字符串长度的字符
        randomAccessFile.seek(10);
        //.4向文件写内容 在文件结尾增加字符串
        randomAccessFile.writeBytes("append...");
        //.2关闭RandomAccessFile对象
        randomAccessFile.close();
    }
/*
     * 向hello.txt文件中插入一行:www.baidu.com
     * 插入到第二行,原内容下移*/
    @Test
    public void testRandomAccessFile() throws IOException {
        RandomAccessFile access = new RandomAccessFile("hello.txt", "rw");
        //先读一行
        String line = access.readLine();
        //这里有疑问,怎么能确保读到buffer中的是除第一行之外的字符呢?又
        //没有将指针定位到第一行结尾
        byte[] buffer = new byte[(int)(access.length()-line.length())];
        access.read(buffer);

        access.seek(line.length());
        //写入要写的字符
        access.writeBytes("
HH
");
        //再写入先前的内容
        access.write(buffer);
        access.close();
    }
45 Java常用类
1 String是不可变的字符序列
2 关于字符串缓冲池:直接通过=为字符串赋值,会先在缓冲池中查找有没有一样的字符串,如果有就把那个引用赋给字符串变量,否则,会创建一个新的字符串,并把它放入缓冲池
3 字符串的几个常用方法:
3.1 去除前后空格的trim()方法
3.2 求子字符串的方法:subString()
从fromIndex开始,包含fromIndex,且String的字索引从0开始
3.3 subString(fromIndex,toIndex):[fromIndex,toIndex)
3.4 indexOf:求指定字符的索引
3.5 spilt(String regex):把字符串拆分成字符数组
3.6 equals():比较字符串内容是否相等必须使用该方法,不能直接使用==
StringBuffer和StringBuilder
StringBuffer和StringBuilder是可以被修改的字符序列
append()方法:追加字符
注意:append()方法的返回值还是当前的StringBuffer对象,可以使用方法的连缀
StringBuilder.append("a")
.append("b")
.append("c")
2). StringBuffer, StringBuilder 是可变的字符序列.
> StringBuffer 是线程安全的, 所以效率较低.
> StringBuilder 是线程不安全的, 效率较高. 大部分时使用 StringBuilder.
Date()封装了日期和时间
1. DateFormat是一个抽象类
抽象类获取对象的方式:
1) 创建其子类对象
2) 有的抽象类中提供了静态工厂方法来获取抽象类的实例
-SimpleDateFormat
如果需要把 Date 类型的对象格式化为一个字符串, 或把一个字符串转为一个 Date 对象则使用 DateFormat.
//1. 调用静态工厂方法来获取 DateFormat 对象.
//传入的参数是日期或时间的样式.
DateFormat dateFormat = DateFormat.getDateTimeInstance(DateFormat.LONG,
DateFormat.LONG);
Date date = new Date();
//格式化日期对象的 format 方法
String dateStr = dateFormat.format(date);
System.out.println(dateStr);
dateStr = "2013年6月10日 下午03时48分06秒";
//解析字符串到日期对象的 parse 方法.
Date date2 = dateFormat.parse(dateStr);
System.out.println(date2);
//创建 SimpleDateFormat 对象.
DateFormat dateFormat =
new SimpleDateFormat("yyyy-MM-dd hh:mm:ss");
Random和Math
Random中封装了随机相关的方法:返回随机的基本数据类型的值
Math:中封装了常用的数学方法
小结
4. 集合:
1). Collection
①. List:
②. Set:
2). Map:
3). Iterator:
4). Collections, Arrays:
3. 泛型:
1). 在集合中使用泛型: List<Person> persons = new ArrayList<>();
2). 定义泛型类: class Dao<T, PK>{}. 在泛型类中可以像使用其他类型那样使用泛型类型.
3). 泛型和继承:
①. List<Object> 不是 List<Person> 的父类!
②. 通配符: List<? extends Object> list 可以指向 List<Object> 或 List<Person>
注意: 带有通配符的泛型集合中不能添加除 null意外的任何元素.
4). 定义泛型方法: public static <E> E get(E e, Integer id){...}
2. IO:
1). 类:
InputStream FileInputStream BufferedInputStream ObjectInputStream
OutputStream FileOutputStream BufferedOutputStream ObjectOutputStream
Reader FileReader BufferedReader InputStreamReader
Writer FileWriter BufferedWriter OuputStreamWriter
2). 最常用的方法:
①. 文件的复制.
InputStream in = new FileInputStream(fileName);
OutputStream out = new FileOutputStream(fileName2);
byte [] buffer = new byte[1024 * 10];
int len = 0;
while((len = in.read(buffer)) != -1){
out.write(buffer, 0, len);
}
in.close;
out.close;
②.
BufferedReader bufferedReader =
new BufferedReader(new InputStreamReader(new FileInputStream(fileName)));
3). 序列化:
①. 序列化的意义:
②. 如果需要对某个类的对象实现序列化: 则该类需要实现 Serializable 接口. 且该类的所有字段也必须
是可被序列化的.
4). RandomAccessFile: 类中有一个指向文件内容的指针. 通过 seek() 方法来移动指针.
可以完成对文件的读写操作.
1. 关于常用类:
1). String 是一个不可变的字符序列!
2). StringBuffer, StringBuilder 是可变的字符序列.
> StringBuffer 是线程安全的, 所以效率较低.
> StringBuilder 是线程不安全的, 效率较高. 大部分时使用 StringBuilder.
3). Date: 封装了时间和日期.
4). DateFormat
-SimpleDateFormat
如果需要把 Date 类型的对象格式化为一个字符串, 或把一个字符串转为一个 Date 对象
则使用 DateFormat.
//1. 调用静态工厂方法来获取 DateFormat 对象.
//传入的参数是日期或时间的样式.
DateFormat dateFormat = DateFormat.getDateTimeInstance(DateFormat.LONG,
DateFormat.LONG);
Date date = new Date();
//格式化日期对象的 format 方法
String dateStr = dateFormat.format(date);
System.out.println(dateStr);
dateStr = "2013年6月10日 下午03时48分06秒";
//解析字符串到日期对象的 parse 方法.
Date date2 = dateFormat.parse(dateStr);
System.out.println(date2);
//创建 SimpleDateFormat 对象.
DateFormat dateFormat =
new SimpleDateFormat("yyyy-MM-dd hh:mm:ss");
5). Random & Math
46 反射
一般在框架中会使用到反射
有3种方式可以得到Class对象
/**
     * 关于Class:
     * 1.Class是一个类
     * 2.对象照镜子后可以得到的信息,某个类的数据成员名、方法和构造器
     * 某个类到底实现了哪些接口
     * 3.对于每个类而言,JRE都为其保留一个不变的Class类型的对象
     * 4.一个Class对象只能由系统建立对象
     * 5.一个类在JVM中只会有一个Class实例
     * @throws ClassNotFoundException
     *
     */

    @Test
    public void testClass() throws ClassNotFoundException{
        Class clazz = null;

        //1.得到Class对象
        //1.1直接通过类名.class的方式得到
        clazz = Person.class;

        //1.2 通过对象调用getClass()方法来获取
        Person person = new Person();
        clazz = person.getClass();

        //1.3 通过全类名的方式获取,用的较多
        String className = "com.test.lesson12.Person";
        clazz = Class.forName(className);

    }
/**
     * Class类的newInstance()方法
     *
     */
    @Test
    public void testNewInstance() throws ClassNotFoundException, InstantiationException, IllegalAccessException {
        String className = "com.test.lesson12.Person";
        Class clazz = Class.forName(className);

        //利用Class对象的newInstance()方法来创建类的一个对象
        //实际调用的是Person类的无参数的构造器,在声明类的时候无参数的构造器是必要的
        //一般一个类若声明了有参数的构造器,还应声明一个无参数的构造器
        Object obj = clazz.newInstance();

    }
类加载器
@Test
    public void testClassLoader() throws ClassNotFoundException{

        String className = "com.test.lesson12.Person";
        //1.获取一个系统的类加载器
        ClassLoader classLoader = ClassLoader.getSystemClassLoader();
        System.out.println(classLoader);

        //2.获取系统类加载器的父加载器
        classLoader = classLoader.getParent();
        System.out.println(classLoader);

        //3. 获取扩展类加载器的父加载器
        classLoader = classLoader.getParent();
        System.out.println(classLoader);

        //4.测试当前类由哪个类加载器进行加载
        classLoader = Class.forName(className).getClassLoader();
        System.out.println(classLoader);

        //5.测试JDK提供的Object类由哪个类加载器负责加载
        classLoader = Class.forName("java.lang.Object").getClassLoader();
        System.out.println(classLoader);

        //6.关于类加载器的一个主要方法
        //调用getResourceAsStream获得类路径下的文件对应的输入流
        InputStream in = null;
        in = this.getClass().getClassLoader().getResourceAsStream("com/test/lesson12/test.properties");
        System.out.println(in);
    }
method:
/*Class是一个对类的描述
     * Method:指定类中的方法
     * 1.获取Method
     * 1.1获取类的方法的数组:clazz.getDeclaredMethods()
     * 1.2获取类的指定的方法:
     * clazz.getDeclaredMethod("setName", String.class)
     * 方法名 方法的参数类型列表
     *
     * 1.3通过method对象执行方法:
     * Object obj = clazz.newInstance();
        method.invoke(obj, "设置的name");
     *
     * */
    @Test
    public void testMethod() throws ClassNotFoundException, NoSuchMethodException, SecurityException, InstantiationException, IllegalAccessException, IllegalArgumentException, InvocationTargetException {
        String className = "com.test.lesson12.Person";
        Class clazz = Class.forName(className);

        //1.clazz对应的Person类的方法,但不能获取private方法
        Method[] methods = clazz.getMethods();
        for (Method method:methods) {
            System.out.println(method.getName());
        }

        //2.获取类对象的所有方法,包括private方法,且只获取当前类声明的方法
        Method[] methods2 = clazz.getDeclaredMethods();
        for (Method method:methods2) {
            System.out.println(method.getName());
        }

        //3.获取指定的方法
        Method method = clazz.getDeclaredMethod("setName", String.class); //1个String类型的参数
        System.out.println(method);

        Method method2 = clazz.getDeclaredMethod("test"); //无参数的private方法
        System.out.println(method2);

        Method method3 = clazz.getDeclaredMethod("setName", String.class,Integer.class);// 两个参数
        System.out.println(method3);

        //4.执行方法
        Object obj = clazz.newInstance();
        method.invoke(obj, "设置的name");
    }
其余小节未细看:
3). 尚硅谷_佟刚_Java基础_ 反射_获取并执行父类中定义的私有方法
4). 尚硅谷_佟刚_Java基础_反射_使用 Method 的工具方法、
5). 尚硅谷_佟刚_Java基础_ 反射_Field
47 线程
获取当前线程:Thread.currentThread().getName()
/*
 * 1 在Java中,Thread类代表一个线程
 *
 * 2.实现线程有2种方式:
 * 2.1继承Thread类
 * 2.2实现Runnable接口
 *
 * 3.继承Thread类:
 * 3.1必须重写run()方法,里边放置的实际的线程体
 *
 * 4.启动线程:
 * 4.1创建Thread对象
 * 4.2 调用Thread对象的start()方法启动线程,而不是run()方法
 *
 * 5 实现Runnable接口的方式:
 * 5.1创建实现Runnable接口的实现类:必须实现run()方法
 * 5.2创建5.1对应的Runnable接口的实现类对象
 * 5.3创建Thread对象,利用Thread(Runnable target)
 * 5.4 调用Thread类的start()方法启动线程
 *
 * */

public class threadTest {

    public static void main(String[] args) {
        Thread thread = new FirstThread();
        thread.start();

        String threadName =
                Thread.currentThread().getName();
        for (int i = 0; i < 100; i++) {
            System.out.println(threadName + ":" + i);
        }

    }

}

class FirstThread extends Thread{
    /*线程体在run()方法中*/
    @Override
    public void run() {
        String threadName =
                Thread.currentThread().getName();
        for (int i = 0; i < 100; i++) {
            System.out.println(threadName + ":" + i);
        }
    }
}
以下三种方式实现:使用两个线程共同打印1—100
/*不考虑线程安全的问题:
 * 使用Thread类,创建两个线程,共同打印0——99
 * */

public class PrintNumber {

    public static void main(String[] args) {

        int i = 0;

        MyThread thread1 = new MyThread("Thread1");
        MyThread thread2 = new MyThread("Thread2");

        MyThread.setI(i);

        thread1.start();
        thread2.start();

    }

}

class MyThread extends Thread{
    //给线程创建一个静态参数
    private static int i;

    public static void setI(int i) {
        MyThread.i = i;
    }


    public MyThread(String threadName) {
        super(threadName);
    }

    @Override
    public void run() {
        String threadName = Thread.currentThread().getName();

        for (; i < 100; i++) {
            System.out.println(threadName + ":" + i);
        }
    }
}
public class PrintNumber2 {
    int i = 0 ;

    public static void main(String[] args) {
        PrintNumber2 printNumber = new PrintNumber2();

        MyThread2 thread1 = new MyThread2("thread1", printNumber);
        MyThread2 thread2 = new MyThread2("thread2",printNumber);

        thread1.start();
        thread2.start();

    }

}

class MyThread2 extends Thread{
    PrintNumber2 printNumber;

    public MyThread2(String threadName,PrintNumber2 printNumber) {
        super(threadName);
        this.printNumber = printNumber;
    }

    @Override
    public void run() {
        String threadName = Thread.currentThread().getName();

        for (; printNumber.i < 100; printNumber.i++) {
            System.out.println(threadName + ":" + printNumber.i);
        }
    }
}
public class MyRunnable implements Runnable {

    int i = 0;
    public void run() {
        String threadName = Thread.currentThread().getName();

        for (; i < 100; i++) {
            System.out.println(threadName + ":" + i);
        }
    }

    public static void main(String[] args) {
        MyRunnable myRunnable = new MyRunnable();

        Thread thread1 = new Thread(myRunnable);
        Thread thread2 = new Thread(myRunnable);

        thread1.start();
        thread2.start();

    }

}
线程的生命周期
New(新建状态) Runnable(可执行状态,有权获得CPU控制权,正在等待) Running(执行状态,已获得CPU控制权)
Dead(死亡状态,使用isAlive方法判断是否死亡,已经死亡的线程不能再调用start()方法,否则会抛异常)
1)yield()方法 主动让出CPU控制权 回到等待状态
2)sleep(int mills)方法 使线程休眠一段时间 以ms为单位
3) join()方法 当前线程调用其他线程的join方法,当前线程将被挂起,进入阻塞状态,等待另一个线程执行完毕
4)interrupt() 解除线程的阻塞状态 会抛出InterruptedException
5)isAlive()
线程调度
1)线程的优先级
setPriority() (一般不使用这种方法来进行优先级设置)getPriority()
共有10个优先级 整数值越大优先级越高 每个线程都有1个默认优先级 主线程的优先级是5
3个常量:MIN_Priority MAX_Priority NORM_Priority
线程同步
实现如下效果:
小强 拿走了1个苹果
还剩下4个苹果
小强 拿走了1个苹果
还剩下3个苹果
小明 拿走了1个苹果
还剩下2个苹果
小强 拿走了1个苹果
还剩下1个苹果
小强 拿走了1个苹果
还剩下0个苹果
小强 的线程结束了
小明 的线程结束了
public class ThreadTest2 implements Runnable {

    int appleNum = 5;

    public static void main(String[] args) throws InterruptedException {
        ThreadTest2 threadTest2 = new ThreadTest2();

        Thread th1 = new Thread(threadTest2);
        Thread th2 = new Thread(threadTest2);

        th1.setName("小强");
        th2.setName("小明");

        th1.start();
        th2.start();

    }

    boolean getApple(){
        //将以下代码锁起来,同一时刻只允许一个线程使用
        synchronized (this) {
            if(appleNum > 0){
                System.out.println(Thread.currentThread().getName() + " 拿走了1个苹果");
                appleNum = appleNum - 1;
                System.out.println("还剩下" + appleNum + "个苹果");
                return true;
            }

            return false;
        }

    }

    public void run() {
            while(appleNum > 0){
                getApple();
            }

            if(getApple() == false){
                System.out.println(Thread.currentThread().getName() + " 的线程结束了");
            }
    }

}
线程安全问题
1)多个线程使用同一个资源导致,使用synchronized代码块(称为同步块)解决线程安全的问题
2)也可以使用synchronized 关键字定义方法,称为同步方法
线程通信
1)wait()方法
2)notify() notifyAll()方法 唤醒等待中的线程 这些方法都需要在同步方法中调用
/*
 * 张飞有1张20元钞票 刘备和关羽各有1张5元钞票 售货员已有1张5元钞票 票值5元
 * */

public class TicketHouse implements Runnable{

    private int fiveCount = 1;
    private int twyCount;
    public synchronized boolean buyticket(){  //该方法使用synchronized修饰
        String buyerName = Thread.currentThread().getName();
        if("zf".equals(buyerName)){
            if(fiveCount < 3){
                System.out.println("张飞来买票了,当前的五元钞票已有" + fiveCount + "张,不够找零,请您等待");
                try {
                    wait();
                } catch (InterruptedException e) {
                    e.printStackTrace();
                }
                }
            System.out.println("张飞来买票了,当前的五元钞票已有" + fiveCount + "张");
            fiveCount = fiveCount -3 ;
            twyCount = twyCount + 1;
            System.out.println("卖给张飞一张票,目前五元钞票剩下" + fiveCount + "张;目前二十元钞票有" + twyCount + "张");
        }else if("gy".equals(buyerName)){
            System.out.println("关羽来买票了,当前的五元钞票已有" + fiveCount + "张");
            fiveCount = fiveCount + 1;
            System.out.println("卖给关羽一张票,目前五元钞票剩下" + fiveCount + "张");
        }else if("lb".equals(buyerName)){
            System.out.println("刘备来买票了,当前的五元钞票已有" + fiveCount + "张");
            fiveCount = fiveCount + 1;
            System.out.println("卖给刘备一张票,目前五元钞票剩下" + fiveCount + "张");
        }

        if(fiveCount == 3){
            notifyAll();  //唤醒被暂停的线程,执行wait()后的代码
        }

        return false;
    }

    public void run() {
        buyticket();
    }

    public static void main(String[] args) {
        TicketHouse ticketHouse = new TicketHouse();

        Thread th1 = new Thread(ticketHouse);
        Thread th2 = new Thread(ticketHouse);
        Thread th3 = new Thread(ticketHouse);

        th1.setName("zf");
        th2.setName("gy");
        th3.setName("lb");

        th3.start();
        th2.start();
        th1.start();
    }

}
48 网络编程
目的:直接或间接地通过网络协议与其他计算机进行通讯
网络编程中主要有两个问题:
1)如何准确地定位网络上一台或多台主机
2)找到主机后如何可靠高效地进行数据传输
常用的TCP/IP以其中的两个协议:TCP和IP协议而得名,实际上是一组协议,还包括其他一些协议
传输控制协议TCP:先建立TCP链接,在传输完毕后,释放连接
用户数据包协议:UDP
端口号与IP地址和组合发出一个网络套接字(Socket) 端口号被规定为一个16位的整数0—65535
套接字能执行7种基本操作:
—连接到远程主机
—绑定到端口
—接收从远程机器来的连接请求
—监听到达的数据
—发送数据
—接收数据
—关闭连接
@Test
    public void testInetAddress() {
        InetAddress inetAddress;
        try {
            //使用getByName()方法
            inetAddress = InetAddress.getByName("www.baidu.com");
            System.out.println(inetAddress);
        } catch (UnknownHostException e) {
            System.out.println("这个域名不存在");
            e.printStackTrace();
        }

    }
客户端Socket的工作过程包括4个步骤:
1)创建一个Socket
2)打开连接到Socket的输入/出流
3)按照一定协议对Socket进行读/写操作
4)关闭Socket
服务端Socket的工作过程包含4个步骤:
1)调用ServerSocket(int port)创建一个服务器端套接字,并绑定到指定端口上
2)调用accept(),监听连接请求
3)调用Socket类的OutputStream和getInputStream获取输出流和输入流,开始网络数据的发送和接收
4)关闭Socket
Server端代码:
@Test
    public void testServerSocket() throws IOException {
        ServerSocket serverSocket = new ServerSocket(8989);
        Socket socket = serverSocket.accept();

        OutputStream out = socket.getOutputStream();
        PrintWriter writer = new PrintWriter(out);
        writer.write("来自服务端的问候哦");

        writer.close();
        out.close();

        socket.close();
        serverSocket.close();

    }
客户端代码:
@Test
    public void testSocket() throws IOException {
        InetAddress  address = InetAddress.getByName("127.0.0.1");
        Socket socket = new Socket(address, 8989);

        InputStream in = socket.getInputStream();
        BufferedReader reader = new BufferedReader(new InputStreamReader(in));

        System.out.println("O(∩_∩)O:" + reader.readLine());

        reader.close();
        in.close();
        socket.close();

    }
完成将服务器文件复制到本地:
public class SocketTest {

    @Test
    public void testServerSocket() throws IOException {
        //新建一个ServerSocket,并设置监听请求
        ServerSocket serverSocket = new ServerSocket(8686);
        Socket socket = serverSocket.accept();
        //从程序到socket的输出流
        OutputStream out = socket.getOutputStream();
        //buffer用于存放从文件中读取出来的字符
        byte [] buffer = new byte[1024];
        int len = 0;
        //从文件到程序的输入流
        InputStream in = new FileInputStream("abc.jpg");
        //通过in从文件读入buffer,再从buffer通过out写入socket,客户端会通过socket接收
        while((len = in.read(buffer)) != -1){
            out.write(buffer, 0, len);
        }

        in.close();
        out.close();
        socket.close();
        serverSocket.close();

    }


    @Test
    public void testSocket() throws IOException {
        //客户端新建一个socket并绑定端口
        InetAddress address = InetAddress.getByName("127.0.0.1");
        Socket socket = new Socket(address, 8686);
        //从socket到程序
        InputStream in = socket.getInputStream();
        //buffer用于存放从程序到本地文件
        byte [] buffer = new byte[1024];
        int len = 0 ;
        //从程序到本地文件
        OutputStream out = new FileOutputStream("abcd.jpg");
        //通过in从socket读入buffer,再通过out将buffer写入文件
        while((len = in.read(buffer)) != -1){
            out.write(buffer, 0, len);
        }

        in.close();
        out.close();
        socket.close();
    }

}
UDP:不能保证数据是否能送达,也不能保证数据什么时候能送达,所以不建议使用
URL编程:
/*
     * 将网络资源下载到本地
     * */
    @Test
    public void testUrlConnection() throws IOException {
        URL url = new URL("http://127.0.0.1:8080/examples/test.txt");

        System.out.println(url.getPath());

        URLConnection urlConnection = url.openConnection();

        //将文件下载到本地
        InputStream in = urlConnection.getInputStream();
        OutputStream out = new FileOutputStream("text.txt");

        byte [] buffer = new byte[1024];
        int len = 0;

        while((len = in.read(buffer)) != -1){
            out.write(buffer, 0, len);
        }
    }
至此,java基础篇结束。