1、安装myeclipse
2、安装FlashBuilder
3、下载blazeds,http://sourceforge.net/adobe/wiki/Projects/
4、在myeclipse中新建web项目,解压blazeds,将其中的lib目录和flex目录复制到web项目路径中
5、修改web.xml
<?xml version="1.0" encoding="UTF-8"?>
<web-app version="2.5" xmlns="http://java.sun.com/xml/ns/javaee"
    xmlns:xsi="http://www.w3.org/2001/XMLSchema-instance"
    xsi:schemaLocation="http://java.sun.com/xml/ns/javaee
    http://java.sun.com/xml/ns/javaee/web-app_2_5.xsd">

    <!-- Http Flex Session attribute and binding listener support -->
    <listener>
        <listener-class>flex.messaging.HttpFlexSession</listener-class>
    </listener>

    <servlet>
        <servlet-name>MessageBrokerServlet</servlet-name>
        <servlet-class>flex.messaging.MessageBrokerServlet</servlet-class>
        <init-param>
            <param-name>services.configuration.file</param-name>
            <param-value>/WEB-INF/flex/services-config.xml</param-value>
        </init-param>
        <load-on-startup>1</load-on-startup>
    </servlet>
    <servlet-mapping>
        <servlet-name>MessageBrokerServlet</servlet-name>
        <url-pattern>/messagebroker/*</url-pattern>
    </servlet-mapping>

</web-app>
6、新建java类,提供flex远程访问
package com.hnhcc;


public class HelloWorld
{

    public String say()
    {
        return "hello world!";
    }
}
7、修改web-inf下flex目录中的remoting-congfig.xml文件,让flex项目能访问
<?xml version="1.0" encoding="UTF-8"?>
<service id="remoting-service"
    class="flex.messaging.services.RemotingService">

    <adapters>
        <adapter-definition id="java-object" class="flex.messaging.services.remoting.adapters.JavaAdapter" default="true"/>
    </adapters>

    <default-channels>
        <channel ref="my-amf"/>
    </default-channels>

    <destination id="hello">
        <properties>
            <source>com.hnhcc.HelloWorld</source>
        </properties>
    </destination>

</service>
8、在FlashBuilder中新建flex项目

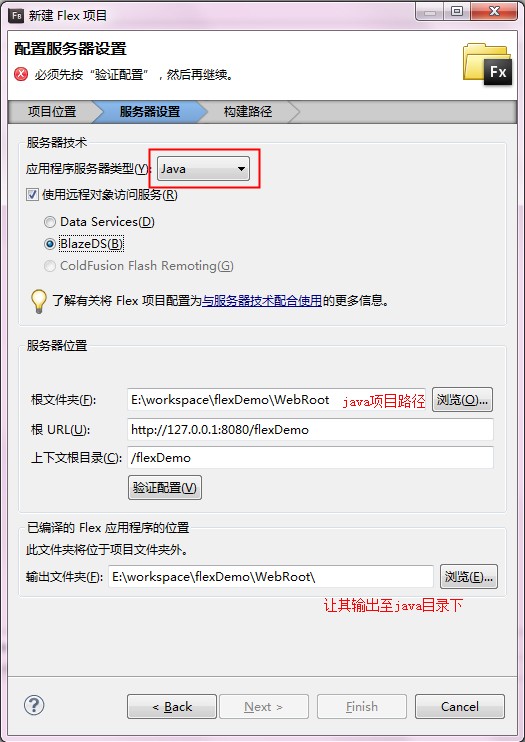
9、配置服务器路径,根目录选择java项目的根目录下,配置完成后点击验证,然后完成
10、在flex主程序中添加相应的控件和返回结果的处理方法
<?xml version="1.0" encoding="utf-8"?>
<s:WindowedApplication xmlns:fx="http://ns.adobe.com/mxml/2009"
                       xmlns:s="library://ns.adobe.com/flex/spark"
                       xmlns:mx="library://ns.adobe.com/flex/mx">
    <fx:Script>
        <![CDATA[
            import mx.rpc.events.ResultEvent;

            protected function helloResultHandler(event:ResultEvent):void
            {
                demo.text = event.result.toString();
            }

            protected function buttonClickHandler(event:MouseEvent):void
            {
                hello.say();
            }

        ]]>
    </fx:Script>
    <fx:Declarations>
        <s:RemoteObject id="hello" destination="hello" result="helloResultHandler(event)"/>
    </fx:Declarations>
    <s:Button x="366" y="180" label="按钮" click="buttonClickHandler(event)"/>
    <s:Label id="demo" x="386" y="135" text="标签"/>

</s:WindowedApplication>
部署到tomcat下,运行http://127.0.0.1:8080/flexDemo试试