JDK Byte Buffer的缺点:长度是固定的,不能动态扩容,API使用复杂,因此Netty封装了自己ByteBuf,Bytebuf有三个重要属性:Capacity容量、readerIndex读取位置和writerIndex写入位置,提供两个指针来支持顺序读写操作.同时三者满足如下关系:0<=readerIndex<=writerIndex<=capacity.下面给出ByteBuf使用demo
public class ByteBufDemo {
    @Test
    public void apiTest() {
        //  +-------------------+------------------+------------------+
        //  | discardable bytes |  readable bytes  |  writable bytes  |
        //  |                   |     (CONTENT)    |                  |
        //  +-------------------+------------------+------------------+
        //  |                   |                  |                  |
        //  0      <=       readerIndex   <=   writerIndex    <=    capacity

        // 1.创建一个非池化的ByteBuf,大小为10个字节
        ByteBuf buf = Unpooled.buffer(10);
        System.out.println("原始ByteBuf为====================>" + buf.toString());
        System.out.println("1.ByteBuf中的内容为===============>" + Arrays.toString(buf.array()) + "
");

        // 2.写入一段内容
        byte[] bytes = {1, 2, 3, 4, 5};
        buf.writeBytes(bytes);
        System.out.println("写入的bytes为====================>" + Arrays.toString(bytes));
        System.out.println("写入一段内容后ByteBuf为===========>" + buf.toString());
        System.out.println("2.ByteBuf中的内容为===============>" + Arrays.toString(buf.array()) + "
");

        // 3.读取一段内容
        byte b1 = buf.readByte();
        byte b2 = buf.readByte();
        System.out.println("读取的bytes为====================>" + Arrays.toString(new byte[]{b1, b2}));
        System.out.println("读取一段内容后ByteBuf为===========>" + buf.toString());
        System.out.println("3.ByteBuf中的内容为===============>" + Arrays.toString(buf.array()) + "
");

        // 4.将读取的内容丢弃
        buf.discardReadBytes();
        System.out.println("将读取的内容丢弃后ByteBuf为========>" + buf.toString());
        System.out.println("4.ByteBuf中的内容为===============>" + Arrays.toString(buf.array()) + "
");

        // 5.清空读写指针
        buf.clear();
        System.out.println("将读写指针清空后ByteBuf为==========>" + buf.toString());
        System.out.println("5.ByteBuf中的内容为===============>" + Arrays.toString(buf.array()) + "
");

        // 6.再次写入一段内容,比第一段内容少
        byte[] bytes2 = {1, 2, 3};
        buf.writeBytes(bytes2);
        System.out.println("写入的bytes为====================>" + Arrays.toString(bytes2));
        System.out.println("写入一段内容后ByteBuf为===========>" + buf.toString());
        System.out.println("6.ByteBuf中的内容为===============>" + Arrays.toString(buf.array()) + "
");

        // 7.将ByteBuf清零
        buf.setZero(0, buf.capacity());
        System.out.println("将内容清零后ByteBuf为==============>" + buf.toString());
        System.out.println("7.ByteBuf中的内容为================>" + Arrays.toString(buf.array()) + "
");

        // 8.再次写入一段超过容量的内容
        byte[] bytes3 = {1, 2, 3, 4, 5, 6, 7, 8, 9, 10, 11};
        buf.writeBytes(bytes3);
        System.out.println("写入的bytes为====================>" + Arrays.toString(bytes3));
        System.out.println("写入一段内容后ByteBuf为===========>" + buf.toString());
        System.out.println("8.ByteBuf中的内容为===============>" + Arrays.toString(buf.array()) + "
");
        //  随机访问索引 getByte
        //  顺序读 read*
        //  顺序写 write*
        //  清除已读内容 discardReadBytes
        //  清除缓冲区 clear
        //  搜索操作
        //  标记和重置
        //  完整代码示例:参考
        // 搜索操作 读取指定位置 buf.getByte(1);
        //
    }
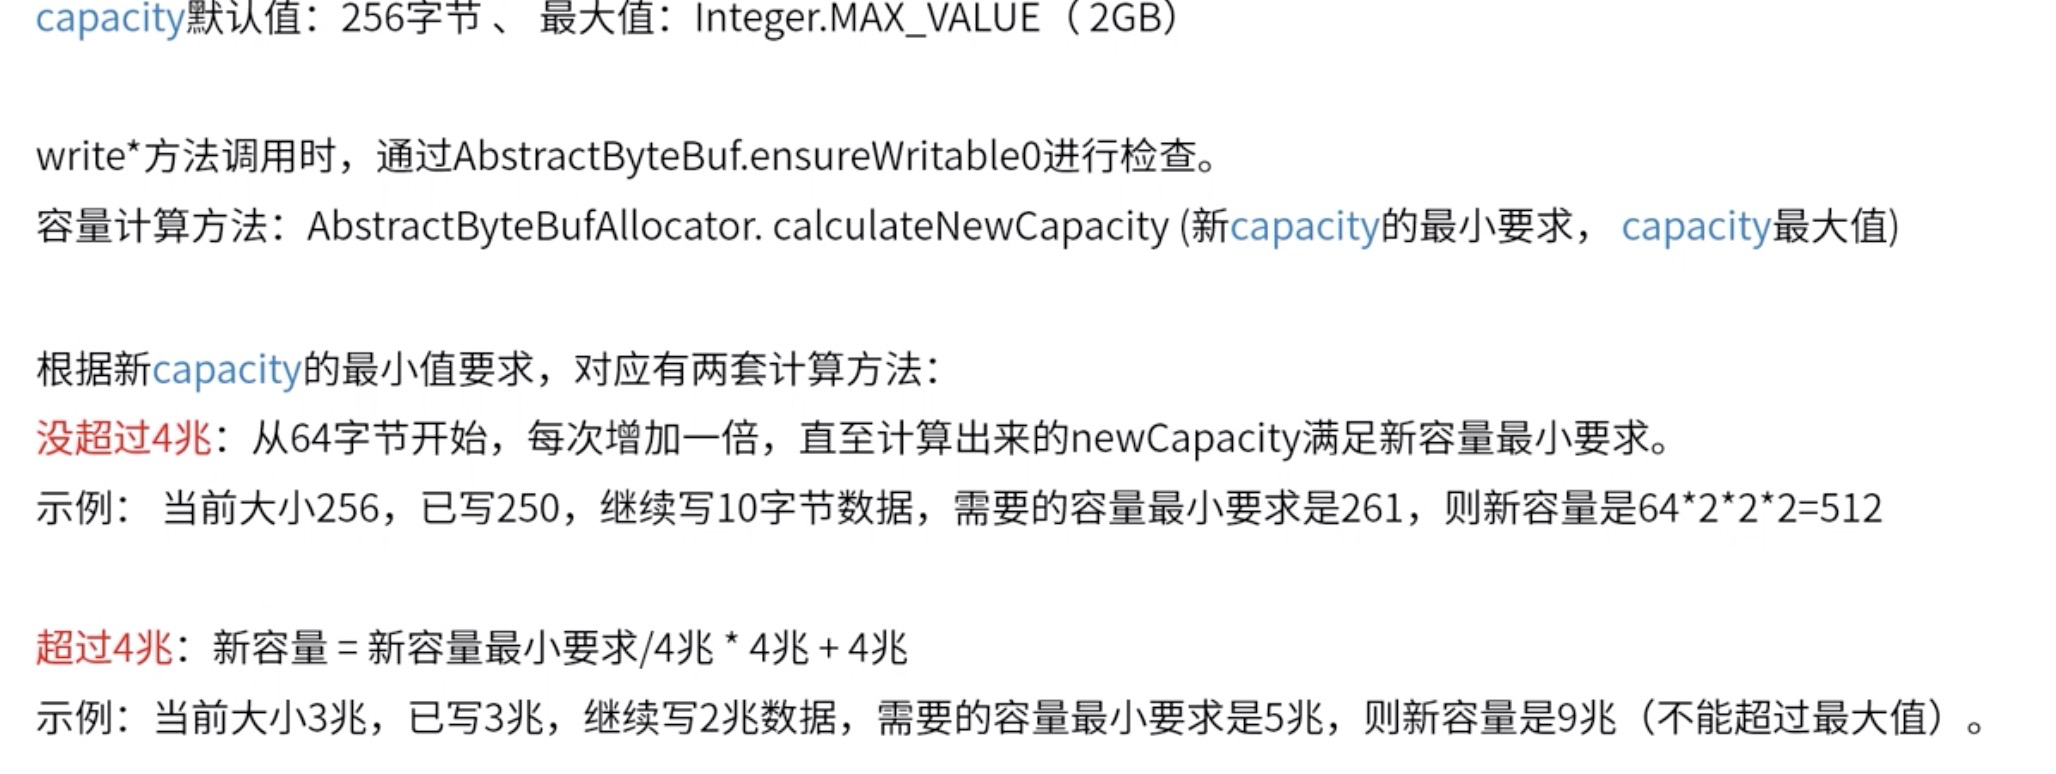
ByteBuf扩容机制
ByteBuf从堆内/堆外、是否池化、访问方式三个纬度分为8种:
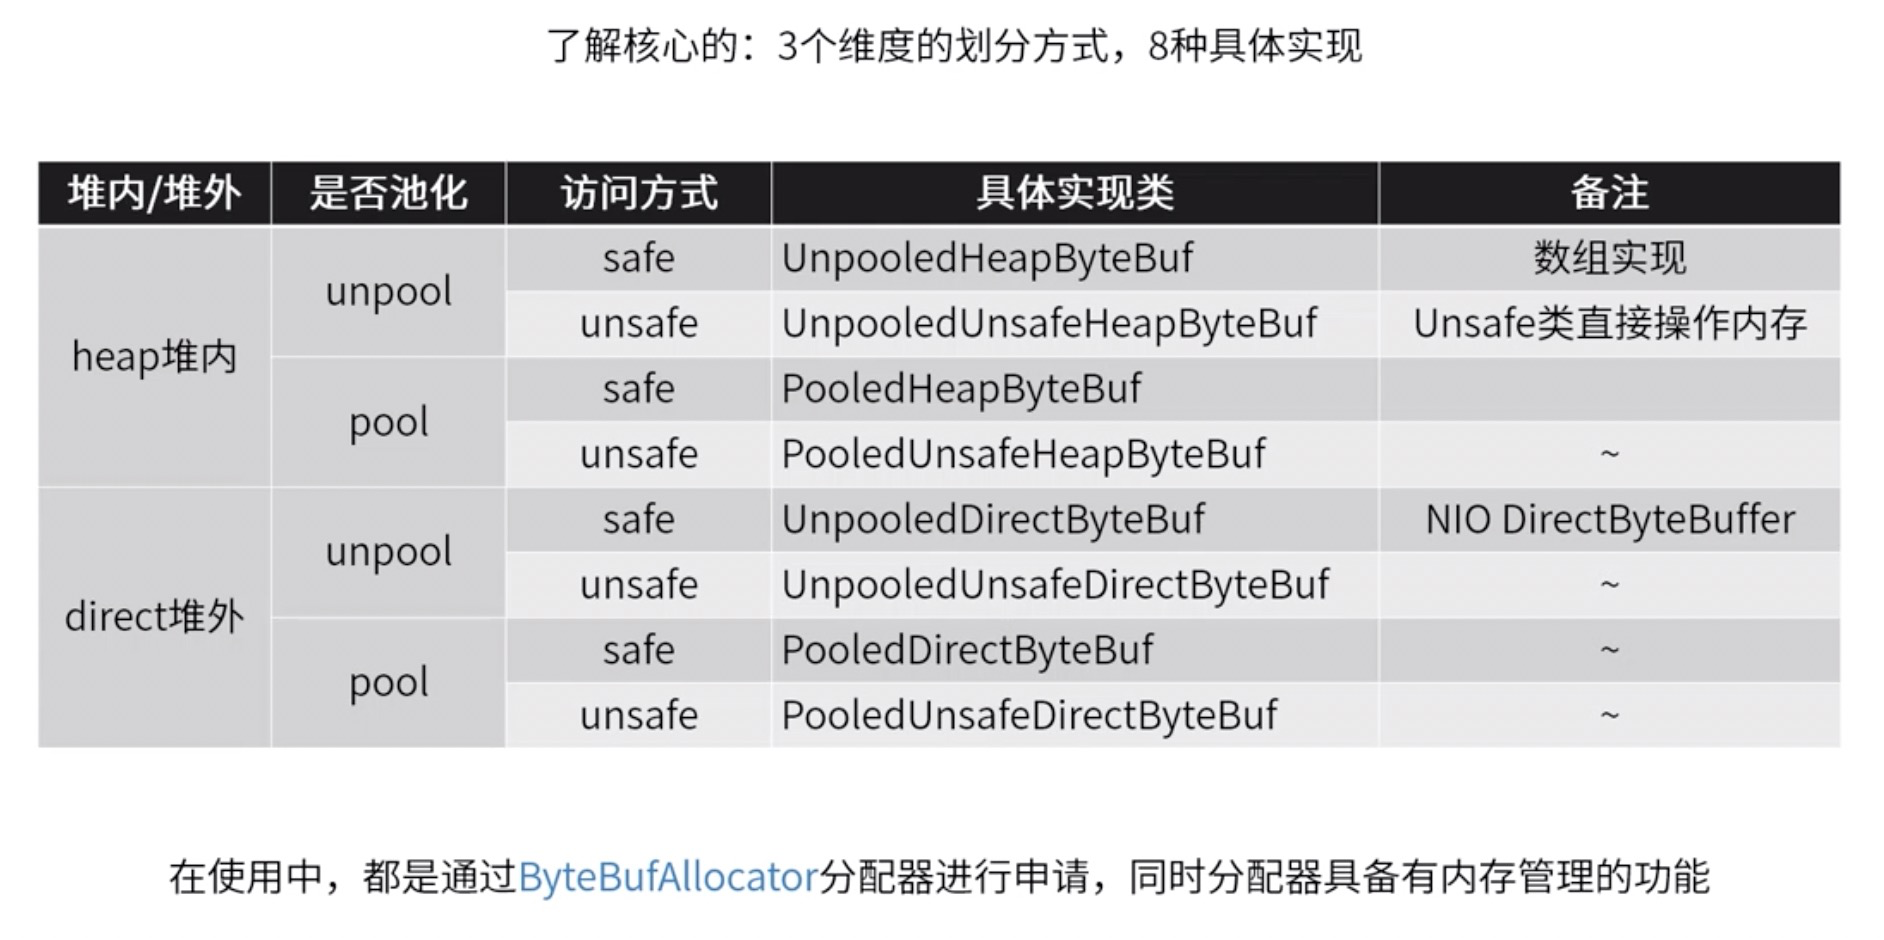
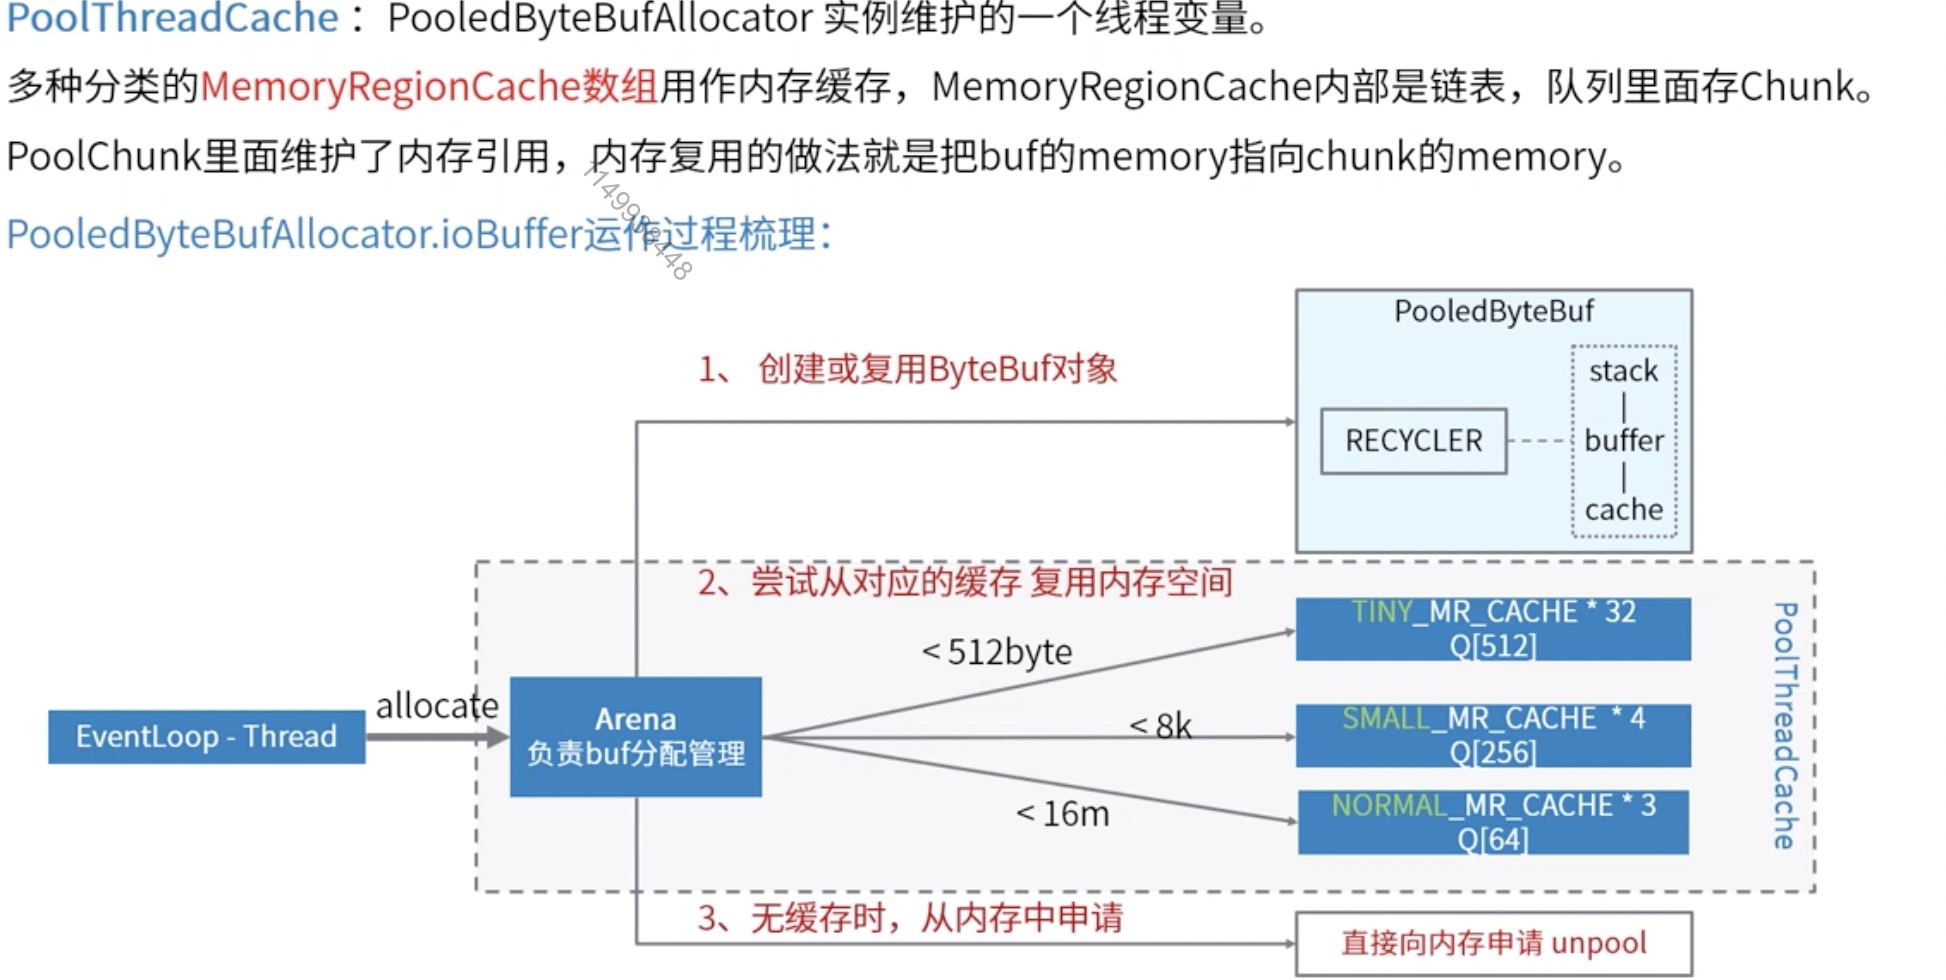
就访问而言,safe和unsafe的主要区别就是是否使用底层是否使用unsafe直接操作内存,堆内/堆外则是指Bytebuf使用jvm堆内内存还是直接使用操作系统的内存,而是否池化则是Bytebuf是否能够放入对象池中复用,Netty为了最求极致的性能默认使用PooledUnsafeDirectByteBuf,Netty对于池化的Bytebuf内存分配算法原理如下
ByteBuf的零copy机制
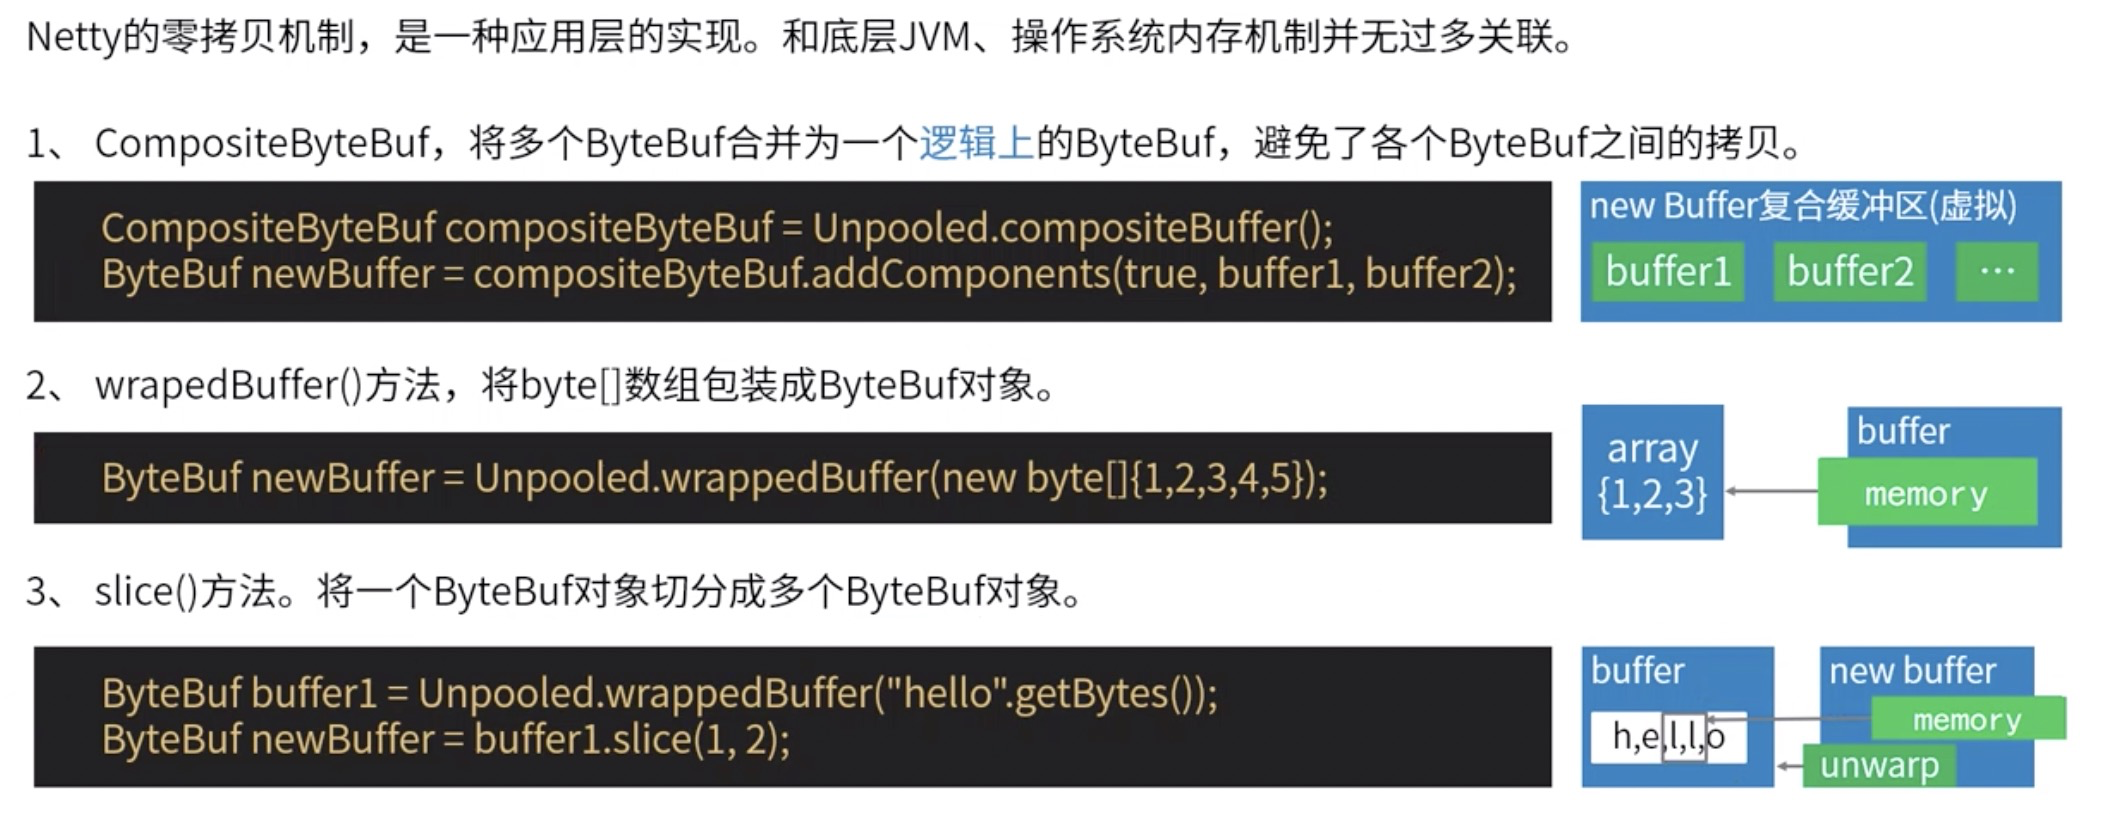
测试demo如下
public class ZeroCopyTest {
    @org.junit.Test
    public void wrapTest() {
        byte[] arr = {1, 2, 3, 4, 5};
        ByteBuf byteBuf = Unpooled.wrappedBuffer(arr);
        System.out.println(byteBuf.getByte(4));
        arr[4] = 6;
        System.out.println(byteBuf.getByte(4));
    }

    @org.junit.Test
    public void sliceTest() {
        ByteBuf buffer1 = Unpooled.wrappedBuffer("hello".getBytes());
        ByteBuf newBuffer = buffer1.slice(1, 2);
        newBuffer.unwrap();
        System.out.println(newBuffer.toString());
    }

    @org.junit.Test
    public void compositeTest() {
        ByteBuf buffer1 = Unpooled.buffer(3);
        buffer1.writeByte(1);
        ByteBuf buffer2 = Unpooled.buffer(3);
        buffer2.writeByte(4);
        CompositeByteBuf compositeByteBuf = Unpooled.compositeBuffer();
        CompositeByteBuf newBuffer = compositeByteBuf.addComponents(true, buffer1, buffer2);
        System.out.println(newBuffer);
    }

}