前言:CANBUS是Apollo需要根据你的底盘写代码的地方,感觉也是Apollo最难调试的部分。这部分首先要选好CAN卡,因为不是Apollo推荐的CAN卡,驱动程序和对应接口,可能都需要自己调整,Apollo推荐的是ESDCAN,我买了一个单口的ESDCAN卡,4000多,超级贵。建议有钱买个4口的CAN卡,因为Apollo推荐的RADAR也要接在CAN总线上,但我的项目是Demo,RADAR就忽略了。
相关的下载请到本人的百度网盘。链接: https://pan.baidu.com/s/1AGs25ReMetT8SCSRrJj8MQ 提取码: gbh2
注意:
(1)购买IPC时需要注意主板上是否有PIC-E X1插槽, ESDCAN卡是要插在这个槽上的。同时注意如果在你的CAN网络中存在120欧姆的匹配电阻,如果没有,ESDCAN上的JX300上的跳线拿下来插到JX400上,如果有,不用动。
(2) Apollo给的文档中可以找到安装ESD CAN的安装方式(https://github.com/ApolloAuto/apollo-kernel/blob/master/linux/ESDCAN-README.md),提供了两种方式:第一种方式在编译Apollo的时候同时编译,第二种方式在build Apollo之后安装。本文采用第二种方式,Apollo也推荐采用第二种方式。
(3) Apollo的消息传递全部是由google的Protocol Buffers来实现,建议搭建先看一下相关的教程:https://developers.google.com/protocol-buffers/及http://www.ibm.com/developerworks/cn/linux/l-cn-gpb/。.proto生成的文件都是写保护的,不可以修改。
第一部分
这部分内容主要是调试CANBUS之前的配置CANBUS、生成必要的文件、代码等。
1. ESD CAN卡安装
参考注意(1)。
2. ESD CAN驱动安装
网络上有许多关于ESDCAN的安装与调试,本人亲测过,好用的不多。所以列出本人的调试过程。
(1) 请在我的百度网盘中下载 canpci402安装脚本.zip。默认下载到Downloads目录,执行:
$ cd ~/Downloads
$ unzip canpci402安装脚本.zip
$ cd canpci402安装脚本
(2) 在拷贝canpci402setup_v1.sh与98-esdcanpcie402.rules文件到~目录,并将canpci402setup_v1.sh变为可执行文件。
$ cp canpci402setup_v1.sh 98-esdcanpcie402.rules ~/
$ sudo chmod a+x ~/canpci402setup_v1.sh
(3) 拷贝 esdcan-pcie402-linux-2.6.x-x86_64-3.10.4.tgz 到 ~目录,并解压。
$ cp esdcan-pcie402-linux-2.6.x-x86_64-3.10.4.tgz ~/
$ cd ~/
$ tar -xv -f esdcan-pcie402-linux-2.6.x-x86_64-3.10.4.tgz
(4) 执行canpci402setup_v1.sh,执行过程中需要输入password。
$ ./canpci402setup_v1.sh
(5) 测试驱动是否安装完成
$ cantest
如果正常安装成功,会出现:
Net 0: ID=CAN_PCIE402 (1 ports) Serial no.: HA002424
Versions (hex): Lib=4.0.01 Drv=3.A.04 HW=1.0.16 FW=0.0.42 (0.0.00)
Baudrate=7fffffff (Not set) Status=0000 Features=00000ffa
Ctrl=esd Advanced CAN Core @ 80 MHz (Error Active / REC:0 / TEC:0)
Transceiver=TI SN65HVD265
TimestampFreq=80.000000 MHz Timestamp=000000007E95031A
如果没有安装成功(大概率会安装成功),请检查以下文件夹是否有相关文件(大概率会有,如果没有我也给出了操作生成):
确认/usr/local/include中是否有ntcan.h;如果没有,请从~/esdcan-pcie402-linux-2.6.x-x86_64-3.10.4/include中拷贝:
$ sudo install -v -g root -o root -m u=rw,g=r,o=r ~/esdcan-pcie402-linux-2.6.x-x86_64-3.10.4/include/ntcan.h /usr/local/include/
确认/usr/local/lib中是否有libntcan.so、libntcan.so.4以及libntcan.so.4.0.1;如果没有全部或部分文件,请按照下述步骤补全没有的文件,并建立动态链接库。
请从~/esdcan-pcie402-linux-2.6.x-x86_64-3.10.4/lib64中拷贝libntcan.so.4.0.1
$ sudo install -v -g root -o root -m u=rwx,g=rx,o=rx ~/esdcan-pcie402-linux-2.6.x-x86_64-3.10.4/lib64/libntcan.so.4.0.1 /usr/local/lib/
$ cd /usr/local/lib
$ sudo ldconfig -v -n /usr/local/lib
确认libntcan.so.4之后,执行
$ sudo ln -sfv libntcan.so.4 libntcan.so
这时会成成libntcan.so。建立动态连接库:
$ ldconfig -p | grep ntcan
$ cat /etc/ld.so.conf | grep /usr/local/lib
$ sudo sh -c "echo /usr/local/lib >> /etc/ld.so.conf"
$ sudo ldconfig
动态连接库建立完成
确认/etc/udev/rules.d中是否有98-esdcanpcie402.rules,如果没有从~目录拷贝。
$ sudo install -v -g root -o root -m u=rw,g=rw,o=r ~/98-esdcanpcie402.rules /etc/udev/rules.d/
$ sudo service udev restart
确认/lib/modules/$(uname -r)/kernel/drivers/pci/中是否有esdcan-pcie402.ko,如果没有,确认~/esdcan-pcie402-linux-2.6.x-x86_64-3.10.4/src中是否有esdcan-pcie402.ko,如果没有
$ cd ~/esdcan-pcie402-linux-2.6.x-x86_64-3.10.4
$ sudo make
$ sudo install -p -v -g root -o root -m u=rw,g=r,o=r ~/esdcan-pcie402-linux-2.6.x-x86_64-3.10.4/src/esdcan-pcie402.ko /lib/modules/$(uname -r)/kernel/drivers/pci/
(6) 测试CAN卡的工作。请接入您的CAN分析仪,如果没有,也可以接入一个能发送CAN帧设备(比如单片机、ARM等),设置波特率为500k,并能发送数据到ESD CAN。
$ cantest 3 0 0x00 0xffff 1 10 100 1000 5000 2 -1
每个参数的含义为:
3 -- canRead
0 -- net0
0x00 -- first-id 0x00
0xffff -- last-id 0xffff
1 -- count of CMSG-packets
10 -- txbuf (useless here)
100 -- rxbuf
1000 -- tx timeout every 1 second (useless here)
5000 -- rx timeout every 5 seconds
2 -- baud rate 500k bit/s
-1 -- count of ntcan-API-Calls, -1 is forever canRead the bus.
如果ESD CAN接收到了数据,那么CAN卡驱动调试完毕。
3. 在Apollo中安装ESD CAN卡
(1) 根据注意(2)中提到的文档,采用第二种方式(Build & Install Out-of-Tree ESD Kernel Driver)构建Apollo中的ESD CAN卡。在这里,我要强调一下,按照Apollo文档的步骤,虽然生成了esdcan-pcie402.ko,但不能通讯,后来是百度美研团队帮助生成了esdcan-pcie402.ko。所以在这里,在百度网盘中直接提供了extra文件夹(默认下载到Downloads),然后拷贝到指定文件夹
$ sudo cp –rf ~/Downloads/extra /lib/modules/$(uname -r)/
(2) 将生成的文件拷贝到Apollo指定的文件夹。
$ cp -rf ~/esdcan-pcie402-linux-2.6.x-x86_64-3.10.4/include/ ~/apollo/third_party/can_card_library/
$ cp -rf ~/esdcan-pcie402-linux-2.6.x-x86_64-3.10.4/lib64/ ~/apollo/third_party/can_card_library/
$ mv ~/apollo/third_party/can_card_library/lib64 ~/apollo/third_party/can_card_library/lib
这时,如果打开dreamviewer,选择module controller,在Hardware CAN部分显示OK。
4. 由于我们的车辆底盘是自定义底盘,所以需要生成自己底盘的DBC文件,DBC文件编写教程个人推荐:https://blog.csdn.net/king110108/article/details/79010272以及网络上的CANOE的视频教程(只看CANdb++编写部分)。CANdb++的软件在百度网盘中(CANdb-PP_Admin.J1939_30SP27.zip)。有几点注意事项:
(1) 编写的DBC文件只有一个Network nodes,即底盘nodes;
(2) 若干的messages,即底盘上各个模块的收发的信息(以底盘为基准),且每个messages要对应TX message还是RX message(针对底盘信息流动方向);
(3) 若干的signals,即每个信息包含的数据意义,signals要与messages对应;
(4) 收发方向(TX,RX)以底盘的实际方向为准;每个信息的ID为地盘上各个模块的地址;
5. 将编辑好的DBC文件生成自定义(自己车辆)的底层CAN代码:
(1) 将dbc文件放置apollo/moudles/tools/gen_vehicle_protocol文件下,默认生成的DBC放在Downloads文件夹下。
$ cp ~/Downloads/hnacar.dbc ~/apollo/moudles/tools/gen_vehicle_protocol/
(2) 仿照lincoln_conf.yml,在gen_vehicle_protocol 文件夹下生成hnacar_conf.yml文件(按照自己的车辆命名,我们的车辆叫hnacar),内容如下红色字的部分:
dbc_file: hnacar.dbc
protocol_conf: hnacar.yml
car_type: hnacar
sender_list: []
sender: MAB
black_list: []
output_dir: output/
(3) 安装pyyaml
(4) 生成自定义车辆的CAN底层代码:
$ cd ~/apollo/moudles/tools/gen_vehicle_protocol/
$ python gen.py hnacar_conf.yml
这时会在当前文件夹下生成output文件夹,里面包含proto和vehicle文件夹,proto下的文件夹为hnacar.proto,vehicle下是hnacar文件夹,包含protocol文件夹, hnacar_controller.cc, hnacar_controller.h, hnacar_message_manager.cc, hnacar_message_manager.h, hnacar_vehicle_factory.cc, hnacar_vehicle_factory.h。hnacar是自己车辆的名字。
6. 配置相关文件
(1) 将生成的hnacar文件夹拷贝到apollo/modules/canbus/vehicle
$ cp -rf ~/apollo/moudles/tools/gen_vehicle_protocol/output/vehicle/hnacar/ ~/apollo/modules/canbus/vehicle/
(2) 修改apollo/modules/canbus/vehicle目录下vehicle_factory.cc,
(在21行)添加头文件#include "modules/canbus/vehicle/hnacar/hnacar_vehicle_factory.h";
void VehicleFactory::RegisterVehicleFactory() 函数下添加(27行):
Register(VehicleParameter::HNACAR, []() -> AbstractVehicleFactory * {
return new HnacarVehicleFactory();
});
所有的hnacar中都添加自己的名字。
(3) 修改apollo/modules/canbus/vehicle目录下BUILD文件,在cc_library的deps中添加(48行):
"//modules/canbus/vehicle/hnacar:hnacar_vehicle_factory",
(4) 修改apollo/modules/canbus/proto目录下vehicle_parameter.proto文件,在enum VehicleBrand下添加:
HNACAR = 0;
LINCOLN_MKZ = 1;
GEM = 2;
(5) 修改apollo/modules/canbus/conf目录下,仿照canbus_conf_gem.pb.txt文件,添加canbus_conf_hnacar.pb.txt文件:
vehicle_parameter {
brand: HNACAR
max_steer_angle: 630.0
max_steer_angle_spd: 229.0
min_steer_angle_spd: 229.0
max_acc: 1.18
min_acc: -4.5
max_brake_pressure: 7.0
max_enable_fail_attempt: 5
driving_mode: COMPLETE_AUTO_DRIVE
}
can_card_parameter {
brand: ESD_CAN
type: PCI_CARD
channel_id: CHANNEL_ID_ZERO
}
enable_debug_mode: false
enable_receiver_log: false
enable_sender_log: false
并修改apollo/modules/canbus/common/canbus_gflags.cc的(27行)改为:
DEFINE_string(canbus_conf_file, "modules/canbus/conf/canbus_conf_hnacar.pb.txt",
"Default canbus conf file");
(6) 修改apollo/modules/canbus/proto/chassis_detail.proto文件,
在message ChassisDetail的optional Gem gem = 18;下面(30行)添加:optional Hnacar hnacar = 19;
将生成的hnacar.proto文件除了第一行外的全部内容,直接拷贝到chassis_detail.proto的最下面。
(7) 在apollo/modules/common/data/文件夹中仿照mkz_config.pb.txt,添加hnacar_config.pb.txt,内容是与车辆相关的信息:
vehicle_param {
front_edge_to_center: 1.315
back_edge_to_center: 1.315
left_edge_to_center: 0.686
right_edge_to_center: 0.686
length: 2.630
1.372
height: 1.9
min_turn_radius: 2.56
max_acceleration: 2.0
max_deceleration: -6.0
max_steer_angle: 0.5236
max_steer_angle_rate: 1
steer_ratio: 1
wheel_base: 1.280
wheel_rolling_radius: 0.2
}
7. 在dreamviewer的vehicle选项中添加hnacar选项
(1) 在apollo/modules/common/configs/config_gflags.cc中,将(37行)改为:
DEFINE_string(vehicle_config_path, "modules/common/data/hnacar_config.pb.txt",
"the file path of vehicle config file");
这样修改时将hnacar作为默认的车型(之前默认的车型为mkz)。
8. 在docker内编译:
$ cd ~/
$ bash Apollo.sh build
编译完成后,打开dreamviewer会产生相应,连接上CAN分析仪,vehicle选项选择hnacar,mode选navigation,点击module controller,点击CANBUS选项,会看到,你定义的ID号全部在发送data为0的数据。
第二部分
这部分内容正式开始调试CANBUS,我会讲的尽量详细,但如果不是自己亲自实践,恐怕很难消化这部分内容。首先,我先介绍一下CANBUS模块中主要的函数和文件,以及他们的关系。见下图。
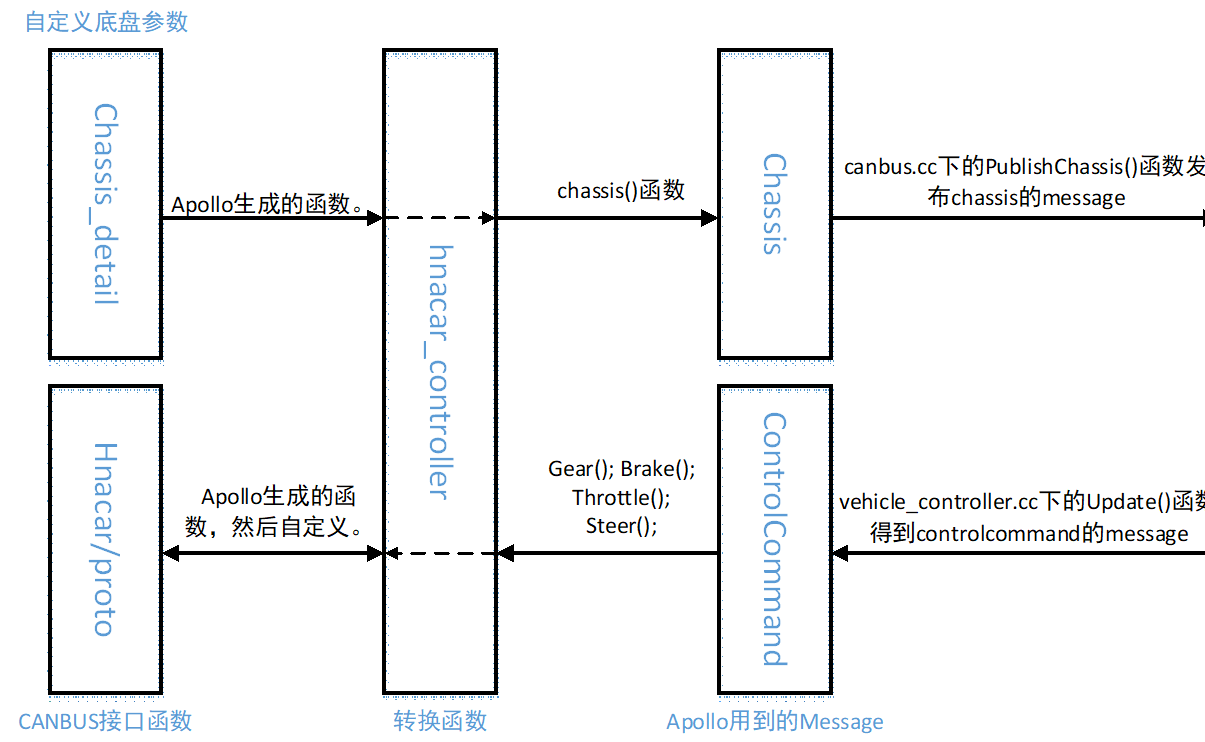
首先解释一下上面的图(根据自己的理解画的如果有人发现有任何问题可以给我留言,我及时改正)。CANBUS模块主要是将来自control等其他模块发出来的message转换成底盘可以执行的数据,通过ESDCAN发给底层,同时也将底盘的返回的数据转换成Apollo需要的message返回给其他模块。上图是具体的执行过程。首先我先介绍一下主要的功能函数。
1. 相关函数:
a) apollo/modules/canbus/proto/chassis_detail.proto:这个文件的作用是保存你车辆的自定义参数。这个文件前面两部分的内容分别是Lincoln车和gem车的参数。在第一部分6(6)中,会根据底盘的DBC生成的hnacar.proto文件(你自定车辆的底盘参数)拷贝到chassis_detail.proto的下面。在这里不要纠结自己车辆生成文件是否可以被Apollo识别,因为Apollo要识别的参数并不是chassis_detail.proto,而是apollo/modules/canbus/proto/chassis.proto。你需要在hnacar_controller.cc中将chassis_detail.proto转换为chassis.proto。
b) apollo/modules/canbus/proto/chassis.proto:Apollo中的一个message。主要用来保存底盘的通用函数(即,底盘的一些通用参数,或者说Apollo用来实现无人驾驶用到的底盘参数)。这些参数通过转换车辆自定义的chassis_detail.proto得到。转换函数在hancar_controller.cc中实现。
c) 在第一部分,6小节,生成了hnacar文件夹,在这个文件夹中,hancar_controller.cc就是用来将其他模块发出来的message转换成底盘可以执行的数据,同时也将底盘的返回的数据转换成Apollo需要的message返回给其他模块。hnacar_message_manager.cc决定了哪些帧用来发送到CAN总线上。hnacar_vehicle_factory.cc将hnacar添加进入Apollo。下面讲解了一些用到的或者需要修改的函数。
hancar_controller.cc中的Init()函数:初始化要发送到CAN总线上的帧,即,初始化hnacar/proto文件夹中的相关帧,以及将帧的ID及函数指针添加到can_sender_(请仿照Lincoln_controller.cc的Init()代码)。
hancar_controller.cc中的chassis()函数:将chassis_detail.proto转换为chassis.proto。具体操作后面介绍。
hancar_controller.cc中的EnableAutoMode()函数:底盘实现无人驾驶需要打开哪些量,比如,使能刹车、油门、转向等等。根据你生成的proto中的函数来。
hancar_controller.cc中的Brake()、Throttle()、Steer()函数:这三个函数是用来的得到controller模块发出的controlcommand中的刹车、转向、油门量。这三个函数是hancar_controller.h中override函数(一定要实现的函数)。由于我的车辆还需要得到速度controlcommand中的速度值,所以在hancar_controller.h中添加了void Speed(double vehicle_speed) override;函数,同时我在hancar_controller.cc中添加了该函数。
d) 在hnacar/proto文件夹中,里面的.cc与.h是你在建立DBC文件的时候,message的名称及ID号(16进制)表示的(注意:每个message都有独立的.cc与.h文件),这些函数的作用是将要发送给底盘的数据转换成底盘可以识别的数据,或将底盘返回的数据转换成Apollo需要的数据。这些函数都需要修改。底盘发送到IPC的message生成.cc与.h文件特点是函数会有void Parse(const std::uint8_t* bytes, int32_t length, ChassisDetail* chassis) 函数。IPC发送给底盘的message生成的.cc与.h文件有virtual void UpdateData(uint8_t *data)函数
2. Apollo调试ESDCAN接收
首先说一下,如果Apollo默认发送bitrate为500k,如果想要修改,请到apollo/modules/drivers/canbus/can_client/esd/esd_can_client.cc中的ret = canSetBaudrate(dev_handler_, NTCAN_BAUD_500);(94行)函数,我这里是250K,所以将NTCAN_BAUD_500改为NTCAN_BAUD_250。其他位置,将apollo_base.sh中的sudo ip link set can0 type can bitrate 500000(182行)改为250000。
CANBUS接收调试从验证ESDCAN是否可以在Apollo内接收信息。所以我的调试步骤为:
(1) 将CAN分析仪借到ESDCAN上,将CAN分析仪的bitrate调为500k,在CAN分析仪软件帧ID的位置默认为00 00 00 01不用变,数据位置由低到高写入31 32 33 34 35 36 37 38,这时因为Apollo的AINFO函数默认接收ASCII码。
(2) 在apollo/modules/drivers/canbus/can_comm/can_receiver.h文件aRecvThreadFunc()函数中(直接接收的信息的位置,169行)添加如下代码:
-
AINFO << "received message is " << std::hex << buf[0].data[0] << " "
-
<< std::hex << buf[0].data[1] << " "
-
<< std::hex << buf[0].data[2] << " "
-
<< std::hex << buf[0].data[3] << " "
-
<< std::hex << buf[0].data[4] << " "
-
<< std::hex << buf[0].data[5] << " "
-
<< std::hex << buf[0].data[6] << " "
-
<< std::hex << buf[0].data[7];
can_client_->Receive(&buf, &frame_num)(144行)函数是在CANBUS接收线程中接收数据的函数,buf的长度为1。所以只查看buf[0]的内容就好。
(3) 在docker内编译,并打开dreamviewer
$ cd /apollo
$ bash apollo.sh build_gpu
$ ./scripts/bootstrap.sh
(4) 查看相应的log文件
$ tail -f data/log/canbus.INFO
点击CAN分析仪软件发送按钮,会在终端上看到:
I0804 15:24:10.373136 30229 can_receiver.h:169] received message is 1 2 3 4 5 6 7 8
3. 调试Apollo接收底层数据
将底盘的发送的数据转换为Apollo的chassis.proto数据,发送到chassis的message中。(建议:在开始调试之前,调试一下apollo/modules/drivers/canbus/common/byte.cc与byte.h文件,试试这个byte的功能)。在第一部分第5步,通过Apollo用我自定义的DBC文件生成了自己的hnacar相关函数,但实际上,我生成的相关函数是有问题的,我生成的函数全是默认是底盘发送的函数,因为我生成的.cc与.h文件都是由Parse()函数(根据Apollo美研团队给我的反馈,是由于我在编写DBC文件的时候没有区分Tx Messages与Rx Messages,但我重写了DBC文件,重新生成了hnacar/proto中的函数还是全部为由Parse()函数。不过没有关系,因为生成的hnacar/proto中的函数全是要修改的)。
首先说明一下你在执行完第一部分的操作,以及第8步build之后生成了哪些函数,如果你了解了Protocol Buffers,那么在第一部分第6步(6)中chassis_detail.proto中添加的optional Hnacar hnacar = 19会在chassis_detail.pb.h(apollo/bazel-out/local-dbg/genfiles/modules/canbus/proto/)中生成Hnacar类,在Hnacar类下面"组合"了各个DBC文件生成的message的类,各个message类中又包含了对message中对signal的操作。所以在IPC读取CANBUS的1帧后,都是通过chassis_detail访问Hnacar然后访问message最后访问操作。其中每个signal基本包含5个操作:
-
void set_has_r_b_turn_motor_high_byte() const; //将r_b_turn_motor_high_byte信号在_has_bits_[0]的对应位设置为1。
-
-
void set_r_b_turn_motor_high_byte(::google::protobuf::int32 value); //对r_b_turn_motor_high_byte信号赋值。
在这里我举一个我自己的例子说明调试过程,我会尽可能详尽的说明。
(1) 在我的车辆需要返回车辆的速度,这个message在我的DBC文件中ID为3,所以在我的proto中有这样一个类Returnturn3。我跟据我的车实际额需要,改写了Returnturn3类下的Parse()函数:
-
void Returnturn3::Parse(const std::uint8_t* bytes, int32_t length,
-
ChassisDetail* chassis) const {
-
chassis->mutable_hnacar()->mutable_return_turn_3()->set_l_b_turn_motor_high_byte(return_current_steer(bytes, length));
-
}
其中,chassis为ChassisDetail的指针,mutable_hnacar()是chassis_detail.proto生成的返回Hnacar指针的函数,mutable_return_turn_3()是chassis_detail.proto生成的返回Returnturn3指针的函数,set_l_b_turn_motor_low_byte是我在定义我的DBC文件中Return_turn的message中的一个名为l_b_turn_motor_low_byte的signal,set_l_b_turn_motor_low_byte函数是对这个信号赋值。return_current_speed(bytes, length)函数是Returnturn3类的函数,作用是将Return_turn的message的8个data字节组拼装成想要的数据。
其他的类也请根据自己的需求改写。实际上,改写的最终目的就是为了将自己的chassis_details.proto,变成Apollo需要的chassis.proto,然后最为message发送到其他模块。
(2) 上面提到的Parse函数在apollo/modules/drivers/canbus/can_comm/message_manager.h中的void MessageManager<SensorType>::Parse(const uint32_t message_id, const uint8_t *data, int32_t length)函数中调用,具体细节大家自己看。这个Parse函数在apollo/modules/drivers/canbus/can_comm/can_receiver.h文件aRecvThreadFunc()线程中被调用。这个线程调用后,底盘的速度和转角会赋值到chassis_detail.proto的l_b_turn_motor_low_byte_与l_b_turn_motor_high_byte_中。
(3) 这时,hnacar_controller.cc中的chassis()函数会调用chassis.proto生成的函数对chassis.proto对应的速度与转角赋值。如下:
-
//AINFO << "The speed is set";
-
} else {
-
chassis_.set_speed_mps(0);
-
//AINFO << "The speed is unset";
-
}
if (chassis_detail.hnacar().return_turn_3().has_l_b_turn_motor_low_byte())这一串就是为了判断chassis_detail中是否有l_b_turn_motor_low_byte信号。chassis_.set_speed_mps()函数是用于对chassis中的speed_mps_赋值。chassis_detail.hnacar().return_turn_3().l_b_turn_motor_low_byte()函数是为了返回l_b_turn_motor_low_byte_的值,也就是速度值。
到此,就是将chassis_detail.proto中的值赋给了chassis_detail.proto
4. 调试底盘发送数据
在调试Apollo底层数据接收的时候,提到了通过DBC生成的每个message的类,都是带Parse()函数的。而第二部分1小节d)中,所有通过DBC文件将IPC发送给底盘的message类中含有UpdateData函数。所以我将要发送到底盘的message类中的Parse()函数全部屏蔽掉,加入在.h中加入virtual void UpdateData(uint8_t *data)函数,然后在.cc中实现它(UpdateData函数的功能是将你要发送到CANBUS上的数据赋值到一个长度为8的uint8_t的数组上)。下面具体说。
首先,在apollo/modules/canbus/canbus.cc里的回调函数OnControlCommand中,调用Update函数,Update函数将control_command中的值通过HnaController类中实现的Gear、Brake、Throttle、Steer等函数 (Gear、Brake、Throttle、Steer函数是VehicleController中的虚函数,HnaController继承了VehicleController并实现了这些函数),在通过这些函数中调用的DBC生成的各个message类中的函数,赋值到各个signal。在由SenderMessage类中的Update()函数(apollo/modules/drivers/canbus/can_comm/can_sender.h的245行)调用message类中的UpdateData函数合成又给8字节的message,然后赋值给can_frame_to_send_。最后在PowerSendThreadFunc()线程中(apollo/modules/drivers/canbus/can_comm/can_sender.h的273行)调用CanFrame()函数返回can_frame_to_send_,通过SendSingleFrame()函数发送到CAN总线上。(这里只介绍主干,其他代码自己看吧)
由于我的车子底盘是由速度控制,而在Apollo默认代码中没有下发速度(在VehicleController中的虚函数中没有Speed虚函数),那么我需要从Controller模块中得到速度,且下发到CANBUS上。下面是我的做法,请大家参考。
首先,我需要得到速度。Controller模块的作用就是将速度转换成刹车、油门量,然后下发。所以根据Apollo美研团队的建议,让我打通Controller模块(即不用Controller模块),我的修改如下:
a)在lon_controller.cc中的268行添加:cmd->set_speed(speed_controller_input_limited); 在195~207行对输入的速度进行修正,speed_controller_input_limited是修正结果。
b)在VehicleController类中添加:virtual void Speed(double vehicle_speed) = 0; 因为在VehicleController类中没有实现从control_command中直接接收Speed。而在control_cmd.proto(/apollo/modules/control/proto/control_cmd.proto)中是有Speed(optional double speed = 9;41行)。
c)在vehicle_controller.cc的ErrorCode VehicleController::Update(const ControlCommand &command)函数的132行添加:Speed(control_command.speed()); 因为在Update函数中只将Gear、Throttle、Brake、SetEpbBreak等量发下去,没有发Speed。
d)在hnacar_controller.h中添加:void Speed(double vehicle_speed) override;在hnacar_controller.cc中添加void HnacarController::Speed(double vehicle_speed) {}函数,用以实现虚函数。Speed函数将control_command转换成从canbus下发的值。
e)在canbus的vehicle中的hna_controller.cc中的chassis()函数添加:
-
if (chassis_detail.has_vehicle_spd() &&
-
chassis_detail.vehicle_spd().has_vehicle_spd()) {
-
chassis_.set_speed_mps(chassis_detail.vehicle_spd().vehicle_spd());
-
} else {
-
chassis_.set_speed_mps(0);
-
}
f) 修改我用DBC生成的下发类。在生成的最初,我的类带有
-
// void Setsteer40::Parse(const std::uint8_t* bytes, int32_t length,
-
// ChassisDetail* chassis) const {
-
// chassis->mutable_hnacar()->mutable_set_steer_40()->set_r_b_turn_motor_high_byte(r_b_turn_motor_high_byte(bytes, length));
-
// chassis->mutable_hnacar()->mutable_set_steer_40()->set_r_b_turn_motor_low_byte(r_b_turn_motor_low_byte(bytes, length));
-
// chassis->mutable_hnacar()->mutable_set_steer_40()->set_l_b_turn_motor_high_byte(l_b_turn_motor_high_byte(bytes, length));
-
// chassis->mutable_hnacar()->mutable_set_steer_40()->set_l_b_turn_motor_low_byte(l_b_turn_motor_low_byte(bytes, length));
-
// chassis->mutable_hnacar()->mutable_set_steer_40()->set_l_f_turn_motor_high_byte(l_f_turn_motor_high_byte(bytes, length));
-
// chassis->mutable_hnacar()->mutable_set_steer_40()->set_l_f_turn_motor_low_byte(l_f_turn_motor_low_byte(bytes, length));
-
// chassis->mutable_hnacar()->mutable_set_steer_40()->set_r_f_turn_motor_high_byte(r_f_turn_motor_high_byte(bytes, length));
-
// chassis->mutable_hnacar()->mutable_set_steer_40()->set_r_f_turn_motor_low_byte(r_f_turn_motor_low_byte(bytes, length));
-
// }
我将上述代码屏蔽(当然还有.h的代码),添加如下:
-
void Setsteer40::UpdateData(uint8_t *data) {
-
set_steering_angle_spd_p(data, steering_angle_, moving_spd_); //设置旋转的角度与速度,如果直行,那么转角为0。
-
set_brake_motor_flag_p(data, brake_motor_enable); //使能刹车电机。
-
set_brake_flag_p(data, brake_enable, brake_disable); //允许刹车。
-
}
这样速度数据就可以发下来了。
(未完,待续。如果上述过程大家在调试过程中发现有错误,请及时联系我,我在博客中及时改正。)