Spring是轻代码而重配置的框架,配置比较繁重,影响开发效率,所以注解开发是一种趋势,注解代替xml配置文
件可以简化配置,提高开发效率。
Spring原始注解主要是替代的配置
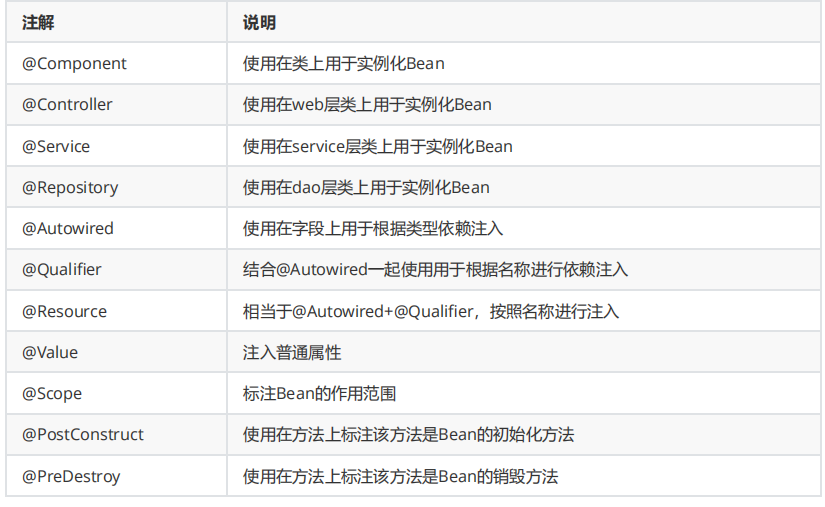
注意:
使用注解进行开发时,需要在applicationContext.xml中配置组件扫描,作用是指定哪个包及其子包下的Bean需要
进行扫描以便识别使用注解配置的类、字段和方法
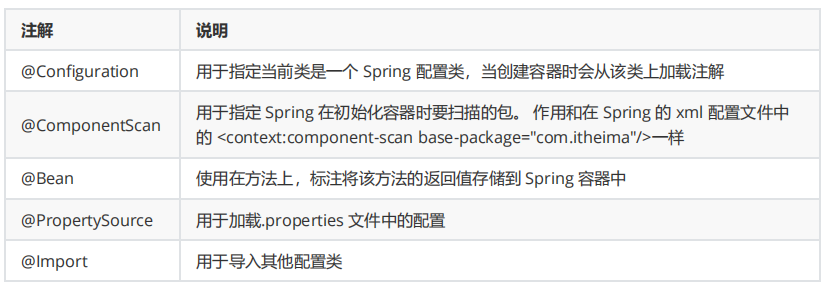
@Confifiguration
@ComponentScan
@Import
//@Scope("prototype")
@Scope("singleton")
public class UserDaoImpl implements UserDao {
//此处省略代码
}
@PostConstruct
public void init(){
System.out.println("初始化方法....");
}
@PreDestroy
public void destroy(){
System.out.println("销毁方法.....");
}
@Configuration
@ComponentScan("com.itheima")
@Import({DataSourceConfiguration.class})
public class SpringConfiguration {
}
@PropertySource
@value
@Bean
测试加载核心配置类创建Spring容器
3. Spring整合Junit
3.1 原始Junit测试Spring的问题
在测试类中,每个测试方法都有以下两行代码:
@PropertySource("classpath:jdbc.properties")
public class DataSourceConfiguration {
@Value("${jdbc.driver}")
private String driver;
@Value("${jdbc.url}")
private String url;
@Value("${jdbc.username}")
private String username;
@Value("${jdbc.password}")
private String password;
@Bean(name="dataSource")
public DataSource getDataSource() throws PropertyVetoException {
ComboPooledDataSource dataSource = new ComboPooledDataSource();
dataSource.setDriverClass(driver);
dataSource.setJdbcUrl(url);
dataSource.setUser(username);
dataSource.setPassword(password);
return dataSource;
}
@Test
public void testAnnoConfiguration() throws Exception {
ApplicationContext applicationContext = new
AnnotationConfigApplicationContext(SpringConfiguration.class); UserService
userService = (UserService)
applicationContext.getBean("userService");
userService.save();
DataSource dataSource = (DataSource)
applicationContext.getBean("dataSource");
Connection connection = dataSource.getConnection();
System.out.println(connection);
}
ApplicationContext ac = new ClassPathXmlApplicationContext("bean.xml");
IAccountService as = ac.getBean("accountService",IAccountService.class);这两行代码的作用是获取容器,如果不写的话,直接会提示空指针异常。所以又不能轻易删掉。
3.2 上述问题解决思路
让SpringJunit负责创建Spring容器,但是需要将配置文件的名称告诉它
将需要进行测试Bean直接在测试类中进行注入
3.3 Spring集成Junit步骤
①导入spring集成Junit的坐标
②使用@Runwith注解替换原来的运行期
③使用@ContextConfifiguration指定配置文件或配置类
④使用@Autowired注入需要测试的对象
⑤创建测试方法进行测试
3.4 Spring集成Junit代码实现
①导入spring集成Junit的坐标
②使用@Runwith注解替换原来的运行期
③使用@ContextConfifiguration指定配置文件或配置类
org.springframework
spring-test
5.0.2.RELEASE
junit
junit
4.12
test
@RunWith(SpringJUnit4ClassRunner.class)
public class SpringJunitTest {
}
@RunWith(SpringJUnit4ClassRunner.class)
//加载spring核心配置文件
//@ContextConfiguration(value = {"classpath:applicationContext.xml"})
//加载spring核心配置类
@ContextConfiguration(classes = {SpringConfiguration.class})
public class SpringJunitTest {
}④使用@Autowired注入需要测试的对象
⑤创建测试方法进行测试
Spring集成Junit步骤
①导入spring集成Junit的坐标
②使用@Runwith注解替换原来的运行期
③使用@ContextConfifiguration指定配置文件或配置类
④使用@Autowired注入需要测试的对象
⑤创建测试方法进行测试