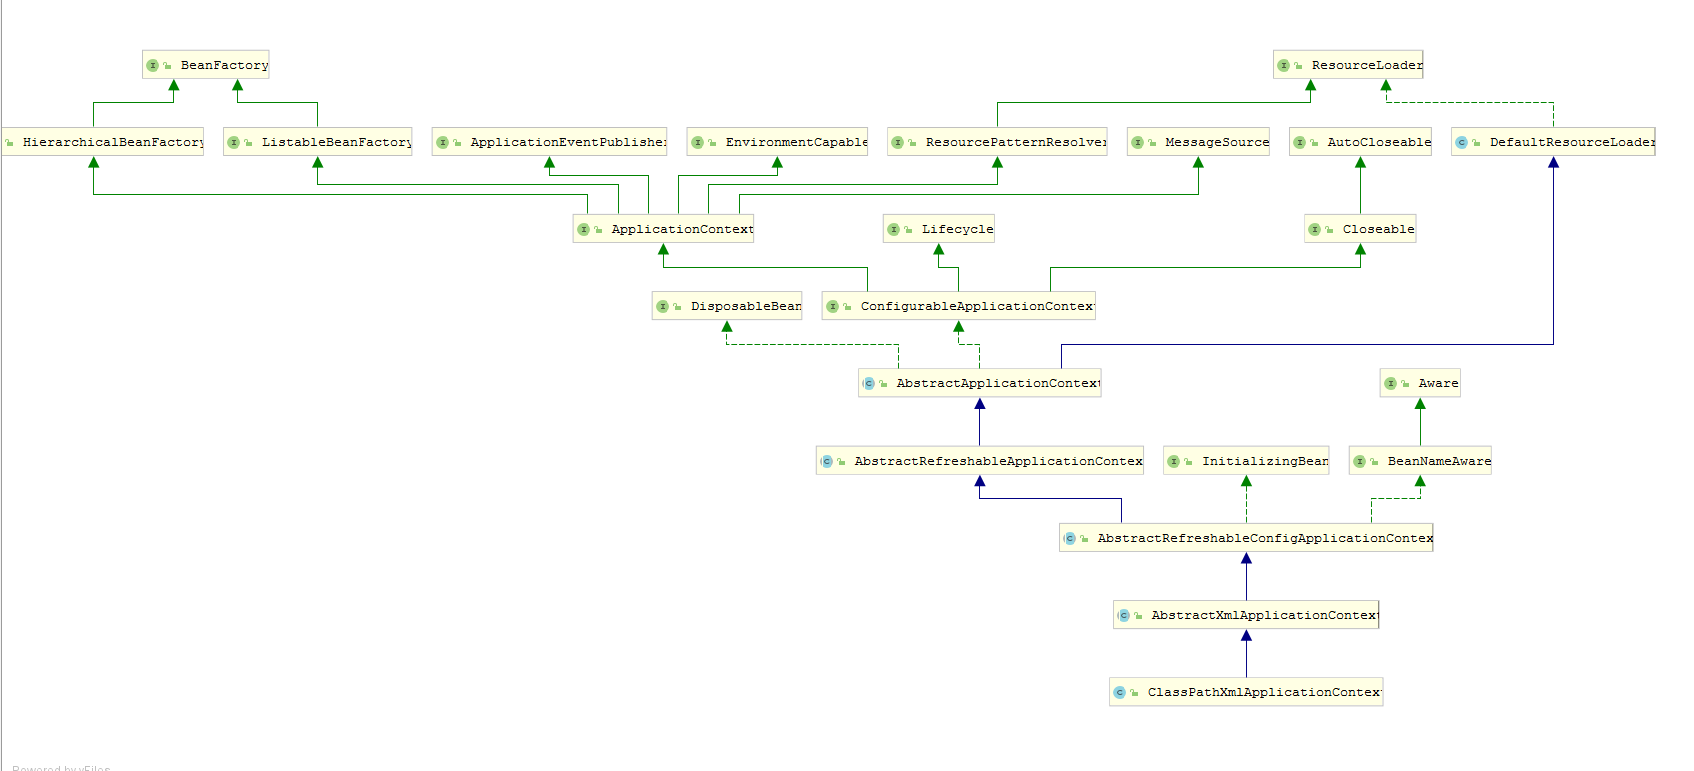
springboot启动时,默认配置文件会加载到 beanfactory
以下简单代码看配置文件的加载过程
public class Test1 {
    public static void main(String[] args) throws Exception {
        ClassPathXmlApplicationContext context = new ClassPathXmlApplicationContext(new String[]{"applicationContext.xml"});
        context.start();

        System.out.println(" app run ");

        System.in.read(); // 按任意键退出
    }
}
进入ClassPathXmlApplicationContext
    public ClassPathXmlApplicationContext(String[] configLocations, boolean refresh, ApplicationContext parent) throws BeansException {
     //继承parent的applicationContext
        super(parent);
     //将xml放入当前容器
        this.setConfigLocations(configLocations);
        if (refresh) {
       //初始化beanfactory.
            this.refresh();
        }

    }
主要是refresh方法,从中可以看出applicationcontext与beanfactory的关系
public void refresh() throws BeansException, IllegalStateException {
        synchronized(this.startupShutdownMonitor) {
            this.prepareRefresh();
       //获取新的Bean工厂, 加载Xml资源并解析,根据解析结果组装BeanDefinitions ,然后初始化BeanFactory的过程
            ConfigurableListableBeanFactory beanFactory = this.obtainFreshBeanFactory();
            this.prepareBeanFactory(beanFactory);

            try {
          //beanfactory准备工作完成后的后置处理工作
                this.postProcessBeanFactory(beanFactory);
          //执行postprocessor方法
                this.invokeBeanFactoryPostProcessors(beanFactory);
          //注册beanpostprocessor(bean的后置处理器)在创建bean前后等执行
                this.registerBeanPostProcessors(beanFactory);
          //初始化message组件,(做国际化,消息绑定解析)
                this.initMessageSource();
          //初始化事件派发器
                this.initApplicationEventMulticaster();
          //子类重写这个方法,容器刷新的时候可以自定义逻辑如创建tomcat,
                this.onRefresh();
          //注册应用监听。就是注册实现了ApplicationListener接口的监听器bean,这些监听器是注册到ApplicationEventMulticaster中的
this.registerListeners();
         //注册非懒加载的单例bean
        this.finishBeanFactoryInitialization(beanFactory);
  //
/完成context的刷新。主要是调用LifecycleProcessor的onRefresh()方法,并且发布事件(ContextRefreshedEvent)
this.finishRefresh();
} catch (BeansException var9) { if (this.logger.isWarnEnabled()) { this.logger.warn("Exception encountered during context initialization - cancelling refresh attempt: " + var9); } this.destroyBeans(); this.cancelRefresh(var9); throw var9; } finally { this.resetCommonCaches(); } } }
进入 obtainFreshBeanFactory初始化beanFactory方法有个refreshbeanfactory 方法
 protected final void refreshBeanFactory() throws BeansException {
        if (this.hasBeanFactory()) {
            this.destroyBeans();
            this.closeBeanFactory();
        }

        try {
            DefaultListableBeanFactory beanFactory = this.createBeanFactory();
            beanFactory.setSerializationId(this.getId());
            this.customizeBeanFactory(beanFactory);
       //组装组装BeanDefinitions
            this.loadBeanDefinitions(beanFactory);
            synchronized(this.beanFactoryMonitor) {
                this.beanFactory = beanFactory;
            }
        } catch (IOException var5) {
            throw new ApplicationContextException("I/O error parsing bean definition source for " + this.getDisplayName(), var5);
        }
    }
组装BeanDefinitions
protected void loadBeanDefinitions(DefaultListableBeanFactory beanFactory) throws BeansException, IOException {
        XmlBeanDefinitionReader beanDefinitionReader = new XmlBeanDefinitionReader(beanFactory);
        beanDefinitionReader.setEnvironment(this.getEnvironment());
        beanDefinitionReader.setResourceLoader(this);
        beanDefinitionReader.setEntityResolver(new ResourceEntityResolver(this));
        this.initBeanDefinitionReader(beanDefinitionReader);
        this.loadBeanDefinitions(beanDefinitionReader);
    }

    protected void initBeanDefinitionReader(XmlBeanDefinitionReader reader) {
        reader.setValidating(this.validating);
    }

    protected void loadBeanDefinitions(XmlBeanDefinitionReader reader) throws BeansException, IOException {
        Resource[] configResources = this.getConfigResources();
        if (configResources != null) {
            reader.loadBeanDefinitions(configResources);
        }
     //与上面setConfigLocations(“”)对应
    String[] configLocations = this.getConfigLocations();

    if (configLocations != null) { reader.loadBeanDefinitions(configLocations); } }
解析xml使用了DocumentBuilder
此处仿写了 读取文件的方法,放到resource根目录,在项目中获取数据的方法:
name=testDemo
Stirng filename = "test.properties";
this.getClass().getClassLoader().getResourceAsStream(filename);
Properties  contextConfig = new Properties();
try {
    contextConfig.load(is);
} catch (IOException e) {
    e.printStackTrace();
}finally {
    if(null != is){
        try {
            is.close();
        } catch (IOException e) {
            e.printStackTrace();
        }
    }
}