本节内容:
1:cookie和session
2:请求生命周期的FBV和CBV
3:model的操作,复习
4:分页的实现
5:Django Form
6:页面请求models里面的all时候的几种实现
7:文件上传
一:cookie和session
1:COOKIE诞生的背景和工作原理
cookie不属于http协议范围,由于http协议无法保持状态,但实际情况,我们却又需要“保持状态”,因此cookie就是在这样一个场景下诞生。

cookie的工作原理是:由服务器产生内容,浏览器收到请求后保存在本地磁盘上的;当浏览器再次访问时,浏览器会自动带上cookie,这样服务器就能通过cookie的内容来判断这个是“谁”了。
2:session诞生的背景
cookie虽然在一定程度上解决了“保持状态”的需求,但是由于cookie本身最大支持4096字节,以及cookie本身保存在客户端,可能被拦截或窃取,
因此就需要有一种新的东西,它能支持更多的字节,并且他保存在服务器,有较高的安全性。这就是session。
3:cookie和session的结合
问题来了,基于http协议的无状态特征,服务器根本就不知道访问者是“谁”。那么上述的cookie就起到桥接的作用。

(1)我们可以给每个客户端的cookie分配一个唯一的id,这样用户在访问时,通过cookie,服务器就知道来的人是“谁”。然后我们再根据不同的cookie的id,在服务器上保存一段时间的私密资料,如“账号密码”等等。

(2)总结而言:cookie弥补了http无状态的不足,让服务器知道来的人是“谁”;但是cookie以文本的形式保存在本地,自身安全性较差;所以我们就通过cookie识别不同的用户,对应的在session里保存私密的信息以及超过4096字节的文本。

(3)另外,上述所说的cookie和session其实是共通性的东西,不限于语言和框架
4:设置cookie
def login(request):
    print("COOKIE",request.COOKIES)
    ##COOKIE {'csrftoken': 'R3Z7KuPa1pUW63PWPIog9CNGzMOE427NQRFDXNPA2tEq9O5VKFenQ5ixcvELu6e6', 'sessionid': 'naqh3zfp2pd6zl8dh2hvuzv5wihhjbwh'}
    if request.method == "POST" and request.POST.get("username") == "yuan":
        ret = redirect("/index/")
        ret.set_cookie("username","yuan")  ###设置cookie 组成一组键值对
        return ret
    return render(request,"login.html")
5:cookie和session的配合
"COOKIE": { "sessionid":"就是session给你的随机字符串,用于打开session的", "csrftoken":"中间件防止跨站伪造请求" } "SESSION": { "COOKIES中的随机字符串":{"服务端的私密的数据"}, }
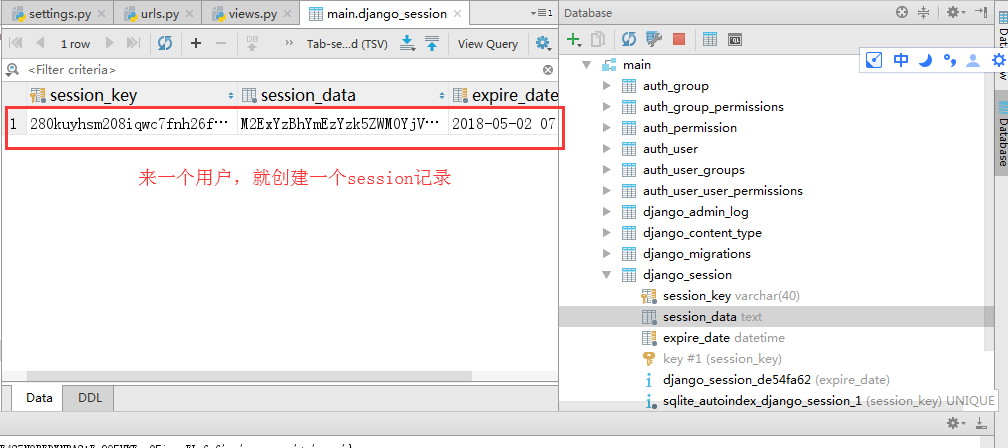
注意:session可以保存在任何的位置,文件、数据库、缓存都是可以的。为什么我们再建表的时候会产生那么多表?
其中一个表就是session表。
实现cookie和session的配合:


from django.shortcuts import render,redirect,HttpResponse

# Create your views here.


def login(request):
    print("COOKIE",request.COOKIES)
    print("session",request.session) ##会发现没有提示,到setting的MIDDLEWARE的改成MIDDLEWARE_CLASSES
    ##COOKIE {'csrftoken': 'R3Z7KuPa1pUW63PWPIog9CNGzMOE427NQRFDXNPA2tEq9O5VKFenQ5ixcvELu6e6', 'sessionid': 'naqh3zfp2pd6zl8dh2hvuzv5wihhjbwh'}
    if request.method == "POST" and request.POST.get("username") == "yuan":
        # ret = redirect("/index/")
        # ret.set_cookie("username","yuan")  ###设置cookie
        # return ret
        request.session["is_login"] = True
        request.session["username"] = "yuan"
        return redirect("/index/")
    return render(request,"login.html")


def index(request):
    # username = request.COOKIES.get("username",None)
    # print(request.COOKIES)
    # ###{'csrftoken': 'R3Z7KuPa1pUW63PWPIog9CNGzMOE427NQRFDXNPA2tEq9O5VKFenQ5ixcvELu6e6', 'sessionid': 'naqh3zfp2pd6zl8dh2hvuzv5wihhjbwh', 'username': 'yuan'}
    # if username == "yuan":
    #     return HttpResponse("hello")
    if request.session.get("is_login") and request.session.get("username") == "yuan":
        return HttpResponse("hello")
    else:
        return redirect("/login/")
如果出现如下错误:

因为上文说了:session默认是保存到session的表中的,而你没有这个表就出错了:解决python manage.py migrate
D:pythonprojectcookie_session>python manage.py makemigrations
No changes detected

D:pythonprojectcookie_session>python manage.py migrate
下面我们再来最后的总结一下cookie和session的知识点:
一、操作Cookie
获取cookie:request.COOKIES[key]
设置cookie:response.set_cookie(key,value)
由于cookie保存在客户端的电脑上,所以,jquery也可以操作cookie。
<script src='http://830909.blog.51cto.com/static/js/jquery.cookie.js'></script>
$.cookie("list_pager_num", 30,{ path: '/' });
二、操作Session(session默认在服务器端保存15天)
获取session:request.session[key]
设置session:reqeust.session[key] = value
删除session:del request.session[key]
(这个删除其实就是把数据库的session_data更新为一个其他的值了,并没有立即删除)
request.session.set_expiry(value)
* 如果value是个整数,session会在些秒数后失效。
* 如果value是个datatime或timedelta,session就会在这个时间后失效。
* 如果value是0,用户关闭浏览器session就会失效。
* 如果value是None,session会依赖全局session失效策略。
二、请求生命周期的FBV和CBV
1:Django的请求生命周期:
指的是当用户在浏览器输入了:http://127.0.0.1:8888/index.html 后都发生了什么事情
1:生成请求体,发送Http请求
2:服务端接收 从上到下匹配url
3:匹配成功后,执行指定的views的函数或类
    URL -->(对应) 函数  ===》这叫FBV
    URL -->(对应) 类   ===》 这叫CBV
        请求到达CBV的类的时候,不会马上执行get或post方法
        他直接执行继承View的dispatch方法通过反射去执行,get或post方法。
        执行完get或post之后,要把结果给dispatch,由dispatch交给用户。

4:业务处理
    -根据个人需求自定
    -操作数据库
        -支持原生sql
        -Django的 ORM(可能是最牛的ORM框架)
    ===》上面都处理完了产生返回给用户的结果《===
    -响应内容
        -响应头
        -响应体
怎么往响应头加点东西:
def  post(self,request):
    ret =  HttpResponse("CBV.POST") ##响应内容就是"CBV.POST"
    ret['h1'] = 'v1'   ##这就是往响应头加上了h1 = v1
    ret.set_cookie('c1','v2') ##还可以往响应头设置cookie
    return ret
2:CBV的实现:
urlpatterns = [
    url(r'^admin/', admin.site.urls),
    url(r'^CBV$', views.CBV.as_view()),  ##cbv后面的/ 不加django会默认给你加的
    url(r'^FBV$', views.index),
]
from  django.views import View
class CBV(View):   ##要继承View ,是get请求就执行get函数
    def get(self,request):
        ##根据请求头中的request.method执行对应的函数
        # return  HttpResponse("CBV.GET")
        return render(request,"CBV.html")

    def  post(self,request):
        return HttpResponse("CBV.POST")
##CBV.html#####

<form action="" method="post">
    <input type="submit">
</form>
CBV中的dispatch方法: 找到类 -- >dispatch反射执行函数--->函数执行完 返回结果 --->dispatch函数--->dispatch再返回给用户
from  django.views import View
class CBV(View):   ##要继承View ,是get请求就执行get函数
    def dispatch(self, request, *args, **kwargs):
        result =super(CBV,self).dispatch(request, *args, **kwargs)
        return result   ##dispatch这样写好像是没毛用,我们什么功能都没给他加,不过起码知道了起码要往哪里加功能

    def get(self,request):
        ##根据请求头中的request.method执行对应的函数
        # return  HttpResponse("CBV.GET")
        return render(request,"CBV.html")

    def  post(self,request):
        return HttpResponse("CBV.POST")
三:model的操作,复习
1对多的操作
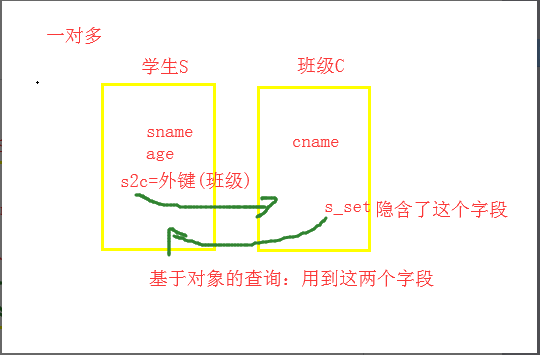
正向查找:(外键在自己表中,通过自己的外键字段)
    ##通过学生表找到“q学生”对应的班级
        ##基于对象:
        obj = models.Student.objects.filter(sname="q学生").first()
        cname = obj.s2c.cname
        print(cname) ##python1

        ###基于"__"
        obj2 = models.Student.objects.filter(sname="q学生").values("s2c__cname")
        print(obj2) #<QuerySet [{'s2c__cname': 'python1'}]>


反向查找:(通过关联自己为外键的类名_set)
    ##通过学生表找到“q学生”对应的班级
        基于"__"
        ret2 = models.Classes.objects.filter(student__sname="q学生").values("cname")
        print(ret2) ##<QuerySet [{'cname': 'python1'}]>

    查找对应的“python1”班级的学生:
        基于对象:
        ret = models.Classes.objects.get(cname="python1")
        ret_sult = ret.student_set.values("sname")
        print(ret_sult)
多对多操作 :
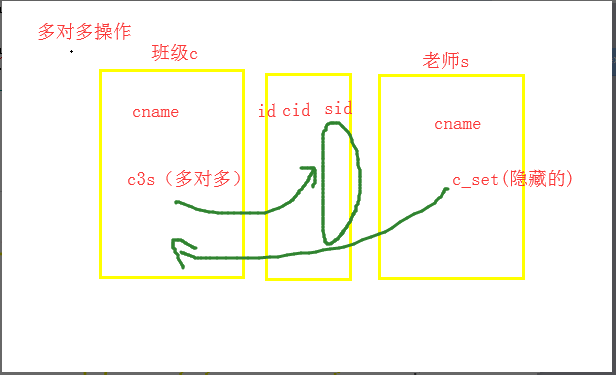
正向查找:
##查询python1对应的老师
    #基于对象:
        # obj = models.Classes.objects.filter(cname="python1")[0]
        # ret = obj.c3s.all().values("tname")   ##obj.c3s.all() 获取到所有的tid
        # print(ret)  ##<QuerySet [{'tname': 'alex'}, {'tname': 'eric'}]>
    #基于"__"
        # obj = models.Classes.objects.filter(cname="python1").values("c3s__tname")
        # print(obj) ##<QuerySet [{'c3s__tname': 'alex'}, {'c3s__tname': 'eric'}]>


反向查找:
##查询alex教的班级
    #基于对象:
        # obj = models.Teachers.objects.filter(tname="alex").first()
        # cc = obj.classes_set.all().values("cname") #obj.classes_set.all() 拿到的就是所有alex的班级
        # print(cc) ##<QuerySet [{'cname': 'python1'}]>

    #基于"__":
        obj = models.Teachers.objects.filter(tname="alex").values("classes__cname")
        print(obj) #<QuerySet [{'classes__cname': 'python1'}]>
四.分页的实现
1:分页的原理:
其实际就是不让一次显示全部的数据,而是用切片的方式进行显现数据:
###一共有1-998条的数据
USER_LIST = []
for i in range(1,999):
    temp = "root"+str(i)+"-"+str(i)
    USER_LIST.append(temp)


def index(request):
    per_page= 10
    current_page = int(request.GET.get("p"))
    ##p=1  显示数据:1-10  对应列表 0-10
    ##p=2  显示数据:11-20  对应列表 10-20
    ##应用小学学过的知识,简单的计算指定页码要显示的数据
    ##start = (current_pae -1) * 10
    ##end = current_page * 10

    start = (current_page -1) * 10
    end = current_page * 10
    data = USER_LIST[start:end]
    return render(request,"index.html",{"user_list":data})
2:Django的内置分页
Django的内置分页,就是给我们提供了2个类,2个对象。 paginator 、page
from django.shortcuts import render
from django.core.paginator import Paginator, EmptyPage, PageNotAnInteger

L = []
for i in range(999):
    L.append(i)

def index(request):
    current_page = request.GET.get('p')

    paginator = Paginator(L, 10)
    # per_page: 每页显示条目数量
    # count:    数据总个数
    # num_pages:总页数
    # page_range:总页数的索引范围,如: (1,10),(1,200)
    # page:     page对象
    try:
        posts = paginator.page(current_page)
        # has_next              是否有下一页
        # next_page_number      下一页页码
        # has_previous          是否有上一页
        # previous_page_number  上一页页码
        # object_list           分页之后的数据列表
        # number                当前页
        # paginator             paginator对象
    except PageNotAnInteger:  ###p不是一个有效的页码默认显示第一页
        posts = paginator.page(1)
    except EmptyPage:
        posts = paginator.page(paginator.num_pages)  ##一共100页,你请求200页的内容,给你返回最后一页的内容
    return render(request, 'index.html', {'posts': posts})
html
<!DOCTYPE html>
<html>
<head lang="en">
    <meta charset="UTF-8">
    <title></title>
</head>
<body>
<ul>
    {% for item in posts %}
        <li>{{ item }}</li>
    {% endfor %}
</ul>

<div class="pagination">
      <span class="step-links">
        {% if posts.has_previous %}
            <a href="?p={{ posts.previous_page_number }}">Previous</a>
        {% endif %}
          <span class="current">
            Page {{ posts.number }} of {{ posts.paginator.num_pages }}.
          </span>
          {% if posts.has_next %}
              <a href="?p={{ posts.next_page_number }}">Next</a>
          {% endif %}
      </span>

</div>
</body>
</html>

Html
3:Django的扩展内置分页
4:自定义分页
分页组件:
class Pagerator(object):
    def __init__(self,total_count,current_page,per_page_num=7,per_page_data=10):
        self.total_count = total_count
        try:
            v = int(current_page)
        except Exception as  e:
            v = 1
        if v<=1:
            v = 1
        self.current_page = v
        self.per_page_data = per_page_data
        self.per_page_num = per_page_num

    @property
    def start(self):
        return (self.current_page - 1 )* self.per_page_data

    @property
    def end(self):
        return self.current_page * self.per_page_data

    @property
    def max_page_num(self):
        a,b = divmod(self.total_count,self.per_page_data)
        if b:
            a= a+1
        return a


    def page_range(self):
        temp_list = []
        part_page_num = round(self.per_page_num / 2)
        ##首页
        frist = "<li><a href='/index.html/?p=1'>首页</a></li>"
        temp_list.append(frist)

        ##上一页
        if self.current_page == 1:
            pre_page = "<li><a href='#'>上一页</a></li>"
        else:
            pre_page = "<li><a href='/index.html/?p=%s'>上一页</a></li>"%(self.current_page-1)
        temp_list.append(pre_page)
        ##如果当前页面小于4的时候,默认就是1 - 最大页码
        if self.current_page <= part_page_num:
            page_start = 1
            page_end = self.per_page_num
        else:
            page_start = self.current_page - 3
            page_end = self.current_page +3
            ##当end_page加+3之后比最大的页面还大的时候,这就是bug了,加上if判断
            if page_end >= self.max_page_num:
                page_end = self.max_page_num

        for i in range(page_start,page_end+1):
            if self.current_page == i :
                temp = "<li class='active'><a href='/index.html/?p=%s'>%s</a></li>"%(i,i)
            else:
                temp = "<li><a  href='/index.html/?p=%s'>%s</a></li>" % (i, i)
            temp_list.append(temp)

        ##下一页
        if self.current_page == self.max_page_num:
            nex_page = "<li><a href='#'>下一页</a></li>"
        else:
            nex_page = "<li><a href='/index.html/?p=%s'>下一页</a></li>"%(self.max_page_num)
        temp_list.append(nex_page)

        ##尾页
        last = "<li><a href='/index.html/?p=%s'>首页</a></li>"%(self.max_page_num)
        temp_list.append(last)

        return "".join(temp_list)
view:
USER_LIST = []
for i in range(1,666):
    temp = "root"+str(i)+"-"+str(i)
    USER_LIST.append(temp)

def index(request):
    from  app01 import  Page
    current_page = request.GET.get("p")
    page_obj=Page.Pagerator(666,current_page)  ##传入当前页和总数
    data = USER_LIST[page_obj.start:page_obj.end] ##
    per_page_num = page_obj.page_range()  ##获取每页显示的页码

    return render(request,"index.html",{"user_list":data,"per_page_num":per_page_num})
<!-- 数据-->
{% for user in user_list %}
    <li>{{ user }}</li>
{% endfor %}


<hr />

<!-- 页码-->
<ul class="pagination">
    {{ per_page_num|safe }}
</ul>
效果图:

五、Form
Django的Form主要具有一下几大功能:
- 生成HTML标签
- 验证用户数据(显示错误信息)
- HTML Form提交保留上次提交数据
- 初始化页面显示内容
1、创建Form类
from django.forms import Form
from django.forms import widgets
from django.forms import fields

class MyForm(Form):
    user = fields.CharField(
        widget=widgets.TextInput(attrs={'id': 'i1', 'class': 'c1'})  ##给他设置属性
    )

    gender = fields.ChoiceField(
        choices=((1, '男'), (2, '女'),),
        initial=2,
        widget=widgets.RadioSelect
    )

    city = fields.CharField(
        initial=2,
        widget=widgets.Select(choices=((1,'上海'),(2,'北京'),))
    )

    pwd = fields.CharField(
        widget=widgets.PasswordInput(attrs={'class': 'c1'}, render_value=True)
    )
2、View函数处理
from django.shortcuts import render, redirect
from .forms import MyForm


def index(request):
    if request.method == "GET":
        obj = MyForm()
        return render(request, 'index.html', {'form': obj})
    elif request.method == "POST":
        obj = MyForm(request.POST, request.FILES)
        if obj.is_valid():   ##进行验证
            values = obj.clean()    ##获取验证后的数据
            print(values)
        else:
            errors = obj.errors  ##获取验证失败的数据   里面的数据是一个个key:[错误列表]
            print(errors)
        return render(request, 'index.html', {'form': obj})
    else:
        return redirect('http://www.google.com')
3、生成HTML
<form action="/" method="POST" enctype="multipart/form-data">
    <p>{{ form.user }} {{ form.user.errors }}</p>
    <p>{{ form.gender }} {{ form.gender.errors }}</p>
    <p>{{ form.city }} {{ form.city.errors }}</p>
    <p>{{ form.pwd }} {{ form.pwd.errors }}</p>
    <input type="submit"/>
</form>
1、Django内置字段如下:
Field
    required=True,               是否允许为空
    widget=None,                 HTML插件
    label=None,                  用于生成Label标签或显示内容
    initial=None,                初始值
    help_text='',                帮助信息(在标签旁边显示)
    error_messages=None,         错误信息 {'required': '不能为空', 'invalid': '格式错误'}
    show_hidden_initial=False,   是否在当前插件后面再加一个隐藏的且具有默认值的插件(可用于检验两次输入是否一直)
    validators=[],               自定义验证规则
    localize=False,              是否支持本地化
    disabled=False,              是否可以编辑
    label_suffix=None            Label内容后缀


CharField(Field)
    max_length=None,             最大长度
    min_length=None,             最小长度
    strip=True                   是否移除用户输入空白

IntegerField(Field)
    max_value=None,              最大值
    min_value=None,              最小值

FloatField(IntegerField)
    ...

DecimalField(IntegerField)
    max_value=None,              最大值
    min_value=None,              最小值
    max_digits=None,             总长度
    decimal_places=None,         小数位长度

BaseTemporalField(Field)
    input_formats=None          时间格式化

DateField(BaseTemporalField)    格式:2015-09-01
TimeField(BaseTemporalField)    格式:11:12
DateTimeField(BaseTemporalField)格式:2015-09-01 11:12

DurationField(Field)            时间间隔:%d %H:%M:%S.%f
    ...

RegexField(CharField)
    regex,                      自定制正则表达式
    max_length=None,            最大长度
    min_length=None,            最小长度
    error_message=None,         忽略,错误信息使用 error_messages={'invalid': '...'}

EmailField(CharField)
    ...

FileField(Field)  ##文件单独放在了request.FILES
    allow_empty_file=False     是否允许空文件

ImageField(FileField)   ##和文件差不多都是一个选择文件的标签
    ...
    注:需要PIL模块,pip3 install Pillow
    以上两个字典使用时,需要注意两点:
        - form表单中 enctype="multipart/form-data"
        - view函数中 obj = MyForm(request.POST, request.FILES)

URLField(Field)
    ...


BooleanField(Field)    ##有 0 和 1 两个值
    ...

NullBooleanField(BooleanField) ##有 0 、1、null 三个值
    ...

ChoiceField(Field)    ##重要*****
    ...
    choices=(),                选项,如:choices = ((0,'上海'),(1,'北京'),)
    required=True,             是否必填
    widget=None,               插件,默认select插件
    label=None,                Label内容
    initial=None,              初始值
    help_text='',              帮助提示


ModelChoiceField(ChoiceField)
    ...                        django.forms.models.ModelChoiceField
    queryset,                  # 查询数据库中的数据
    empty_label="---------",   # 默认空显示内容
    to_field_name=None,        # HTML中value的值对应的字段
    limit_choices_to=None      # ModelForm中对queryset二次筛选

ModelMultipleChoiceField(ModelChoiceField)
    ...                        django.forms.models.ModelMultipleChoiceField


TypedChoiceField(ChoiceField)   ##ChoiceField中比如select的value是字符串,可以将coerce = lambda x :int(x) 变成int类型
    coerce = lambda val: val   对选中的值进行一次转换
    empty_value= ''            空值的默认值

MultipleChoiceField(ChoiceField)  ###多选select
    ...

TypedMultipleChoiceField(MultipleChoiceField)
    coerce = lambda val: val   对选中的每一个值进行一次转换
    empty_value= ''            空值的默认值

ComboField(Field)
    fields=()                  使用多个验证,如下:即验证最大长度20,又验证邮箱格式
                               fields.ComboField(fields=[fields.CharField(max_length=20), fields.EmailField(),])

MultiValueField(Field)
    PS: 抽象类,子类中可以实现聚合多个字典去匹配一个值,要配合MultiWidget使用

SplitDateTimeField(MultiValueField)
    input_date_formats=None,   格式列表:['%Y--%m--%d', '%m%d/%Y', '%m/%d/%y']
    input_time_formats=None    格式列表:['%H:%M:%S', '%H:%M:%S.%f', '%H:%M']

FilePathField(ChoiceField)     文件选项,目录下文件显示在页面中
    path,                      文件夹路径
    match=None,                正则匹配
    recursive=False,           递归下面的文件夹
    allow_files=True,          允许文件
    allow_folders=False,       允许文件夹
    required=True,
    widget=None,
    label=None,
    initial=None,
    help_text=''

GenericIPAddressField
    protocol='both',           both,ipv4,ipv6支持的IP格式
    unpack_ipv4=False          解析ipv4地址,如果是::ffff:192.0.2.1时候,可解析为192.0.2.1, PS:protocol必须为both才能启用

SlugField(CharField)        数字,字母,下划线,减号(连字符)(了解)
    ...

UUIDField(CharField)           uuid类型(了解)
    ...
注:UUID是根据MAC以及当前时间等创建的不重复的随机字符串
>>> import uuid

    # make a UUID based on the host ID and current time
    >>> uuid.uuid1()    # doctest: +SKIP
    UUID('a8098c1a-f86e-11da-bd1a-00112444be1e')

    # make a UUID using an MD5 hash of a namespace UUID and a name
    >>> uuid.uuid3(uuid.NAMESPACE_DNS, 'python.org')
    UUID('6fa459ea-ee8a-3ca4-894e-db77e160355e')

    # make a random UUID
    >>> uuid.uuid4()    # doctest: +SKIP
    UUID('16fd2706-8baf-433b-82eb-8c7fada847da')

    # make a UUID using a SHA-1 hash of a namespace UUID and a name
    >>> uuid.uuid5(uuid.NAMESPACE_DNS, 'python.org')
    UUID('886313e1-3b8a-5372-9b90-0c9aee199e5d')

    # make a UUID from a string of hex digits (braces and hyphens ignored)
    >>> x = uuid.UUID('{00010203-0405-0607-0809-0a0b0c0d0e0f}')

    # convert a UUID to a string of hex digits in standard form
    >>> str(x)
    '00010203-0405-0607-0809-0a0b0c0d0e0f'

    # get the raw 16 bytes of the UUID
    >>> x.bytes
    b'x00x01x02x03x04x05x06x07x08
x0bx0c
x0ex0f'

    # make a UUID from a 16-byte string
    >>> uuid.UUID(bytes=x.bytes)
    UUID('00010203-0405-0607-0809-0a0b0c0d0e0f')
2、Django内置插件:
我们说Form为什么我们写个:

class myForm(forms.Form):
    username = fields.CharField(max_length=17)


就可以在前端{{ obj.username }} 就能够显示出。input框出来,
obj是myForm的对象,而username 是属于CharField字段的,那么它的默认内置插件就是一个<input />

###CharField的继承说明
##CharField继承Field。Field的默认插件就是TextInput。TextInput继承Input。Input返回input的字符
class CharField(Field):  ==> class Field(object):  ==>  class TextInput(Input):  ==>
                                widget = TextInput         input_type = 'text'


class Input(Widget):
    return format_html('<input{} />', flatatt(final_attrs))
TextInput(Input)
NumberInput(TextInput)
EmailInput(TextInput)
URLInput(TextInput)
PasswordInput(TextInput)
HiddenInput(TextInput)
Textarea(Widget)
DateInput(DateTimeBaseInput)
DateTimeInput(DateTimeBaseInput)
TimeInput(DateTimeBaseInput)
CheckboxInput
Select
NullBooleanSelect
SelectMultiple
RadioSelect
CheckboxSelectMultiple
FileInput
ClearableFileInput
MultipleHiddenInput
SplitDateTimeWidget
SplitHiddenDateTimeWidget
SelectDateWidget
3:常用选择插件(上面说的那么多插件,了解就好)这个要记住了
CharField的就是返回,是一个字符串的就可以,而要形成什么input是由里面的widget去指定。
# 单radio,值为字符串
# user = fields.CharField(
#     initial=2,
#     widget=widgets.RadioSelect(choices=((1,'上海'),(2,'北京'),)) ##只有select比较特殊,里面还有choices,去指定值。
# )


### 单radio,返回值为数字
### user = fields.IntegerField(
###     initial=2,
###     widget=widgets.RadioSelect(choices=((1,'上海'),(2,'北京'),)) ##只有select比较特殊,里面还有choices,去指定值。
### )


# 单radio,值为字符串
# user = fields.ChoiceField(
#     choices=((1, '上海'), (2, '北京'),),
#     initial=2,
#     widget=widgets.RadioSelect
# )

# 单select,值为字符串
# user = fields.CharField(
#     initial=2,
#     widget=widgets.Select(choices=((1,'上海'),(2,'北京'),))
# )

# 单select,值为字符串
# user = fields.ChoiceField(
#     choices=((1, '上海'), (2, '北京'),),
#     initial=2,
#     widget=widgets.Select
# )

# 多选select,值为列表
# user = fields.MultipleChoiceField(
#     choices=((1,'上海'),(2,'北京'),),
#     initial=[1,],
#     widget=widgets.SelectMultiple
# )


# 单checkbox
# user = fields.CharField(
#     widget=widgets.CheckboxInput()
# )


# 多选checkbox,值为列表
# user = fields.MultipleChoiceField(
#     initial=[2, ],
#     choices=((1, '上海'), (2, '北京'),),
#     widget=widgets.CheckboxSelectMultiple
# )
在使用选择标签时,需要注意choices的选项可以从数据库中获取,但是由于是静态字段 ***获取的值无法实时更新***,那么需要自定义构造方法从而达到此目的。
方式一:
from django.forms import Form
from django.forms import widgets
from django.forms import fields
from django.core.validators import RegexValidator

class MyForm(Form):

    user = fields.ChoiceField(
        # choices=((1, '上海'), (2, '北京'),),
        initial=2,
        widget=widgets.Select
    )

    def __init__(self, *args, **kwargs):
        super(MyForm,self).__init__(*args, **kwargs)
        # self.fields['user'].widget.choices = ((1, '上海'), (2, '北京'),)
        # 或
        self.fields['user'].widget.choices = models.Classes.objects.all().value_list('id','caption')

        ##super必须放在第一个位置,因为它会执行父类的init方法,拷贝所有的静态字段,复制给self.fields


def    form1(request):
    if request.method = "GET":
        obj= MyForm()    ##每次创建一个obj对象的时候,就去执行MyForm中的init方法。这样就能做到了实时更新
    else:
        obj = MyForm(request.POST)
        obj.is_valid():
    return render(request,"form1.html",locals())
方式二:(不推荐,它要是想显示中文依赖model中的__str__)
使用django提供的ModelChoiceField和ModelMultipleChoiceField字段来实现
from django import forms
from django.forms import fields
from django.forms import widgets
from django.forms import models as form_model
from django.core.exceptions import ValidationError
from django.core.validators import RegexValidator

class FInfo(forms.Form):
    authors = form_model.ModelMultipleChoiceField(queryset=models.NNewType.objects.all())
    # authors = form_model.ModelChoiceField(
                                            queryset=models.NNewType.objects.all(),
                                            to_field_name='id')

    ##默认select里面values是id,而我们要改变也是可以的里面的value
    ##默认不能显示中文,依赖model
4:ajax实现Form
Form :ajax提交
    1:不能在后台进行 redirect
        1.1:要想实现:obj.is_valid()的时候,给他json.dumps(一个status的字典)
        1.2:前端success:function(arg){
            判断(status="true"){
                windows.localtion.href = 'http://www.baidu.com'}
            }
    2:错误信息需要自己显示
from django.shortcuts import render
from django.shortcuts import redirect,HttpResponse

# Create your views here.


from  django import  forms
from django.forms import  fields
from django.forms import widgets
class UserInfo(forms.Form):
    username = fields.CharField(min_length=6,)
    email = fields.EmailField(error_messages={"invalid":"格式不正确"})
    city = fields.IntegerField(
        widget=widgets.Select(
            choices=[(1,'北京'),(2,'武汉'),(3,'天津')],
        ),
    )

def ajax_form(request):
    if request.method == "GET":
        obj = UserInfo()
        return  render(request,"ajax_form.html",locals())
    else:
        import json
        ret = {"status":False,"message":None}
        obj = UserInfo(request.POST)
        if obj.is_valid():
            print(obj.cleaned_data)
            # return redirect("http://www.baidu.com")
            ret["status"] = True
            return HttpResponse(json.dumps(ret))
        else:
            print(type(obj.errors))
            ##<class 'django.forms.utils.ErrorDict'> 继承dict  默认能json只有基本数据类型,
            ##而ErrorDict 继承dict 所以可以被json.dumps
            ##ErrorDict就是帮你把数据变成了as_ul,as_data,as_text默认是as_ul
            ret["message"] = obj.errors
            from  django.forms.utils import ErrorDict
            print(obj.errors)
            print(obj.errors.as_ul())
            print(obj.errors.as_data())
            print(obj.errors.as_text())
            return HttpResponse(json.dumps(ret))
from django.conf.urls import url
from django.contrib import admin
from app01 import views

urlpatterns = [
    url(r'^admin/', admin.site.urls),
    # url(r'^my_form/', views.my_form),
    url(r'^ajax_form.html/', views.ajax_form),
]
form action="/" method="POST" enctype="multipart/form-data">
    <p>{{ form.user }} {{ form.user.errors }}</p>
    <p>{{ form.gender }} {{ form.gender.errors }}</p>
    <p>{{ form.city }} {{ form.city.errors }}</p>
    <p>{{ form.pwd }} {{ form.pwd.errors }}</p>
    <input type="submit"/>
</form>


###第二种都显示所有的数据
<form>
    {{form.as_table}}
</form>

###第三种都显示所有的数据
{{form.as_p}}

##第四种都显示所有的数据
{{form.as_ul}}
5:自定义验证规则
方式一:
from django.forms import Form
from django.forms import widgets
from django.forms import fields
from django.core.validators import RegexValidator

class MyForm(Form):
    user = fields.CharField(
        validators=[RegexValidator(r'^[0-9]+$', '请输入数字'), RegexValidator(r'^159[0-9]+$', '数字必须以159开头')],
    )
方式二:
class UserInfo1(fforms.Form):
    username = fields.CharField()
    phone = fields.RegexField(r'^159[0-9]+$',error_messages={'invalid':"必须以159开始的手机"})
方式三:
要是username是unique的,注册的时候不能重复,我们怎么通过Form进行判断说,“用户已经存在”
前戏1:
Form源码解析:
当我们obj.is_valid()的时候,会有两个产物 cleand_data 、errors
一:
    def is_valid(self):
        """
        Returns True if the form has no errors. Otherwise, False. If errors are
        being ignored, returns False.
        """
        return self.is_bound and not self.errors
        ##会去执行self.errors的函数


二:
    @property
    def errors(self):
        "Returns an ErrorDict for the data provided for the form"
        if self._errors is None:
            self.full_clean()   ###默认_errors 是None执行full_clean()方法
        return self._errors


三:
    def full_clean(self):
        self._errors = ErrorDict()  ##创建一个ErrorDict的字典
        if not self.is_bound:  # Stop further processing.
            return
        self.cleaned_data = {}   ##通过验证的字典
        if self.empty_permitted and not self.has_changed():
            return

        self._clean_fields()  ##执行_clean_fields方法,对每个字典进行匹配规则
        self._clean_form()
        self._post_clean()


四:
    def _clean_fields(self):
        for name, field in self.fields.items():  ##依次遍历Form字段
            # value_from_datadict() gets the data from the data dictionaries.
            # Each widget type knows how to retrieve its own data, because some
            # widgets split data over several HTML fields.
            if field.disabled:
                value = self.initial.get(name, field.initial)
            else:
                value = field.widget.value_from_datadict(self.data, self.files, self.add_prefix(name))
            try:
                if isinstance(field, FileField):
                    initial = self.initial.get(name, field.initial)
                    value = field.clean(value, initial)
                else:
                    value = field.clean(value)
                self.cleaned_data[name] = value   ##验证成功临时放入cleaned_data中["username":"crik","pwd":123]
                if hasattr(self, 'clean_%s' % name):  ##要是在Form中有clean_字段名,要执行,通过这个,才真正的放入cleaned_data字段中
                    value = getattr(self, 'clean_%s' % name)()
                    self.cleaned_data[name] = value
            except ValidationError as e:   ##如果有ValidationError,就add_error (name=字段名字,而e是错误)
                self.add_error(name, e)
前戏2:
通过源码,我们可以知道了在Form class中我们可以定义一个以"clean_"前缀的字段方法。
进行额外的判断:
注意:方法的返回值必须是self.cleand_data[name]=value 因为在第一次只是临时放入到cleand_data字典正确数据,
实现:
from  django import forms as fforms
from django.forms import fields
from django.forms import  widgets

from django.core.validators import RegexValidator
from app01 import  models
from django.core.exceptions import NON_FIELD_ERRORS,ValidationError
class UserInfo(fforms.Form):
    username = fields.CharField()
    phone = fields.CharField(
        validators=[RegexValidator(r'^[0-9]+$', '请输入数字'), RegexValidator(r'^159[0-9]+$', '数字必须以159开头')],
        )
    def clean_username(self):
        v = self.cleaned_data['username']
        if models.Users.objects.filter(username=v).count(): ##存在username=发过来的username,就报错
            raise ValidationError('用户名已存在')
        return v
views
from app01.myform import *
import json
def exform(request):
    if request.method == "GET":
        obj = UserInfo()
        return render(request,"exForm.html",{"obj":obj})
    else:
        obj = UserInfo(request.POST)
        if obj.is_valid():
            print(obj.cleaned_data)
            return HttpResponse("OK")
        else:
            print(obj.errors)
            ##<ul class="errorlist"><li>username<ul class="errorlist"><li>用户名已存在</li></ul></li><li> phone<ul class="errorlist"><li>数字必须以159开头</li></ul></li></ul>
            return  HttpResponse(json.dumps(obj.errors))
方式四:
对于方式三的时候,我们可以对其单个字段进行一个扩展,但是在设计数据库的时候
我们是有存在联合唯一的key的,往往需要两个或三个字段唯一才报错。
前戏:源码解析
一:

    def is_valid(self):
        """
        Returns True if the form has no errors. Otherwise, False. If errors are
        being ignored, returns False.
        """
        return self.is_bound and not self.errors  ##执行self.errors函数

二:
    @property
    def errors(self):
        "Returns an ErrorDict for the data provided for the form"
        if self._errors is None:
            self.full_clean()  ##执行full_clean函数
        return self._errors

三:
    def full_clean(self):
        """
        Cleans all of self.data and populates self._errors and
        self.cleaned_data.
        """
        self._errors = ErrorDict()
        if not self.is_bound:  # Stop further processing.
            return
        self.cleaned_data = {}
        # If the form is permitted to be empty, and none of the form data has
        # changed from the initial data, short circuit any validation.
        if self.empty_permitted and not self.has_changed():
            return

        self._clean_fields()  ##在方式三的时候,这个函数是逐一进行匹配单个字段的、并且存在一个clean_字段名的扩展
        self._clean_form()    ##开始执行_clean_form()函数
        self._post_clean()

四:
    def _clean_form(self):
        try:
            cleaned_data = self.clean()  ##执行self.clean()方法,当clean里面有ValidationError的时候,就会被捕捉到
        except ValidationError as e:
            self.add_error(None, e)        ##以None为key的错误
        else:
            if cleaned_data is not None:
                self.cleaned_data = cleaned_data

        ##from django.core.exceptions import NON_FIELD_ERRORS, ValidationError
        ##NON_FIELD_ERRORS = '__all__'  定义的是以None为key,而他进行了一个转换none==__all__


五:
    def clean(self):  ##这就是一个钩子、我们可以做任何的事情。但是要记得必须要return self.cleaned_data
        """
        Hook for doing any extra form-wide cleaning after Field.clean() has been
        called on every field. Any ValidationError raised by this method will
        not be associated with a particular field; it will have a special-case
        association with the field named '__all__'.
        """
        return self.cleaned_data
myforms文件
from  django import forms as fforms
from django.forms import fields
from django.forms import  widgets

from django.core.validators import RegexValidator
from app01 import  models
from django.core.exceptions import NON_FIELD_ERRORS,ValidationError
class UserInfo(fforms.Form):
    username = fields.CharField()
    phone = fields.CharField(
        validators=[RegexValidator(r'^[0-9]+$', '请输入数字'), RegexValidator(r'^159[0-9]+$', '数字必须以159开头')],
        )
    def clean_username(self):
        v = self.cleaned_data['username']
        if models.Users.objects.filter(username=v).count():
            raise ValidationError('用户名已存在')
        return v

    def clean(self):
        username = self.cleaned_data['username']  ##这里可以获取到cleand_data的数据,因为单个字段验证完成
        phone = self.cleaned_data['phone']
        if username == "root" and phone == '159159': ##这里就做一个简单的实例,正常是去数据库匹配数据
            raise ValidationError("用户已经注册")
        return self.cleaned_data   ##必须返回cleand_data
views
from django.shortcuts import render
from django.shortcuts import redirect,HttpResponse


from app01.myform import *
import json
def exform(request):
    if request.method == "GET":
        obj = UserInfo()
        return render(request,"exForm.html",{"obj":obj})
    else:
        obj = UserInfo(request.POST)
        if obj.is_valid():
            print(obj.cleaned_data)
            return HttpResponse("OK")
        else:
            print(obj.errors)
            ##<ul class="errorlist"><li>__all__<ul class="errorlist nonfield"><li>用户已经注册</li></ul></li></ul>
            return  HttpResponse(json.dumps(obj.errors))
六、页面请求models里面的all时候的几种实现
方式1:一次撸到底,单一页面
#####views####

def v1_all(request):
    user_list = models.Users.objects.all()
    return render(request,"v1_all.html",{"user_list":user_list})


#####v1_all.html####

<body>

<h1>用户列表</h1>
<table>
    {% for row in user_list %}
        <tr>
            <td>{{ row.id }}</td>
            <td>{{ row.username }}</td>
        </tr>
    {% endfor %}
</table>

</body>
方式2:两个url,一个加载页面,一个加载数据
views:
def v1_all(request):
    return render(request,"v1_all.html")


def get_data(request):
    user_list = models.Users.objects.all()
    return render(request,"get_data.html",{"user_list":user_list})
template:
{% for row in user_list %}
    <tr>
        <td>{{ row.id }}</td>
        <td>{{ row.username }}</td>
    </tr>
{% endfor %}
<body>

<h1>用户列表</h1>
<table id="tb">

</table>

<script src="/static/jquery-3.3.1.min.js"></script>
<script>
    (function () {
        GetData(); //加载完自动执行函数
    })();
    function GetData() {
        $.ajax({
            url:"/get_data/",
            type:"get",
            success:function (arg) {
                $("#tb").append(arg)  //返回来的是一堆tr包裹着td的标签
            }
        })
    }
</script>

</body>
方式3:序列化的方式
所谓的序列化,就是把一个对象转成字符串,能够保存在文件的东西,
这一过程就是序列化。
import json
from django.core import serializers
def v1_all(request):
    return render(request, "v1_all.html")


def get_data(request):
    ret = {"status": False, "message": None}
    user_list = models.Users.objects.all()
    if user_list.exists():  ##user_list存在数据,这一过程不会执行sql语句,执行去看一下是否有数据
        ret["status"] = True
        ret["message"] = serializers.serialize("json", user_list) ##
    return HttpResponse(json.dumps(ret))
django的返回数据有:
QuerySet的对象类型;
    ##不是基本类型,不能直接采用json.dumps而是要采用Django内置的,serializers进行序列化,然后再进行json.dumps
values:QuerySet 包裹着字典 ;
values_list :QuerySet 包裹着元组;
    ##对其上的两种,我们可以采用去掉外面的QuerySet外衣 直接 list[user_list],
    ##把QuerySet外衣变成list的外衣;然后就可以进行json.dumps
七、文件上传
views
def upload(request):
    if request.method == "GET":
        return render(request,"upload.html")
    else:
        # print(request.POST) #<QueryDict: {'csrfmiddlewaretoken': ['k24X8CeB8v75MbSqe18167yF4L5WAgrLjQKtlVe19zRzPW8p9YY8NA3wHuV30ky4'], 'user': ['dad']}>
        # print(request.FILES) # <MultiValueDict: {'img': [<InMemoryUploadedFile: 个人简历模板.doc (application/msword)>]}>
        user = request.POST.get("user") ##user是字符串
        file = request.FILES.get("img") ##file是一个对象,包含文件内容、大小、文件名称等
        # print(file.name) ##个人简历模板.doc
        # print(file.size) ##25088
        f = open(file.name,'wb')
        for line in file.chunks():   ##文件的内容,默认是生成一个迭代器,要一点一点的去取数据
            f.write(line)
        f.close()

        return HttpResponse(".....OK")
template
<body>
<form action="/upload.html" method="post" enctype="multipart/form-data">
    {% csrf_token %}
    <input type="text" name="user" placeholder="用户名"/>
    <div style="position: relative">
        <a href="">NB上传</a>
        <input type="file" name="img" style="opacity: 0;position: absolute;top: 0;left: 0; "/>  ##可以自定制上传按钮。
    </div>
    <input type="submit" value="提交" />
</form>

</body>