本节内容:
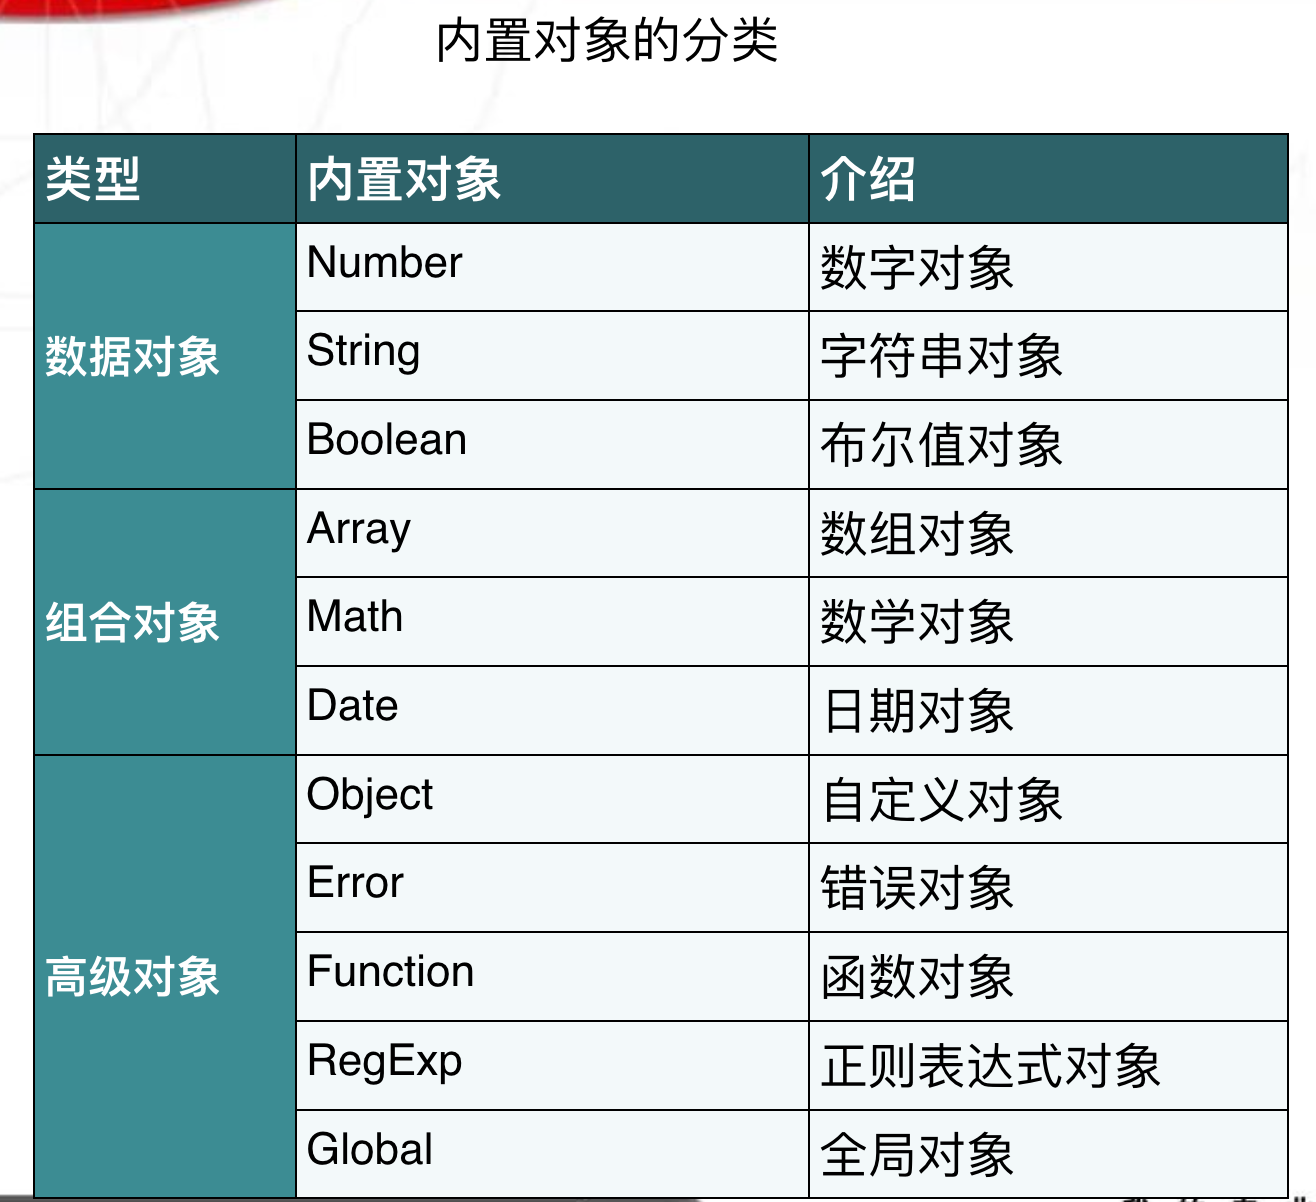
1:ECMA对象
2:string对象
3:Array对象
4:BOM对象
5:DOM对象之节点
6:DOM对象之EVENT事件
7:DOM节点的增删改查
8: 实例练习
http://www.cnblogs.com/yuanchenqi/articles/5977825.html
1:ECMA对象
JavaScript 是基于类的实现方式,我们不创建类,只是使用类:
一共给了我们11中内置的对象:
Array ,String , Date, Math, Boolean, Number Function, Global, Error, RegExp , Object
2:string对象
两种创建字符串对象 :
var str = 'hello';
console.log(typeof (str)); //string

var str2 = new String('hello');
console.log(typeof (str2)); //object

两种创建字符串对象 :
第一种创建:就按基本数据对象给你创建,是变量和数据都是在栈中
第二种创建:是按堆的方式去给你创建,变量指向堆里面的地址   因为有个new的过程。
字符串的属性: length
var str = 'hello';
console.log(str.length) //5
字符串的方法 :
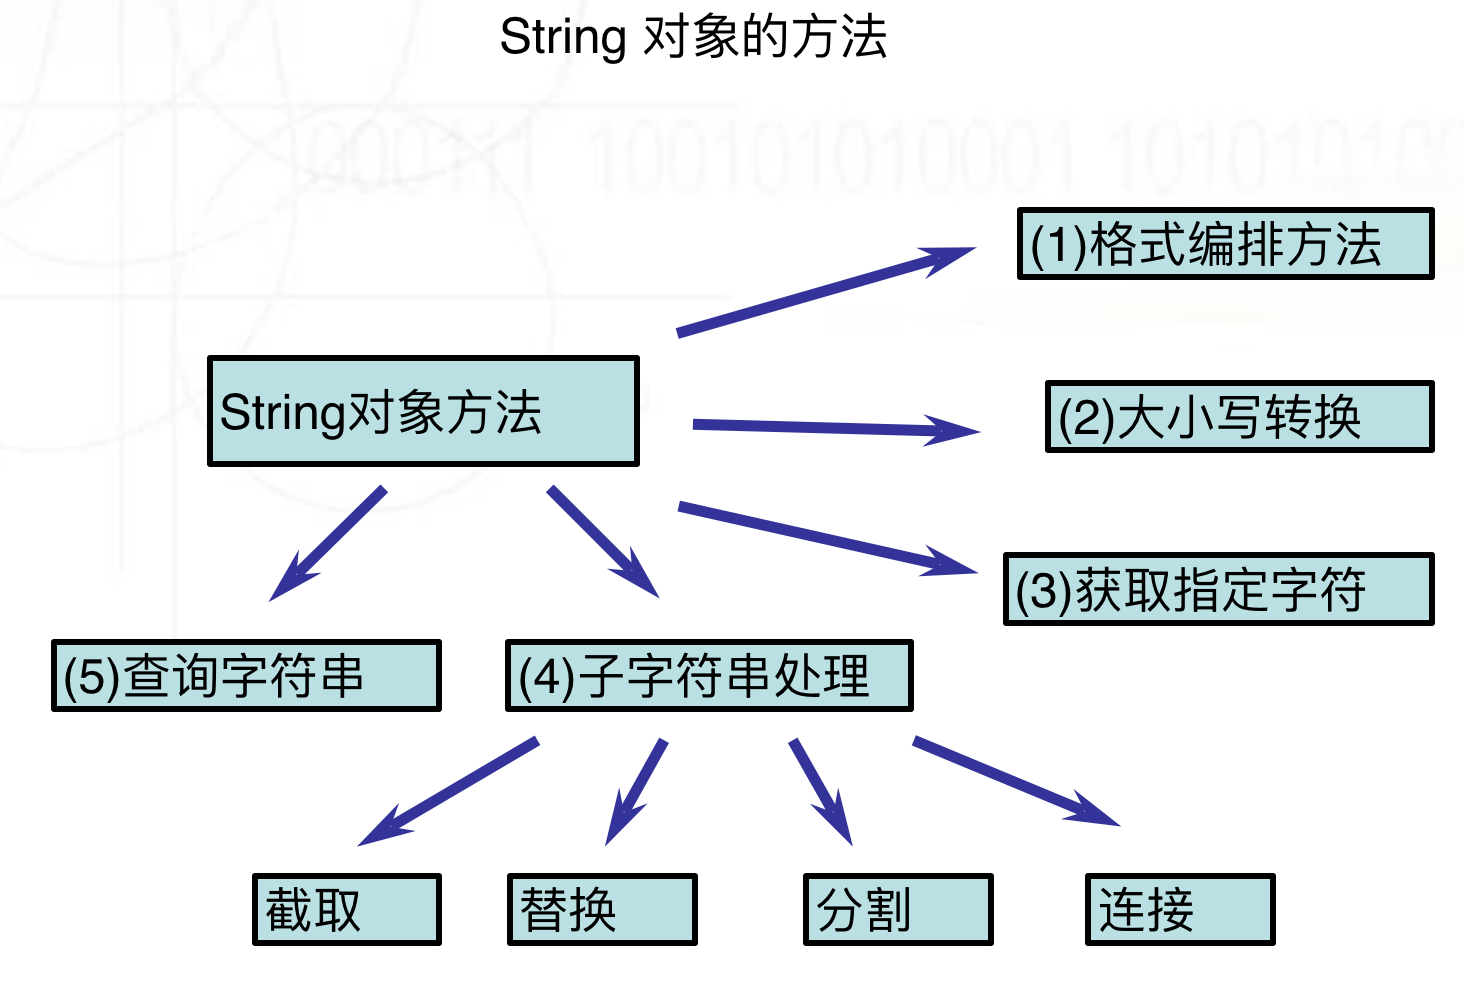
1:编排方法
所谓的编排方式就是给你的字符串加标签;


var str = 'hello';
例:变斜体 console.log(str.italics()); //<i>hello</i>
例:变粗  console.log(str.bold());  //<b>hello</b>

如
x.anchor()返回锚定义字符串<a>x</a>,
x.bold()返回粗体表示字符串<b>x</b>,
x.sup()返回上标格式字符串<sup>x</sup>。
2:大小写转换
var str1="AbcdEfgh";

var str2=str1.toLowerCase();
var str3=str1.toUpperCase();
alert(str2);
//结果为"abcdefgh"
alert(str3);
//结果为"ABCDEFGH"
3:获取指定字符
书写格式

x.charAt(index)

x.charCodeAt(index)

使用注解

x代表字符串对象
index代表字符位置
index从0开始编号
charAt返回index位置的字符
charCodeAt返回index位置的Unicode编码
----------------------
var str1="welcome to the world of JS! 苑昊";

var str2=str1.charAt(28);
var str3=str1.charCodeAt(28);
alert(str2);
//结果为"苑"
alert(str3);
//结果为33489
4:查询字符串
//书写格式
//
//x.indexOf(findstr,index)
//x.lastIndexOf(findstr)
//-------------------------------------
var str1="welcome to the world of JS!";

var str2=str1.indexOf("l");
var str3=str1.lastIndexOf("l");
alert(str2);
//结果为2
alert(str3);
//结果为18

//-------*********************************************************-------

//书写格式
//
//x.match(regexp)
//
//x.search(regexp)
//
//使用注解
//
//x代表字符串对象
//
//regexp代表正则表达式或字符串
//
//match返回匹配字符串的数组,如果没有匹配则返回null
//
//search返回匹配字符串的首字符位置索引
//-------------------------------------
var str1="welcome to the world of JS!";

var str2=str1.match("world");
var str3=str1.search("world");
alert(str2[0]);
//结果为"world"
alert(str3);
//结果为15
5:截取子字符串
//截取子字符串
//
//书写格式
//
//x.substr(start, length)
//
//x.substring(start, end)
//
//使用注解
//
//x代表字符串对象
//
//start表示开始位置
//
//length表示截取长度
//
//end是结束位置加1
//
//第一个字符位置为0


var str1="abcdefgh";
var str2=str1.substr(2,4);
var str3=str1.substring(2,4);
alert(str2);
//结果为"cdef"
alert(str3);
//结果为"cd"

//-------*********************************************************-------
//x.slice(start, end)


var str1="abcdefgh";
var str2=str1.slice(2,4);
var str3=str1.slice(4);
var str4=str1.slice(2,-1);
var str5=str1.slice(-3,-1);
alert(str2);
//结果为"cd"
alert(str3);
//结果为"efgh"
alert(str4);
//结果为"cdefg"
alert(str5);
//结果为"fg"
6:替换子字符串
//x.replace(findstr,tostr)

var str1="abcdefgh";
var str2=str1.replace("cd","aaa");
alert(str2);
//结果为"abaaaefgh"
7:分割字符串
var str1="一,二,三,四,五,六,日";

var strArray=str1.split(",");

alert(strArray[1]);
//结果为"二"
8:连接字符串
//y=x.concat(addstr)
//
//使用注解
//
//x代表字符串对象
//addstr为添加字符串
//返回x+addstr字符串

var str1="abcd";
var str2=str1.concat("efgh");

alert(str2);
//结果为"abcdefgh"
3:Array对象
创建数组对象
Array 对象用于在单个的变量中存储多个值。
语法:

创建方式1:
var a=[1,2,3];

创建方式2:
new Array();     //  创建数组时允许指定元素个数也可以不指定元素个数。
new Array(size);//if 1个参数且为数字,即代表size,not content
    初始化数组对象:
    var cnweek=new Array(7);
        cnweek[0]="星期日";
        cnweek[1]="星期一";
        ...
        cnweek[6]="星期六";

new Array(element0, element1, ..., elementn)//也可以直接在建立对象时初始化数组元素,元素类型允许不同

var test=new Array(100,"a",true);
创建二维数组
///////

aa = [[1,'1ss'],[2,'2']];
console.log(aa[0][1])
///////


var cnweek=new Array(7);
for (var i=0;i<=6;i++){
    cnweek[i]=new Array(2);
}
cnweek[0][0]="星期日";
cnweek[0][1]="Sunday";
cnweek[1][0]="星期一";
cnweek[1][1]="Monday";
...
cnweek[6][0]="星期六";
cnweek[6][1]="Saturday";
Array对象的属性
获取数组元素的个数:length
    aa = [[1,'1ss'],[2,'2']];
    // b[10]= 23;
    console.log(aa[0][1])
    console.log(aa.length) //2
Array对象的方法

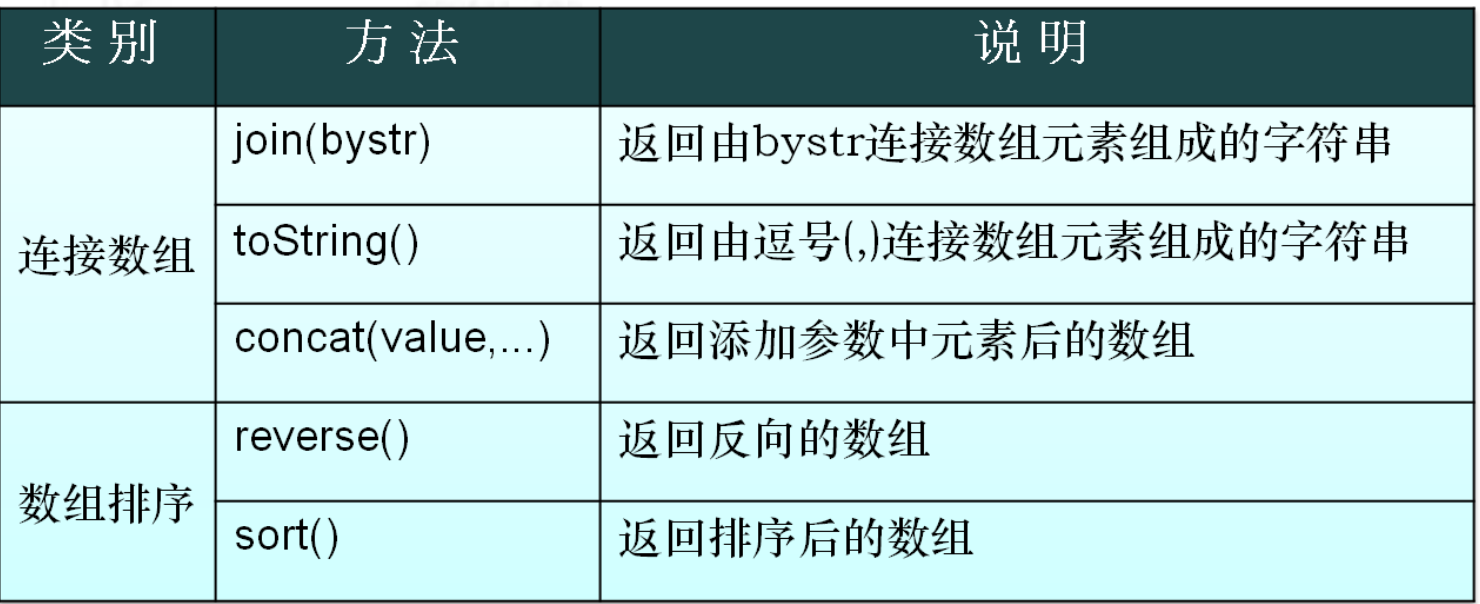
1、 连接数组-join方法 (这是因为)
//书写格式
//x.join(bystr)
//使用注解
//
//x代表数组对象
//bystr作为连接数组中元素的字符串
//返回连接后的字符串
//与字符串的split功能刚好相反

var arr1=[1, 2, 3, 4, 5, 6, 7];

var str1=arr1.join("-");

alert(str1);
//结果为"1-2-3-4-5-6-7"
我们在python学join的时候是在字符串的时候: 数字和字符串不能想操作不像js
print("---".join(["sss","qq"]))
##sss---qq
2、连接数组-concat方法
//连接数组-concat方法
//
//x.concat(value,...)


var a = [1,2,3];
var a = new Array(1,2,3);
var b=a.concat(4,5) ;


alert(a.toString());
//返回结果为1,2,3
alert(b.toString());
//返回结果为1,2,3,4,5
3、数组排序-reverse sort
//x.reverse()
//x.sort()

var arr1=[32, 12, 111, 444];
//var arr1=["a","d","f","c"];

arr1.reverse(); //颠倒数组元素
alert(arr1.toString());
//结果为444,111,12,32

arr1.sort();    //排序数组元素
alert(arr1.toString());
//结果为111,12,32,444

//------------------------------
arr=[1,5,2,100];

//arr.sort();
//alert(arr);
//如果就想按着数字比较呢?

function intSort(a,b){
    if (a>b){
        return 1;//-1
    }
    else if(a<b){
        return -1;//1
    }
    else {
        return 0
    }
}

arr.sort(intSort);

alert(arr);

function IntSort(a,b){
    return a-b;
}
4、数组切片-slice
//x.slice(start, end)
//
//使用注解
//
//x代表数组对象
//start表示开始位置索引
//end是结束位置下一数组元素索引编号
//第一个数组元素索引为0
//start、end可为负数,-1代表最后一个数组元素
//end省略则相当于从start位置截取以后所有数组元素

var arr1=['a','b','c','d','e','f','g','h'];
var arr2=arr1.slice(2,4);
var arr3=arr1.slice(4);
var arr4=arr1.slice(2,-1);

alert(arr2.toString());
//结果为"c,d"
alert(arr3.toString());
//结果为"e,f,g,h"
alert(arr4.toString());
//结果为"c,d,e,f,g"
5、删除子数组
//x. splice(start, deleteCount, value, ...)
//
//使用注解
//
//x代表数组对象
//splice的主要用途是对数组指定位置进行删除和插入
//start表示开始位置索引
//deleteCount删除数组元素的个数
//value表示在删除位置插入的数组元素
//value参数可以省略


var a = [1,2,3,4,5,6,7,8];
a.splice(1,2);
//a变为 [1,4,5,6,7,8]
alert(a.toString());
a.splice(1,1);
 //a变为[1,5,6,7,8]
alert(a.toString());
a.splice(1,0,2,3);
 //a变为[1,2,3,5,6,7,8]
alert(a.toString());
6、数组的进出栈操作(1)
//push pop这两个方法模拟的是一个栈操作

//x.push(value, ...)  压栈
//x.pop()             弹栈
//使用注解
//
//x代表数组对象
//value可以为字符串、数字、数组等任何值
//push是将value值添加到数组x的结尾
//pop是将数组x的最后一个元素删除


var arr1=[1,2,3];
arr1.push(4,5);
alert(arr1);
//结果为"1,2,3,4,5"
arr1.push([6,7]);
alert(arr1)
//结果为"1,2,3,4,5,6,7"
arr1.pop();
alert(arr1);
//结果为"1,2,3,4,5"
7、数组的进出栈操作(2)
// unshift shift
//x.unshift(value,...)
//x.shift()
//使用注解
//
//x代表数组对象
//value可以为字符串、数字、数组等任何值
//unshift是将value值插入到数组x的开始
//shift是将数组x的第一个元素删除

var arr1=[1,2,3];
arr1.unshift(4,5);
alert(arr1);
//结果为"4,5,1,2,3"
arr1. unshift([6,7]);
alert(arr1);
//结果为"6,7,4,5,1,2,3"
arr1.shift();
alert(arr1);
//结果为"4,5,1,2,3"
8、总结js的数组特性:
//  js中数组的特性
         //java中数组的特性,  规定是什么类型的数组,就只能装什么类型.只有一种类型.
         //js中的数组特性1: js中的数组可以装任意类型,没有任何限制.
         //js中的数组特性2: js中的数组,长度是随着下标变化的.用到多长就有多长.
         var arr5 = ['abc',123,1.14,true,null,undefined,new String('1213'),new Function('a','b','alert(a+b)')];
        /*  alert(arr5.length);//8
         arr5[10] = "hahaha";
         alert(arr5.length); //11
         alert(arr5[9]);// undefined */
4:Function 对象(重点)
创建函数
function 函数名 (参数){

函数体;
   return 返回值;
}

//another way:
var 函数名 = new Function("参数1","参数n","function_body");
实例
function func1(){
    alert('hello yuan!');
    return 8
}

func1();

----------------

var func1=new Function("name","alert("hello"+name);")
func1("yuan")
注意:js的函数加载执行与python不同,它是整体加载完才会执行,所以执行函数放在函数声明上面或下面都可以:
Function 属性: length
function foo(x)
{
    console.log(x)
}
alert(foo.length) //1

//ECMAScript 定义的属性 length 声明了函数期望的参数个数。
Function 方法:void
function foo(x) {
    return 6
}
ret = foo(2);
console.log(ret);   //6
ret = void (foo(2))
console.log(ret);  //undefined

//运算符void()作用:拦截方法的返回值
函数的调用
function func1(a,b){

    alert(a+b);
}

    func1(1,2);  //3
    func1(1,2,3);//3
    func1(1);    //NaN
    func1();     //NaN

    //只要函数名写对即可,参数怎么填都不报错.

-------------------面试题-----------
 function a(a,b){
    alert(a+b);
}

   var a=1;
   var b=2;
   a(a,b)

 //报错a现在的指向了1
函数的内置对象arguments
function add(a,b){

        console.log(a+b);//3
        console.log(arguments.length);//2
        console.log(arguments);//[1,2]

    }
    add(1,2)

    ------------------arguments的用处1 ------------------
    function nxAdd(){
        var result=0;
        for (var num in arguments){
            result+=arguments[num]
        }
        alert(result)

    }

    nxAdd(1,2,3,4,5)

//     ------------------arguments的用处2 ------------------

    function f(a,b,c){
        if (arguments.length!=3){
            throw new Error("function f called with "+arguments.length+" arguments,but it just need 3 arguments")
        }
        else {
            alert("success!")
        }
    }

    f(1,2,3,4,5)
匿名函数
匿名函数就是没有名字的函数:

#######第一种方式:#########
var foo = function (arg)
    {
        alert(arg)
    }

然后再去调用:foo("hello")

#######第二种方式:#########
(function (arg)
{
    alert(arg)
})("hello") ; //他没有名字,我调用不了,那就用括号括起来,把它自己当成函数名 后面再加();


这时候可能有会问?那我一个标准函数和匿名函数有什么区别? 我一样是调用foo("hello")啊
注意: 你可以尝试下下面的测试:

###########匿名###########  报错!会说函数没有加载
foo("hello")
var foo = function (arg)
    {
        alert(arg)
    }

#########标准函数########  正常执行,js是先加载完再执行的
foo("hello")
function foo(arg)
    {
        alert(arg)
    }
函数的作用域链和闭包
作用域
js的作用域和py相似,if while等控制语句并没有自己作用域;而函数是有自己的作用域的;
if(1==1){

        var s=12;
    }
    console.log(s);//12

   // ----------------------
    function f(){
        var temp=666;
    }
    f();
    console.log(temp);//Uncaught ReferenceError: temp is not defined
闭包
 var city = 'beijing';

function func(){
    var city = "shanghai";
    function inner(){
        // var city = "langfang";
        console.log(city);
    }
    return inner;
}
var ret = func();
ret();   //shanghai
4:BOM对象
BOM(浏览器对象模型),可以对浏览器窗口进行访问和操作。使用 BOM,开发者可以移动窗口、改变状态栏中的文本以及执行其他与页面内容不直接相关的动作。
使 JavaScript 有能力与浏览器“对话”。
windows对象
window对象
    所有浏览器都支持 window 对象。
    概念上讲.一个html文档对应一个window对象.
    功能上讲: 控制浏览器窗口的.
    使用上讲: window对象不需要创建对象,直接使用即可.
windows对象方法:
alert()            显示带有一段消息和一个确认按钮的警告框。
confirm()          显示带有一段消息以及确认按钮和取消按钮的对话框。
prompt()           显示可提示用户输入的对话框。

open()             打开一个新的浏览器窗口或查找一个已命名的窗口。
close()            关闭浏览器窗口。
setInterval()      按照指定的周期(以毫秒计)来调用函数或计算表达式。
clearInterval()    取消由 setInterval() 设置的 timeout。
setTimeout()       在指定的毫秒数后调用函数或计算表达式。
clearTimeout()     取消由 setTimeout() 方法设置的 timeout。
scrollTo()         把内容滚动到指定的坐标。
交互操作:
//----------alert confirm prompt----------------------------
//alert('aaa');


// var ret = window.confirm("hello")
// console.log(ret)  //true
##用户是有选择的,选择是有返回值的。


//prompt()           显示可提示用户输入的对话框。
// var ret2 = window.prompt("hello");
// console.log(ret2) //搜索 输入什么就是什么


方法讲解:
//open方法 打开和一个新的窗口 并 进入指定网址.参数1 : 网址.
//调用方式1
    //open("http://www.baidu.com");
//参数1 什么都不填 就是打开一个新窗口.  参数2.填入新窗口的名字(一般可以不填). 参数3: 新打开窗口的参数.
    open('','','width=200,resizable=no,height=100'); // 新打开一个宽为200 高为100的窗口
//close方法  将当前文档窗口关闭.
    //close();
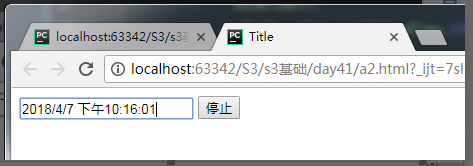
setInterval clearInterval
<input id="ID1" type="text" onclick="begin()">
<button onclick="end()">停止</button>

<script>


    function showTime(){
           var nowd2=new Date().toLocaleString();
           var temp=document.getElementById("ID1");
           temp.value=nowd2;

    }

    var clock;

    function begin(){

        if (clock==undefined){  //当你一再的点击input框 会创建多个的clock这时候,就不能停止了

             showTime();
             clock=setInterval(showTime,1000);

        }

    }

    function end(){

        clearInterval(clock);
    }

</script>
setTimeout clearTimeout
var ID = setTimeout(abc,2000); // 只调用一次对应函数.
            clearTimeout(ID);
    function abc(){
        alert('aaa');
    }
History 对象
History 对象属性
History 对象包含用户(在浏览器窗口中)访问过的 URL。
History 对象是 window 对象的一部分,可通过 window.history 属性对其进行访问。
|
1
|
length 返回浏览器历史列表中的 URL 数量。 |
History 对象方法
back()    加载 history 列表中的前一个 URL。
forward()    加载 history 列表中的下一个 URL。
go(1[-1])    加载 history 列表中的某个具体页面。
#########history1 页面
<a href="history2.html">click</a>
<button onclick="history.forward()"> >>> </button>

先点击click后,跳到history2页面,再点击back就会回去了,因为back知道页面是从什么地方来的
#########history2 页面
<button onclick="history.back()">back</button>


#####go  history1 页面
###就是相当于go里面的数字代替了back和forward
<a href="history2.html">click</a>
<button onclick="history.go(1)"> >>> </button>
<script>
    console.log(history.length) //2
</script>

#####go  history2 页面
<button onclick="history.go(-1)">back</button>
Location 对象
Location 对象包含有关当前 URL 的信息。
Location 对象是 Window 对象的一个部分,可通过 window.location 属性来访问。
Location 对象方法
location.assign(URL)  ##跳转到一个新的页面,有点像链接的意思
location.reload()      ##重新加载一个页面,刷新一样
location.replace(newURL)//注意与assign的区别 替换当前页面
<button onclick="foo()">reflush</button>
<b>nnn</b>
<script>
    function foo() {
        //location.reload("http://www.baidu.com")
        //location.assign("http://www.baidu.com") //类似链接的作用是可以back回去的
        location.replace("http://www.baidu.com")
    }
</script>
5:DOM对象之节点
DOM定义了访问HTML和XML文档的标准。 DOM( Document Object Model 文档对象模型)
W3C DOM 标准被分为 3 个不同的部分:
- 核心 DOM - 针对任何结构化文档的标准模型
- XML DOM - 针对 XML 文档的标准模型
- HTML DOM - 针对 HTML 文档的标准模型
- 什么是 XML DOM? ---->XML DOM 定义了所有 XML 元素的对象和属性,以及访问它们的方法。
- 什么是 HTML DOM?---->HTML DOM 定义了所有 HTML 元素的对象和属性,以及访问它们的方法。
DOM节点:
一个html网页就是一个DOM,可以把html整体看成一棵树,而里面的一个个标签就是各个的叶子(节点)。
根据 W3C 的 HTML DOM 标准,HTML 文档中的所有内容都是节点(NODE):
- 整个文档是一个文档节点(document对象)
- 每个 HTML 元素是元素节点(element 对象)
- HTML 元素内的文本是文本节点(text对象)
- 每个 HTML 属性是属性节点(attribute对象)
- 注释是注释节点(comment对象)
画dom树是为了展示文档中各个对象之间的关系,用于对象的导航。
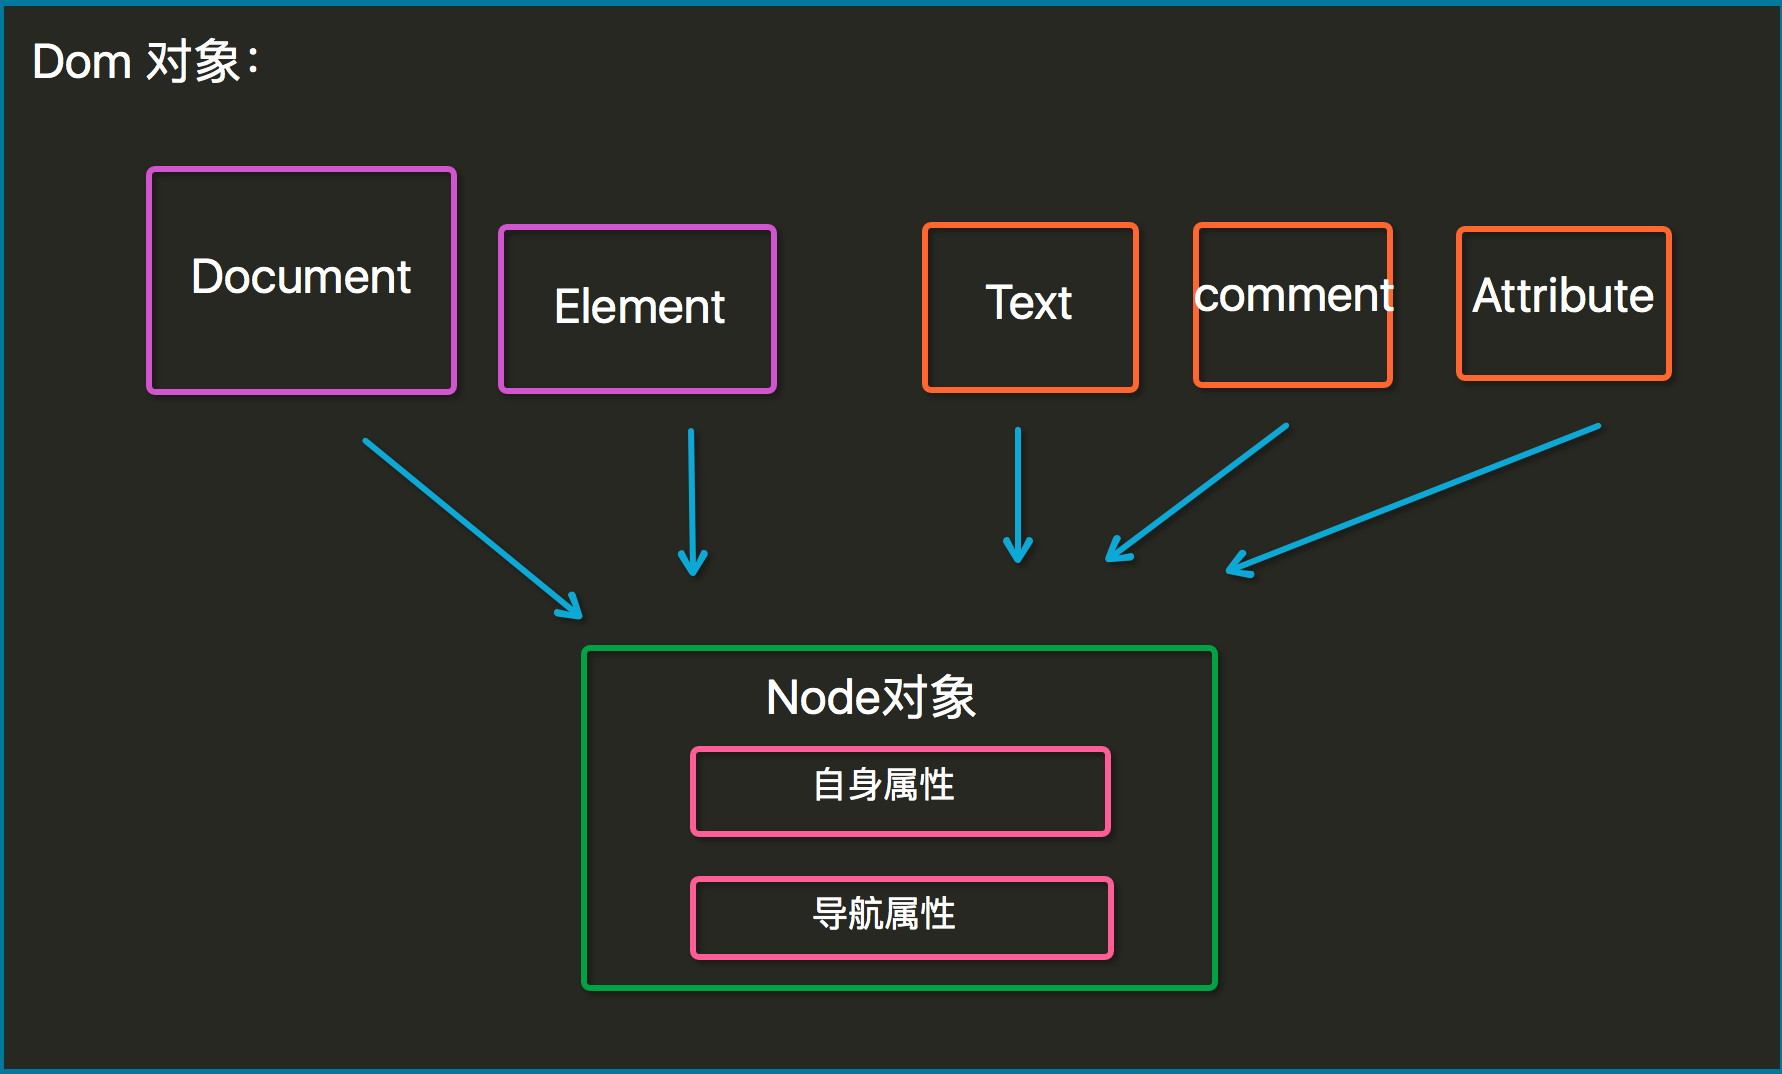
节点(自身)属性:
- attributes - 节点(元素)的属性节点
- nodeType – 节点类型
- nodeValue – 节点值
- nodeName – 节点名称
- innerHTML - 节点(元素)的文本值
<p class="p1" gen="22">hello</p>
<p>world</p>
<script>
   var ele = document.getElementsByClassName('p1')[0]
    // console.log(ele) //<p class="p1">hello</p>
    console.log(ele.nodeType); //1
    console.log(ele.nodeValue); //null
    console.log(ele.nodeName); //p
    console.log(ele.innerHTML); //hello  记住这个!!
    console.log(ele.attributes); //获取到p标签的属性
</script>
导航属性: (有了一个标签对象了怎么去找到其他的标签对象)
- parentNode - 节点(元素)的父节点 (推荐)
- firstChild – 节点下第一个子元素
- lastChild – 节点下最后一个子元素
- childNodes - 节点(元素)的子节点
注意:
div id="div1">
    <div id="div2"></div>
    <p>hello yuan</p>
</div>

<script>
    var div=document.getElementById("div2");

    console.log(div.nextSibling.nodeName);  //思考:为什么不是P?
</script>

<!--//因为默认标签与标签之间存在空白-->
推荐导航属性:
parentElement              // 父节点标签元素

children                        // 所有子标签

firstElementChild          // 第一个子标签元素

lastElementChild           // 最后一个子标签元素

nextElementtSibling       // 下一个兄弟标签元素

previousElementSibling  // 上一个兄弟标签元素
访问 HTML 元素(节点),访问 HTML 元素等同于访问节点,我们能够以不同的方式来访问 HTML 元素:
页面查找:
- 通过使用 getElementById() 方法
- 通过使用 getElementsByTagName() 方法 ##获取到数组格式的对象
- 通过使用 getElementsByClassName() 方法 ##获取到数组格式的对象
- 通过使用 getElementsByName() 方法 ##获取到数组格式的对象
局部查找:
<div id="div1">

    <div class="div2">i am div2</div>
    <div name="yuan">i am div2</div>
    <div id="div3">i am div2</div>
    <p>hello p</p>
</div>

<script>

   var div1=document.getElementById("div1");

////支持;
//   var ele= div1.getElementsByTagName("p");
//   alert(ele.length);
////支持
//   var ele2=div1.getElementsByClassName("div2");
//   alert(ele2.length);
////不支持
//   var ele3=div1.getElementById("div3");
//   alert(ele3.length);
////不支持
//   var ele4=div1.getElementsByName("yuan");
//   alert(ele4.length)

</script>
6:DOM对象之EVENT事件
HTML 4.0 的新特性之一是有能力使 HTML 事件触发浏览器中的动作(action),比如当用户点击某个 HTML 元素时启动一段 JavaScript。下面是一个属性列表,这些属性可插入 HTML 标签来定义事件动作。
onclick        当用户点击某个对象时调用的事件句柄。
ondblclick     当用户双击某个对象时调用的事件句柄。

onfocus        元素获得焦点。               //练习:输入框
onblur         元素失去焦点。               应用场景:用于表单验证,用户离开某个输入框时,代表已经输入完了,我们可以对它进行验证.
onchange       域的内容被改变。             应用场景:通常用于表单元素,当元素内容被改变时触发.(三级联动)

onkeydown      某个键盘按键被按下。          应用场景: 当用户在最后一个输入框按下回车按键时,表单提交.
onkeypress     某个键盘按键被按下并松开。
onkeyup        某个键盘按键被松开。
onload         一张页面或一幅图像完成加载。
onmousedown    鼠标按钮被按下。
onmousemove    鼠标被移动。
onmouseout     鼠标从某元素移开。
onmouseover    鼠标移到某元素之上。
onmouseleave   鼠标从元素离开

onselect      文本被选中。
onsubmit      确认按钮被点击。
两种为元素附加事件属性的方式
<div onclick="alert(123)">点我呀</div>
<p id="abc">试一试!</p>

<script>
    var ele=document.getElementById("abc");


    ele.onclick=function(){
        alert("hi");
    };

</script>
注意:
<div id="abc" onclick="func1(this)">事件绑定方式1</div>
<div id="id123">事件绑定方式2</div>
<script>
    function func1(self){
        console.log(self.id)
    }

    //jquery下是$(self), 这种方式this参数必须填写;

//------------------------------------------
    var ele=document.getElementById("id123").onclick=function(){
         console.log(this.id);
        //jquery下是$(this), 这种方式不需要this参数;
    }

</script>
onload:
onload 属性开发中 只给 body元素加.
这个属性的触发 标志着 页面内容被加载完成.
应用场景: 当有些事情我们希望页面加载完立刻执行,那么可以使用该事件属性.
<!DOCTYPE html>
<html lang="en">
<head>
    <meta charset="UTF-8">
    <title>Title</title>

    <script>
//          window.onload=function(){
//               var ele=document.getElementById("ppp");
//               ele.onclick=function(){
//                alert(123)
//            };
//          };


          function fun1() {
              var ele=document.getElementById("ppp");
               ele.onclick=function(){
                alert(123)
            };
          }

    </script>
</head>
<body onload="fun1()">

<p id="ppp">hello p</p>

</body>
</html>
onsubmit:
是当表单在提交时触发. 该属性也只能给form元素使用.应用场景: 在表单提交前验证用户输入是否正确.如果验证失败.在该方法中我们应该阻止表单的提交.
<form id="form">
            <input type="text"/>
            <input type="submit" value="点我!" />
</form>

<script type="text/javascript">
            //阻止表单提交方式1().
            //onsubmit 命名的事件函数,可以接受返回值. 其中返回false表示拦截表单提交.其他为放行.

            var ele=document.getElementById("form");
            ele.onsubmit=function(event) {  //加个event代表了当前的事件,你可以获取到当前事件的状态和信息
//                alert("验证失败 表单不会提交!");
//                return false;

            // 阻止表单提交方式2 event.preventDefault(); ==>通知浏览器不要执行与事件关联的默认动作。
             alert("验证失败 表单不会提交!");
             event.preventDefault();

    }
onsubmit里的event:
Event 对象:

Event 对象代表事件的状态,比如事件在其中发生的元素、键盘按键的状态、鼠标的位置、鼠标按钮的状态。

事件通常与函数结合使用,函数不会在事件发生前被执行!event对象在事件发生时系统已经创建好了,并且会在事件函数被调用时传给事件函数.我们获得仅仅需要接收一下即可.

比如onkeydown,我们想知道哪个键被按下了,需要问下event对象的属性,这里就时KeyCode;

思考:onclick=function(event){};这个方法是谁调用的?
事件传播:
<style>
    .outer{
        display: inline-block;
        height: 300px;
         300px;
        background-color: #396bb3;
    }
    .inner {
        display: inline-block;
        height: 100px;
         100px;
        background-color:#84a42b;
    }
</style>
<body>


<div class="outer" onclick="func1()">
    <div class="inner" onclick="func2()"></div>
</div>

<script>
    function func1() {
        alert("outer")
    }

    function func2() {   //点击inner的区域的时候会,一起触发outer的onclick事件
        //var ele = document.getElementsByClassName("inner")[0];
        //ele.stopPropagation();
        alert("inner")
    }
</script>

</body>
7:DOM节点的增删改查
增:
|
1
2
|
createElement(name)创建元素appendChild();将元素添加 |
删:
|
1
2
3
|
获得要删除的元素获得它的父元素使用removeChild()方法删除 |
改:
第一种方式:
使用上面增和删结合完成修改
第二中方式:
使用setAttribute();方法修改属性
使用innerHTML属性修改元素的内容
查: 使用之前介绍的方法.
<!DOCTYPE html>
<html lang="en">
<head>
    <meta charset="UTF-8">
    <title>Title</title>
</head>
<style>
    .outer{
        display: inline-block;
        height: 300px;
         300px;
        background-color: #396bb3;
    }
    .inner {
        display: inline-block;
        height: 100px;
         100px;
        background-color:#84a42b;
    }
</style>
<body>
<div id="div_1" onclick="addNode()">div_1</div>

<script type="text/javascript">
//在第一个div中动态增加一个a标签. 该a标签点击之后跳转到百度首页.
    function addNode(){
        //1.获得 第一个div
        var div = document.getElementById("div_1");
        //2.创建a标签  createElement==>创建一个a标签   <a></a>
        var eleA =  document.createElement("a");
        //3.为a标签添加属性 <a href="http://www.baidu.com"></a>
        eleA.setAttribute("href", "http://www.baidu.com");
        //4.为a标签添加内容 <a href="http://www.baidu.com">百度</a>
        eleA.innerHTML = "百度";
        //5.将a标签添加到div中
        div.appendChild(eleA);
    }
    //点击后 删除div区域2
    function deleteNode(){
        //1 获得要删除的div区域
            var div = document.getElementById("div_2");
        //2.获得父亲
            var parent = div.parentNode;
        //3 由父亲操刀
            parent.removeChild(div);
    }
    //点击后 替换div区域3 为一个美女
    function updateNode(){
        //1 获得要替换的div区域3
        var div = document.getElementById("div_3");
        //2创建img标签对象 <img />
        var img = document.createElement("img");
        //3添加属性 <img src="001.jpg" />
        img.setAttribute("src", "001.JPG");
        //4.获得父节点
        var parent = div.parentNode;
        //5.替换
        parent.replaceChild(img, div);
    }
    //点击后 将div区域4 克隆一份 添加到页面底部

    function copyNode(){
        //1.获取要克隆的div
        var div = document.getElementById("div_4");
        //2.克隆 参数为true 那么克隆时克隆所有子元素. false 只克隆自己
        var div_copy = div.cloneNode(true);
        //3.获得父亲
        var parent = div.parentNode;
        //4.添加
        parent.appendChild(div_copy);
    }


</script>
</body>
</html>
- 改变 HTML 内容
改变元素内容的最简答的方法是使用 innerHTML ,innerText。
- 改变 CSS 样式
|
1
2
|
<p id="p2">Hello world!</p>document.getElementById("p2").style.color="blue";<br data-filtered="filtered"> .style.fontSize=48px |
- 改变 HTML 属性
elementNode.setAttribute(name,value)
elementNode.getAttribute(name)<-------------->elementNode.value(DHTML)
- 创建新的 HTML 元素
createElement(name)
- 删除已有的 HTML 元素
elementNode.removeChild(node)
- 关于class的操作
elementNode.className
elementNode.classList.add
elementNode.classList.remove
<div class="div1 div2">div_1</div>

<script type="text/javascript">
var ele = document.getElementsByTagName("div")[0]
    console.log(ele.className);//div1 div2
    console.log(ele.classList[1]);//div2

</script>
8: 实例练习
1 模态对话框: 有两个变化

<!DOCTYPE html>
<html lang="en">
<head>
    <meta charset="UTF-8">
    <title>Title</title>
    <style>
        * {
            margin: 0;
            padding: 0;
        }
        .content {
            height: 1800px;
            background-color: #204982;
        }
        /*遮罩层,可以看见内容 透明度,占满屏,*/
        .shade {
            position: fixed;
            top: 0;
            right: 0;
            left: 0;
            bottom: 0;
            background-color: #999999;
            opacity: 0.5;
        }
        .hide{
            display: none;
        }
        .model {
             200px;
            height: 200px;
            position: absolute;
            top: 25%;
            left: 30%;
            background-color: gold;
        }
    </style>
</head>
<body>
<div  class="content">
    <button onclick="show()">show</button>
</div>
<div class="shade hide"></div>

<div class="model hide">
    <input type="button" value="cancel" onclick="cancle()">
</div>

<script>
    function show() {
        var ele = document.getElementsByClassName("shade")[0];
        var ele2 = document.getElementsByClassName("model")[0];
        ele.classList.remove("hide");
        ele2.classList.remove("hide");
    }
    function cancle() {
        var ele = document.getElementsByClassName("shade")[0];
        var ele2 = document.getElementsByClassName("model")[0];
        ele.classList.add("hide");
        ele2.classList.add("hide");
    }

</script>
</body>
</html>
2 全选反选取消
 <button onclick="select('all');">全选</button>
     <button onclick="select('cancel');">取消</button>
     <button onclick="select('reverse');">反选</button>

     <table border="1" id="Table">
         <tr>
             <td><input type="checkbox"></td>
             <td>111</td>
         </tr>
         <tr>
             <td><input type="checkbox"></td>
             <td>222</td>
         </tr>
         <tr>
             <td><input type="checkbox"></td>
             <td>333</td>
         </tr>
         <tr>
             <td><input type="checkbox"></td>
             <td>444</td>
         </tr>
     </table>


<script>
    function select(choice){
        var ele=document.getElementById("Table");

        var inputs=ele.getElementsByTagName("input");
        for (var i=0;i<inputs.length;i=i+1){

                   var ele2=inputs[i];
            if (choice=="all"){
                ele2.checked=true;

            }else if(choice=="cancel"){
                ele2.checked=false;
            }
            else {

                if (ele2.checked){
                    ele2.checked=false;
                }else {
                    ele2.checked=true;
                }
            }

            }
    }
</script>
3 两级联动
<script>
    var data={"河北省":["廊坊","邯郸"],"北京":["朝阳区","海淀区"]};
    console.log(typeof data); //object
    console.log(data.河北省); //["廊坊", "邯郸"]
    console.log(data["河北省"]); //["廊坊", "邯郸"]
    for (i in data) {
        console.log(i)
    } // 河北省 北京 和python一样
</script>
<select id="province">
    <option>请选择省:</option>
</select>

<select id="city">
    <option>请选择市:</option>
</select>


<script>
    data={"河北省":["廊坊","邯郸"],"北京":["朝阳区","海淀区"]};


      var p=document.getElementById("province");
      var c=document.getElementById("city");

    for(var i in data){
        var option_pro=document.createElement("option");

        option_pro.innerHTML=i;

        p.appendChild(option_pro);
    }
     p.onchange=function(){

            pro=(this.options[this.selectedIndex]).innerHTML;
            //this是select的标签的;
            //this.selectedIndex 获取到select下的被选中的索引;
            //this.options 获取select的所有option标签数组
            citys=data[pro];

         c.options.length=0;
         //在每次的选中 要情空之前的option

         for (var i in citys){
             var option_city=document.createElement("option");
             option_city.innerHTML=citys[i];
             c.appendChild(option_city);
         }

        }
</script>