Azure的SLB和ILB是最常用的4层负载均衡工具。但有些场景是7层的负载均衡,SLB和ILB就无能为力了。
Azure上已经推出了APP Gateway的服务,就是7层负载均衡的负载均衡器。
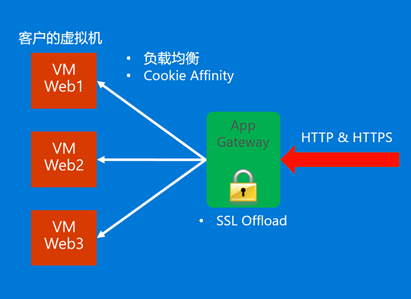
如上图,APP Gateway实现用户HTTPS网站的SSL Offload,还可以实现多个VM的负载均衡。而且可以实现Cookie Affinity功能,这也是7层负载均衡的一种功能。
通过App Gateway、SLB、Traffic Manager综合使用,可以实现对应用系统的高扩展性:

可以通过智能DNS选择北部的Azure的数据中心还是东部的Azure的数据中心,再通过4层的SLB把流量分担到多个Application Gateway上,Application Gateway再根据策略,把流量分担到各个虚拟机上。
Application Gateway的部署基于VNet,但其负载均衡的节点可以是非本VNet的虚拟机。如下图:

其负载均衡的节点除本VNet的虚拟机外,可以是其他的Cloud Service,其他VNet内的虚拟机(需要VPN打通),甚至外部的虚拟机都可以成为Application Gateway的负载均衡节点。
App Gateway一共有3中型号:
- Small – Dev/Test使用,不建议部署在生产环境
- Medium – 可以支持150Mbps的SSL流量
- Large – 可以支持200Mbps的SSL流量
具体配置命令:
-
创建Application Gateway
New-AzureApplicationGateway -Name hwappgw -VnetName hwvnet -Subnets Subnet-1 -InstanceCount 2 -GatewaySize Medium
New-AzureApplicationGateway -Name hwappgw02 -VnetName hwvnet -Subnets Subnet-1 -InstanceCount 2 -GatewaySize Medium
上面的配置中配置了两个APP Gateway。
第一个会把其对外的地址设定为Subnet-1的地址,将采用ILB的四层负载均衡;第二个会让其自动获得公网的VIP地址,将采用SLB的四层负载均衡。
-
设置Application Gateway的配置文件
首先编辑Application Gateway的配置文件,a.xml将采用ILB的方式实现负载均衡,c.xml将采用SLB的方式实现负载均衡:
a.xml
<?xml version="1.0" encoding="utf-8"?>
<ApplicationGatewayConfiguration xmlns:i="http://www.w3.org/2001/XMLSchema-instance" xmlns="http://schemas.microsoft.com/windowsazure">
<FrontendIPConfigurations>
<FrontendIPConfiguration>
<Name>fip1</Name>
<Type>Private</Type>
<StaticIPAddress>10.1.1.140</StaticIPAddress>
</FrontendIPConfiguration>
</FrontendIPConfigurations>
<FrontendPorts>
<FrontendPort>
<Name>FrontendPort1</Name>
<Port>80</Port>
</FrontendPort>
</FrontendPorts>
<BackendAddressPools>
<BackendAddressPool>
<Name>BackendPool1</Name>
<IPAddresses>
<IPAddress>10.1.1.151</IPAddress>
<IPAddress>10.1.1.152</IPAddress>
</IPAddresses>
</BackendAddressPool>
</BackendAddressPools>
<BackendHttpSettingsList>
<BackendHttpSettings>
<Name>BackendSetting1</Name>
<Port>80</Port>
<Protocol>Http</Protocol>
<CookieBasedAffinity>Enabled</CookieBasedAffinity>
</BackendHttpSettings>
</BackendHttpSettingsList>
<HttpListeners>
<HttpListener>
<Name>HTTPListener1</Name>
<FrontendIP>fip1</FrontendIP>
<FrontendPort>FrontendPort1</FrontendPort>
<Protocol>Http</Protocol>
</HttpListener>
</HttpListeners>
<HttpLoadBalancingRules>
<HttpLoadBalancingRule>
<Name>HttpLBRule1</Name>
<Type>basic</Type>
<BackendHttpSettings>BackendSetting1</BackendHttpSettings>
<Listener>HTTPListener1</Listener>
<BackendAddressPool>BackendPool1</BackendAddressPool>
</HttpLoadBalancingRule>
</HttpLoadBalancingRules>
</ApplicationGatewayConfiguration>
可以注意到其前端的IP地址是10.1.1.140。
c.xml
<?xml version="1.0" encoding="utf-8"?>
<ApplicationGatewayConfiguration xmlns:i="http://www.w3.org/2001/XMLSchema-instance" xmlns="http://schemas.microsoft.com/windowsazure">
<FrontendPorts>
<FrontendPort>
<Name>FrontendPort1</Name>
<Port>80</Port>
</FrontendPort>
</FrontendPorts>
<BackendAddressPools>
<BackendAddressPool>
<Name>BackendPool1</Name>
<IPAddresses>
<IPAddress>10.1.1.151</IPAddress>
<IPAddress>10.1.1.152</IPAddress>
</IPAddresses>
</BackendAddressPool>
</BackendAddressPools>
<BackendHttpSettingsList>
<BackendHttpSettings>
<Name>BackendSetting1</Name>
<Port>80</Port>
<Protocol>Http</Protocol>
<CookieBasedAffinity>Enabled</CookieBasedAffinity>
</BackendHttpSettings>
</BackendHttpSettingsList>
<HttpListeners>
<HttpListener>
<Name>HTTPListener1</Name>
<FrontendPort>FrontendPort1</FrontendPort>
<Protocol>Http</Protocol>
</HttpListener>
</HttpListeners>
<HttpLoadBalancingRules>
<HttpLoadBalancingRule>
<Name>HttpLBRule1</Name>
<Type>basic</Type>
<BackendHttpSettings>BackendSetting1</BackendHttpSettings>
<Listener>HTTPListener1</Listener>
<BackendAddressPool>BackendPool1</BackendAddressPool>
</HttpLoadBalancingRule>
</HttpLoadBalancingRules>
</ApplicationGatewayConfiguration>
这个配置中的前端IP不进行设置,讲自动获得VIP地址。
-
设置Application Gateway的配置
Set-AzureApplicationGatewayConfig -Name hwappgw -ConfigFile D:a.xml
Set-AzureApplicationGatewayConfig -Name hwappgw02 -ConfigFile D:c.xml
-
启动Application Gateway
Start-AzureApplicationGateway -Name hwappgw
Start-AzureApplicationGateway -Name hwappgw02
这个过程将比较耗时,这一步需要大约20分钟的时间创建。这个过程中,Azure会在后台创建多台Application Gateway的VM,实现HA的配置。
-
获得Application Gateway的状态
Get-AzureApplicationGateway
|
Name |
hwappgw |
|
Description |
|
|
VnetName |
hwvnet |
|
Subnets |
{Subnet-1} |
|
InstanceCount |
2 |
|
GatewaySize |
Medium |
|
State |
Running |
|
VirtualIPs |
{10.1.1.140} |
|
DnsName |
|
Name |
hwappgw02 |
|
Description |
|
|
VnetName |
hwvnet |
|
Subnets |
{Subnet-1} |
|
InstanceCount |
2 |
|
GatewaySize |
Medium |
|
State |
Running |
|
VirtualIPs |
{42.159.241.87} |
|
DnsName |
70da9ed4-cf13-45a9-9fa3-c44f7e98e73a.chinacloudapp.cn |
可以观察到,hwappgw的地址是一个内部地址,而hwappgw02的地址是一个公网地址,并有DNS的域名。
这时已经可以通过这个两个负载均衡的地址访问后台的服务了。Application Gateway会根据10.1.1.151和10.1.1.152两台虚拟机的状态进行负载均衡的流量转发。
-
上传SSL证书
Add-AzureApplicationGatewaySslCertificate -Name hwappgw02 -CertificateName hengweicert -Password xxxx -CertificateFile D:HengweiCert.pfx
Name HTTP Status Code Operation ID Error
---- ---------------- ------------ -----
Successful OK ae3d3289-618f-4da0-bf45-56ed2542d098
-
确认证书状态
Get-AzureApplicationGatewaySslCertificate -Name hwappgw02
Name : hengweicert
SubjectName : CN=ClientCertificateHengwei
Thumbprint : 1336E8F9BB18A947AD79F0A2939411B0BC3D893B
ThumbprintAlgo : sha1RSA
State : Provisioned
-
更改hwappgw02的配置文件
修改c.xml配置文件,修改协议为https、443端口,以及添加证书配置:
<?xml version="1.0" encoding="utf-8"?>
<ApplicationGatewayConfiguration xmlns:i="http://www.w3.org/2001/XMLSchema-instance" xmlns="http://schemas.microsoft.com/windowsazure">
<FrontendPorts>
<FrontendPort>
<Name>FrontendPort1</Name>
<Port>443</Port>
</FrontendPort>
</FrontendPorts>
<BackendAddressPools>
<BackendAddressPool>
<Name>BackendPool1</Name>
<IPAddresses>
<IPAddress>10.1.1.151</IPAddress>
<IPAddress>10.1.1.152</IPAddress>
</IPAddresses>
</BackendAddressPool>
</BackendAddressPools>
<BackendHttpSettingsList>
<BackendHttpSettings>
<Name>BackendSetting1</Name>
<Port>80</Port>
<Protocol>Http</Protocol>
<CookieBasedAffinity>Enabled</CookieBasedAffinity>
</BackendHttpSettings>
</BackendHttpSettingsList>
<HttpListeners>
<HttpListener>
<Name>HTTPListener1</Name>
<FrontendPort>FrontendPort1</FrontendPort>
<Protocol>Https</Protocol>
<SslCert>hengweicert</SslCert>
</HttpListener>
</HttpListeners>
<HttpLoadBalancingRules>
<HttpLoadBalancingRule>
<Name>HttpLBRule1</Name>
<Type>basic</Type>
<BackendHttpSettings>BackendSetting1</BackendHttpSettings>
<Listener>HTTPListener1</Listener>
<BackendAddressPool>BackendPool1</BackendAddressPool>
</HttpLoadBalancingRule>
</HttpLoadBalancingRules>
</ApplicationGatewayConfiguration>
-
上传APP Gateway的设置
Set-AzureApplicationGatewayConfig -Name hwappgw02 -ConfigFile D:c.xml
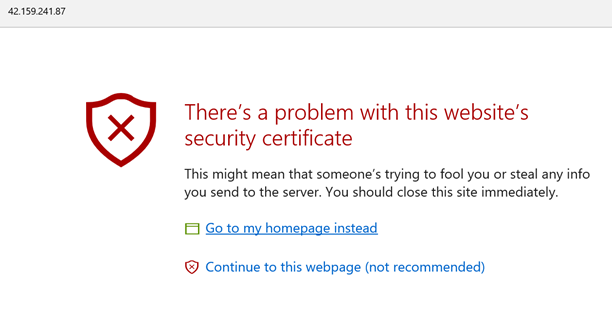
此时通过https访问这个网站,会提示证书不受信任(自签名证书)
点击继续后,出现网站主页面:
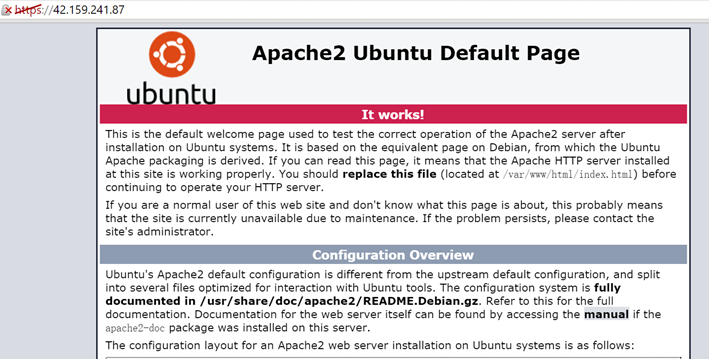
而此时虚拟机提供的只是HTTP服务,由application gateway做了SSL的加密发送给用户。
目前Application Gateway可以实现的功能主要是基于CookieAffinity的负载均衡和SSL的Offload。
将来还会出基于URL的HTTP路由策略。新功能出来后,再做更新!