一、SpringBoot入门
1、简介
简化Spring应用开发的一个框架;
整个Spring技术栈的一个大整合;
J2EE开发的一站式解决方案;
2、POM文件
2.1 父项目
<!-- 父项目 -->
<parent>
    <groupId>org.springframework.boot</groupId>
    <artifactId>spring-boot-starter-parent</artifactId>
    <version>2.2.1.RELEASE</version>
    <relativePath/> <!-- lookup parent from repository -->
</parent>

<!-- 祖父项目 -->
<!-- 包含了所有的依赖及其版本信息 -->
<parent>
    <groupId>org.springframework.boot</groupId>
    <artifactId>spring-boot-dependencies</artifactId>
    <version>2.2.1.RELEASE</version>
    <relativePath>../../spring-boot-dependencies</relativePath>
</parent>
所以以后导入依赖就不需要写版本信息
2.2 依赖的导入
直接引入场景依赖就行,也就是添加场景启动器,其会自动导入相应的jar包,例如
<dependency>
    <groupId>org.springframework.boot</groupId>
    <artifactId>spring-boot-starter-web</artifactId>
</dependency>
所以spring boot它将所有的场景给提取出来,做成一个个启动器,需要什么就引入这些启动器就可以
完成某项功能。
2.3 主方法
@SpringBootApplication
public class SpringbootApplication {
    public static void main(String[] args) {
        SpringApplication.run(SpringbootApplication.class, args);
    }
}
点进@SpringBootApplication,如下
@Target({ElementType.TYPE})
@Retention(RetentionPolicy.RUNTIME)
@Documented
@Inherited
@SpringBootConfiguration
@EnableAutoConfiguration
@ComponentScan(
    excludeFilters = {@Filter(
    type = FilterType.CUSTOM,
    classes = {TypeExcludeFilter.class}
), @Filter(
    type = FilterType.CUSTOM,
    classes = {AutoConfigurationExcludeFilter.class}
)}
)
public @interface SpringBootApplication {
在这里@SpringBootConfiguration代表的是本类是springboot的的配置类,定义如下
@Target({ElementType.TYPE})
@Retention(RetentionPolicy.RUNTIME)
@Documented
@Configuration
public @interface SpringBootConfiguration {
@Configuration:标注此类是一个配置类,且配置也是容器中的一个组件
@EnableAutoConfiguration:表示开启自动配置,将一些组件自动配置,无需再手写xml文件了,其定义如下
@Target({ElementType.TYPE})
@Retention(RetentionPolicy.RUNTIME)
@Documented
@Inherited
@AutoConfigurationPackage
@Import({AutoConfigurationImportSelector.class})
public @interface EnableAutoConfiguration {
@AutoConfigurationPackage:自动配置包,其定义如下
@Target({ElementType.TYPE})
@Retention(RetentionPolicy.RUNTIME)
@Documented
@Inherited
@Import({Registrar.class})
public @interface AutoConfigurationPackage {
}
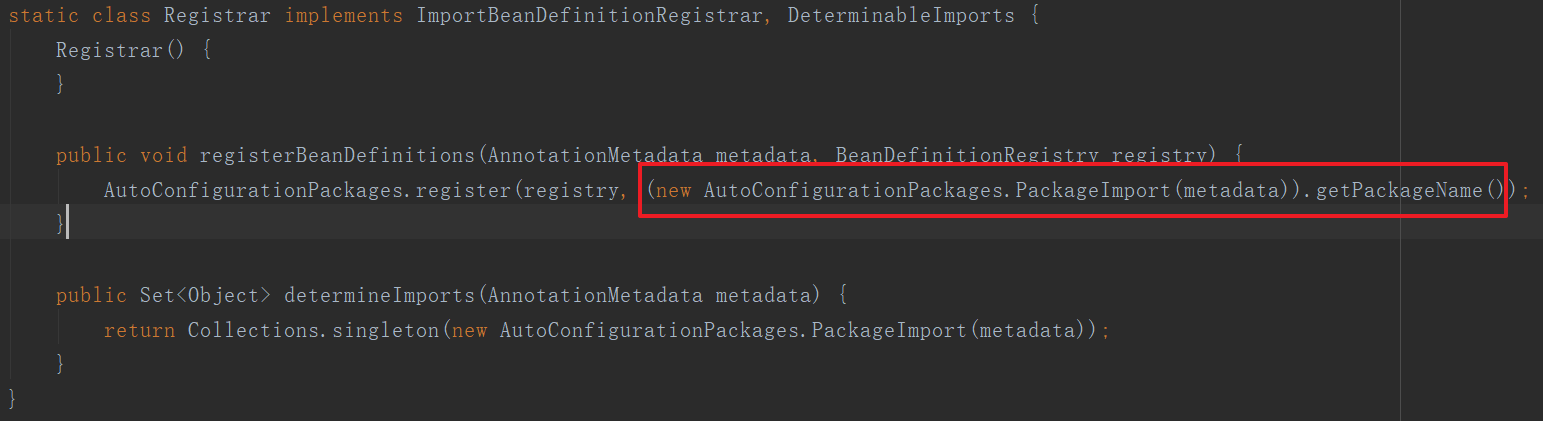
@Import是spring的底层注解,用来给容器导入一个组件,其导入的是Registrar.class,查看其源码,可发现标记中的代码,它的值就是标注了@SpringBootConfiguration注解的包的名字。因此@AutoConfigurationPackage的作用就是将主配置类所在包即子包内的所有组件扫描到spring容器中。
@Import({AutoConfigurationImportSelector.class}):自动配置导入选择器
前面@AutoConfigurationPackage注解的作用是将主配置类下的组件扫描进spring容器中,打个比方,在以往配置springMVC环境的时候我们不仅需要将组件导入到Ioc容器中,而且还要写xml配置文件,而这个注解的作用就是来替代xml文件的。它可以导入非常多的自动配置类,就是给容器中导入这个场景需要的所有组件,并配置好这些组件。
自动配置类在spring-boot-autoconfigure.jar包下
二、配置文件
1、YAML语法
1.1 基本语法
k:(空格)v:表示一对键值对(空格必须有);
以空格的缩进来控制层级关系;只要是左对齐的一列数据,都是同一个层级的
server:
    port: 8081
    path: /hello
属性和值也是大小写敏感;
1.2 值的写法
- 字面量
普通的值(数字,字符串,布尔)
k: v:字面直接来写;
字符串默认不用加上单引号或者双引号;
"":双引号;不会转义字符串里面的特殊字符;特殊字符会作为本身想表示的意思
name: "zhangsan lisi":输出;zhangsan 换行 lisi
'':单引号;会转义特殊字符,特殊字符最终只是一个普通的字符串数据
name: ‘zhangsan lisi’:输出;zhangsan lisi
- 对象
对象、Map(属性和值)(键值对)
k: v:在下一行来写对象的属性和值的关系;注意缩进
对象还是k: v的方式
friends:
		lastName: zhangsan
		age: 20
行内写法:
friends: {lastName: zhangsan,age: 18}
- 数组
(List、Set)
用- 值表示数组中的一个元素
pets:
 - cat
 - dog
 - pig
行内写法
pets: [cat,dog,pig]
2、配置文件注入
首先引入配置文件处理器,这样写配置时会有提示功能
<!--导入配置文件处理器,配置文件进行绑定就会有提示-->
<dependency>
    <groupId>org.springframework.boot</groupId>
    <artifactId>spring-boot-configuration-processor</artifactId>
    <optional>true</optional>
</dependency>
然后开始写配置文件信息,yml如下
user:
  name: lisi
  password: 123
注意yml配置中不能出现下划线,如果标签头出现下划线将会报错,属性出现的话可能会获取不到值。
/**
 * 将配置文件中配置的每一个属性的值,映射到这个组件中
 * @ConfigurationProperties:告诉SpringBoot将本类中的所有属性和配置文件中相关的配置进行绑定;
 *      prefix = "user":配置文件中哪个下面的所有属性进行一一映射
 *
 * 只有这个组件是容器中的组件,才能使用容器提供的@ConfigurationProperties功能;
 *
 */
@Component
@ConfigurationProperties(prefix = "user")
public class User {

    private String name;
    private String password;
2.1 SpringBoot单元测试
在要进行测试的类上标注注解@SpringBootTest,再加上@RunWith(SpringRunner.class),需要spring-boot-starter-test启动器,如下
@RunWith(SpringRunner.class)
@SpringBootTest
public class SpringbootApplicationTests {
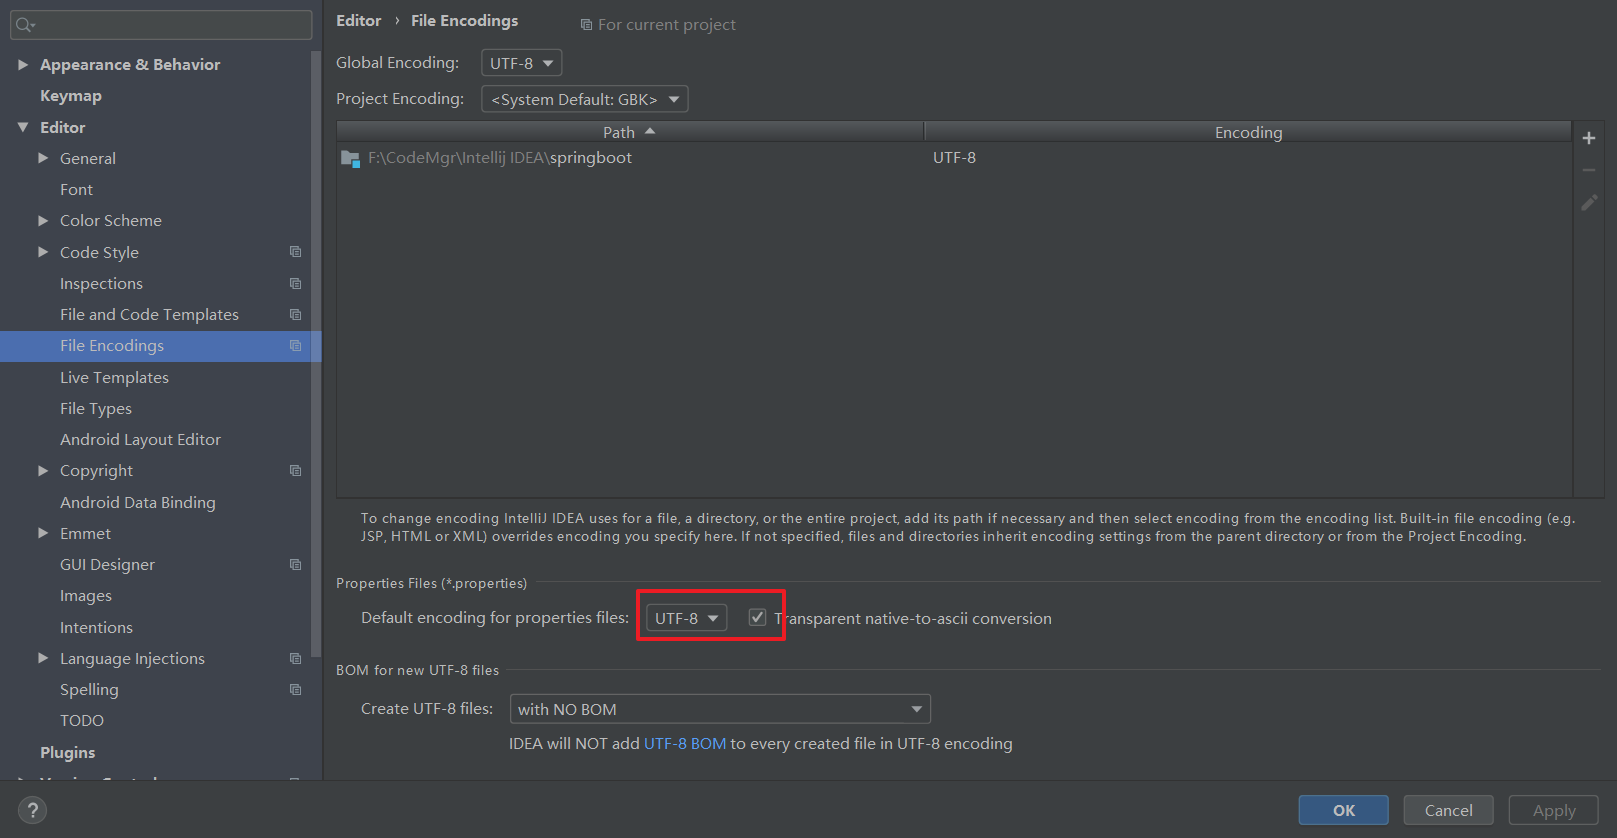
2.2 properties乱码问题
properties配置文件在idea中乱码问题
2.3 配置文件注入值校验
@Component
@ConfigurationProperties(prefix = "person")
@Validated
public class Person {

    /**
     * <bean class="Person">
     *      <property name="lastName" value="字面量/${key}从环境变量、配置文件中获取值/#{SpEL}"></property>
     * <bean/>
     */

   //lastName必须是邮箱格式
    @Email
    //@Value("${person.last-name}")
    private String lastName;
2.4 @Value和@Config…获取值比较
@Value获取值和@ConfigurationProperties获取值比较
| @ConfigurationProperties | @Value | |
|---|---|---|
| 功能 | 批量注入配置文件中的属性 | 一个个指定 |
| 松散绑定(松散语法) | 支持 | 不支持 |
| SpEL | 不支持 | 支持 |
| JSR303数据校验 | 支持 | 不支持 |
| 复杂类型封装 | 支持 | 不支持 |
配置文件yml还是properties他们都能获取到值,@configurationProperties除了不支持SpEL其他都支持,@Value则恰恰相反
如果说,我们只是在某个业务逻辑中需要获取一下配置文件中的某项值,使用@Value;
如果说,我们专门编写了一个javaBean来和配置文件进行映射,我们就直接使用@ConfigurationProperties;
2.5 加载指定配置文件
@PropertySource:加载指定的配置文件
当不使用@PropertySource时,springboot默认会从全局配置文件寻找匹配信息,全局配置文件有两个,application.properties和application.yml
/**
 * 将配置文件中配置的每一个属性的值,映射到这个组件中
 * @ConfigurationProperties:告诉SpringBoot将本类中的所有属性和配置文件中相关的配置进行绑定;
 *      prefix = "person":配置文件中哪个下面的所有属性进行一一映射
 *
 * 只有这个组件是容器中的组件,才能容器提供的@ConfigurationProperties功能;
 *  @ConfigurationProperties(prefix = "person")默认从全局配置文件中获取值;
 *
 */
@PropertySource(value = {"classpath:person.properties"})
@Component
@ConfigurationProperties(prefix = "person")
public class Person {
2.6 Spring配置文件
1、导入spring配置文件
@ImportResource:导入Spring的配置文件,让配置文件里面的内容生效;
Spring Boot里面没有Spring的配置文件,我们自己编写的配置文件,也不能自动识别;
想让Spring的配置文件生效,加载进来;@ImportResource标注在一个配置类上
@ImportResource(locations = {"classpath:beans.xml"})
导入Spring的配置文件让其生效
接下来编写Spring的配置文件
<?xml version="1.0" encoding="UTF-8"?>
<beans xmlns="http://www.springframework.org/schema/beans"
       xmlns:xsi="http://www.w3.org/2001/XMLSchema-instance"
       xsi:schemaLocation="http://www.springframework.org/schema/beans http://www.springframework.org/schema/beans/spring-beans.xsd">


    <bean id="helloService" class="com.atguigu.springboot.service.HelloService"></bean>
</beans>
2、编写配置类
SpringBoot推荐给容器中添加组件的方式;推荐使用全注解的方式
1、配置类@Configuration------>Spring配置文件
2、使用@Bean给容器中添加组件
/**
 * @Configuration:指明当前类是一个配置类;就是来替代之前的Spring配置文件
 *
 * 在配置文件中用<bean><bean/>标签添加组件
 *
 */
@Configuration
public class MyAppConfig {

    //将方法的返回值添加到容器中;容器中这个组件默认的id就是方法名
    @Bean
    public HelloService helloService02(){
        System.out.println("配置类@Bean给容器中添加组件了...");
        return new HelloService();
    }
}
3、配置文件占位符
3.1 随机数
${random.value}、${random.int}、${random.long}
${random.int(10)}、${random.int[1024,65536]}
3.2 获取之前配置值
占位符获取之前配置的值,如果没有可以是用:指定默认值
person.last-name=张三${random.uuid}
person.age=${random.int}
person.birth=2017/12/15
person.boss=false
person.maps.k1=v1
person.maps.k2=14
person.lists=a,b,c
person.dog.name=${person.hello:hello}_dog
person.dog.age=15
可以通过一个在占位符后面添加一个冒号:来指定默认值
4、Profile
4.1 多Profile文件
我们在主配置文件编写的时候,文件名可以是 application-{profile}.properties/yml
默认使用application.properties的配置;
4.2 yml支持多文档块方式
server:
  port: 8081
spring:
  profiles:
    active: prod

---
server:
  port: 8083
spring:
  profiles: dev


---

server:
  port: 8084
spring:
  profiles: prod  #指定属于哪个环境
4.3 激活指定profile
1、在配置文件中指定
spring.profiles.active=dev
2、命令行:
java -jar springboot.jar --spring.profiles.active=dev
可以直接在测试的时候,配置传入命令行参数
3、虚拟机参数;
-Dspring.profiles.active=dev
5、配置文件加载位置
springboot 启动会扫描以下位置的application.properties或者application.yml文件作为Spring boot的默认配置文件
–file:./config/
–file:./
–classpath:/config/
–classpath:/
优先级由高到底,高优先级的配置会覆盖低优先级的配置;
SpringBoot会从这四个位置全部加载主配置文件;互补配置
但是还有更高优先级的,就是使用spring.config.location,把项目打包好后,用命令行参数启动项目,这时指定的配置文件路径时最高优先的,如下
java -jar springboot.jar --spring.config.location=G:/application.properties
6、外部配置加载顺序
SpringBoot也可以从以下位置加载配置; 优先级从高到低;高优先级的配置覆盖低优先级的配置,所有的配置会形成互补配置
1.命令行参数
所有的配置都可以在命令行上进行指定
java -jar springboot.jar --server.port=8087 --server.context-path=/abc
多个配置用空格分开; --配置项=值
2.来自java:comp/env的JNDI属性
3.Java系统属性(System.getProperties())
4.操作系统环境变量
5.RandomValuePropertySource配置的random.*属性值
由jar包外向jar包内进行寻找;
优先加载带profile
6.jar包外部的application-{profile}.properties或application.yml(带spring.profile)配置文件
7.jar包内部的application-{profile}.properties或application.yml(带spring.profile)配置文件
再来加载不带profile
8.jar包外部的application.properties或application.yml(不带spring.profile)配置文件
9.jar包内部的application.properties或application.yml(不带spring.profile)配置文件
10.@Configuration注解类上的@PropertySource
11.通过SpringApplication.setDefaultProperties指定的默认属性
所有支持的配置加载来源:参考官方文档
7、自动配置原理
配置文件到底能写什么?怎么写?配置文件能配置的属性参照
7.1 配置原理
- spring的注解@EnableAutoConfiguration开启了自动配置,他将当前主类所在包内的所有组件扫描到容器中,并开启自动配置
其中有方法如下
List<String> configurations = this.getCandidateConfigurations(annotationMetadata, attributes);
它可以获取所有候选的自动配置类,在文件 META-INF/spring.factories中
# Auto Configure
org.springframework.boot.autoconfigure.EnableAutoConfiguration=
org.springframework.boot.autoconfigure.admin.SpringApplicationAdminJmxAutoConfiguration,
org.springframework.boot.autoconfigure.aop.AopAutoConfiguration,
org.springframework.boot.autoconfigure.amqp.RabbitAutoConfiguration,
org.springframework.boot.autoconfigure.batch.BatchAutoConfiguration,
org.springframework.boot.autoconfigure.cache.CacheAutoConfiguration,
org.springframework.boot.autoconfigure.cassandra.CassandraAutoConfiguration,
org.springframework.boot.autoconfigure.cloud.CloudServiceConnectorsAutoConfiguration,
org.springframework.boot.autoconfigure.context.ConfigurationPropertiesAutoConfiguration,
org.springframework.boot.autoconfigure.context.MessageSourceAutoConfiguration,
org.springframework.boot.autoconfigure.context.PropertyPlaceholderAutoConfiguration,
……
每一个这样的 xxxAutoConfiguration类都是容器中的一个组件,都加入到容器中;用他们来做自动配置;
以HttpEncodingAutoConfiguration为例
//表示当前类是一个配置类,与以前的xml配置文件一样可以给容器中添加组件
@Configuration(
    proxyBeanMethods = false
)
//启动指定的ConfigurationProperties功能,将配置文件中的值与指定的类属性绑定起来,并添加到Ioc容器中
@EnableConfigurationProperties({HttpProperties.class})
//@Conditional能判断条件,如果满足条件配置类就会生效
//在这里就是判断是否时web应用
@ConditionalOnWebApplication(
    type = Type.SERVLET
)
//判断是否存在CharacterEncodingFilter类
@ConditionalOnClass({CharacterEncodingFilter.class})
//@ConditionalOnProperty判断是否存在某个配置,在这里即判断spring.http.encoding.enabled是否存在
//matchIfMissing意思时即使之前的配置不存在,配置类也会生效
@ConditionalOnProperty(
    prefix = "spring.http.encoding",
    value = {"enabled"},
    matchIfMissing = true
)
public class HttpEncodingAutoConfiguration {
7.2、拓展
1、@Conditional派生注解(Spring注解版原生的@Conditional作用)
作用:必须是@Conditional指定的条件成立,才给容器中添加组件,配置配里面的所有内容才生效
| @Conditional扩展注解 | 作用(判断是否满足当前指定条件) |
|---|---|
| @ConditionalOnJava | 系统的java版本是否符合要求 |
| @ConditionalOnBean | 容器中存在指定Bean; |
| @ConditionalOnMissingBean | 容器中不存在指定Bean; |
| @ConditionalOnExpression | 满足SpEL表达式指定 |
| @ConditionalOnClass | 系统中有指定的类 |
| @ConditionalOnMissingClass | 系统中没有指定的类 |
| @ConditionalOnSingleCandidate | 容器中只有一个指定的Bean,或者这个Bean是首选Bean |
| @ConditionalOnProperty | 系统中指定的属性是否有指定的值 |
| @ConditionalOnResource | 类路径下是否存在指定资源文件 |
| @ConditionalOnWebApplication | 当前是web环境 |
| @ConditionalOnNotWebApplication | 当前不是web环境 |
| @ConditionalOnJndi | JNDI存在指定项 |
自动配置类必须在一定的条件下才能生效;
我们怎么知道哪些自动配置类生效;
我们可以通过启用 debug=true属性;来让控制台打印自动配置报告,这样我们就可以很方便的知道哪些自动配置类生效;
=========================
AUTO-CONFIGURATION REPORT
=========================


Positive matches:(自动配置类启用的)
-----------------

   DispatcherServletAutoConfiguration matched:
      - @ConditionalOnClass found required class 'org.springframework.web.servlet.DispatcherServlet'; @ConditionalOnMissingClass did not find unwanted class (OnClassCondition)
      - @ConditionalOnWebApplication (required) found StandardServletEnvironment (OnWebApplicationCondition)


Negative matches:(没有启动,没有匹配成功的自动配置类)
-----------------

   ActiveMQAutoConfiguration:
      Did not match:
         - @ConditionalOnClass did not find required classes 'javax.jms.ConnectionFactory', 'org.apache.activemq.ActiveMQConnectionFactory' (OnClassCondition)

   AopAutoConfiguration:
      Did not match:
         - @ConditionalOnClass did not find required classes 'org.aspectj.lang.annotation.Aspect', 'org.aspectj.lang.reflect.Advice' (OnClassCondition)
三、日志框架
1、简述
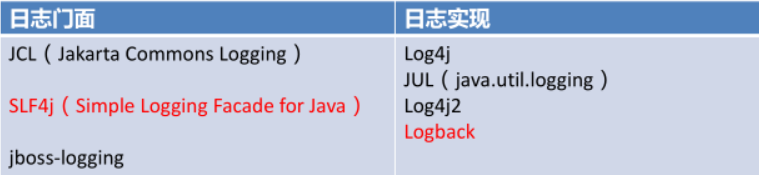
市场上存在非常多的日志框架。JUL(java.util.logging),JCL(Apache Commons Logging),Log4j,Log4j2,Logback、SLF4j、jboss-logging等。Spring Boot在框架内容部使用JCL,spring-boot-starter-logging采用了sif4j+logback的形式,Spring Boot也能自动适配(jul、log4j2、logback)并简化配置
日志框架历史:
- JCL:是Apache的一个日志框架,由于是Jakarta小组写的所以命名为JCL,但是最近的一次更新也是在2014年,所以太老了,不推荐使用
- jboss-logging:使用的场景太少了,不适合使用
- Log4j:首次出来,使用状况还不错,但是存在性能问题,所以作者准备升级一下
- Logback:Log4j的作者觉得重写框架可能太费时间,于是重新写了一个,这就是日志实现
- SLF4j:这个就是Log4j2的日志门面
- Log4j2:是Apache所写的,但是写的太好,许多框架并不适配它
Spring使用JCL也就是commons-logging
SpringBoot选用 SLF4j和logback
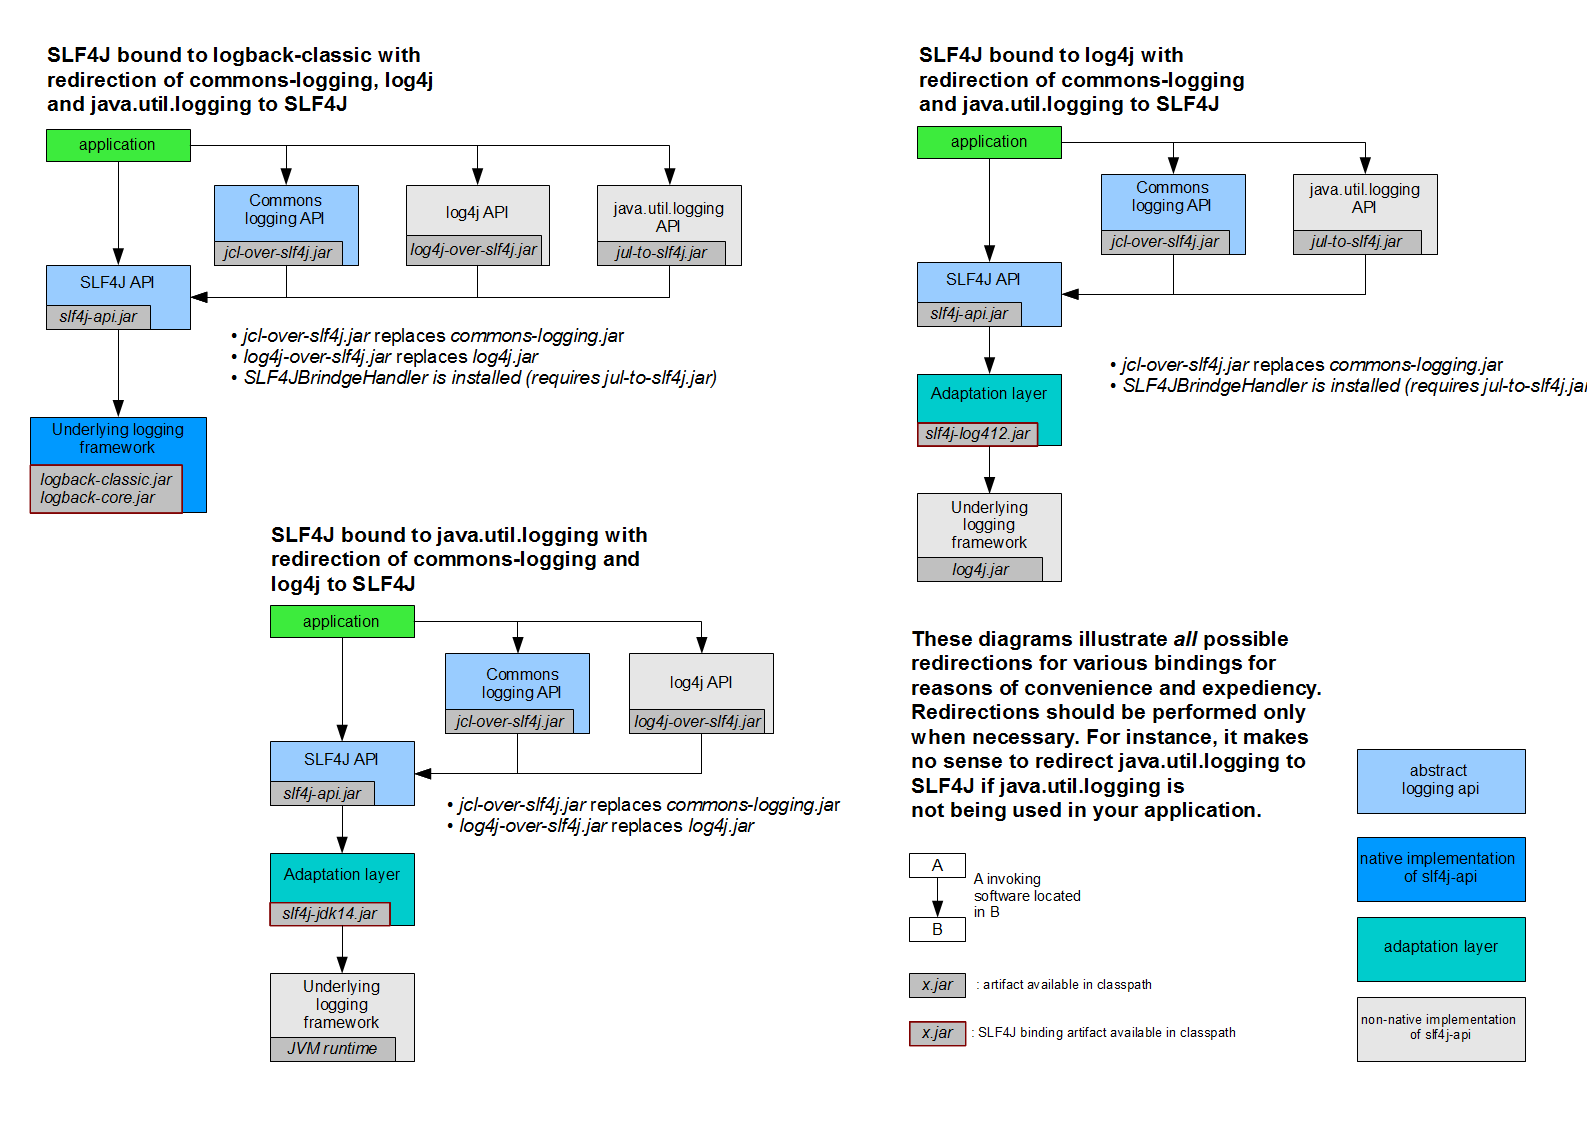
2、SLF4j的使用
以后开发的时候,日志记录方法的调用,不应该来直接调用日志的实现类,而是调用日志抽象层里面的方法;
给系统里面导入slf4j的jar和 logback的实现jar
import org.slf4j.Logger;
import org.slf4j.LoggerFactory;

public class HelloWorld {
  public static void main(String[] args) {
    Logger logger = LoggerFactory.getLogger(HelloWorld.class);
    logger.info("Hello World");
  }
}
图示;
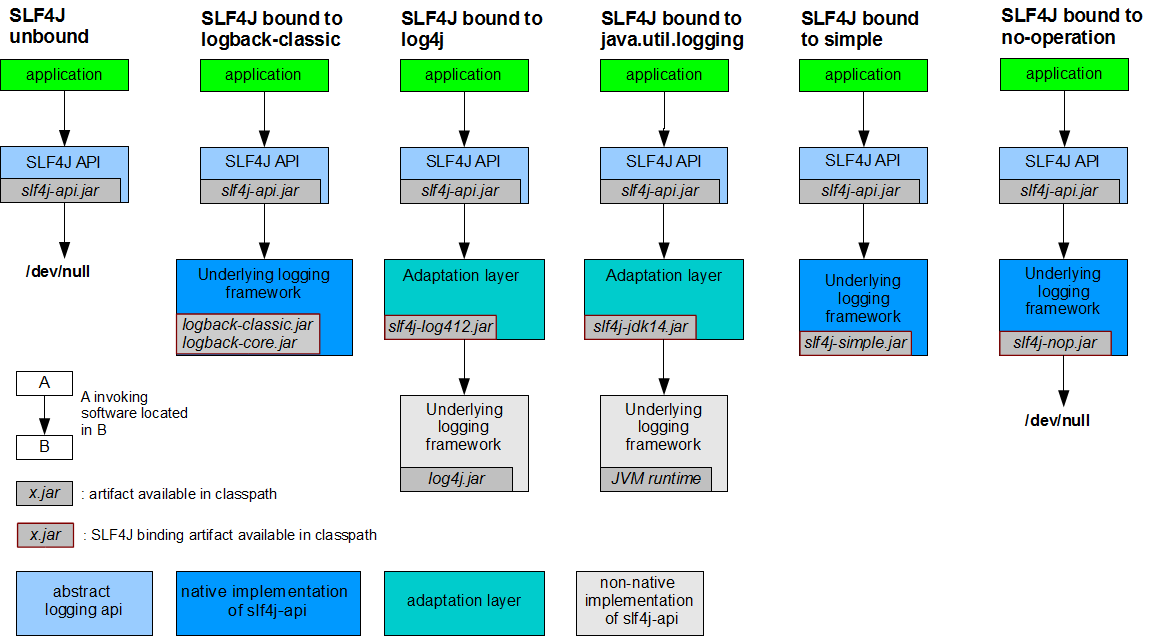
每一个日志的实现框架都有自己的配置文件。使用slf4j以后,配置文件还是做成日志实现框架自己本身的配置文件;
3、遗留问题
a(slf4j+logback): Spring(commons-logging)、Hibernate(jboss-logging)、MyBatis、xxxx
统一日志记录,即使是别的框架和我一起统一使用slf4j进行输出?
如何让系统中所有的日志都统一到slf4j;
1、将系统中其他日志框架先排除出去;
2、用中间包来替换原有的日志框架;
3、我们导入slf4j其他的实现
4、SpringBoot日志关系
<dependency>
    <groupId>org.springframework.boot</groupId>
    <artifactId>spring-boot-starter</artifactId>
</dependency>
SpringBoot使用它来做日志功能;
<dependency>
    <groupId>org.springframework.boot</groupId>
    <artifactId>spring-boot-starter-logging</artifactId>
</dependency>
底层依赖关系

总结:
1)、SpringBoot底层也是使用slf4j+logback的方式进行日志记录
2)、SpringBoot也把其他的日志都替换成了slf4j;
3)、中间替换包?
@SuppressWarnings("rawtypes")
public abstract class LogFactory {

    static String UNSUPPORTED_OPERATION_IN_JCL_OVER_SLF4J = "http://www.slf4j.org/codes.html#unsupported_operation_in_jcl_over_slf4j";

    static LogFactory logFactory = new SLF4JLogFactory();
4)、如果我们要引入其他框架?一定要把这个框架的默认日志依赖移除掉?
Spring框架用的是commons-logging;
		<dependency>
			<groupId>org.springframework</groupId>
			<artifactId>spring-core</artifactId>
			<exclusions>
				<exclusion>
					<groupId>commons-logging</groupId>
					<artifactId>commons-logging</artifactId>
				</exclusion>
			</exclusions>
		</dependency>
SpringBoot能自动适配所有的日志,而且底层使用slf4j+logback的方式记录日志,引入其他框架的时候,只需要把这个框架依赖的日志框架排除掉即可;
4.1 默认配置
SpringBoot默认帮我们配置好了日志;
	//记录器
	Logger logger = LoggerFactory.getLogger(getClass());
	@Test
	public void contextLoads() {
		//System.out.println();

		//日志的级别;
		//由低到高   trace<debug<info<warn<error
		//可以调整输出的日志级别;日志就只会在这个级别以以后的高级别生效
		logger.trace("这是trace日志...");
		logger.debug("这是debug日志...");
		//SpringBoot默认给我们使用的是info级别的,没有指定级别的就用SpringBoot默认规定的级别;root级别
		logger.info("这是info日志...");
		logger.warn("这是warn日志...");
		logger.error("这是error日志...");


	}
    日志输出格式:
		%d表示日期时间,
		%thread表示线程名,
		%-5level:级别从左显示5个字符宽度
		%logger{50} 表示logger名字最长50个字符,否则按照句点分割。
		%msg:日志消息,
		%n是换行符
    -->
    %d{yyyy-MM-dd HH:mm:ss.SSS} [%thread] %-5level %logger{50} - %msg%n
SpringBoot修改日志的默认配置
logging.level.com.atguigu=trace


#logging.path=
# 不指定路径在当前项目下生成springboot.log日志
# 可以指定完整的路径;
#logging.file=G:/springboot.log

# 在当前磁盘的根路径下创建spring文件夹和里面的log文件夹;使用 spring.log 作为默认文件
logging.path=/spring/log

#  在控制台输出的日志的格式
logging.pattern.console=%d{yyyy-MM-dd} [%thread] %-5level %logger{50} - %msg%n
# 指定文件中日志输出的格式
logging.pattern.file=%d{yyyy-MM-dd} === [%thread] === %-5level === %logger{50} ==== %msg%n
| logging.file | logging.path | Example | Description |
|---|---|---|---|
| (none) | (none) | 只在控制台输出 | |
| 指定文件名 | (none) | my.log | 输出日志到my.log文件 |
| (none) | 指定目录 | /var/log | 输出到指定目录的 spring.log 文件中 |
4.2 指定配置
给类路径下放上每个日志框架自己的配置文件即可;SpringBoot就不使用他默认配置的了
| Logging System | Customization |
|---|---|
| Logback | logback-spring.xml, logback-spring.groovy, logback.xml or logback.groovy |
| Log4j2 | log4j2-spring.xml or log4j2.xml |
| JDK (Java Util Logging) | logging.properties |
logback.xml:直接就被日志框架识别了;
logback-spring.xml:日志框架就不直接加载日志的配置项,由SpringBoot解析日志配置,可以使用SpringBoot的高级Profile功能
<springProfile name="staging">
    <!-- configuration to be enabled when the "staging" profile is active -->
  	可以指定某段配置只在某个环境下生效
</springProfile>
如:
<appender name="stdout" class="ch.qos.logback.core.ConsoleAppender">
        <!--
        日志输出格式:
			%d表示日期时间,
			%thread表示线程名,
			%-5level:级别从左显示5个字符宽度
			%logger{50} 表示logger名字最长50个字符,否则按照句点分割。
			%msg:日志消息,
			%n是换行符
        -->
        <layout class="ch.qos.logback.classic.PatternLayout">
            <springProfile name="dev">
                <pattern>%d{yyyy-MM-dd HH:mm:ss.SSS} ----> [%thread] ---> %-5level %logger{50} - %msg%n</pattern>
            </springProfile>
            <springProfile name="!dev">
                <pattern>%d{yyyy-MM-dd HH:mm:ss.SSS} ==== [%thread] ==== %-5level %logger{50} - %msg%n</pattern>
            </springProfile>
        </layout>
    </appender>
如果使用logback.xml作为日志配置文件,还要使用profile功能,会有以下错误
no applicable action for [springProfile]
5、切换日志框架
可以按照slf4j的日志适配图,进行相关的切换;
slf4j+log4j的方式;
<dependency>
  <groupId>org.springframework.boot</groupId>
  <artifactId>spring-boot-starter-web</artifactId>
  <exclusions>
    <exclusion>
      <artifactId>logback-classic</artifactId>
      <groupId>ch.qos.logback</groupId>
    </exclusion>
    <exclusion>
      <artifactId>log4j-over-slf4j</artifactId>
      <groupId>org.slf4j</groupId>
    </exclusion>
  </exclusions>
</dependency>

<dependency>
  <groupId>org.slf4j</groupId>
  <artifactId>slf4j-log4j12</artifactId>
</dependency>
切换为log4j2
   <dependency>
            <groupId>org.springframework.boot</groupId>
            <artifactId>spring-boot-starter-web</artifactId>
            <exclusions>
                <exclusion>
                    <artifactId>spring-boot-starter-logging</artifactId>
                    <groupId>org.springframework.boot</groupId>
                </exclusion>
            </exclusions>
        </dependency>

<dependency>
  <groupId>org.springframework.boot</groupId>
  <artifactId>spring-boot-starter-log4j2</artifactId>
</dependency>
四、Web开发
1、静态资源的映射
- 所有的
/webjars/**都去classpath:/META-INF/resources/webjars/找资源
webjars:以jar包的方式引入静态资源
例如jquery
<!--引入jquery-webjar-->在访问的时候只需要写webjars下面资源的名称即可
<dependency>
    <groupId>org.webjars</groupId>
    <artifactId>jquery</artifactId>
    <version>3.3.1</version>
</dependency>
/**访问当前项目的任何资源,都去(静态资源的文件夹)找映射
"classpath:/META-INF/resources/",
"classpath:/resources/",
"classpath:/static/",
"classpath:/public/"
"/":当前项目的根路径
- 欢迎页: 静态资源文件夹下的所有
index.html页面;被/**映射 - 网页图标:所有的
**/favicon.ico都是在静态资源文件下找
2、模板引擎
JSP、Velocity、Freemarker、Thymeleaf,基本上所有的模板引擎都有同一个原理
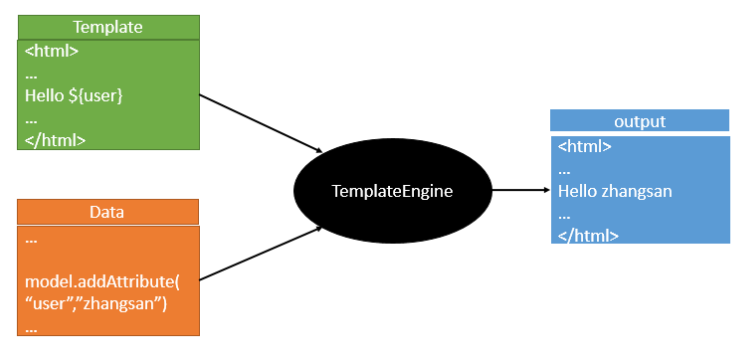
SpringBoot推荐Thymeleaf
3、引入thymeleaf
<dependency>
    <groupId>org.springframework.boot</groupId>
    <artifactId>spring-boot-starter-thymeleaf</artifactId>
    2.1.6
</dependency>
<!--切换thymeleaf版本-->
<properties>
    <thymeleaf.version>3.0.9.RELEASE</thymeleaf.version>
    <!-- 布局功能的支持程序  thymeleaf3主程序  layout2以上版本 -->
    <!-- thymeleaf2   layout1-->
    <thymeleaf-layout-dialect.version>2.2.2</thymeleaf-layout-dialect.version>
</properties>
3.1 Thymeleaf使用
@ConfigurationProperties(prefix = "spring.thymeleaf")
public class ThymeleafProperties {

	private static final Charset DEFAULT_ENCODING = Charset.forName("UTF-8");

	private static final MimeType DEFAULT_CONTENT_TYPE = MimeType.valueOf("text/html");

	public static final String DEFAULT_PREFIX = "classpath:/templates/";

	public static final String DEFAULT_SUFFIX = ".html";
只要我们把HTML页面放在classpath:/templates/,thymeleaf就能自动渲染;
导入thymeleaf的名称空间
<html lang="en" xmlns:th="http://www.thymeleaf.org">
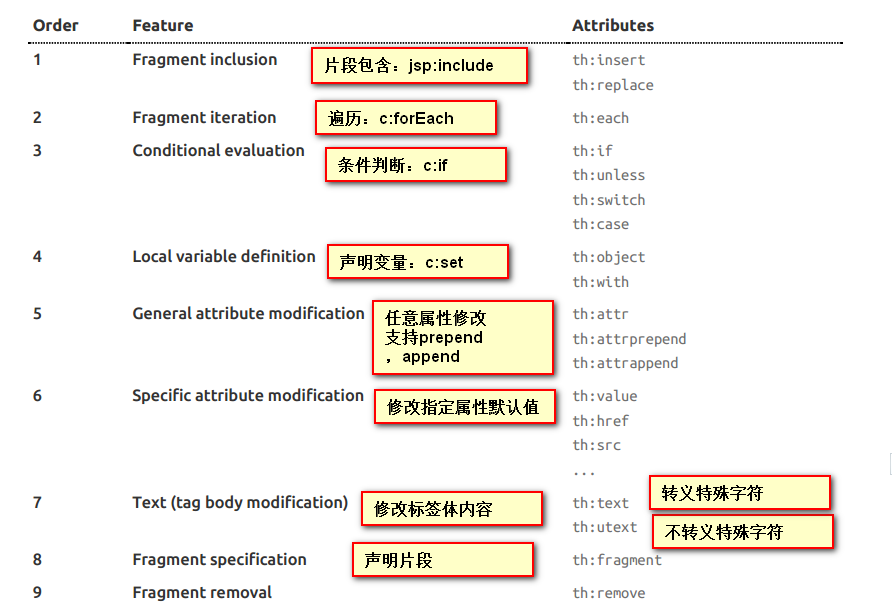
3.2 标签
3.3 表达式
Simple expressions:(表达式语法)
	Variable Expressions: ${...}:获取变量值;OGNL;
    1)、获取对象的属性、调用方法
    2)、使用内置的基本对象:
        #ctx : the context object.
        #vars: the context variables.
        #locale : the context locale.
        #request : (only in Web Contexts) the HttpServletRequest object.
        #response : (only in Web Contexts) the HttpServletResponse object.
        #session : (only in Web Contexts) the HttpSession object.
        #servletContext : (only in Web Contexts) the ServletContext object.
        ${session.foo}
	3)、内置的一些工具对象:
#execInfo : information about the template being processed.
#messages : methods for obtaining externalized messages inside variables expressions, in the same way as they would be obtained using #{…} syntax.
#uris : methods for escaping parts of URLs/URIs
#conversions : methods for executing the configured conversion service (if any).
#dates : methods for java.util.Date objects: formatting, component extraction, etc.
#calendars : analogous to #dates , but for java.util.Calendar objects.
#numbers : methods for formatting numeric objects.
#strings : methods for String objects: contains, startsWith, prepending/appending, etc.
#objects : methods for objects in general.
#bools : methods for boolean evaluation.
#arrays : methods for arrays.
#lists : methods for lists.
#sets : methods for sets.
#maps : methods for maps.
#aggregates : methods for creating aggregates on arrays or collections.
#ids : methods for dealing with id attributes that might be repeated (for example, as a result of an iteration).

Selection Variable Expressions: *{...}:
选择表达式:和${}在功能上是一样;
补充:配合 th:object="${session.user}
Message Expressions: #{...}:获取国际化内容
Link URL Expressions: @{...}:定义URL;
Literals(字面量)
      Text literals: 'one text' , 'Another one!' ,…
      Number literals: 0 , 34 , 3.0 , 12.3 ,…
      Boolean literals: true , false
      Null literal: null
      Literal tokens: one , sometext , main ,…
Text operations:(文本操作)
    String concatenation: +
    Literal substitutions: |The name is ${name}|
Arithmetic operations:(数学运算)
    Binary operators: + , - , * , / , %
    Minus sign (unary operator): -
Boolean operations:(布尔运算)
    Binary operators: and , or
    Boolean negation (unary operator): ! , not
Comparisons and equality:(比较运算)
    Comparators: > , < , >= , <= ( gt , lt , ge , le )
    Equality operators: == , != ( eq , ne )
Conditional operators:条件运算(三元运算符)
    If-then: (if) ? (then)
    If-then-else: (if) ? (then) : (else)
    Default: (value) ?: (defaultvalue)
Special tokens:
    No-Operation: _
3.3 公共页面抽取
1、抽取公共片段
<div th:fragment="copy">
© 2011 The Good Thymes Virtual Grocery
</div>
2、引入公共片段
<div th:insert="~{footer :: copy}"></div>
~{templatename::selector}:模板名::选择器
~{templatename::fragmentname}:模板名::片段名
3、默认效果:
insert的公共片段在div标签中
如果使用th:insert等属性进行引入,可以不用写~{}:
行内写法可以加上:[[~{}]];[(~{})];
- 三种引入公共片段的th属性
- th:insert:将公共片段整个插入到声明引入的元素中
- th:replace:将声明引入的元素替换为公共片段
- th:include:将被引入的片段的内容包含进这个标签中
<footer th:fragment="copy">
© 2011 The Good Thymes Virtual Grocery
</footer>
引入方式
<div th:insert="footer :: copy"></div>
<div th:replace="footer :: copy"></div>
<div th:include="footer :: copy"></div>
效果
<div>
<footer>
© 2011 The Good Thymes Virtual Grocery
</footer>
</div>
<footer>
© 2011 The Good Thymes Virtual Grocery
</footer>
<div>
© 2011 The Good Thymes Virtual Grocery
</div>
4、springMVC
4.1 springMVC自动配置
在springboot官方文档中Spring Boot Features->Developing Web Applications模块下,如下
Spring Boot为Spring MVC提供了自动配置,可与大多数应用程序完美配合。
自动配置在Spring的默认设置之上添加了以下功能:
-
包含
ContentNegotiatingViewResolver和BeanNameViewResolverBean。 -
支持提供静态资源,包括对WebJars的支持(在本文档的后面部分有介绍)。
-
自动注册
Converter,GenericConverter和FormatterBean。 -
对
HttpMessageConverters的支持(在本文档后面介绍)。 -
自动注册
MessageCodesResolver(在本文档后面介绍)。 -
静态
index.html支持。 -
自定义
Favicon支持(在本文档后面介绍)。 -
自动使用
ConfigurableWebBindingInitializerBean(在本文档后面介绍)。
自动使用ConfigurableWebBindingInitializer Bean(在本文档后面介绍)。
4.2 拓展springMVC
如果要保留这些Spring Boot MVC定制并进行更多的MVC定制(拦截器,格式化程序,视图控制器和其他功能),则可以添加自己的类型为WebMvcConfigurer的@Configuration类,但不要使用@EnableWebMvc。
如果要提供RequestMappingHandlerMapping,RequestMappingHandlerAdapter或ExceptionHandlerExceptionResolver的自定义实例,并且仍然保留Spring Boot MVC自定义,则可以声明WebMvcRegistrations类型的bean,并使用它提供那些组件的自定义实例。
4.3 全面接管springMVC
如果要完全控制Spring MVC,则可以添加用@EnableWebMvc注释的自己的@Configuration,或者按照@EnableWebMvc的Javadoc中的说明添加自己的@Configuration注释的DelegatingWebMvcConfiguration。
5、错误处理
5.1 错误处理机制
自动配置由ErrorMvcAutoConfiguration配置类管理,它给容器添加有以下组件
-
DefaultErrorAttributes,添加以下数据到模型中-
timestamp:时间戳 -
status:状态码 -
error:错误提示 -
exception:异常信息 -
message:错误消息 -
errors:JSR303数据校验
-
-
BasicErrorController,错误页控制器,控制返回的视图对象
@Controller
@RequestMapping("${server.error.path:${error.path:/error}}")
public class BasicErrorController extends AbstractErrorController {
      @RequestMapping(produces = "text/html")//产生html类型的数据;浏览器发送的请求来到这个方法处理
	public ModelAndView errorHtml(HttpServletRequest request,
			HttpServletResponse response) {
		HttpStatus status = getStatus(request);
		Map<String, Object> model = Collections.unmodifiableMap(getErrorAttributes(
				request, isIncludeStackTrace(request, MediaType.TEXT_HTML)));
		response.setStatus(status.value());

        //去哪个页面作为错误页面;包含页面地址和页面内容
		ModelAndView modelAndView = resolveErrorView(request, response, status, model);
		return (modelAndView == null ? new ModelAndView("error", model) : modelAndView);
	}

	@RequestMapping
	@ResponseBody    //产生json数据,其他客户端来到这个方法处理;
	public ResponseEntity<Map<String, Object>> error(HttpServletRequest request) {
		Map<String, Object> body = getErrorAttributes(request,
				isIncludeStackTrace(request, MediaType.ALL));
		HttpStatus status = getStatus(request);
		return new ResponseEntity<Map<String, Object>>(body, status);
	}
ErrorPageCustomizer,发送错误请求默认到/error
@Value("${error.path:/error}")
private String path = "/error";  //系统出现错误以后来到error请求进行处理;(web.xml注册的错误页面规则)
DefaultErrorViewResolver
@Override
public ModelAndView resolveErrorView(HttpServletRequest request, HttpStatus status,
Map<String, Object> model) {
ModelAndView modelAndView = resolve(String.valueOf(status), model);
if (modelAndView == null && SERIES_VIEWS.containsKey(status.series())) {
modelAndView = resolve(SERIES_VIEWS.get(status.series()), model);
}
return modelAndView;
}
private ModelAndView resolve(String viewName, Map<String, Object> model) {
    //默认SpringBoot可以去找到一个页面?  error/404
	String errorViewName = "error/" + viewName;

    //模板引擎可以解析这个页面地址就用模板引擎解析
	TemplateAvailabilityProvider provider = this.templateAvailabilityProviders
			.getProvider(errorViewName, this.applicationContext);
	if (provider != null) {
        //模板引擎可用的情况下返回到errorViewName指定的视图地址
		return new ModelAndView(errorViewName, model);
	}
    //模板引擎不可用,就在静态资源文件夹下找errorViewName对应的页面   error/404.html
	return resolveResource(errorViewName, model);
}
小结:一旦出现4xx或5xx的错误ErrorPageCustomizer就会生效,发送去/error的请求,然后被BasicErrorController处理,最后由DefaultErrorViewResolver来解析响应页面
5.2 定制错误响应页面
1、有模板引擎的情况下
error/状态码【将错误页面命名为 错误状态码.html 放在模板引擎文件夹里面的 error文件夹下】,发生此状态码的错误就会来到 对应的页面;
2、没有模板引擎的情况下
去静态资源文件加下寻找
3、以上都不存在
响应默认的springboot错误页面
5.3 定制错误json数据
1、编写标注了@ControllerAdvice的异常处理类
2、添加标注了@ExceptionHandler的方法,方法体返回包含错误信息的json数据(通过添加@ResponseBody注解)
以上方法虽能返回json数据,但是不管是客户端访问还是浏览器访问都是返回json数据,没有自适应的效果。
实现自适应效果
1、编写标注了@ControllerAdvice的异常处理类
2、添加标注了@ExceptionHandler的方法,将错误信息封装在Map中,然后返回字符串,将页面转发到/error,额外要注意的是需要在request域添加javax.servlet.error.status_code属性信息,如下
 @ExceptionHandler(UserNotExistException.class)
 public String handleException(Exception e, HttpServletRequest request){
        Map<String,Object> map = new HashMap<>();
 	request.setAttribute("javax.servlet.error.status_code",500);
        map.put("code","user.notexist");
        map.put("message",e.getMessage());
        //转发到/error
        return "forward:/error";
    }
5.3 将自定义错误信息携带出去
出现错误以后,会来到/error请求,会被BasicErrorController处理,响应出去可以获取的数据是由getErrorAttributes得到的(是AbstractErrorController(ErrorController)规定的方法);
1、完全来编写一个ErrorController的实现类【或者是编写AbstractErrorController的子类】,放在容器中;
2、页面上能用的数据,或者是json返回能用的数据都是通过errorAttributes.getErrorAttributes得到;
容器中DefaultErrorAttributes.getErrorAttributes();默认进行数据处理的;
自定义ErrorAttributes
//给容器中加入我们自己定义的ErrorAttributes
@Component
public class MyErrorAttributes extends DefaultErrorAttributes {

    @Override
    public Map<String, Object> getErrorAttributes(RequestAttributes requestAttributes, boolean includeStackTrace) {
        Map<String, Object> map = super.getErrorAttributes(requestAttributes, includeStackTrace);
        map.put("company","atguigu");
        return map;
    }
}
最终的效果:响应是自适应的,可以通过定制ErrorAttributes改变需要返回的内容
6、配置嵌入式Servlet容器
6.1 定制Servlet容器配置
1、修改和server有关的配置(ServerProperties);
server.port=8081
server.context-path=/crud

server.tomcat.uri-encoding=UTF-8

//通用的Servlet容器设置
server.xxx
//Tomcat的设置
server.tomcat.xxx
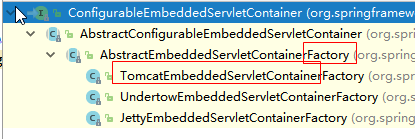
2、编写一个EmbeddedServletContainerCustomizer:嵌入式的Servlet容器的定制器;来修改Servlet容器的配置
@Bean  //一定要将这个定制器加入到容器中
public EmbeddedServletContainerCustomizer embeddedServletContainerCustomizer(){
    return new EmbeddedServletContainerCustomizer() {

        //定制嵌入式的Servlet容器相关的规则
        @Override
        public void customize(ConfigurableEmbeddedServletContainer container) {
            container.setPort(8083);
        }
    };
}
6.2 注册Servlet三大组件
由于SpringBoot默认是以jar包的方式启动嵌入式的Servlet容器来启动SpringBoot的web应用,没有web.xml文件。
注册三大组件用以下方式
ServletRegistrationBean
//注册三大组件
@Bean
public ServletRegistrationBean myServlet(){
    ServletRegistrationBean registrationBean = new ServletRegistrationBean(new MyServlet(),"/myServlet");
    return registrationBean;
}
FilterRegistrationBean
@Bean
public FilterRegistrationBean myFilter(){
    FilterRegistrationBean registrationBean = new FilterRegistrationBean();
    registrationBean.setFilter(new MyFilter());
    registrationBean.setUrlPatterns(Arrays.asList("/hello","/myServlet"));
    return registrationBean;
}
ServletListenerRegistrationBean
@Bean
public ServletListenerRegistrationBean myListener(){
    ServletListenerRegistrationBean<MyListener> registrationBean = new ServletListenerRegistrationBean<>(new MyListener());
    return registrationBean;
}
SpringBoot帮我们配置springMVC的时候,就是自动注册springMVC的前端控制器
@Bean(name = DEFAULT_DISPATCHER_SERVLET_REGISTRATION_BEAN_NAME)
@ConditionalOnBean(value = DispatcherServlet.class, name = DEFAULT_DISPATCHER_SERVLET_BEAN_NAME)
public DispatcherServletRegistrationBean dispatcherServletRegistration(DispatcherServlet dispatcherServlet,
      WebMvcProperties webMvcProperties, ObjectProvider<MultipartConfigElement> multipartConfig) {
   DispatcherServletRegistrationBean registration = new DispatcherServletRegistrationBean(dispatcherServlet,
         webMvcProperties.getServlet().getPath());
   registration.setName(DEFAULT_DISPATCHER_SERVLET_BEAN_NAME);
   registration.setLoadOnStartup(webMvcProperties.getServlet().getLoadOnStartup());
   multipartConfig.ifAvailable(registration::setMultipartConfig);
   return registration;
}
6.3 替换为其他嵌入式Servlet容器
默认支持:
Tomcat(默认使用)
<dependency>
   <groupId>org.springframework.boot</groupId>
   <artifactId>spring-boot-starter-web</artifactId>
   引入web模块默认就是使用嵌入式的Tomcat作为Servlet容器;
</dependency>
Jetty
<!-- 引入web模块 -->
<dependency>
   <groupId>org.springframework.boot</groupId>
   <artifactId>spring-boot-starter-web</artifactId>
   <exclusions>
      <exclusion>
         <artifactId>spring-boot-starter-tomcat</artifactId>
         <groupId>org.springframework.boot</groupId>
      </exclusion>
   </exclusions>
</dependency>

<!--引入其他的Servlet容器-->
<dependency>
   <artifactId>spring-boot-starter-jetty</artifactId>
   <groupId>org.springframework.boot</groupId>
</dependency>
Undertow
<!-- 引入web模块 -->
<dependency>
   <groupId>org.springframework.boot</groupId>
   <artifactId>spring-boot-starter-web</artifactId>
   <exclusions>
      <exclusion>
         <artifactId>spring-boot-starter-tomcat</artifactId>
         <groupId>org.springframework.boot</groupId>
      </exclusion>
   </exclusions>
</dependency>

<!--引入其他的Servlet容器-->
<dependency>
   <artifactId>spring-boot-starter-undertow</artifactId>
   <groupId>org.springframework.boot</groupId>
</dependency>
五、Docker
1、简介
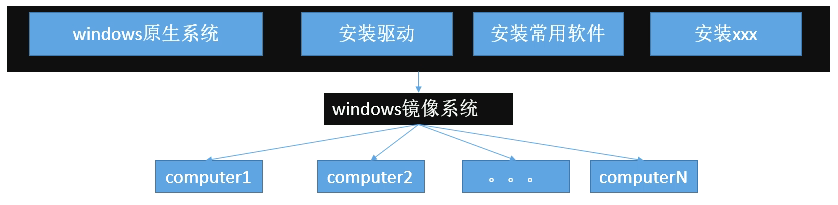
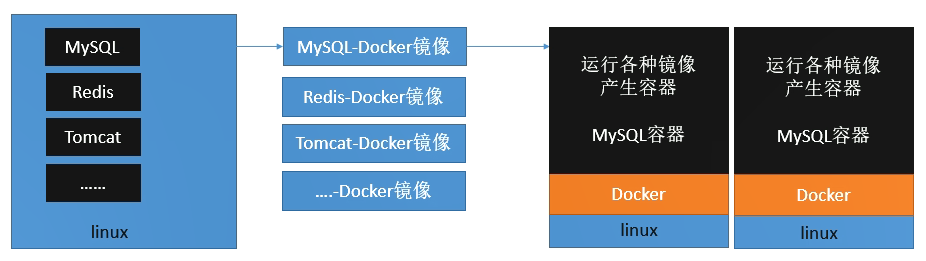
Docker是一个开源的应用容器引擎;是一个轻量级容器技术;
Docker支持将软件编译成一个镜像;然后在镜像中各种软件做好配置,将镜像发布出去,其他使用者可以直接使用这个镜像;
运行中的这个镜像称为容器,容器启动是非常快速的。
2、核心概念
docker主机(Host):安装了Docker程序的机器(Docker直接安装在操作系统之上);
docker客户端(Client):连接docker主机进行操作;
docker仓库(Registry):用来保存各种打包好的软件镜像;
docker镜像(Images):软件打包好的镜像;放在docker仓库中;
docker容器(Container):镜像启动后的实例称为一个容器;容器是独立运行的一个或一组应用
使用Docker的步骤:
1)、安装Docker
2)、去Docker仓库找到这个软件对应的镜像;
3)、使用Docker运行这个镜像,这个镜像就会生成一个Docker容器;
4)、对容器的启动停止就是对软件的启动停止;
3、安装docker
3.2 安装
1、检查内核版本,必须是3.10及以上
uname -r
2、安装docker
yum install docker
3、输入y确认安装
4、启动docker
[root@localhost ~]# systemctl start docker
[root@localhost ~]# docker -v
Docker version 1.12.6, build 3e8e77d/1.12.6
5、开机启动docker
[root@localhost ~]# systemctl enable docker
Created symlink from /etc/systemd/system/multi-user.target.wants/docker.service to /usr/lib/systemd/system/docker.service.
6、停止docker
systemctl stop docker
3.2 Docker换源
默认docker源下载东西十分的慢,因此需要换源
1、首先修改daemon.json 文件
[root@localhost ~]# vi /etc/docker/daemon.json
2、替换成以下内容
{
"registry-mirrors": ["https://mj9kvemk.mirror.aliyuncs.com"]
}
3、重启docker
service docker restart
演示如下
[root@localhost ~]# vi /etc/docker/daemon.json
[root@localhost ~]# cat /etc/docker/daemon.json
{
"registry-mirrors": ["https://mj9kvemk.mirror.aliyuncs.com"]
}
[root@localhost ~]# service docker restart
Redirecting to /bin/systemctl restart docker.service
4、Docker常用命令
4.1 镜像相关操作
1、检索
docker search [keyword]
2、拉取
docker pull [镜像名]:[tag]
3、查看本地镜像
docker images
4、删除本地镜像
docker rmi image-[id]
Docker的相关镜像可以去网页查看
4.2 容器相关操作
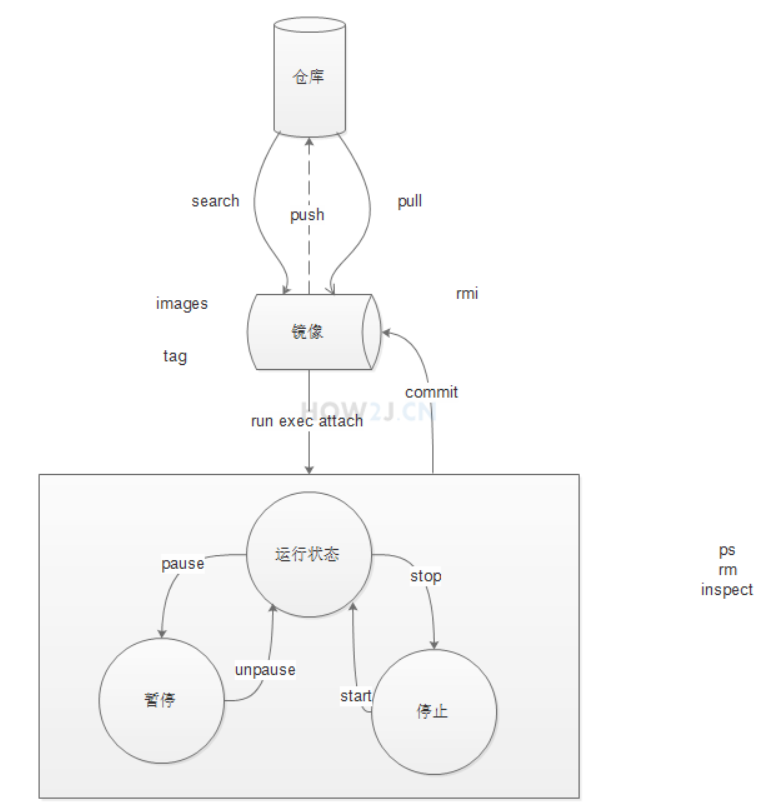
1、运行镜像
docker run --name [container-name] -d [image-name]
--name:自定义容器名
-d:后台运行
-i:提供交互接口
-t:提供一个 tty (伪终端),与 -i 配合就可以通过 ssh 工具连接到 这个容器里面去了
image-name:指定镜像模板
2、查看运行中的容器
docker ps
3、停止运行中的容器
docker stop [container-id|container-name]
4、查看所有的容器
docker ps -a
5、删除容器
docker rm [container-id|container-name]
注:容器必须是停止的
6、端口映射
-p [外部端口:内部端口]
[root@localhost ~]# docker run -d -p 8080:8080 tomcat
7、查看容器日志
docker logs [container-name|container-id]
4.3 其他操作
1、查看防火墙状态
service firewalld status
2、临时关闭防火墙
service firewalld stop
3、以命令行的方式运行容器
docker exec -it [container-id|contain-name] bash
六、springBoot与数据访问
1、JDBC
<dependency>
    <groupId>org.springframework.boot</groupId>
    <artifactId>spring-boot-starter-jdbc</artifactId>
</dependency>
<dependency>
    <groupId>mysql</groupId>
    <artifactId>mysql-connector-java</artifactId>
    <scope>runtime</scope>
</dependency>
spring:
  datasource:
    username: root
    password: root
    url: jdbc:mysql://192.168.15.22:3306/jdbc
    driver-class-name: com.mysql.jdbc.Driver
自动配置原理
1、参考DataSourceConfiguration,根据配置创建数据源;可以使用spring.datasource.type指定自定义的数据源类型;
2、SpringBoot默认可以支持;
org.apache.tomcat.jdbc.pool.DataSource、HikariDataSource、BasicDataSource、
3、自定义数据源类型
/**
 * Generic DataSource configuration.
 */
@ConditionalOnMissingBean(DataSource.class)
@ConditionalOnProperty(name = "spring.datasource.type")
static class Generic {

   @Bean
   public DataSource dataSource(DataSourceProperties properties) {
       //使用DataSourceBuilder创建数据源,利用反射创建响应type的数据源,并且绑定相关属性
      return properties.initializeDataSourceBuilder().build();
   }

}
4、DataSourceInitializer:ApplicationListener;
作用:

	1)、runSchemaScripts();运行建表语句;

	2)、runDataScripts();运行插入数据的sql语句;
默认只需要将文件命名为:
schema-*.sql、data-*.sql
默认规则:schema.sql,schema-all.sql;
可以使用
	schema:
      - classpath:department.sql
      指定位置
5、操作数据库:自动配置了JdbcTemplate操作数据库
2、整合Druid数据源
spring:
  messages:
    basename: i18n.login
  datasource:
    url: jdbc:mysql://localhost:3306/test?characterEncoding=utf8&useSSL=false&serverTimezone = GMT
    driver-class-name: com.mysql.cj.jdbc.Driver
    username: root
    password: root
    type: com.alibaba.druid.pool.DruidDataSource
    initialsize: 5
    minIdle: 5
    maxActive: 20
    maxWait: 60000
    timeBetweenEvictionRunsMillis: 60000
    minEvictableIdleTimeMillis: 300000
    validationQuery: SELECT 1 FROM user
    testWhileIdle: true
    testOnBorrow: false
    testOnReturn: false
    poolPreparedStatements: true
    #配置监控统计拦截的filters,去掉后监控界面sql无法统计,'wall用于防火墙
    filters: [stat, wall, log4j]
    maxPoolPreparedStatementPerConnectionSize: 20
    useGlobalDataSourceStat: true
    connectionProperties: druid.stat.mergeSql=true, druid.stat.slowSqlMillis=500
@Bean
public ServletRegistrationBean statViewServlet(){
    ServletRegistrationBean bean = new ServletRegistrationBean(new StatViewServlet(), "/druid/*");
    Map<String, String> initParams = new HashMap<String, String>();
    initParams.put("loginUsername", "root");
    initParams.put("loginPassword", "root");
    initParams.put("allow", "");
    bean.setInitParameters(initParams);
    return bean;
}

@Bean
public FilterRegistrationBean webStatFilter(){
    FilterRegistrationBean bean = new FilterRegistrationBean();
    bean.setFilter(new WebStatFilter());
    Map<String, String> initParams = new HashMap<>();
    initParams.put("exclusions", "*.js, *.css, /druid/*");
    bean.setInitParameters(initParams);
    bean.setUrlPatterns(Arrays.asList("/*"));
    return bean;
}
3、整合Mybatis
<dependency>
    <groupId>org.mybatis.spring.boot</groupId>
    <artifactId>mybatis-spring-boot-starter</artifactId>
    <version>1.3.1</version>
</dependency>
3.1 注解版
//指定这是一个操作数据库的mapper
@Mapper
public interface DepartmentMapper {

    @Select("select * from department where id=#{id}")
    public Department getDeptById(Integer id);

    @Delete("delete from department where id=#{id}")
    public int deleteDeptById(Integer id);

    @Options(useGeneratedKeys = true,keyProperty = "id")
    @Insert("insert into department(departmentName) values(#{departmentName})")
    public int insertDept(Department department);

    @Update("update department set departmentName=#{departmentName} where id=#{id}")
    public int updateDept(Department department);
}
问题:自定义MyBatis的配置规则;给容器中添加一个ConfigurationCustomizer;
@org.springframework.context.annotation.Configuration
public class MyBatisConfig {

    @Bean
    public ConfigurationCustomizer configurationCustomizer(){
        return new ConfigurationCustomizer(){

            @Override
            public void customize(Configuration configuration) {
                configuration.setMapUnderscoreToCamelCase(true);
            }
        };
    }
}
使用MapperScan批量扫描所有的Mapper接口;
@MapperScan(value = "com.atguigu.springboot.mapper")
@SpringBootApplication
public class SpringBoot06DataMybatisApplication {

	public static void main(String[] args) {
		SpringApplication.run(SpringBoot06DataMybatisApplication.class, args);
	}
}
3.2 配置文件版
mybatis:
  config-location: classpath:mybatis/mybatis-config.xml 指定全局配置文件的位置
  mapper-locations: classpath:mybatis/mapper/*.xml  指定sql映射文件的位置
更多使用参照
4、整合SpringData JPA

JPA:ORM(Object Relational Mapping);
1)编写一个实体类(bean)和数据表进行映射,并且配置好映射关系;
//使用JPA注解配置映射关系
@Entity //告诉JPA这是一个实体类(和数据表映射的类)
@Table(name = "tbl_user") //@Table来指定和哪个数据表对应;如果省略默认表名就是user;
public class User {

    @Id //这是一个主键
    @GeneratedValue(strategy = GenerationType.IDENTITY)//自增主键
    private Integer id;

    @Column(name = "last_name",length = 50) //这是和数据表对应的一个列
    private String lastName;
    @Column //省略默认列名就是属性名
    private String email;
2)编写一个Dao接口来操作实体类对应的数据表(Repository)
//继承JpaRepository来完成对数据库的操作
public interface UserRepository extends JpaRepository<User,Integer> {
}
3)基本的配置JpaProperties
spring:
 jpa:
    hibernate:
#     更新或者创建数据表结构
      ddl-auto: update
#    控制台显示SQL
    show-sql: true
七、启动配置原理
1、事件回调机制
配置在META-INF/spring.factories
ApplicationContextInitializer
SpringApplicationRunListener
只需要放在ioc容器中
ApplicationRunner
CommandLineRunner
2、启动流程
2.1 创建SpringApplication对象
initialize(sources);
private void initialize(Object[] sources) {
    //保存主配置类
    if (sources != null && sources.length > 0) {
        this.sources.addAll(Arrays.asList(sources));
    }
    //判断当前是否一个web应用
    this.webEnvironment = deduceWebEnvironment();
    //从类路径下找到META-INF/spring.factories配置的所有ApplicationContextInitializer;然后保存起来
    setInitializers((Collection) getSpringFactoriesInstances(
        ApplicationContextInitializer.class));
    //从类路径下找到ETA-INF/spring.factories配置的所有ApplicationListener
    setListeners((Collection) getSpringFactoriesInstances(ApplicationListener.class));
    //从多个配置类中找到有main方法的主配置类
    this.mainApplicationClass = deduceMainApplicationClass();
}
2.2运行run方法
public ConfigurableApplicationContext run(String... args) {
   StopWatch stopWatch = new StopWatch();
   stopWatch.start();
   ConfigurableApplicationContext context = null;
   FailureAnalyzers analyzers = null;
   configureHeadlessProperty();

   //获取SpringApplicationRunListeners;从类路径下META-INF/spring.factories
   SpringApplicationRunListeners listeners = getRunListeners(args);
    //回调所有的获取SpringApplicationRunListener.starting()方法
   listeners.starting();
   try {
       //封装命令行参数
      ApplicationArguments applicationArguments = new DefaultApplicationArguments(
            args);
      //准备环境
      ConfigurableEnvironment environment = prepareEnvironment(listeners,
            applicationArguments);
       		//创建环境完成后回调SpringApplicationRunListener.environmentPrepared();表示环境准备完成

      Banner printedBanner = printBanner(environment);

       //创建ApplicationContext;决定创建web的ioc还是普通的ioc
      context = createApplicationContext();

      analyzers = new FailureAnalyzers(context);
       //准备上下文环境;将environment保存到ioc中;而且applyInitializers();
       //applyInitializers():回调之前保存的所有的ApplicationContextInitializer的initialize方法
       //回调所有的SpringApplicationRunListener的contextPrepared();
       //
      prepareContext(context, environment, listeners, applicationArguments,
            printedBanner);
       //prepareContext运行完成以后回调所有的SpringApplicationRunListener的contextLoaded();

       //s刷新容器;ioc容器初始化(如果是web应用还会创建嵌入式的Tomcat);Spring注解版
       //扫描,创建,加载所有组件的地方;(配置类,组件,自动配置)
      refreshContext(context);
       //从ioc容器中获取所有的ApplicationRunner和CommandLineRunner进行回调
       //ApplicationRunner先回调,CommandLineRunner再回调
      afterRefresh(context, applicationArguments);
       //所有的SpringApplicationRunListener回调finished方法
      listeners.finished(context, null);
      stopWatch.stop();
      if (this.logStartupInfo) {
         new StartupInfoLogger(this.mainApplicationClass)
               .logStarted(getApplicationLog(), stopWatch);
      }
       //整个SpringBoot应用启动完成以后返回启动的ioc容器;
      return context;
   }
   catch (Throwable ex) {
      handleRunFailure(context, listeners, analyzers, ex);
      throw new IllegalStateException(ex);
   }
}
3、事件监听机制
配置在META-INF/spring.factories
ApplicationContextInitializer
public class HelloApplicationContextInitializer implements ApplicationContextInitializer<ConfigurableApplicationContext> {
    @Override
    public void initialize(ConfigurableApplicationContext applicationContext) {
        System.out.println("ApplicationContextInitializer...initialize..."+applicationContext);
    }
}
SpringApplicationRunListener
public class HelloSpringApplicationRunListener implements SpringApplicationRunListener {

    //必须有的构造器
    public HelloSpringApplicationRunListener(SpringApplication application, String[] args){

    }

    @Override
    public void starting() {
        System.out.println("SpringApplicationRunListener...starting...");
    }

    @Override
    public void environmentPrepared(ConfigurableEnvironment environment) {
        Object o = environment.getSystemProperties().get("os.name");
        System.out.println("SpringApplicationRunListener...environmentPrepared.."+o);
    }

    @Override
    public void contextPrepared(ConfigurableApplicationContext context) {
        System.out.println("SpringApplicationRunListener...contextPrepared...");
    }

    @Override
    public void contextLoaded(ConfigurableApplicationContext context) {
        System.out.println("SpringApplicationRunListener...contextLoaded...");
    }

    @Override
    public void finished(ConfigurableApplicationContext context, Throwable exception) {
        System.out.println("SpringApplicationRunListener...finished...");
    }
}
配置(META-INF/spring.factories)
org.springframework.context.ApplicationContextInitializer=
com.atguigu.springboot.listener.HelloApplicationContextInitializer

org.springframework.boot.SpringApplicationRunListener=
com.atguigu.springboot.listener.HelloSpringApplicationRunListener
只需要放在ioc容器中
ApplicationRunner
@Component
public class HelloApplicationRunner implements ApplicationRunner {
    @Override
    public void run(ApplicationArguments args) throws Exception {
        System.out.println("ApplicationRunner...run....");
    }
}
CommandLineRunner
@Component
public class HelloCommandLineRunner implements CommandLineRunner {
    @Override
    public void run(String... args) throws Exception {
        System.out.println("CommandLineRunner...run..."+ Arrays.asList(args));
    }
}
八、自定义starter
1、模式
启动器只能用来做依赖导入,并且以来自动配置,别人只需要引入启动器
命名规则
1、官方
spring-boot-starter-[模块]
2、自定义
[模块]-spring-boot-starter