往期回顾:
声明:本文中源码使用的是Spring5.3版本,就是源码中的master分支!!!
一般来说,设计模式分为创建型、结构性和行为性,具体的有以下23种,其中的简单工厂模式其实不算真正意义上的设计模式:
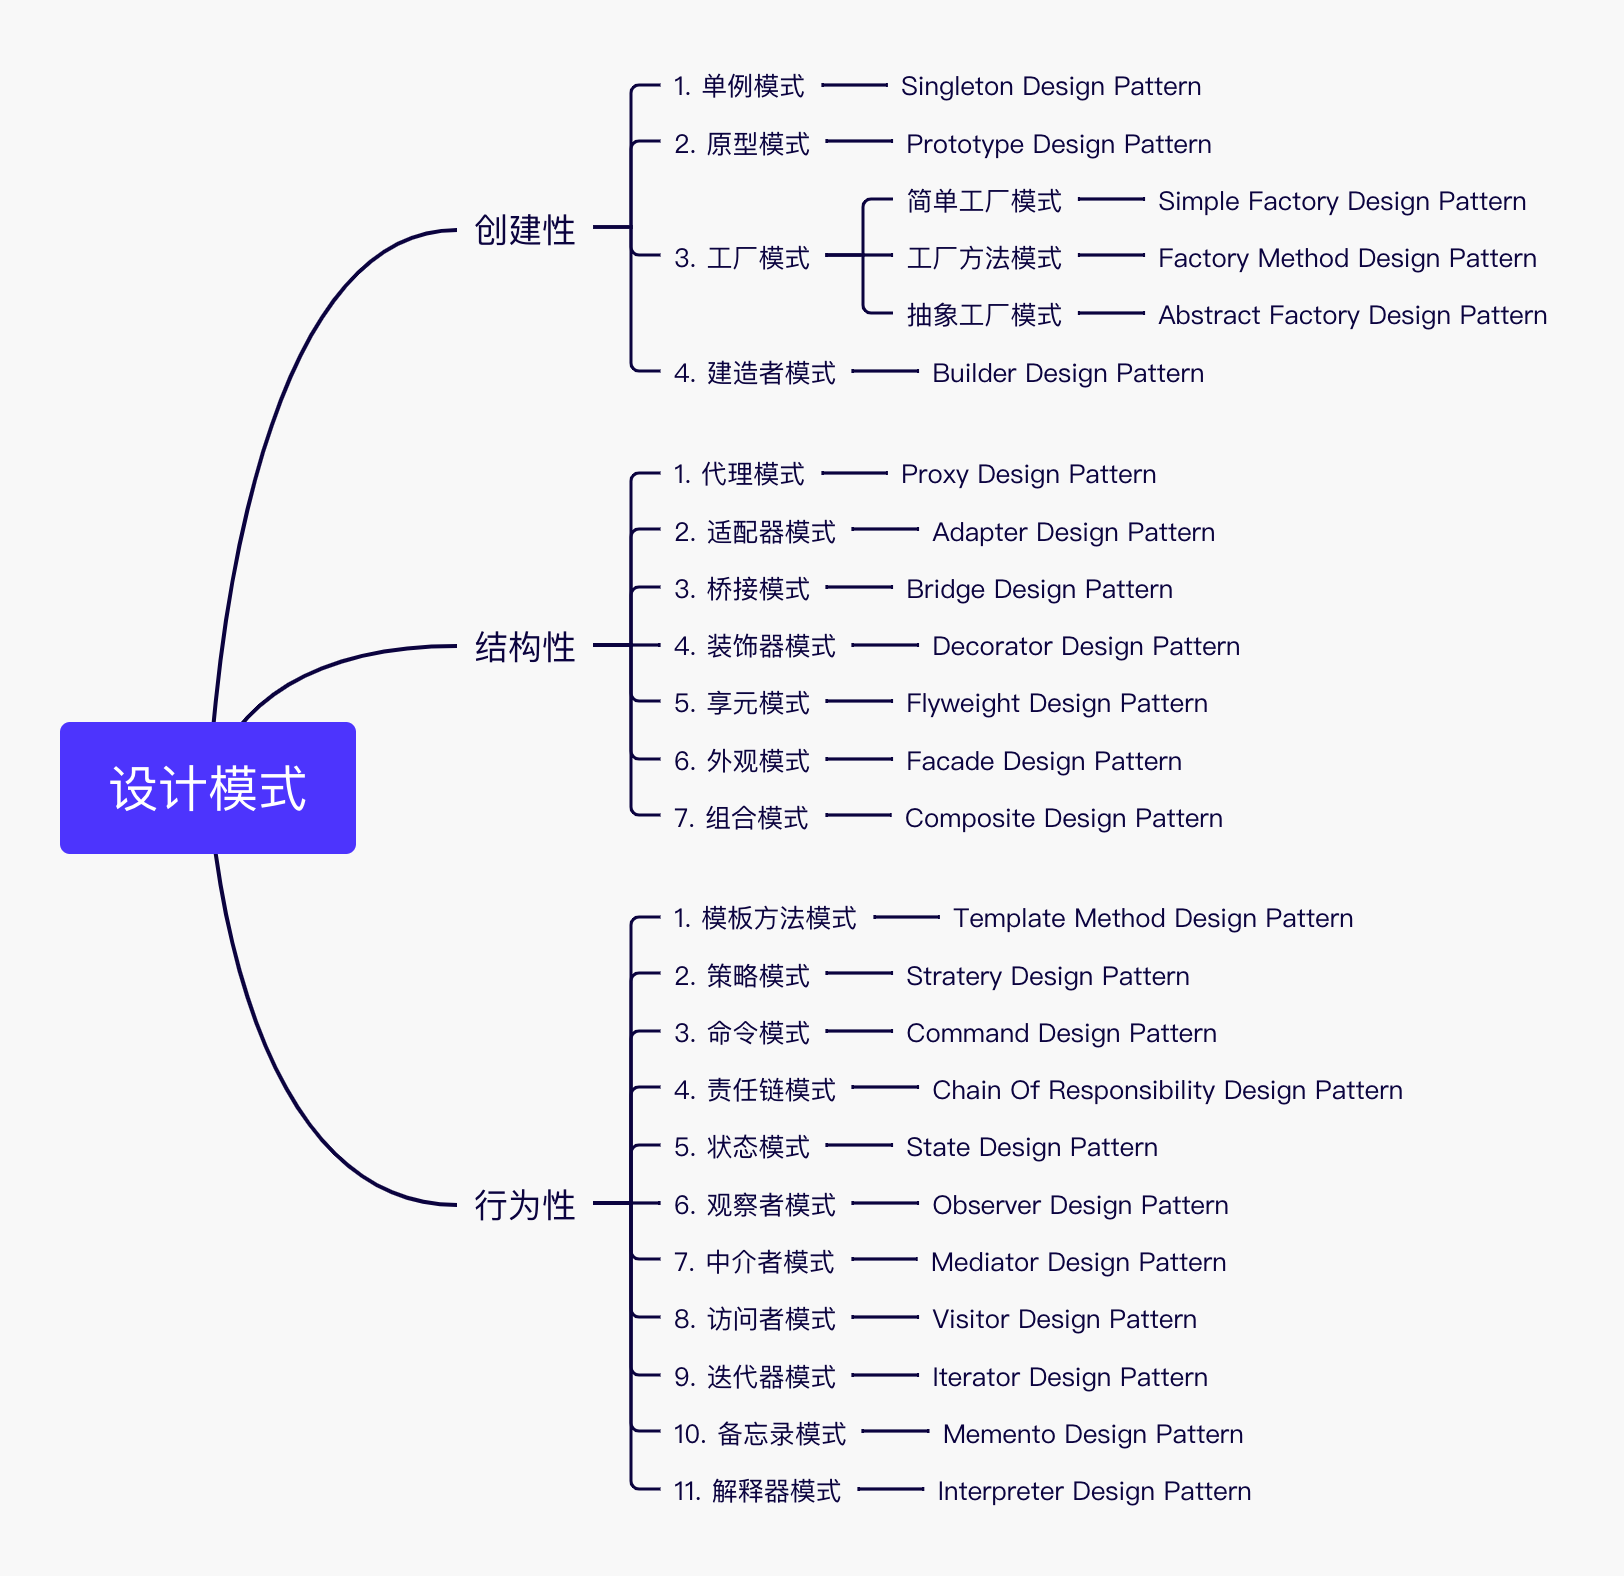
我在看Spring源码的过程中,梳理出了如下几种设计模式:

下面详细介绍每一种设计模式是如何在Spring中使用的,这些知识点不算是阅读源码的前置知识点,但是Spring的源码也不是读一两遍就能完全掌握的,我就是一个方法一个方法地通读了一遍之后,因为读到了很多不理解的写法,然后通过查阅资料才发现是用到了这些设计模式,所以整个下来感受就是:知道这些设计模式,对于通读之后的精读,掌握Springq其他组件,比如SpringBoot等,甚至是在开发过程中对Spring进行扩展,都算是一个前置条件,而且知道了这些,读起源码来,才能自顶向下有一个全局的认识。废话不多说,直接开写吧!
一、创建性模式
在Spring中单例和多例都是用来创建bean的时候使用,现来看一下创建bean的代码:
1.1 单例模式
单例模式详解传送门:http://c.biancheng.net/view/1338.html
Spring中的应用:创建Bean
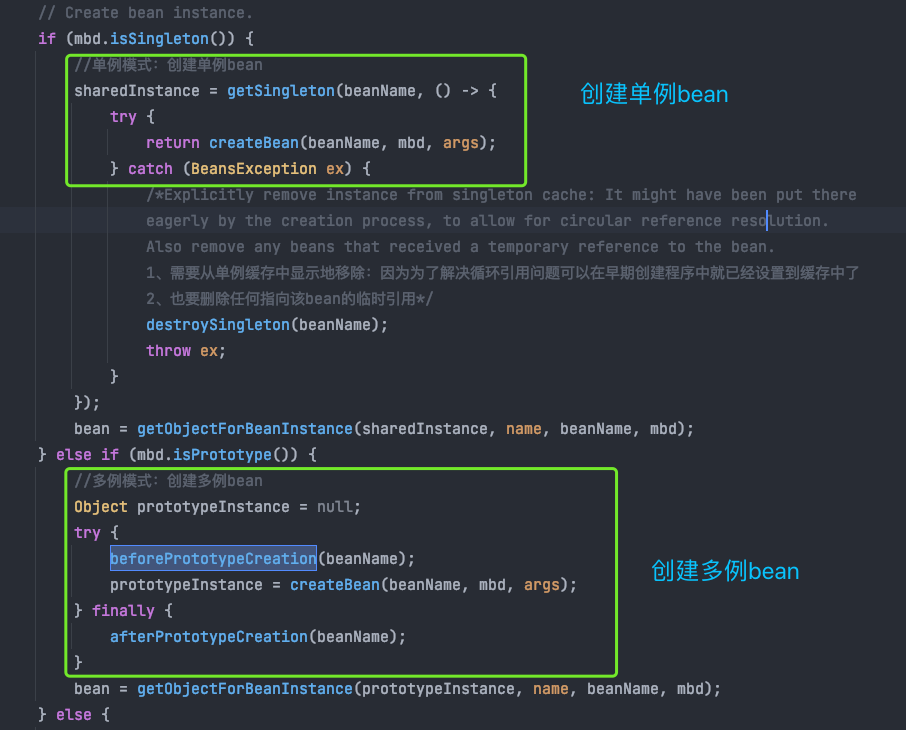
说明:单例模式就是Spring中定义Bean的时候,可以指定scope,如果是Singleton,就会创建在Spring容器内创建一个全局唯一的单例bean,但需要注意的是,spring中的单例跟设计模式中的单例还是有区别的,在设计模式中,相同的类加载器只能创建一个实例,但是在spring中,是通过bean的id来校验唯一性,就是说,同一个类可以创建多个id不同的实例,spring中创建单例的源代码如下:
 1 // Create bean instance.
 2                 if (mbd.isSingleton()) {
 3                     //单例模式:创建单例bean
 4                     sharedInstance = getSingleton(beanName, () -> {
 5                         try {
 6                             return createBean(beanName, mbd, args);
 7                         } catch (BeansException ex) {
 8                             /*Explicitly remove instance from singleton cache: It might have been put there
 9                             eagerly by the creation process, to allow for circular reference resolution.
10                             Also remove any beans that received a temporary reference to the bean.
11                             1、需要从单例缓存中显示地移除:因为为了解决循环引用问题可以在早期创建程序中就已经设置到缓存中了
12                             2、也要删除任何指向该bean的临时引用*/
13                             destroySingleton(beanName);
14                             throw ex;
15                         }
16                     });
17                     bean = getObjectForBeanInstance(sharedInstance, name, beanName, mbd);
18                 }
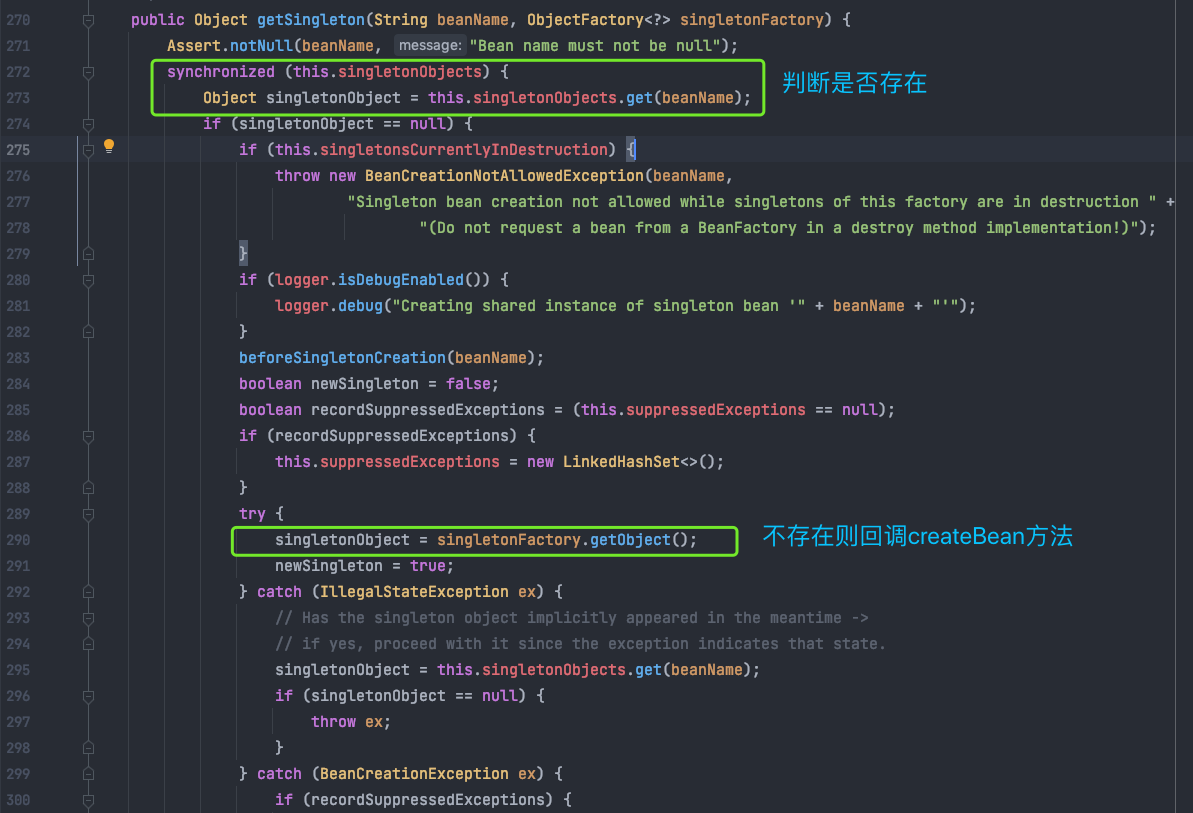
上面的第4~7行就是创建一个单例bean的过程,先看getSingleton方法:
其中的singletonObjects的源码如下:
/**
     * Cache of singleton objects: bean name to bean instance.
     * 缓存单例对象:beanName->beanInstance
     */
    private final Map<String, Object> singletonObjects = new ConcurrentHashMap<>(256);
在一个CurrentHashMap中存储beanName到beanInstance的映射关系,其实这就是传说中的一级缓存,从代码可以看出,Spring在创建一个单例bean的时候,会先通过beanName从一级缓存中获取,当获取不到是才会去调用回调函数createBean进行实例创建,在createBean中调用doCreateBean,在doCreateBean中调用instantiateBean方法,而instantiateBean具体创建bean的过程是通过策略模式实现的,这个在策略模式中讲,但在这里就能感觉到源码的魅力了。
1.2 原型模式
原型模式详解传送门:http://c.biancheng.net/view/1343.html
Spring中的应用:创建Bean
说明:同单例模式,如果指定bean的scope为Prototype,就会创建多例bean,即在每次获取时都会创建一个bean对象,Spring中创建多例bean的原源代码如下:
 1 if (mbd.isPrototype()) {
 2       //多例模式:创建多例bean
 3        Object prototypeInstance = null;
 4        try {
 5           beforePrototypeCreation(beanName);
 6           prototypeInstance = createBean(beanName, mbd, args);
 7         } finally {
 8           afterPrototypeCreation(beanName);
 9         }
10    bean = getObjectForBeanInstance(prototypeInstance, name, beanName, mbd);
11 }
可以看到和单例模式不同的地方在于,在调用createBean之前,没有调用getSingleton方法从一级缓存中获取,就是说每次获取都是创建一个新的。下面用一个例子来验证单例和多例:
1、在spring.xml中定义两个bean,一个为单例,一个为多例
1  <bean id="face1" class="com.spring.reading.vo.Face" init-method="init" destroy-method="destroy" scope="singleton">
2         <property name="eye" value="黑眼睛1"/>
3     </bean>
4     <bean id="face2" class="com.spring.reading.vo.Face" init-method="init" destroy-method="destroy" scope="prototype">
5         <property name="eye" value="黑眼睛2"/>
6     </bean>
上面第1行定义了一个名称为face1的bean,它的scope为singleton,第4行定义了一个名称为face2的bean,它的scope为prototype
2、获取两个face1和两个face2,并比较两个对象是否相等
 1 public class OpenTheDoor {
 2
 3     public static void main(String[] args) {
 4         ClassPathXmlApplicationContext context = new ClassPathXmlApplicationContext("classpath:spring-lifecycle.xml");
 5         System.out.println("---获取单例Bean---");
 6         Face face11 = (Face) context.getBean("face1");
 7         Face face12 = (Face) context.getBean("face1");
 8         System.out.println("face11=face12:" + (face11 == face12));
 9         System.out.println("face11=face12:" + (face11.equals(face12)));
10         System.out.println("---获取多例Bean---");
11         Face face21 = (Face) context.getBean("face2");
12         Face face22 = (Face) context.getBean("face2");
13         System.out.println("face21=face22:" + (face21 == face22));
14         System.out.println("face11=face12:" + (face21.equals(face22)));
15         context.close();
16     }
17 }
上面的第6、7行两次获取名称为face1的Face对象,第11、12行两次获取名称为face2的Face对象,并对两次获取的结果进行比较,同时使用了==和equals方法,因为没有重写equals方法,所以比较的还是对象在内存中的地址。
3、查看比较结果

可以看出同一个类的不同bean,定义成单例时,每次获取的都是同一个对象,定义成单例时,每次获取都是不同的对象,其实这里就能看出Spring中的单例跟设计模式中的单例其实是有区别的,spring中同一个类可以创建多个对象,通过id区分不同实例,通过一个beanName多次获取对象时,每次都能取到同一个,而在单例模式中,同一个类全局只能创建一个实例对象,虽然都叫单例,但Spring中的单例其实并不是真正意义上的单例模式。
总结:
1、Spring创建Bean时默认是单例模式,且非懒加载,即在容器启动过程中就完成创建
2、对于同一个类,可以创建不同的实例,每个实例是不相同的,只是根据同一个beanName多次获取时,得到的实例都是同一个;
3、单例模式中的单例是针对同一个类,全局只能创建一个唯一的实例。
以上就是对Spring中单例模式和多例模式的分析过程。
1.3 工厂模式
工厂模式详解传送门:http://c.biancheng.net/view/1351.html
spring中的工厂模式有两种,一种是工厂方法模式,一种是抽象工厂模式,它们二者的区别在于前者是具体工厂生产具体的产品,而后者是一个工厂中可以生产不同类型的产品,Spring中主要涉及的类和接口如下: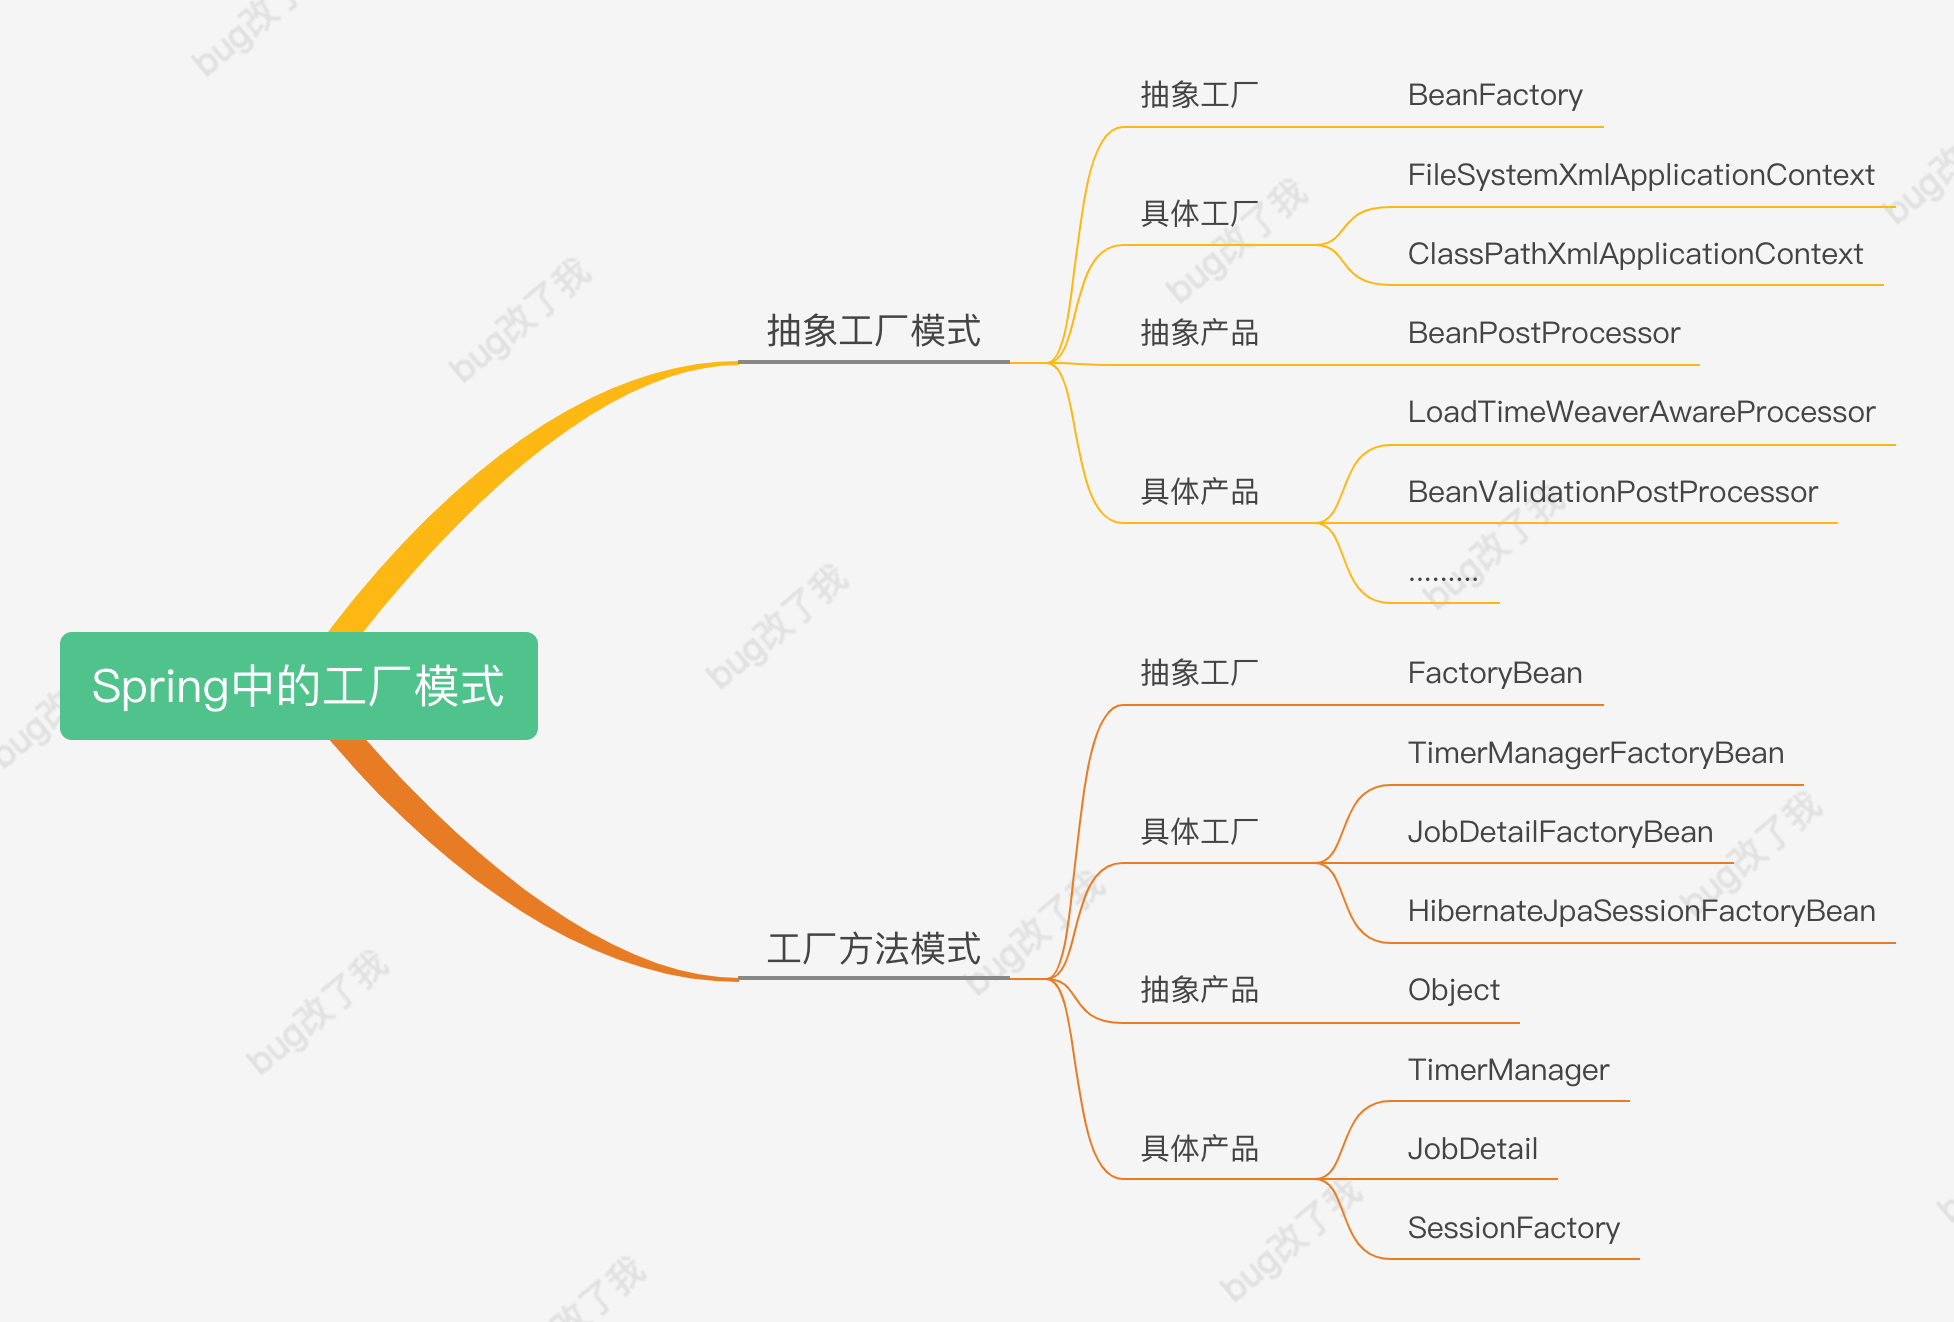
可以看到两者,一个是BeanFactory,一个是BeanFactory,它们两者也有一定的区别,简单来讲就是:BeanFactory是spring容器中用来生产bean的工厂,它负责管理一个Bean的生命周期;而FactoryBean它本身就是一个Bean,同时也可以作为工厂来生产各种自定义的Bean,不支持管理Bean的生命周期,需要开发者手动实现实现管理Bean初始化的接口InitializingBean和销毁的接口DisposableBean,一般用与和第三方集成。
1.4 建造者模式
建造者模式传送门:http://c.biancheng.net/view/1354.html
Spring中的应用:用来在web应用中提供http请求响应结果
说明:建造者模式指将一个复杂对象的构造与它的表示分离,使同样的构建过程可以创建不同的表示,这样的设计模式被称为建造者模式。它是将一个复杂的对象分解为多个简单的对象,然后一步一步构建而成。它将变与不变相分离,即产品的组成部分是不变的,但每一部分是可以灵活选择的。
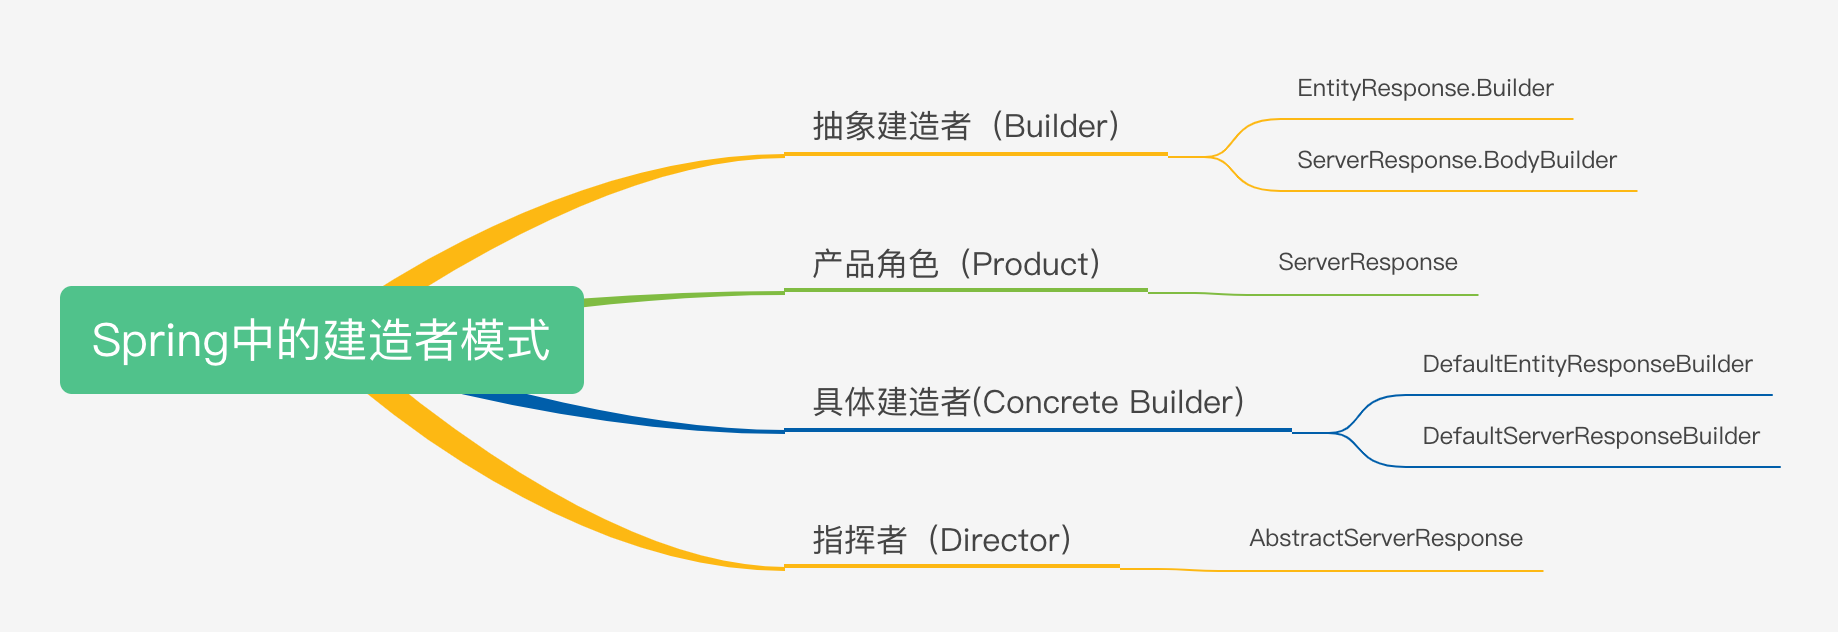
建造者(Builder)模式的主要角色如下。
- 产品角色(Product):它是包含多个组成部件的复杂对象,由具体建造者来创建其各个零部件。
- 抽象建造者(Builder):它是一个包含创建产品各个子部件的抽象方法的接口,通常还包含一个返回复杂产品的方法 getResult()。
- 具体建造者(Concrete Builder):实现 Builder 接口,完成复杂产品的各个部件的具体创建方法。
- 指挥者(Director):它调用建造者对象中的部件构造与装配方法完成复杂对象的创建,在指挥者中不涉及具体产品的信息。
spring中各个角色对应的类如下:
二、结构性模式
2.1 代理模式
代理模式传送门:http://c.biancheng.net/view/1359.html
Spring中的应用:Aop
说明:通过jdk和cglib动态代理方式实现Aop功能
首先来了解一下两种动态代理的区别:
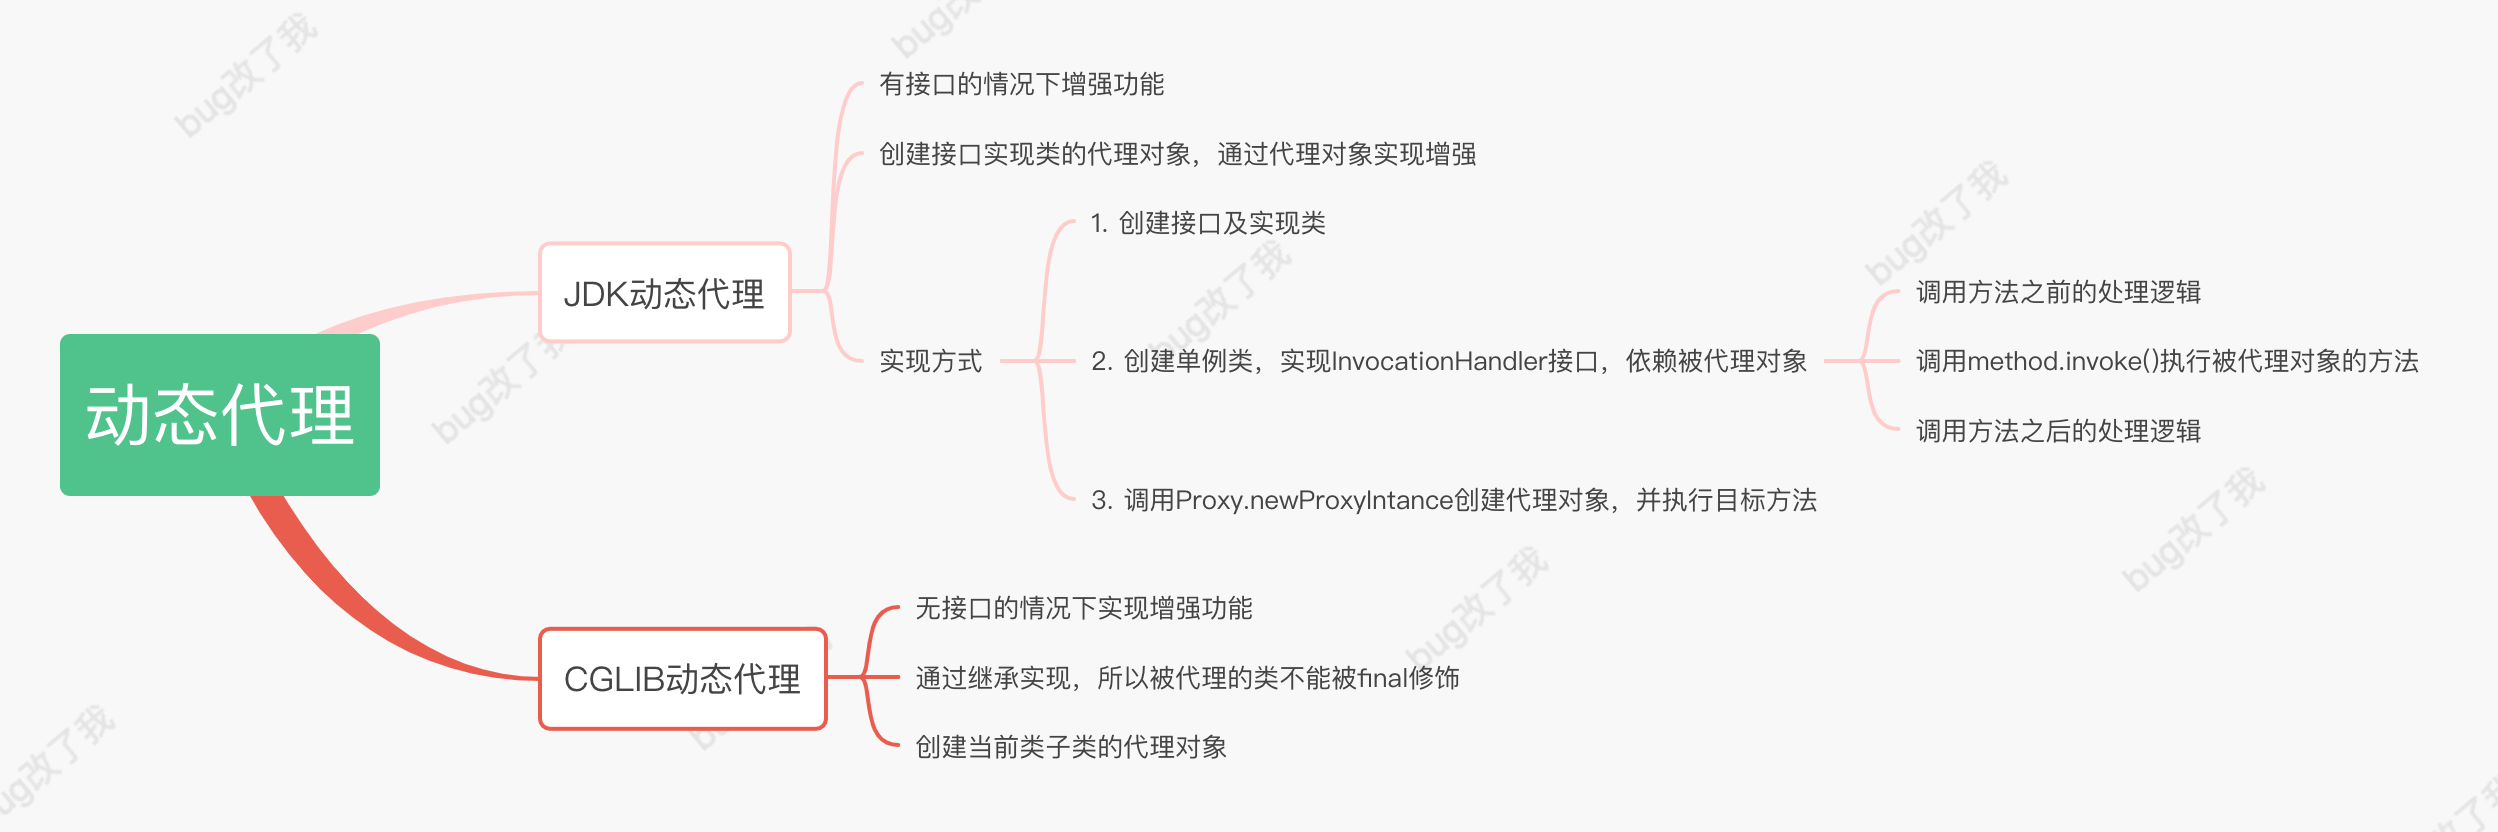
下面先举两种动态代理的实现方式,再看Spring中的源码实现。
2.1.1 jdk动态代理
2.1.1.1 jdk动态代理的实现
jdk动态代理是代理一个接口,并由代理类实现InvocationHandler接口的方式实现
1、创建一个UserService接口类,并定义两个方法
 1 package com.spring.reading.proxy.jdk;
 2
 3 import com.spring.reading.vo.UserVo;
 4
 5 /**
 6  * @author: cyhua
 7  * @createTime: 2021/11/26
 8  * @description:
 9  */
10 public interface UserService {
11
12     int add(UserVo userVo);
13
14
15     String update(UserVo userVo);
16 }
2、创建一个UserServiceImpl实现类,实现上面的接口
 1 package com.spring.reading.proxy.jdk;
 2
 3 import com.spring.reading.vo.UserVo;
 4
 5 /**
 6  * @author: cyhua
 7  * @createTime: 2021/11/26
 8  * @description:
 9  */
10 public class UserServiceImpl implements UserService {
11     @Override
12     public int add(UserVo userVo) {
13         System.out.println("add user sueccess" + userVo);
14         return 1;
15     }
16
17     @Override
18     public String update(UserVo userVo) {
19         return null;
20     }
21 }
3、创建一个代理类UserJdkProxy,实现InvocationHandler接口
 1 package com.spring.reading.proxy.jdk;
 2
 3 import java.lang.reflect.InvocationHandler;
 4 import java.lang.reflect.Method;
 5
 6 /**
 7  * @author: cyhua
 8  * @createTime: 2021/11/26
 9  * @description:
10  */
11 public class UserJdkProxy implements InvocationHandler {
12
13     /**
14      * 被代理的对象
15      */
16     private Object object;
17
18     public UserJdkProxy(Object object) {
19         this.object = object;
20     }
21
22     @Override
23     public Object invoke(Object proxy, Method method, Object[] args) throws Throwable {
24         System.out.println("方法之前执行:" + method.getName() + ";参数:" + args.toString());
25         Object result = method.invoke(object, args);
26         System.out.println("方法之后执行" + method.getName() + ";结果" + result);
27         return result;
28     }
29
30 }
4、通过代理类生成代理对象并调用add接口
 1 package com.spring.reading.proxy.jdk;
 2
 3 import com.spring.reading.vo.UserVo;
 4
 5 import java.lang.reflect.Proxy;
 6
 7 /**
 8  * @author: cyhua
 9  * @createTime: 2021/11/26
10  * @description:
11  */
12 public class UserJdkProxyCaller {
13
14     public static void main(String[] args) {
15         UserVo userVo = new UserVo();
16         Class[] interfaces = {UserService.class};
17         UserService userService = (UserService) Proxy.newProxyInstance(UserJdkProxy.class.getClassLoader(), interfaces, new UserJdkProxy(new UserServiceImpl()));
18         int add = userService.add(userVo);
19         System.out.println("add:" + add);
20     }
21 }
上面第17行代码中的userService对象是通过gdk动态代理创建的。
2.1.1.2 Spring中的应用
Spring中通过jdk实现的动态代理类的关系如下:
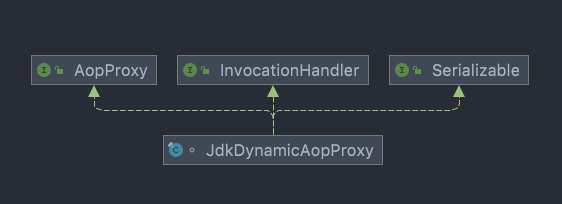
获取代理对象的核心源代码如下:
 1 /** Config used to configure this proxy. */
 2     private final AdvisedSupport advised;
 3
 4     /**
 5      * Is the {@link #equals} method defined on the proxied interfaces?
 6      */
 7     private boolean equalsDefined;
 8
 9     /**
10      * Is the {@link #hashCode} method defined on the proxied interfaces?
11      */
12     private boolean hashCodeDefined;
13
14
15     /**
16      * Construct a new JdkDynamicAopProxy for the given AOP configuration.
17      * 通过指定AOP配置类创建JdkDynamicAopProxy的构造方法
18      * @param config the AOP configuration as AdvisedSupport object
19      * @throws AopConfigException if the config is invalid. We try to throw an informative
20      * exception in this case, rather than let a mysterious failure happen later.
21      */
22     public JdkDynamicAopProxy(AdvisedSupport config) throws AopConfigException {
23         Assert.notNull(config, "AdvisedSupport must not be null");
24         if (config.getAdvisors().length == 0 && config.getTargetSource() == AdvisedSupport.EMPTY_TARGET_SOURCE) {
25             throw new AopConfigException("No advisors and no TargetSource specified");
26         }
27         this.advised = config;
28     }
29
30
31     @Override
32     public Object getProxy() {
33         return getProxy(ClassUtils.getDefaultClassLoader());
34     }
35
36     /**
37      * 获取指定类加载器的代理对象
38      * @param classLoader the class loader to create the proxy with
39      * (or {@code null} for the low-level proxy facility's default)
40      * @return
41      */
42     @Override
43     public Object getProxy(@Nullable ClassLoader classLoader) {
44         if (logger.isTraceEnabled()) {
45             logger.trace("Creating JDK dynamic proxy: " + this.advised.getTargetSource());
46         }
47         //通过advised获取到被代理接口
48         Class<?>[] proxiedInterfaces = AopProxyUtils.completeProxiedInterfaces(this.advised, true);
49         findDefinedEqualsAndHashCodeMethods(proxiedInterfaces);
50         return Proxy.newProxyInstance(classLoader, proxiedInterfaces, this);
51     }
上面代码中第2行维护了一个被代理对象的配置类advised,该类的值通过22行的构造函数JdkDynamicAopProxy(AdvisedSupport config)传入,在48行通过AopProxyUtil工具解析被代理的接口列表,很典型的的jdk动态代理实践。
2.1.2 cglib动态代理
cglib动态代理代理的对象不是一个接口,而是一个具体的类,而且代理类需要实现MethodInterceptor接口
2.1.2.1 cglib动态代理的实现
1、引入axpectj的依赖
 1         <dependency>
 2             <groupId>org.springframework</groupId>
 3             <artifactId>spring-aop</artifactId>
 4             <version>5.2.9.RELEASE</version>
 5         </dependency>
 6
 7         <dependency>
 8             <groupId>org.aspectj</groupId>
 9             <artifactId>aspectjweaver</artifactId>
10             <version>1.9.6</version>
11         </dependency>
2、创建一个类OrderService
 1 package com.spring.reading.proxy.cglib;
 2
 3 import java.util.UUID;
 4
 5 /**
 6  * @author: cyhua
 7  * @createTime: 2021/11/27
 8  * @description: 一个具体的类,提供订单相关服务
 9  */
10 public class OrderService {
11
12     public String createOrder(Order order) {
13         System.out.println("OrderService createOrder begin...");
14         String orderNumber = UUID.randomUUID().toString().replace("-", "");
15         order.setOrderNumber(orderNumber);
16         System.out.println("OrderService createOrder end...");
17         return orderNumber;
18     }
19
20 }
3、创建一个代理类CglibProxy
 1 package com.spring.reading.proxy.cglib;
 2
 3 import org.springframework.cglib.proxy.Enhancer;
 4 import org.springframework.cglib.proxy.MethodInterceptor;
 5 import org.springframework.cglib.proxy.MethodProxy;
 6
 7 import java.lang.reflect.Method;
 8
 9 /**
10  * @author: cyhua
11  * @createTime: 2021/11/27
12  * @description: 实现MethodInterceptor,CGLIB动态代理
13  */
14 public class CglibProxy<T> implements MethodInterceptor {
15
16     public T getProxy(Class<T> targetClass) {
17         Enhancer enhancer = new Enhancer();
18         return (T) enhancer.create(targetClass, this);
19     }
20
21     @Override
22     public Object intercept(Object o, Method method, Object[] args, MethodProxy methodProxy) throws Throwable {
23         System.out.println("OrderInterceptor intercept begin");
24         return methodProxy.invokeSuper(o, args);
25     }
26 }
4、通过cglig代理生成UserService的对象,并调用createOrder方法
 1 package com.spring.reading.proxy.cglib;
 2
 3 import java.math.BigDecimal;
 4 import java.util.Arrays;
 5
 6 /**
 7  * @author: cyhua
 8  * @createTime: 2021/11/27
 9  * @description:
10  */
11 public class OrderServiceCaller {
12
13     public static void main(String[] args) {
14         Order order = new Order();
15         order.setTotalPrice(new BigDecimal(200));
16         order.setProductIds(Arrays.asList("1", "2", "3"));
17         OrderService orderService = new CglibProxy<OrderService>().getProxy(OrderService.class);
18         System.out.println("OrderServiceCaller end:orderNumber=" + orderService.createOrder(order));
19     }
20 }
上面的第17行就是通过cglib动态代理生成UserService类对象的方式。
2.1.2.2 Spring中的实现
Spring中通过jdk实现的动态代理类的关系如下:
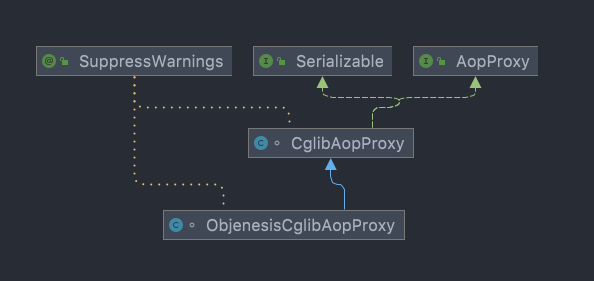
其中的CgligAopProxy就是实现cglib动态代理类,因为代码较多,只选取核心代码看看,具体实现大家直接看源码:
 1 // Configure CGLIB Enhancer...
 2             //配置CGLIB的Enhancer
 3             Enhancer enhancer = createEnhancer();
 4             if (classLoader != null) {
 5                 enhancer.setClassLoader(classLoader);
 6                 if (classLoader instanceof SmartClassLoader &&
 7                         ((SmartClassLoader) classLoader).isClassReloadable(proxySuperClass)) {
 8                     enhancer.setUseCache(false);
 9                 }
10             }
11             enhancer.setSuperclass(proxySuperClass);
12             enhancer.setInterfaces(AopProxyUtils.completeProxiedInterfaces(this.advised));
13             enhancer.setNamingPolicy(SpringNamingPolicy.INSTANCE);
14             enhancer.setStrategy(new ClassLoaderAwareGeneratorStrategy(classLoader));
15
16             //获取回调接口:通过反射获取
17             Callback[] callbacks = getCallbacks(rootClass);
18             Class<?>[] types = new Class<?>[callbacks.length];
19             for (int x = 0; x < types.length; x++) {
20                 types[x] = callbacks[x].getClass();
21             }
22             // fixedInterceptorMap only populated at this point, after getCallbacks call above
23             //在上面的回调函数调用字后,执行过滤器,只使用已被填充的属性
24             enhancer.setCallbackFilter(new ProxyCallbackFilter(
25                     this.advised.getConfigurationOnlyCopy(), this.fixedInterceptorMap, this.fixedInterceptorOffset));
26             enhancer.setCallbackTypes(types);
27
28             // Generate the proxy class and create a proxy instance.
29             //生成代理类并创建一个代理对象
30             return createProxyClassAndInstance(enhancer, callbacks);
以上就是spring中代理模式的实现。
三、行为性模式
3.1 模板方法模式
模板方法模式传送门:http://c.biancheng.net/view/1376.html
Spring中的应用:容器初始化过程
说明:AbstractApplicationContext,容器初始化的refresh方法就使用了经典模板方法模式
模板方法(Template Method)模式的定义如下:定义一个操作中的算法骨架,而将算法的一些步骤延迟到子类中,使得子类可以不改变该算法结构的情况下重定义该算法的某些特定步骤。它是一种类行为型模式。
Spring中的refres方法可以收是对模板方法模式的最佳实践:
 1 public void refresh() throws BeansException, IllegalStateException {
 2         synchronized(this.startupShutdownMonitor) {
 3             this.prepareRefresh();
 4             ConfigurableListableBeanFactory beanFactory = this.obtainFreshBeanFactory();
 5             this.prepareBeanFactory(beanFactory);
 6
 7             try {
 8                 this.postProcessBeanFactory(beanFactory);
 9                 this.invokeBeanFactoryPostProcessors(beanFactory);
10                 this.registerBeanPostProcessors(beanFactory);
11                 this.initMessageSource();
12                 this.initApplicationEventMulticaster();
13                 this.onRefresh();
14                 this.registerListeners();
15                 this.finishBeanFactoryInitialization(beanFactory);
16                 this.finishRefresh();
17             } catch (BeansException var9) {
18                 if (this.logger.isWarnEnabled()) {
19                     this.logger.warn("Exception encountered during context initialization - cancelling refresh attempt: " + var9);
20                 }
21
22                 this.destroyBeans();
23                 this.cancelRefresh(var9);
24                 throw var9;
25             } finally {
26                 this.resetCommonCaches();
27             }
28
29         }
30     }
refresh方法中定义了一套流程,其中postProcessBeanFactory、onRefresh以及一些其他方法中调用的方法,都是延迟到子类中实现,在AbstractApplicationContext类中只是定义了一个空实现,这就是模板方法模式中的钩子方法,下面是对该模式中各个角色在Spring中的应用枚举: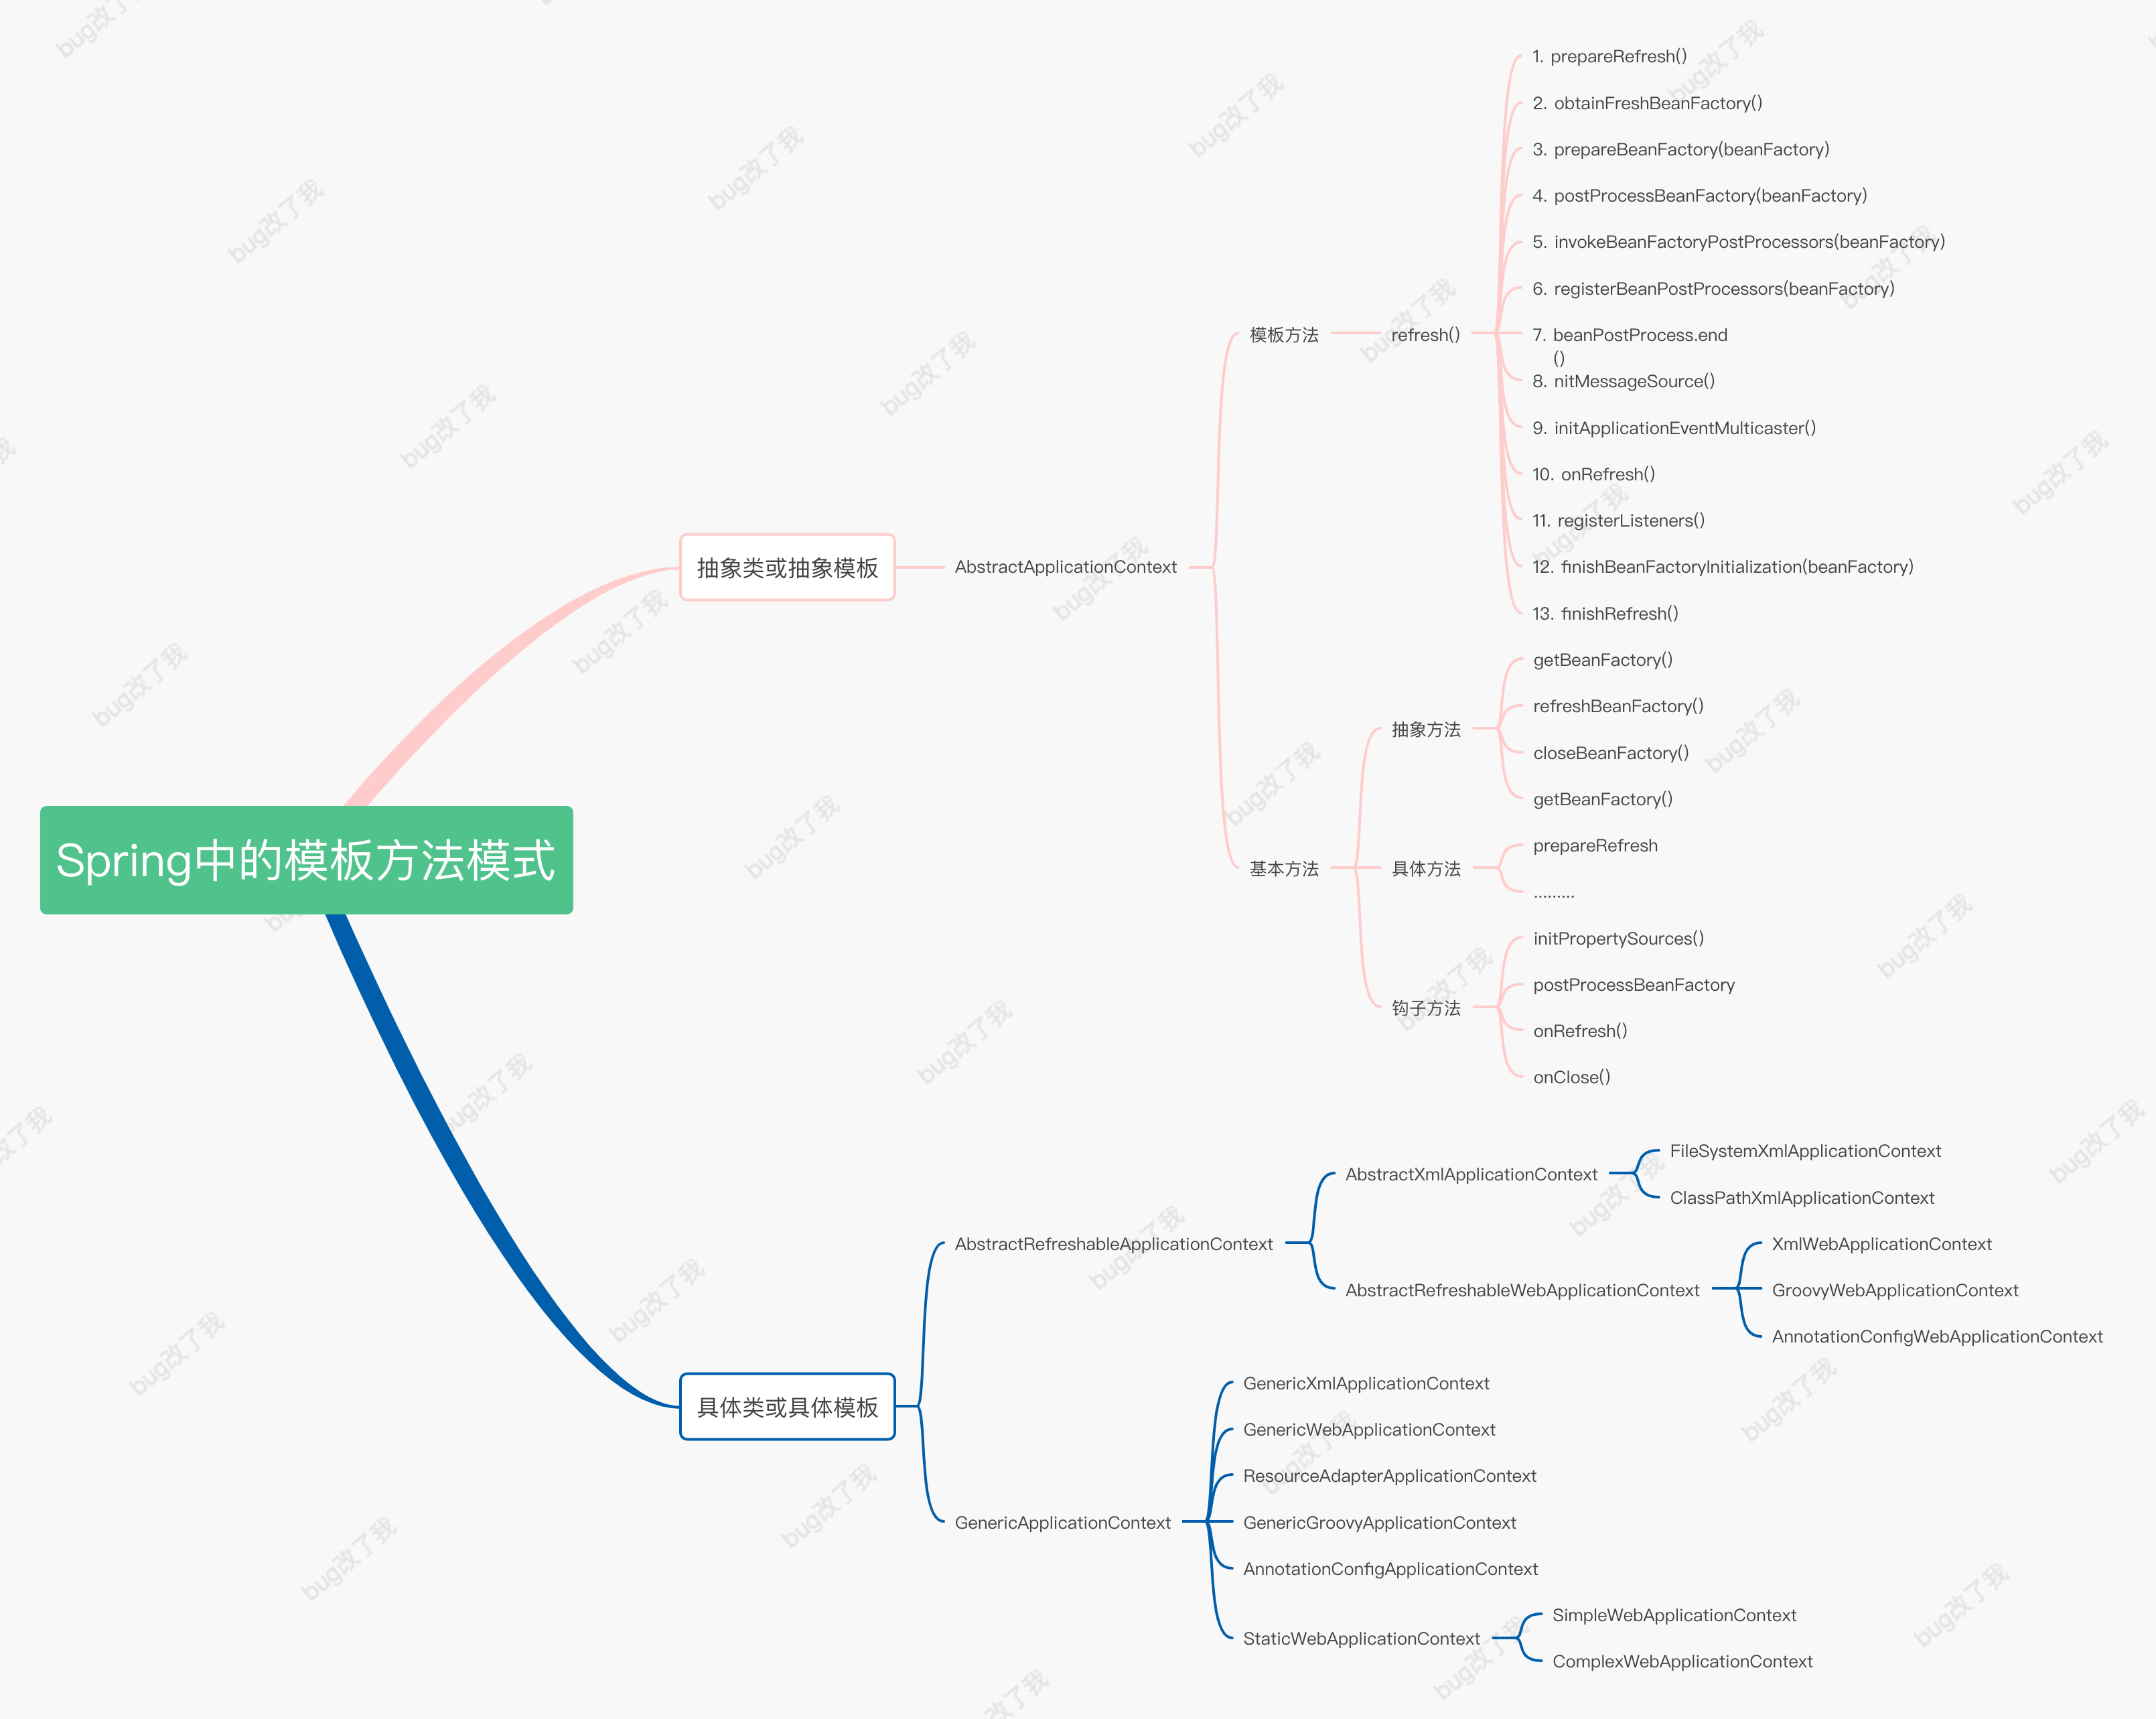
这个模式在Spring中的应用真的是太经典了,让我直呼膜拜!!!
3.2 观察者模式
观察者模式传送门:http://c.biancheng.net/view/1390.html
Spring中的应用:广播上下文事件,由监听器进行监听处理
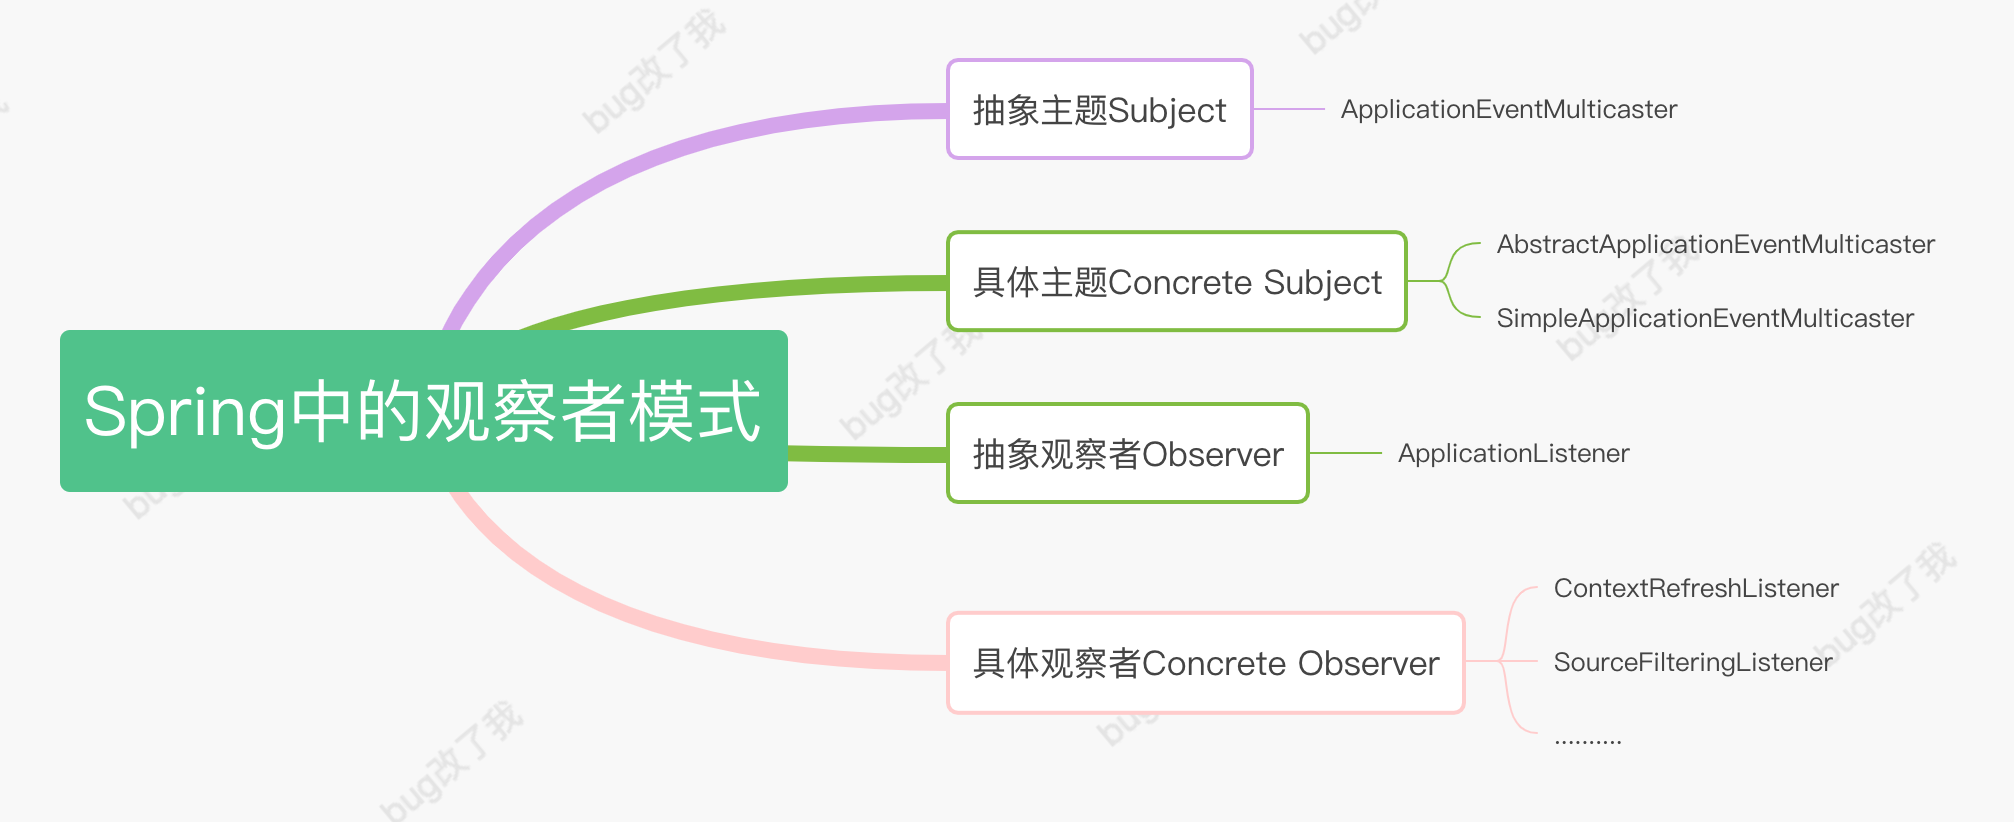
说明:观察者(Observer)模式,指多个对象间存在一对多的依赖关系,当一个对象的状态发生改变时,所有依赖于它的对象都得到通知并被自动更新。这种模式有时又称作发布-订阅模式、模型-视图模式,它是对象行为型模式。在spring中,会有很多不同的事件和监听器,来发布和监听上下文的变化情况,并根据具体事件作出对应的处理
观察者模式的主要角色如下。
- 抽象主题(Subject)角色:也叫抽象目标类,它提供了一个用于保存观察者对象的聚集类和增加、删除观察者对象的方法,以及通知所有观察者的抽象方法。
- 具体主题(Concrete Subject)角色:也叫具体目标类,它实现抽象目标中的通知方法,当具体主题的内部状态发生改变时,通知所有注册过的观察者对象。
- 抽象观察者(Observer)角色:它是一个抽象类或接口,它包含了一个更新自己的抽象方法,当接到具体主题的更改通知时被调用。
- 具体观察者(Concrete Observer)角色:实现抽象观察者中定义的抽象方法,以便在得到目标的更改通知时更新自身的状态。
观察者模式中的角色在Spring中的对应关系如下:
下面来看下各个角色的代码实现:
1、抽象主题(Subject)角色,提供了一个用于保存观察者对象的聚集类和增加、删除观察者对象的方法,以及通知所有观察者的抽象方法。
 1 /**
 2  * Interface to be implemented by objects that can manage a number of
 3  * {@link ApplicationListener} objects and publish events to them.
 4  * 实现该接口的对象能够管理多个ApplicationListener对象,并向它们发布事件
 5  *
 6  * <p>An {@link org.springframework.context.ApplicationEventPublisher}, typically
 7  * a Spring {@link org.springframework.context.ApplicationContext}, can use an
 8  * {@code ApplicationEventMulticaster} as a delegate for actually publishing events.
 9  * 一个ApplicationEventPublisher,通常是一个spring ApplicationContext,能有使用ApplicationEventMulticaster作为实际发布事件的代理
10  * 该接口是观察者模式中的抽象主题(Subject)角色:
11  * 也叫抽象目标类,提供了用户保存观察者对象的聚集类和增加、删除观察者对象的方法,以及通知所有观察者的抽象方法
12  *
13  *
14  * @author Rod Johnson
15  * @author Juergen Hoeller
16  * @author Stephane Nicoll
17  * @see ApplicationListener
18  */
19 public interface ApplicationEventMulticaster {
20
21     /**
22      * Add a listener to be notified of all events.
23      * 添加一个监听器用来通知所有事件
24      * @param listener the listener to add
25      */
26     void addApplicationListener(ApplicationListener<?> listener);
27
28     /**
29      * Add a listener bean to be notified of all events.
30      * 添加一个监听器bean,用来通知所有事件
31      * @param listenerBeanName the name of the listener bean to add
32      */
33     void addApplicationListenerBean(String listenerBeanName);
34
35     /**
36      * Remove a listener from the notification list.
37      * 从通知列表中移除一个监听器
38      * @param listener the listener to remove
39      */
40     void removeApplicationListener(ApplicationListener<?> listener);
41
42     /**
43      * Remove a listener bean from the notification list.
44      * 从通知列表中移除一个监听器bean名称
45      * @param listenerBeanName the name of the listener bean to remove
46      */
47     void removeApplicationListenerBean(String listenerBeanName);
48
49     /**
50      * Remove all listeners registered with this multicaster.
51      * <p>After a remove call, the multicaster will perform no action
52      * on event notification until new listeners are registered.
53      * 移除这个多播器中所有的监听器,移除之后,多播器将会在新的监听器被注册之前,被通知时都不会执行任何动作
54      */
55     void removeAllListeners();
56
57     /**
58      * Multicast the given application event to appropriate listeners.
59      * <p>Consider using {@link #multicastEvent(ApplicationEvent, ResolvableType)}
60      * if possible as it provides better support for generics-based events.
61      * 广播给定的事给到合适的监听器,如果可能的话,使用下面的方法,因为它提供了更好的支持
62      * @param event the event to multicast
63      */
64     void multicastEvent(ApplicationEvent event);
65
66     /**
67      * Multicast the given application event to appropriate listeners.
68      * <p>If the {@code eventType} is {@code null}, a default type is built
69      * based on the {@code event} instance.
70      * @param event the event to multicast
71      * @param eventType the type of event (can be {@code null})
72      * @since 4.2
73      */
74     void multicastEvent(ApplicationEvent event, @Nullable ResolvableType eventType);
75
76 }
2、具体主题(Concrete Subject)角色:也叫具体目标类,它实现抽象目标中的通知方法,当具体主题的内部状态发生改变时,通知所有注册过的观察者对象。
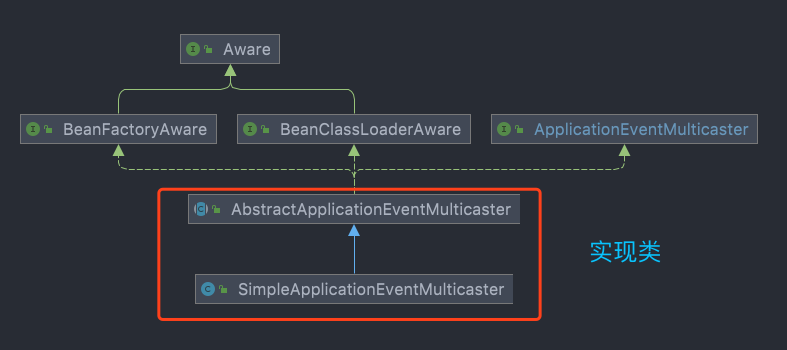
具体主题有SimpleApplicationEventMulticaster和AbstractApplicationEventMulticaster,其中前者继承自后者,SimpleApplicationEventMulticaster中实现了通知方法,源代码如下:
 1 @Override
 2     public void multicastEvent(final ApplicationEvent event, @Nullable ResolvableType eventType) {
 3         //第一步:调用resolveDefaultEventType方法解析事件的类型,会返回类的全限定名
 4         ResolvableType type = (eventType != null ? eventType : resolveDefaultEventType(event));
 5         Executor executor = getTaskExecutor();
 6         for (ApplicationListener<?> listener : getApplicationListeners(event, type)) {
 7             if (executor != null) {
 8                 executor.execute(() -> invokeListener(listener, event));
 9             }
10             else if (this.applicationStartup != null) {
11                 StartupStep invocationStep = this.applicationStartup.start("spring.event.invoke-listener");
12                 invokeListener(listener, event);
13                 invocationStep.tag("event", event::toString);
14                 if (eventType != null) {
15                     invocationStep.tag("eventType", eventType::toString);
16                 }
17                 invocationStep.tag("listener", listener::toString);
18                 invocationStep.end();
19             }
20             else {
21                 //将事件event通知给监听器listener
22                 invokeListener(listener, event);
23             }
24         }
25     }
3、抽象观察者(Observer)角色:它是一个抽象类或接口,它包含了一个更新自己的抽象方法,当接到具体主题的更改通知时被调用。
抽象观察者是ApplicationListener类,只有一个监听接口onApplicationEvent,在监听到event事件时做出相应的操作,源代码如下:
 1 package org.springframework.context;
 2
 3 import java.util.EventListener;
 4
 5 /**
 6  * Interface to be implemented by application event listeners.
 7  * 被应用程序监听器实现的接口
 8  *
 9  * <p>Based on the standard {@code java.util.EventListener} interface
10  * for the Observer design pattern.
11  * 基于标准的EventListener接口实现的观察者模式
12  *
13  * <p>As of Spring 3.0, an {@code ApplicationListener} can generically declare
14  * the event type that it is interested in. When registered with a Spring
15  * {@code ApplicationContext}, events will be filtered accordingly, with the
16  * listener getting invoked for matching event objects only.
17  * 从Spring 3.0开始,ApplicationListener能够声明它感兴趣的事件类型,当一个ApplicationContext被注册时,
18  * 事件将会被过滤,监听器只会调用匹配的事件
19  * 该接口充当观察者模式中的抽象观察者(Observer):
20  * 它是一个抽象类或接口,包含了一个更新自己的抽象方法,当接到具体主题的更改通知(具体事件)时被调用
21  *
22  *
23  * @author Rod Johnson
24  * @author Juergen Hoeller
25  * @param <E> the specific {@code ApplicationEvent} subclass to listen to
26  * @see org.springframework.context.ApplicationEvent
27  * @see org.springframework.context.event.ApplicationEventMulticaster
28  * @see org.springframework.context.event.EventListener
29  */
30 @FunctionalInterface
31 public interface ApplicationListener<E extends ApplicationEvent> extends EventListener {
32
33     /**
34      * Handle an application event.
35      * @param event the event to respond to
36      */
37     void onApplicationEvent(E event);
38
39 }
4、具体观察者(Concrete Observer)角色:实现抽象观察者中定义的抽象方法,以便在得到目标的更改通知时更新自身的状态。
可以看到ApplicationListener有下面这些实现类
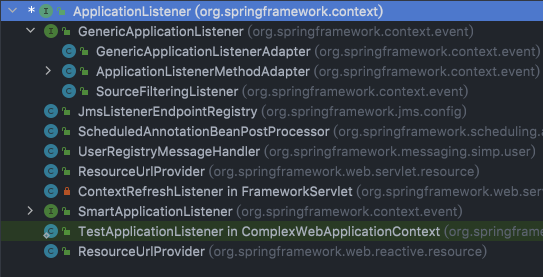
其中最常用的就是ContextRefreshListener,在应用上下文发生变化时进行处理,它其实是ApplicationListener的一个内部类,实现了ApplicationListener接口,源代码如下:
 1 /**
 2      * ApplicationListener endpoint that receives events from this servlet's WebApplicationContext
 3      * only, delegating to {@code onApplicationEvent} on the FrameworkServlet instance.
 4      */
 5     private class ContextRefreshListener implements ApplicationListener<ContextRefreshedEvent> {
 6
 7         @Override
 8         public void onApplicationEvent(ContextRefreshedEvent event) {
 9             FrameworkServlet.this.onApplicationEvent(event);
10         }
11     }
在finishRefresh方法中,就调用了发布ContextRefreshListener事件的方法:
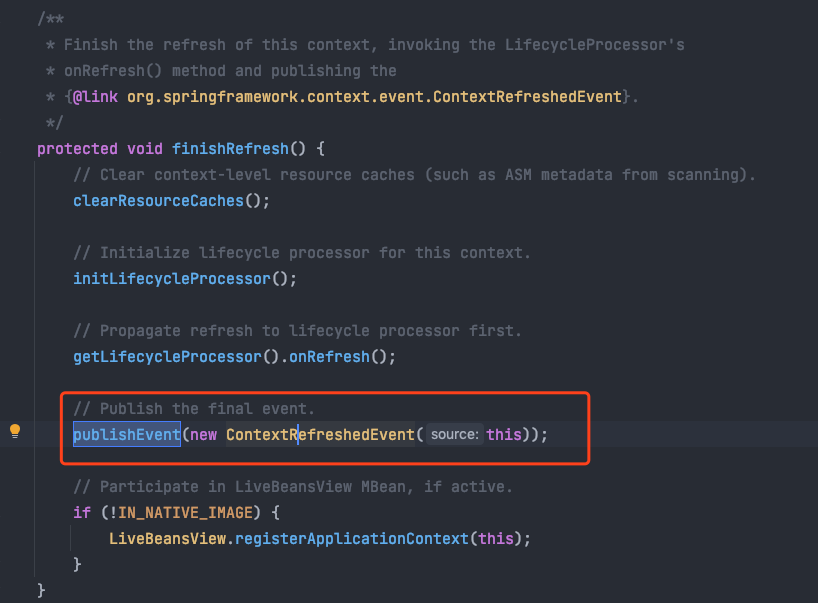
所以知道了这个设计模式在Spring中的应用,读起源码来就会更加的得心应手。
3.3 策略模式
策略模式传送门:http://c.biancheng.net/view/1378.html
Spring中的应用:在实例化bean的过程中,会采用策略模式
策略(Strategy)模式的定义:该模式定义了一系列算法,并将每个算法封装起来,使它们可以相互替换,且算法的变化不会影响使用算法的客户。策略模式属于对象行为模式,它通过对算法进行封装,把使用算法的责任和算法的实现分割开来,并委派给不同的对象对这些算法进行管理。
策略模式的主要角色如下。
-
抽象策略(Strategy)类:定义了一个公共接口,各种不同的算法以不同的方式实现这个接口,环境角色使用这个接口调用不同的算法,一般使用接口或抽象类实现。
-
具体策略(Concrete Strategy)类:实现了抽象策略定义的接口,提供具体的算法实现。
-
环境(Context)类:持有一个策略类的引用,最终给客户端调用。
在实例化一个对象时,是通过代理模式,还是构造方法,需要进行一定的决策,这里就用到了策略模式。策略模式中的角色在Spring中对应的类如下:

下面来看下Spring中各个角色的源代码
1、抽象策略InstantiationStrategy
 1 /**
 2  * Interface responsible for creating instances corresponding to a root bean definition.
 3  * 该接口的职责是:根据根bean的定义去创建一个实例
 4  * <p>This is pulled out into a strategy as various approaches are possible,
 5  * including using CGLIB to create subclasses on the fly to support Method Injection.
 6  *
 7  * @author Rod Johnson
 8  * @author Juergen Hoeller
 9  * @since 1.1
10  */
11 public interface InstantiationStrategy {
12
13     /**
14      * Return an instance of the bean with the given name in this factory.
15      * 给工厂中的beanName对应的定义类返回一个实例
16      * @param bd the bean definition bean定义信息
17      * @param beanName the name of the bean when it is created in this context.
18      * The name can be {@code null} if we are autowiring a bean which doesn't
19      * belong to the factory.
20      * 在上下文中要创建的bean名称,如果自动注入一个不属于工厂的bean,该名称就是空的
21      * @param owner the owning BeanFactory bean所属的工厂
22      * @return a bean instance for this bean definition 返回该bean定义的实例
23      * @throws BeansException if the instantiation attempt failed
24      */
25     Object instantiate(RootBeanDefinition bd, @Nullable String beanName, BeanFactory owner)
26             throws BeansException;
27
28     /**
29      * Return an instance of the bean with the given name in this factory,
30      * creating it via the given constructor.
31      * 给工厂中的beanName对应的定义类返回一个实例,通过给定的构造器创建实例
32      * @param bd the bean definition
33      * @param beanName the name of the bean when it is created in this context.
34      * The name can be {@code null} if we are autowiring a bean which doesn't
35      * belong to the factory.
36      * @param owner the owning BeanFactory
37      * @param ctor the constructor to use
38      * @param args the constructor arguments to apply
39      * @return a bean instance for this bean definition
40      * @throws BeansException if the instantiation attempt failed
41      */
42     Object instantiate(RootBeanDefinition bd, @Nullable String beanName, BeanFactory owner,
43             Constructor<?> ctor, Object... args) throws BeansException;
44
45     /**
46      * Return an instance of the bean with the given name in this factory,
47      * creating it via the given factory method.
48      * 给工厂中的beanName对应的定义类返回一个实例,通过给定的工厂方法创建实例
49      * @param bd the bean definition
50      * @param beanName the name of the bean when it is created in this context.
51      * The name can be {@code null} if we are autowiring a bean which doesn't
52      * belong to the factory.
53      * @param owner the owning BeanFactory
54      * @param factoryBean the factory bean instance to call the factory method on,
55      * or {@code null} in case of a static factory method
56      * @param factoryMethod the factory method to use
57      * @param args the factory method arguments to apply
58      * @return a bean instance for this bean definition
59      * @throws BeansException if the instantiation attempt failed
60      */
61     Object instantiate(RootBeanDefinition bd, @Nullable String beanName, BeanFactory owner,
62             @Nullable Object factoryBean, Method factoryMethod, Object... args)
63             throws BeansException;
64
65 }
这个类中定义了三个方法,都是用来创建实例,只不过是三种不同的策略,它的具体实现类如下:
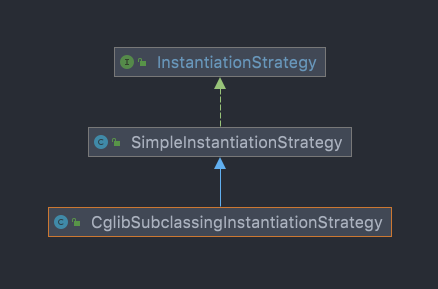
关系比较简单,只有两个实现类,且为继承关系,下面来看在具体策略类中是怎么实现的
2、具体策略类SimpleInstantiationStrategy和CglibSubclassingInstantiationStrategy
先看SimpleInstantiationStrategy中的第一个方法(就看这一个方法吧~~)
 1 @Override
 2     public Object instantiate(RootBeanDefinition bd, @Nullable String beanName, BeanFactory owner) {
 3         // Don't override the class with CGLIB if no overrides.
 4         if (!bd.hasMethodOverrides()) {
 5             //如果某个bean中没有重写方法,则执行该逻辑
 6             Constructor<?> constructorToUse;
 7             synchronized (bd.constructorArgumentLock) {
 8                 constructorToUse = (Constructor<?>) bd.resolvedConstructorOrFactoryMethod;
 9                 if (constructorToUse == null) {
10                     final Class<?> clazz = bd.getBeanClass();
11                     if (clazz.isInterface()) {
12                         throw new BeanInstantiationException(clazz, "Specified class is an interface");
13                     }
14                     try {
15                         if (System.getSecurityManager() != null) {
16                             constructorToUse = AccessController.doPrivileged(
17                                     (PrivilegedExceptionAction<Constructor<?>>) clazz::getDeclaredConstructor);
18                         }
19                         else {
20                             constructorToUse = clazz.getDeclaredConstructor();
21                         }
22                         bd.resolvedConstructorOrFactoryMethod = constructorToUse;
23                     }
24                     catch (Throwable ex) {
25                         throw new BeanInstantiationException(clazz, "No default constructor found", ex);
26                     }
27                 }
28             }
29             //通过构造方法的方式实例化Bean
30             return BeanUtils.instantiateClass(constructorToUse);
31         }
32         else {
33             // Must generate CGLIB subclass.
34             //如果没有重写方法,则必须生成CGLIB的子类,通过cglib代理的方式实例化Bean
35             return instantiateWithMethodInjection(bd, beanName, owner);
36         }
37     }
它会判断当前的Bean中是否有方法覆盖,没有覆盖就通过构造器的方式进行实例化,否则通过CGLIB生成子类的实例,再进行实例化,因为bean是存在继承关系的,在实例化一个子类之前,要先实例化其父类
其中的35行代码调用了下面的方法:
1 /**
2      * Subclasses can override this method, which is implemented to throw
3      * UnsupportedOperationException, if they can instantiate an object with
4      * the Method Injection specified in the given RootBeanDefinition.
5      * Instantiation should use a no-arg constructor.
6      */
7     protected Object instantiateWithMethodInjection(RootBeanDefinition bd, @Nullable String beanName, BeanFactory owner) {
8         throw new UnsupportedOperationException("Method Injection not supported in SimpleInstantiationStrategy");
9     }
该方法上的注释说明:子类可以覆盖这个方法过程中会抛出一个UnsupportedOperationException异常,如果它能用定义中给定的方法实例化一个对象,实例化必须使用无参构造方法。
下面来看在CglibSubclassingInstantiationStrategy中的实现,源代码如下:
 1 @Override
 2     protected Object instantiateWithMethodInjection(RootBeanDefinition bd, @Nullable String beanName, BeanFactory owner) {
 3         return instantiateWithMethodInjection(bd, beanName, owner, null);
 4     }
 5
 6     @Override
 7     protected Object instantiateWithMethodInjection(RootBeanDefinition bd, @Nullable String beanName, BeanFactory owner,
 8             @Nullable Constructor<?> ctor, Object... args) {
 9
10         // Must generate CGLIB subclass...
11         return new CglibSubclassCreator(bd, owner).instantiate(ctor, args);
12     }
第3行调用第7行的方法,通过cglib代理,用构造函数进行实例化bean.
Spring容器在创建实例的过程中就调用了策略模式中的实例化方法,如下图所示:

可以看到,这个地方又回到了refresh方法的流程当中来,这就是为什么我要把Spring中的策略模式作为阅读源码的前置知识点来介绍的原因,一切都是为了更好第地读懂和理解源代码。
说到这儿也差不多完了,其实这里的每一个设计模式都可以拎出来单独写一篇文章,因为我没有介绍具体设计模式的实现方式,所以就写在一篇文章中,这样其实可以更好地理解设计模式,因为如果通过手写举例,无非是一些阿猫阿狗的简单例子,并不会对设计模式有什么深刻的理解,结合Spring源码,就会发现平时觉得一看就懂的设计模式,在Spring中需要经过一番研究才能搞清楚它们是怎么实现的。本文内容优点多,下面来做一个简单的总结吧:
1、单例模式在获取bean时使用,底层通过CurrentHashMap存储beanName于bean实例的映射关系,是beanName级别的单例,而不是类级别的单例,这一点不同于真正意义上的单例模式
2、Spring中默认bean是单例模式,且是懒加载,即在容器启动过程中完成创建;
3、原型模式,即多例模式,实现原型模式需要开发者自己配置,且默认懒加载,即在获取时才会创建;
4、工厂模式是为了获取Bean,有工厂方法模式和抽象工厂模式;
5、建造者模式用于构造复杂的bean,在http响应中使用,比如一个http响应体要包含header、body、status、cookie等,每个部分都是一个bean,此时构建响应体就可以用建造者模式;
6、观察者模式,用来发布时间到监听器,方便在应用上下文变化时做出及时的处理,在关键方法refresh源码中有使用;
7、模板方法模式,在refresh方法中可以说是最佳实践;
8、策略模式,因为容器管理的Bean可能是千奇百怪的,所以它需要各种创建实例的策略,这个策略就是通过策略模式实现的。
9、代理模式,理解jdk和cglib两种动态代理,有助于理解AOP以及bean的实例化;
这是我看源码过程中发现的策略模式,也许还有我没有发现的,我会继续发现.........
对不同设计模式的定义描述引自编程网,里面有很不错的设计模式介绍:http://c.biancheng.net/view/1378.html,今天就这样吧~~~睡了