https://facebook.github.io/react-native/docs/native-components-android.html
这里有一大堆的原生组件可以用,一些是平台自带的,另一些是第三方库的,而更多的正在其他项目中被使用。RN包装了大部分核心平台组件,但不是所有。幸运的是可以很简单地完美集成现有的原生组件到RN中
ImageView案例
这个案例的目标是实现在JS中使用imageView。RN中对安卓原生组件的创建和管理都是通过继承ViewManager或SimpleViewManager。SimpleViewManager在这里用起来更加方便,因为它可以把应用公共的属性如背景色、透明度和弹性布局。
以上RN中创建出来的这些子类本质上都是单例的,每个子类的单个实例都是通过RN bridge创建的。这些子类把原生组件交给NativeViewHierarchyManager,NativeViewHierarchyManager再通知这些原生组件去设置和更新自己的属性。而ViewManager则让这些原生组件通过RN bridge把事件传递回给JS。
1.创建ViewManager子类。
public class ReactImageManager extends SimpleViewManager<ReactImageView> {

    public static final String REACT_CLASS = "RCTImageView";

    // JS通过这里返回的name值来获取当前子类
    @Override
    public String getName() {
        return REACT_CLASS;
    }

    // 视图都是在这个方法中创建的
    @Override
    protected ReactImageView createViewInstance(ThemedReactContext reactContext) {
        return new ReactImageView(context, Fresco.newDraweeControllerBuilder(), mCallerContext);
    }
}
3.通过ReactProps或ReactPropsGroup注解来暴露视图属性的setter
setter方法的第一个参数应该是要更新的视图,第二个参数是属性值。要求是public void。
ReactProps注解拥有一个必填的字符串name属性。这个name值用于在JS端引用视图的属性。除了name之外,还有其他可选的defaultBoolean、defaultInt和defaultFloat。这些属性的值会被传递到setter函数中(当setter引用的属性被移除时会选用这些值)
在RN中更新视图的属性会导致setter执行。一种更新组件的方式就是移除之前设置的属性,这样setter也会执行,而且采用defaultXX设置的默认值
  @ReactProp(name = "src")
  public void setSrc(ReactImageView view, @Nullable ReadableArray sources) {
    view.setSource(sources);
  }

  @ReactProp(name = "borderRadius", defaultFloat = 0f)
  public void setBorderRadius(ReactImageView view, float borderRadius) {
    view.setBorderRadius(borderRadius);
  }

  @ReactProp(name = ViewProps.RESIZE_MODE)
  public void setResizeMode(ReactImageView view, @Nullable String resizeMode) {
    view.setScaleType(ImageResizeMode.toScaleType(resizeMode));
  }
4.注册viewManager
在java中的最后一步就是把ViewManager注册到application中。
  @Override
  public List<ViewManager> createViewManagers(
                            ReactApplicationContext reactContext) {
    return Arrays.<ViewManager>asList(
      new ReactImageManager()
    );
  }
步骤:首先创建一个package(一个子类实现了ReactPackage,实现以上方法),接着在Application中重新getPackages方法,将刚刚的package实例添加到数组中返回即可。过程可以参照这里https://facebook.github.io/react-native/docs/native-modules-android.html
5.实现JS模块
最后创建一个模块,模块中为用户定义了组件的接口
// ImageView.js

import PropTypes from 'prop-types';
import {requireNativeComponent, ViewPropTypes} from 'react-native';

var iface = {
  name: 'ImageView',
  propTypes: {
    src: PropTypes.string,
    borderRadius: PropTypes.number,
    resizeMode: PropTypes.oneOf(['cover', 'contain', 'stretch']),
    ...ViewPropTypes, // include the default view properties
  },
};

module.exports = requireNativeComponent('RCTImageView', iface);
以上接口的name值用于debug,而propTypes用于让RN去反射,来检测原生组件是否有效。
事件
就以上例子不做其他任何处理,原生组件可以处理对应的触摸事件,如setOnClickListener等。现在需要把这个事件通知给JS,当事件发生的时候(下面那个是某事件的回调方法),开始往JS传递一个topChange事件
class MyCustomView extends View {
   ...
   public void onReceiveNativeEvent() {
      WritableMap event = Arguments.createMap();
      event.putString("message", "MyMessage");
      ReactContext reactContext = (ReactContext)getContext();
      reactContext.getJSModule(RCTEventEmitter.class).receiveEvent(
          getId(),
          "topChange",
          event);
    }
}
为了建立toChange消息与JS回调函数onChange的映射,需要在ViewManager中重写以下方法。这样一来,当以上消息发出之后,RN原生组件上的onChange属性回调函数就会被执行
public class ReactImageManager extends SimpleViewManager<MyCustomView> {
    ...
    public Map getExportedCustomBubblingEventTypeConstants() {
        return MapBuilder.builder()
            .put(
                "topChange",
                MapBuilder.of(
                    "phasedRegistrationNames",
                    MapBuilder.of("bubbled", "onChange")))
                    .build();
    }
}
在RN中定义一个组件进行包装,设置原生组件的onChange事件
// MyCustomView.js

class MyCustomView extends React.Component {
  constructor(props) {
    super(props);
    this._onChange = this._onChange.bind(this);
  }
  _onChange(event: Event) {
    if (!this.props.onChangeMessage) {
      return;
    }
    this.props.onChangeMessage(event.nativeEvent.message);
  }
  render() {
    return <RCTMyCustomView {...this.props} onChange={this._onChange} />;
  }
}
MyCustomView.propTypes = {
  /**
   * Callback that is called continuously when the user is dragging the map.
   */
  onChangeMessage: PropTypes.func,
  ...
};

var RCTMyCustomView = requireNativeComponent(`RCTMyCustomView`, MyCustomView, {
  nativeOnly: {onChange: true}
});
文档中对于nativeOnly的解释我不是很懂....
实践
自己测试了一个引用TextView的例子,项目地址:https://github.com/947133297/native-ui-component-android-example
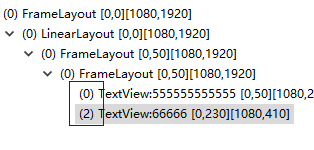
坑坑坑。。。在RN使用这个原生组件时,如果不设置尺寸,则这个组件不会被渲染出来,通过android studio monitor分析如下,少了一个节点: