MongoDB是一个通用的、基于文档的分布式数据库,它是为现代应用程序开发人员和云时代而构建的。没有数据库能让你更有效率。
1.下载需要的软件包
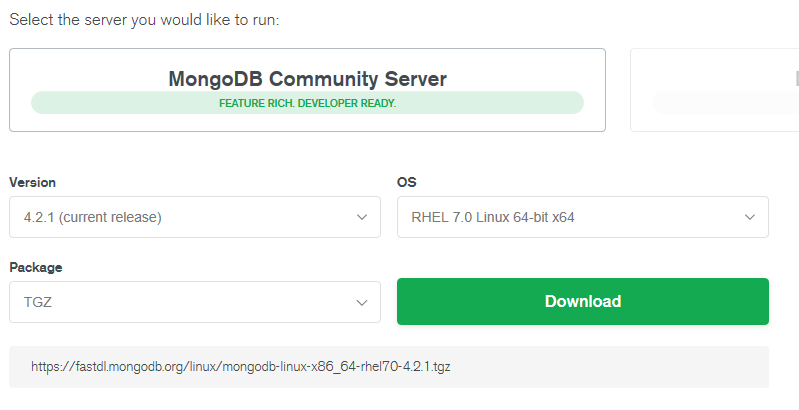
https://www.mongodb.com/download-center/community
这个是社区版本,按照自己的需求,选择自己需要的版本
进行解压 tar -xzvf mongodb-linux-x86_64-rhel70-4.2.1.tgz
重命名 mv mongodb-linux-x86_64-rhel70-4.2.1 mongodb
置系统环境变量 vim /etc/profile
export PATH=$PATH:/root/mongodb/bin
使生效 source /etc/profile
创建文件夹:
[root@master2 mongodb]# pwd
/root/mongodb/mongodb
[root@master2 mongodb]# mkdir db logs
创建MongoDB运行时使用的配置文件 vim mongodb.conf
dbpath = /root/mongodb/db #数据文件存放目录
logpath =/root/mongodb/logs/mongodb.log #日志文件存放目录
port = 27017 #端口
fork = true #以守护程序的方式启用,即在后台运行
#auth=true #需要认证。如果放开注释,就必须创建MongoDB的账号,使用账号与密码才可远程访问,第一次安装建议注释
bind_ip=0.0.0.0 #允许远程访问,或者直接注释,127.0.0.1是只允许本地访问
启动MongoDB
[root@master2 bin]# ./mongod -f mongodb.conf
about to fork child process, waiting until server is ready for connections.
forked process: 4858
child process started successfully, parent exiting
关闭MongoDB
[root@master2 bin]# mongod -f mongodb.conf --shutdown
2019-11-29T22:27:10.645+0800 I CONTROL [main] log file "/root/mongodb/logs/mongodb.log" exists; moved to "/root/mongodb/logs/mongodb.log.2019-11-29T14-27-10".
killing process with pid: 4858
创建MongoDB的账号
[root@master2 bin]# mongo
MongoDB shell version v4.2.1
connecting to: mongodb://127.0.0.1:27017/?compressors=disabled&gssapiServiceName=mongodb
Implicit session: session { "id" : UUID("3e1cfaee-6dc4-460b-b986-661b11f7cbc3") }
MongoDB server version: 4.2.1
Welcome to the MongoDB shell.
For interactive help, type "help".
For more comprehensive documentation, see
http://docs.mongodb.org/
Questions? Try the support group
http://groups.google.com/group/mongodb-user
Server has startup warnings:
2019-11-29T22:31:57.430+0800 I CONTROL [initandlisten]
2019-11-29T22:31:57.430+0800 I CONTROL [initandlisten] ** WARNING: Access control is not enabled for the database.
2019-11-29T22:31:57.430+0800 I CONTROL [initandlisten] ** Read and write access to data and configuration is unrestricted.
2019-11-29T22:31:57.430+0800 I CONTROL [initandlisten] ** WARNING: You are running this process as the root user, which is not recommended.
2019-11-29T22:31:57.430+0800 I CONTROL [initandlisten]
2019-11-29T22:31:57.430+0800 I CONTROL [initandlisten]
2019-11-29T22:31:57.430+0800 I CONTROL [initandlisten] ** WARNING: /sys/kernel/mm/transparent_hugepage/enabled is 'always'.
2019-11-29T22:31:57.430+0800 I CONTROL [initandlisten] ** We suggest setting it to 'never'
2019-11-29T22:31:57.430+0800 I CONTROL [initandlisten]
2019-11-29T22:31:57.430+0800 I CONTROL [initandlisten] ** WARNING: /sys/kernel/mm/transparent_hugepage/defrag is 'always'.
2019-11-29T22:31:57.430+0800 I CONTROL [initandlisten] ** We suggest setting it to 'never'
2019-11-29T22:31:57.430+0800 I CONTROL [initandlisten]
2019-11-29T22:31:57.430+0800 I CONTROL [initandlisten] ** WARNING: soft rlimits too low. rlimits set to 7812 processes, 204800 files. Number of processes should be at least 102400 : 0.5 times number of files.
2019-11-29T22:31:57.430+0800 I CONTROL [initandlisten]
---
Enable MongoDB's free cloud-based monitoring service, which will then receive and display
metrics about your deployment (disk utilization, CPU, operation statistics, etc).
The monitoring data will be available on a MongoDB website with a unique URL accessible to you
and anyone you share the URL with. MongoDB may use this information to make product
improvements and to suggest MongoDB products and deployment options to you.
To enable free monitoring, run the following command: db.enableFreeMonitoring()
To permanently disable this reminder, run the following command: db.disableFreeMonitoring()
---
> show dbs;
admin 0.000GB
config 0.000GB
local 0.000GB
> use admin
switched to db admin
> show users
> show collections
system.version
> db.createUser({ user: 'root', pwd: 'root',roles: [ { role: "dbOwner", db: "test" }] })
Successfully added user: {
"user" : "root",
"roles" : [
{
"role" : "dbOwner",
"db" : "test"
}
]
}
> db.auth("root","root")
1
> use test
switched to db test
> db.firstCollection.save({"name":"yzh","age":"25"})
WriteResult({ "nInserted" : 1 })
> db.firstCollection.find({name:"yzh"})
{ "_id" : ObjectId("5de12c9c771bf721cc7a0b07"), "name" : "yzh", "age" : "25" }
>
至此,MongoDB 创建完成!