首先我们来看看spring官方文档对这个注解的解释:
The
@Profileannotation allows you to indicate that a component is eligible for registration when one or more specified profiles are active
这个注解可以根据当前的环境,动态的激活和切换一系列组件的功能
结合之前的一些知识,做一个例子,在我们开发的时候,可能在开发的时候连接的是开发环境的数据库,在测试的时候连接测试环境,生产环境连接的是生产数据库,不同环境下使用的数据库是不同的,如何动态的切换数据源的注入呢?
配置类讲解
首先看一下配置类MainConfigProfile类
import javax.sql.DataSource;
import org.springframework.beans.factory.annotation.Value;
import org.springframework.context.EmbeddedValueResolverAware;
import org.springframework.context.annotation.Bean;
import org.springframework.context.annotation.Configuration;
import org.springframework.context.annotation.Profile;
import org.springframework.context.annotation.PropertySource;
import org.springframework.util.StringValueResolver;
import com.atguigu.bean.Yellow;
import com.mchange.v2.c3p0.ComboPooledDataSource;

/**
 * Profile:
 * 		Spring为我们提供的可以根据当前环境,动态的激活和切换一系列组件的功能;
 *
 * 开发环境、测试环境、生产环境;
 * 数据源:(/A)(/B)(/C);
 *
 *
 * @Profile:指定组件在哪个环境的情况下才能被注册到容器中,不指定,任何环境下都能注册这个组件
 *
 * 1)、加了环境标识的bean,只有这个环境被激活的时候才能注册到容器中。默认是default环境
 * 2)、写在配置类上,只有是指定的环境的时候,整个配置类里面的所有配置才能开始生效
 * 3)、没有标注环境标识的bean在,任何环境下都是加载的;
 */

@PropertySource("classpath:/dbconfig.properties")
@Configuration
public class MainConfigOfProfile implements EmbeddedValueResolverAware{

	@Value("${db.user}")
	private String user;

	private StringValueResolver valueResolver;

	private String  driverClass;


	@Bean
	public Yellow yellow(){
		return new Yellow();
	}

	@Profile("test")
	@Bean("testDataSource")
	public DataSource dataSourceTest(@Value("${db.password}")String pwd) throws Exception{
		ComboPooledDataSource dataSource = new ComboPooledDataSource();
		dataSource.setUser(user);
		dataSource.setPassword(pwd);
		dataSource.setJdbcUrl("jdbc:mysql://localhost:3306/test"); // 测试库
		dataSource.setDriverClass(driverClass);
		return dataSource;
	}


	@Profile("dev")
	@Bean("devDataSource")
	public DataSource dataSourceDev(@Value("${db.password}")String pwd) throws Exception{
		ComboPooledDataSource dataSource = new ComboPooledDataSource();
		dataSource.setUser(user);
		dataSource.setPassword(pwd);
		dataSource.setJdbcUrl("jdbc:mysql://localhost:3306/ssm_crud"); // 开发库
		dataSource.setDriverClass(driverClass);
		return dataSource;
	}

	@Profile("prod")
	@Bean("prodDataSource")
	public DataSource dataSourceProd(@Value("${db.password}")String pwd) throws Exception{
		ComboPooledDataSource dataSource = new ComboPooledDataSource();
		dataSource.setUser(user);
		dataSource.setPassword(pwd);
		dataSource.setJdbcUrl("jdbc:mysql://localhost:3306/scw_0515");  // 生产库

		dataSource.setDriverClass(driverClass);
		return dataSource;
	}

	@Override
	public void setEmbeddedValueResolver(StringValueResolver resolver) {
		// TODO Auto-generated method stub
		this.valueResolver = resolver;
		driverClass = valueResolver.resolveStringValue("${db.driverClass}");
	}

}
在配置类中我们注入了三个Bean,分别对应测试环境、开发环境、生产环境。
我们知道数据源的注入需要四大金刚:user、password、driver、url。
注意:这里,三种环境连接的都不是相同的数据库,我们这里只以url作为区分。每个环境下的url是不同的。
其他三个参数,我们都配置在类路径下的db.properties中,如下
db.user=root
db.password=123456
db.driverClass=com.mysql.jdbc.Driver
这里结合之前我学习的知识点,使用不同的方式注入db.properties中的值
使用是加载资源文件,这个用法可参阅:Spring中使用@Value和@PropertySource为属性赋值
@PropertySource("classpath:/dbconfig.properties")
那如何为
dataSource.setUser(user);
dataSource.setPassword(pwd);
这两句中的方法赋值呢?
第一个我们构造了一个
private String user;属性,然后在属性上通过@Value("${db.user}")然后再
dataSource.setUser(user);就拿到值了。
其次呢,
public DataSource dataSourceDev(@Value("${db.password}")String pwd) throws Exception{...}我们在方法上添加了一个参数,在参数前加上了@Value("${db.password}")便可以从资源文件db.properties中拿到值,赋给这个参数
小结:以上是@Value的用法,可参考上面的链接
进行到这里,我们换一种方式,来取得资源文件中的driverClass,
我们可以通过实现EmbeddedValueResolverAware接口,spring中有很多aware接口,是提供给我们使用spring底层功能的途径。
这里的EmbeddedValueResolverAware就是值解析器 ,实现该接口,即实现其抽象方法
	@Override
	public void setEmbeddedValueResolver(StringValueResolver resolver) {
		// TODO Auto-generated method stub
		this.valueResolver = resolver;
		driverClass = valueResolver.resolveStringValue("${db.driverClass}");
	}
在容器启动的时候 ,这个方法会被调用,
我们定义 了一个属性,用以接收方法中参数的值,也即StringValueResolver resolver
private StringValueResolver valueResolver;
然后解析
driverClass = valueResolver.resolveStringValue("${db.driverClass}");
并赋值给我们自定义的属性driverClass。这样这个属性就拿到了资源文件中的值
以上和@Profile没有太大的关系,但可以很好的复习
另外我们还在配置类中,定义 了一个叫做yellow的bean。
测试,并激活对应的环境
首先我们全部不加入@Profile注解
测试一下,观察控制台输出,该方法我们就称为测试方法1
package com.atguigu.test;

import javax.sql.DataSource;

import org.junit.Test;
import org.springframework.context.annotation.AnnotationConfigApplicationContext;

import com.atguigu.bean.Yellow;
import com.atguigu.config.MainConfigOfProfile;

public class IOCTest_Profile {

	@Test
	public void test01(){
		AnnotationConfigApplicationContext applicationContext = new AnnotationConfigApplicationContext(MainConfigOfProfile.class);
		String[] definitionNames = applicationContext.getBeanDefinitionNames();
		for (String name : definitionNames) {
			System.out.println(name);
		}
	}
}
mainConfigOfProfile
yellow
testDataSource
devDataSource
prodDataSource
可以看到包含配置类本身所有的bean都被注入到了ioc容器中。
现在打开所有的@Profile注释
比如现在我们是在dev即开发环境下,如何只激活@Bean("devDataSource")这个组件呢?
我们写个测试类
package com.atguigu.test;

import javax.sql.DataSource;

import org.junit.Test;
import org.springframework.context.annotation.AnnotationConfigApplicationContext;

import com.atguigu.bean.Yellow;
import com.atguigu.config.MainConfigOfProfile;

public class IOCTest_Profile {

	//1、使用命令行动态参数: 在虚拟机参数位置加载 -Dspring.profiles.active=test
	@SuppressWarnings("resource")
	//2、代码的方式激活某种环境;
	@Test
	public void test01(){
		AnnotationConfigApplicationContext applicationContext =
				new AnnotationConfigApplicationContext();
		//1、创建一个applicationContext
		//2、设置需要激活的环境
		applicationContext.getEnvironment().setActiveProfiles("dev");   // 这里可以写多个值,
		//3、注册主配置类
		applicationContext.register(MainConfigOfProfile.class);
		//4、启动刷新容器
		applicationContext.refresh();


		String[] namesForType = applicationContext.getBeanNamesForType(DataSource.class);
		for (String string : namesForType) {
			System.out.println(string);
		}

		Yellow bean = applicationContext.getBean(Yellow.class);
		System.out.println(bean);
		applicationContext.close();

//		AnnotationConfigApplicationContext applicationContext = new AnnotationConfigApplicationContext(MainConfigOfProfile.class);
//		String[] definitionNames = applicationContext.getBeanDefinitionNames();
//		for (String name : definitionNames) {
//			System.out.println(name);
//		}

	}

}
控制台打印:
devDataSource
com.atguigu.bean.Yellow@27ce24aa // 没有被@Profile修饰。
观察可以发现,确实只有开发环境的bean被注入了ioc容器中,
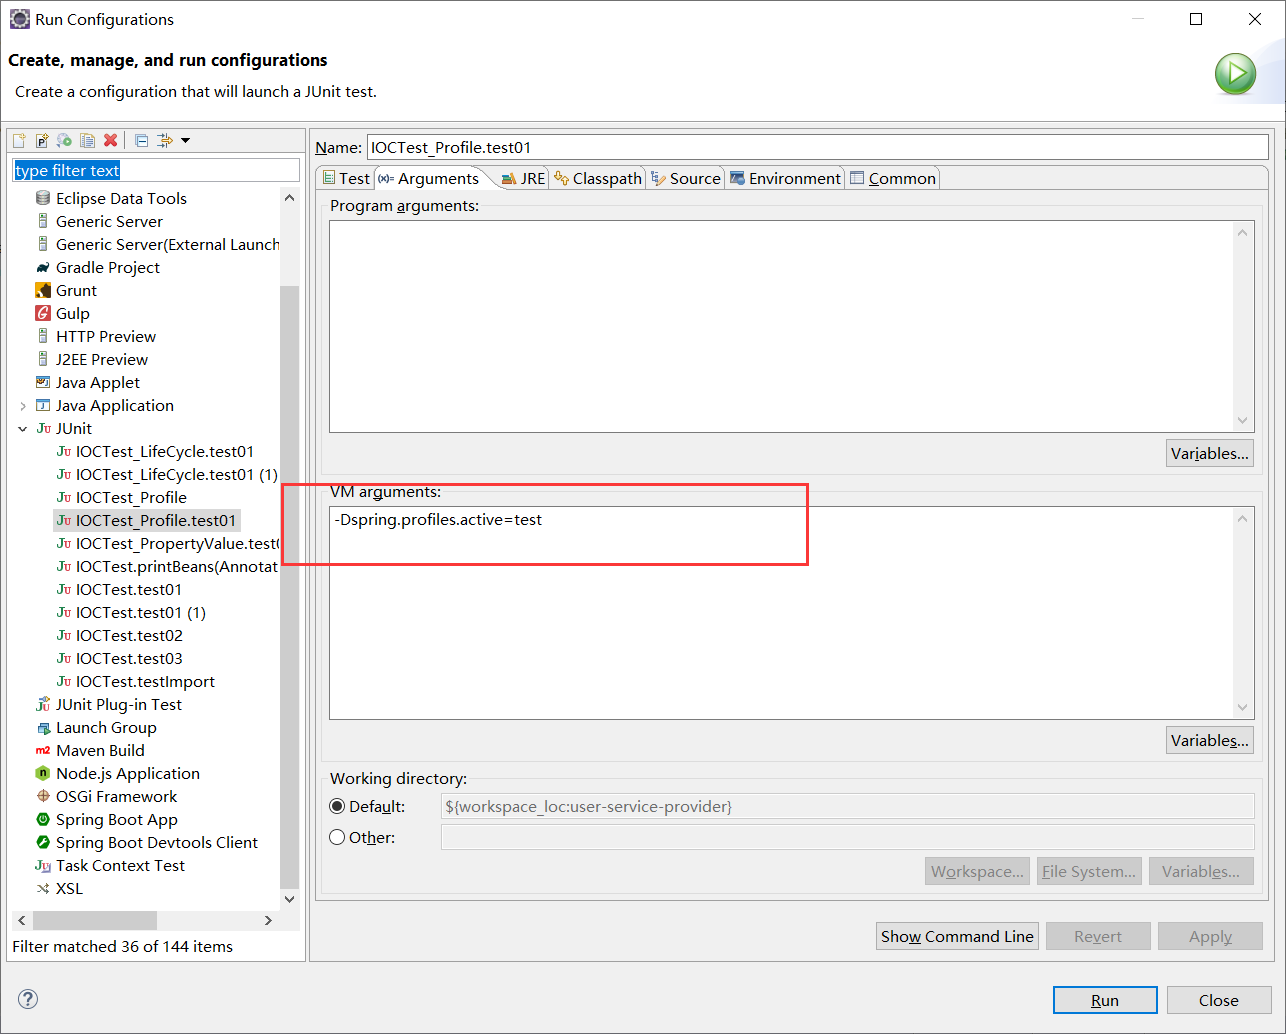
这里还有另外一种激活@Profile注解 的方式。
测试方法1:
	@Test
	public void test01(){
		AnnotationConfigApplicationContext applicationContext = new AnnotationConfigApplicationContext(MainConfigOfProfile.class);
		String[] definitionNames = applicationContext.getBeanDefinitionNames();
		for (String name : definitionNames) {
			System.out.println(name);
		}
	}
然后运行该方法,不过需要在运行时候加上虚拟机参数。=后面是我们需要激活的环境,多个值用逗号分隔开。
-Dspring.profiles.active=test
打印一下输出:
mainConfigOfProfile
yellow
testDataSource //测试环境被注入
@Profile注解 使用在类上,
保持配置类不变,我们在该配置类上加上@Profile("prod")
我们在来运行测试方法1(前面有提),控制台并没有输出,这表示配置类中的bean都没有被注入进容器中,
可以这样思考:@Profile注解标注在类上,如果你没有指定激活该环境,自然该配置类整个都不会被加载,配置类中的Bean(即使如Yellow,没有被@Profile注解),也不会被注入进容器中,
那我们以同样的方式,来正确的激活该环境后呢?(如何激活环境,参考前文)
控制台打印输出
mainConfigOfProfile
yellow
prodDataSource
这显然与我们预料的是一致的。
Tips
如果环境都没有被激活,那@Profile("default")会被激活,也就是说,默认就是default环境。