1. HorizontalScrollView
本来,画廊式的图片浏览器,使用Android中的Gallery就能轻松完成,但是Google说Gallery每次切换图片时都要新建视图,造成太多的资源浪费,已经在安卓api 19之后被彻底废弃,Google推荐使用ViewPager 或者 HorizontalScrollView来实现Gallery的效果。网上对此的资料太杂,有部分资料写得太高深,完全看不懂。我搞了一个下午,才使用HorizontalScrollView完成画廊式的图片浏览器,如下图:
2. HorizontalScrollView案例:
(1)首先我们来到主布局文件activity_main.xml,如下:
 1 <LinearLayout xmlns:android="http://schemas.android.com/apk/res/android"
 2     android:layout_width="match_parent"
 3     android:layout_height="match_parent"
 4     android:layout_gravity="center_horizontal"
 5     android:orientation="vertical" >
 6
 7     <ImageView
 8         android:id="@+id/imageView1"
 9         android:layout_width="match_parent"
10         android:layout_height="200dp"
11         android:paddingTop="10dp" />
12
13     <HorizontalScrollView
14         android:layout_width="match_parent"
15         android:layout_height="wrap_content"
16         android:layout_gravity="center_vertical"
17         android:scrollbars="horizontal" >
18
19         <LinearLayout
20             android:id="@+id/linearLayout1"
21             android:layout_width="wrap_content"
22             android:layout_height="wrap_content"
23             android:layout_gravity="center_vertical"
24             android:orientation="horizontal" >
25         </LinearLayout>
26     </HorizontalScrollView>
27
28     <TextView
29         android:gravity="center_horizontal"
30         android:layout_width="match_parent"
31         android:layout_height="wrap_content"
32         android:id="@+id/tv"
33         android:text="简介描述"
34         />
35
36 </LinearLayout>
(2)接下来直接来到主Activity,也就是MainActivity,如下:
  1 package com.himi.horizontalscrollviewdemo;
  2
  3 import android.app.Activity;
  4 import android.os.Bundle;
  5 import android.view.Gravity;
  6 import android.view.View;
  7 import android.view.View.OnClickListener;
  8 import android.view.ViewGroup;
  9 import android.widget.ImageView;
 10 import android.widget.LinearLayout;
 11 import android.widget.LinearLayout.LayoutParams;
 12 import android.widget.TextView;
 13
 14 public class MainActivity extends Activity {
 15
 16     private LinearLayout linearLayout1;
 17     private ImageView imageView1;
 18     private TextView tv;
 19
 20     // 把要显示的图片放到一个图片id数组里面便于操作
 21     private int[] imageId = new int[] { R.drawable.img1, R.drawable.img2,
 22             R.drawable.img3, R.drawable.img4,
 23             R.drawable.img5, R.drawable.img6
 24         };
 25
 26     @Override
 27     protected void onCreate(Bundle savedInstanceState) {
 28         super.onCreate(savedInstanceState);
 29         setContentView(R.layout.activity_main);
 30         // 获取组件
 31         linearLayout1 = (LinearLayout) findViewById(R.id.linearLayout1);
 32         imageView1 = (ImageView) findViewById(R.id.imageView1);
 33         tv = (TextView)findViewById(R.id.tv);
 34
 35         for (int i = 0; i < imageId.length; i++) {
 36             // 新建一个线性布局
 37             LinearLayout linearLayout = new LinearLayout(this);
 38             // 设置新生成线性布局的参数,宽度为100,高度为匹配父组件,也就是水平滚动视图的高度
 39             LayoutParams layoutParams = new LayoutParams(100,
 40                     ViewGroup.LayoutParams.MATCH_PARENT);
 41                 // 设置线性布局内的组件水平居中
 42             layoutParams.gravity = Gravity.CENTER_HORIZONTAL;
 43                 // 设置新生成的线性布局android:orientation="vertical"
 44             linearLayout.setOrientation(LinearLayout.VERTICAL);
 45                 // 应用到新生成的线性布局
 46             linearLayout.setLayoutParams(layoutParams);
 47
 48             // 新建一个图片视图
 49             ImageView imageView = new ImageView(this);
 50                 // 这里由于id不能为字符的缘故,所有对图片的id分别设为20000,20001,20002,...便于下面的图片点击监听器所控制
 51             imageView.setId(i + 20000);
 52                 // 将数组中的第i张图片放到图片视图
 53             imageView.setImageResource(imageId[i]);
 54                 // 自动缩放为宽高比
 55             imageView.setAdjustViewBounds(true);
 56                 // 图片的高度为80dp
 57             imageView.setMaxHeight(100);
 58             imageView.setPadding(10, 10, 10, 10);
 59             imageView.setOnClickListener(new OnClickListener() {
 60                 @Override
 61                 public void onClick(View view) {
 62                     // 把点击的图片id取出之后,减20000就是要显示的图片在图片数组的位置了。
 63                     imageView1.setImageResource(imageId[view.getId() - 20000]);
 64                     switch (view.getId() - 20000) {
 65                     case 0:
 66                             tv.setText("安徽建筑大学南校区大门");
 67                             break;
 68                     case 1:
 69                             tv.setText("安徽建筑大学南校区教学楼,楼下草坪");
 70                             break;
 71                     case 2:
 72                             tv.setText("安徽建筑大学南校区,傍晚的图书馆");
 73                             break;
 74                     case 3:
 75                             tv.setText("安徽建筑大学南校区,易海傍晚的晚霞");
 76                             break;
 77                     case 4:
 78                             tv.setText("健身房的美女,大长腿");
 79                             break;
 80                     case 5:
 81                             tv.setText("健身房的美女,大长腿");
 82                             break;
 83                     default:
 84                             break;
 85                     }
 86                 }
 87             });
 88
 89             // 将图片视图加载到新生成的线性布局之中
 90             linearLayout.addView(imageView);
 91
 92             // 新生成一个标签文本
 93             TextView textView = new TextView(this);
 94             //textView.setText("图片" + i);
 95             switch (i) {
 96             case 0:
 97                     textView.setText("校门");
 98                     break;
 99             case 1:
100                     textView.setText("教学楼");
101                     break;
102             case 2:
103                     textView.setText("图书馆");
104                     break;
105             case 3:
106                     textView.setText("晚霞");
107                     break;
108             case 4:
109                     textView.setText("健身房美女");
110                     break;
111             case 5:
112                     textView.setText("健身房美女");
113                     break;
114             default:
115                     break;
116             }
117
118
119             textView.setTextSize(10);
120                 // 标签文本在水平位置居中
121             textView.setGravity(Gravity.CENTER);
122                 // 添加到新生成的线性布局之后
123             linearLayout.addView(textView);
124
125             //添加到LinearLayout1
126             linearLayout1.addView(linearLayout);
127         }
128
129     }
130
131
132 }
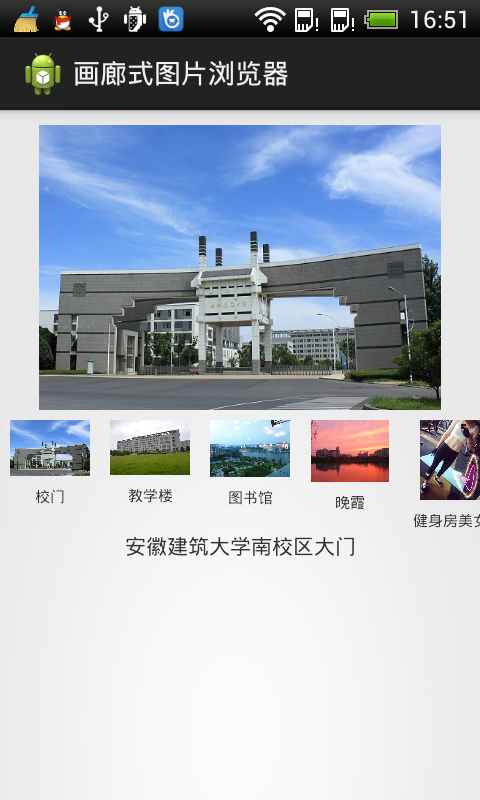
(3)运行到手机上(HTC),效果如下:
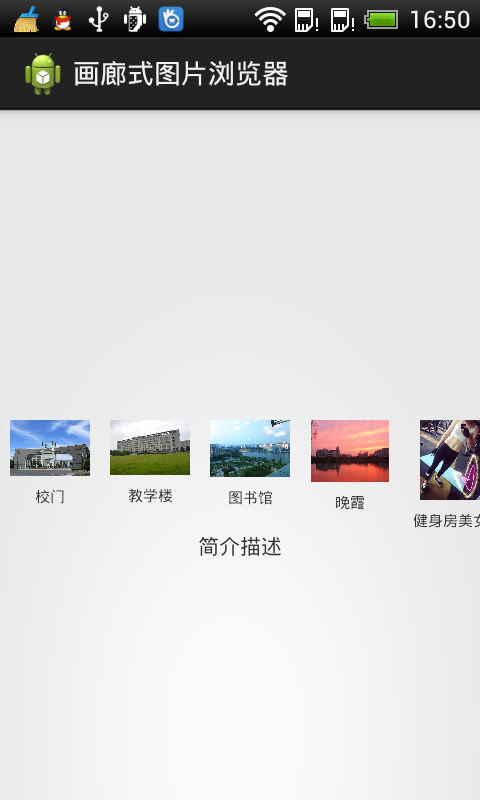
- 程序刚刚启动的效果如下: