Springboot接口简单实现调用接口生成MySQL插入语句
在实际测试中,有这样一个需求场景,比如:在性能压力测试中,可能需要我们事先插入数据库中一些相关联的数据。
我们在实际测试中,遇到问题,需要事先在数据库中创建10000家门店,存在shop表中。关键字段(门店的编号6位数)。
分析:两种具体实现方案。
一、利用MySQL函数功能随机生成<SELECT FLOOR(+ RAND() * 1000000)>,最后编写insert语句。但是效率低下。
二、使用springboot编写接口实现,并自动生成insert脚本保存本地。
本次实现以springboot接口实现此次目的:
-
开发环境
-
开发工具IDEA
-
JDK 1.8
-
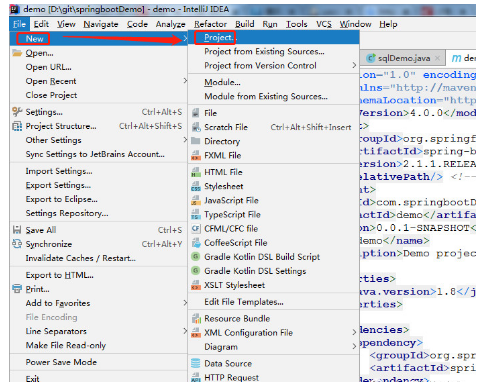
新建springboot项目
1、新建project
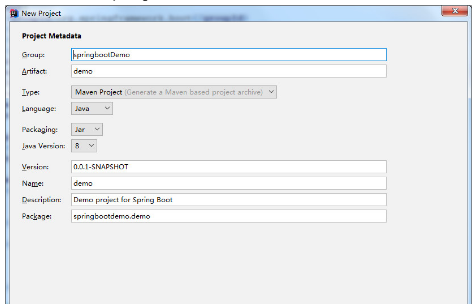
2、填写springbootDemo
直到填写finish完成。
3、pom.xml文件配置
<?xml version="1.0" encoding="UTF-8"?>
<project xmlns="http://maven.apache.org/POM/4.0.0" xmlns:xsi="http://www.w3.org/2001/XMLSchema-instance"
   xsi:schemaLocation="http://maven.apache.org/POM/4.0.0 http://maven.apache.org/xsd/maven-4.0.0.xsd">
   <modelVersion>4.0.0</modelVersion>
   <parent>
      <groupId>org.springframework.boot</groupId>
      <artifactId>spring-boot-starter-parent</artifactId>
      <version>2.1.1.RELEASE</version>
      <relativePath/> <!-- lookup parent from repository -->
   </parent>
   <groupId>com.springbootDemo</groupId>
   <artifactId>demo</artifactId>
   <version>0.0.1-SNAPSHOT</version>
   <name>demo</name>
   <description>Demo project for Spring Boot</description>

   <properties>
      <java.version>1.8</java.version>
   </properties>

   <dependencies>
      <dependency>
         <groupId>org.springframework.boot</groupId>
         <artifactId>spring-boot-starter-web</artifactId>
      </dependency>

      <dependency>
         <groupId>org.springframework.boot</groupId>
         <artifactId>spring-boot-starter-test</artifactId>
         <scope>test</scope>
      </dependency>

      <dependency>
         <groupId>org.projectlombok</groupId>
         <artifactId>lombok</artifactId>
         <version>1.16.14</version>
      </dependency>

   </dependencies>

   <build>
      <plugins>
         <plugin>
            <groupId>org.springframework.boot</groupId>
            <artifactId>spring-boot-maven-plugin</artifactId>
         </plugin>
      </plugins>
   </build>

</project>
4、打开工程,看到main里面有默认启动类。
@RestController
@SpringBootApplication
public class DemoApplication {
   public static void main(String[] args) {
      SpringApplication.run
(DemoApplication.class, args);
   }

}
-
编写接口实现类
* 分析:
* inpuid:    uuid
* sotreId=commonCode 以8开头后面五位随机
* createDatetime:当前时间
* create_by: admin
* is_recharge_consumption:1
* updateDatetime:当前时间
* update_by:admin
* sync_date:null
* channel_key:123456
* chainName: XX
* state:0
* shopCode 以8开头后面五位随机
    @RequestMapping("/generateSql")
    public static String insert(@RequestParam(required = false) int size) throws IOException {
        // 开时时间
        Long begin = new Date().getTime();
        log.info("begin:{}",begin);
        for (int i = 0; i <size ; i++) {
            StringBuffer addSql = new StringBuffer();
            SimpleDateFormat sdf = new SimpleDateFormat("yyyy-MM-dd HH:mm:ss");
            addSql.append("INSERT INTO"
                    + " t_shop"
                    + "(`inputId`, `storeId`, `storeType`, `initialsName`, `storeName`, `ipAddress`, `portEP`, `ipAddressEP`, `fixedTelephone`, `mobile`, `contactPerson`, `email`, `address`, `registrationNo`, `createDatetime`, `create_by`, `is_recharge_consumption`, `updateDatetime`, `update_by`, `sync_date`, `channel_key`, `chainName`, `state`, `commonCode`, `areaCode`, `registNumberEP`, `softName`, `busiNature`, `brand`, `floor`, `usageArea`, `computerNum`, `profit_rate`)");

            addSql.append("values" + "(");
            addSql.append("'"+UUID.randomUUID().toString().replace("-", "") + "',");
            //生成commoncode  storeid
            String newStoreId;
            double a = (Math.random()+1)*1000;
            int sotreId = Integer.parseInt(String.valueOf(a).substring(0,4));
            newStoreId = "'8" + String.valueOf(sotreId) + "'";
            addSql.append(newStoreId + ",");
//        String empty = "".join("'", Collections.nCopies(12,"',"));
            String empty = "'',";
            addSql.append(empty);
            addSql.append(empty);
            addSql.append(newStoreId + ",");
            addSql.append(empty);
            addSql.append(empty);
            addSql.append(empty);
            addSql.append(empty);
            addSql.append(empty);
            addSql.append(empty);
            addSql.append(empty);
            addSql.append(empty);
            addSql.append(empty);
            Date date = new Date();
            SimpleDateFormat sdf1 = new
            SimpleDateFormat("yyyy-MM-dd HH:mm:ss");
            String createTime = sdf1.format(date);
            addSql.append("'"+createTime + "',");
            addSql.append("'admin',");
            addSql.append("'1',");
            addSql.append("'"+createTime + "',");
            addSql.append("'admin',");
            addSql.append(NULL + ",");
            addSql.append("'123456',");
            addSql.append("'XX',");
            addSql.append("'0',");
            addSql.append(newStoreId + ",");
            addSql.append(empty);
            addSql.append("'201805093512',");
            addSql.append(empty);
            addSql.append(empty);
            addSql.append(empty);
            addSql.append(empty);
            addSql.append(NULL + ",");
            addSql.append(NULL + ",");
            addSql.append(NULL);
            addSql.append(");");
            String path = "D:\sqlYpay.txt";
            BufferedWriter out = new BufferedWriter(new OutputStreamWriter(new FileOutputStream(path,true)));
            out.write(addSql+"
");
            System.out.println(addSql);
            out.close();

        }
//        System.out.println(addSql);
        // 结束时间
        Long end = new Date().getTime();
        log.info("end:{}",end);
        log.info("耗时:{}",end-begin);
        // 耗时
        System.out.println("cast : " + (end - begin) / 1000 + " s");
        return "生成SQL执行语句成功,一共生成了:>>>>>>" + size;
    }
-
启动主程序,调用接口
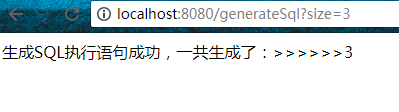
SQL语句生成执行成功,查看文件夹生成文件。执行即可。