1,安装
step1
linux下环境安装,直接从地址下载 https://bitnami.com/stack/testlink/installer 打包集成好的软件,安装极其简单
下载好的文件bitnami-testlink-1.9.20-6-linux-x64-installer.run
step2
chmod +x bitnami-testlink-1.9.20-6-linux-x64-installer.run
step3
执行./bitnami-testlink-1.9.20-6-linux-x64-installer.run
提示错误信息
MySQL requires a library that was not found in your system: libtinfo.so.5. You can find more information on how to install it below:
https://docs.bitnami.com/installer/faq/linux-faq/troubleshooting/troubleshooting-components/#missing-library-libtinfo-so-5
Do you want to continue with the installation? [y/N]:
缺少文件libtinfo.so.5
执行locate libtinfo.so.*
找到了一个libtinfo.so.6的目录/lib/x86_64-linux-gnu
root@test-team-server:/lib/x86_64-linux-gnu# ll libtinfo.so.6*
lrwxrwxrwx 1 root root 15 3月 29 2019 libtinfo.so.6 -> libtinfo.so.6.1
-rw-r--r-- 1 root root 174864 5月 23 2018 libtinfo.so.6.1
然后复制了一个
root@test-team-server:/lib/x86_64-linux-gnu# ln -s libtinfo.so.6.1 libtinfo.so.5
然后再重新安装就没有报错了,接着根据提示一直选择Y
(如果本机没有安装过的话,可以从别的机器拷贝一个或者访问上面的地址有方法说明https://docs.bitnami.com/installer/faq/linux-faq/troubleshooting/troubleshooting-components/#missing-library-libtinfo-so-5)
默认安装在/opt下,如果输入文件夹,则安装在当前运行目录下
也可以跳过邮箱设置
设置账户密码的时候,如果是root安装,则需要root权限账户密码,否则在访问testlink的时候提示没有权限访问
Language Selection
Please select the installation language
[1] English - English
[2] Spanish - Espa?ol
[3] Simplified Chinese - 简体中文
Please choose an option [1] : 3
----------------------------------------------------------------------------
欢迎使用 Bitnami TestLink Stack 安装向导。
----------------------------------------------------------------------------
选择您想要安装的组件,清除您不想安装的组件。当您准备继续时,点击“前进”。
TestLink : Y (Cannot be edited)
PhpMyAdmin [Y/n] :Y
上述选择是否正确? [Y/n]: Y
----------------------------------------------------------------------------
安装文件夹
请选择安装Bitnami TestLink Stack的文件夹
选择一个文件夹 [/opt/testlink-1.9.20-6]:
----------------------------------------------------------------------------
创建管理员帐户
Bitnami TestLink Stack admin 用户创建
您的真实姓名 [User Name]: eric
Email地址 [user@example.com]:
登录 [user]: root
密码 :
请确认密码 :
----------------------------------------------------------------------------
Web服务器端口
Choose a port that is not currently in use, such as port 81.
Apache Web 服务端口 [81]:
----------------------------------------------------------------------------
Web服务器端口
Choose a port that is not currently in use, such as port 444.
SSL 端口 [444]: 444
----------------------------------------------------------------------------
MySQL信息
请输入MySQL数据库信息
Choose a port that is not currently in use, such as port 3307.
MySQL服务端口 [3307]: 3308
Do you want to configure mail support? [y/N]: N
----------------------------------------------------------------------------
安装程序已经准备好将 Bitnami TestLink Stack 安装到您的电脑。
您确定要继续吗? [Y/n]: Y
----------------------------------------------------------------------------
正在安装 Bitnami TestLink Stack 至您的电脑中,请稍候。
正在安装
0% ______________ 50% ______________ 100%
#########################################
----------------------------------------------------------------------------
安装程序已经将 Bitnami TestLink Stack 安装于您的电脑中。
调用 Bitnami TestLink Stack [Y/n]: n
安装完成,如果是远程连接服务器的,可以在安装目录下通过命令行启动和查看状态
root@test-team-server:/home/eric/testlink/install# ./ctlscript.sh status
apache already running
mysql already running
其他命令
$ sudo installdir/ctlscript.sh start
$ sudo installdir/ctlscript.sh restart mysql
$ sudo installdir/ctlscript.sh restart postgresql
$ sudo installdir/ctlscript.sh restart apache
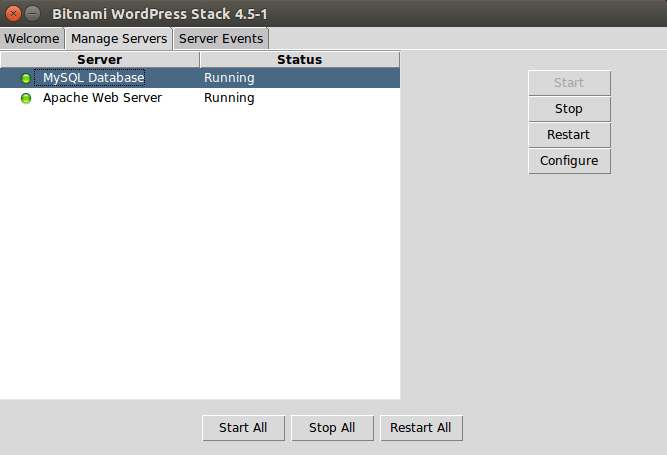
如果有带GUI的linux,可以直接在安装目录下双击manager-linux-x64.run
2,访问
访问服务器ip, http://192.168.1.119进入主页,访问不了的话可能是服务器防火墙打开了,给关掉就行
问题1:(折腾我好久,百度了也找不到答案,官方也没有找到答案)
点击页面上的access testlink,居然提示找不到URL,安装过程没有任何错误啊,然后就反复卸载再重装,一直这样折腾2-3次,彻底想放弃了
后来发现我配置了SSL端口号,我用https访问试试,https://192.168.1.119:444,居然可以了。
原来提供了http和https同时访问,只不过访问testlink只能通过ssl方式。
补充说明下:登录testlink和phpmyadmin的管理账号就是安装时候设置的用户名和密码
问题2:当通过主页点击访问phpmyadmin的时候,提示
也就是限制了不能通过远程访问,必须是本机服务器访问
然后去找了找有没有配置选项,发现安装目录下/opt/testlink-1.9.20-6/apps/phpmyadmin/conf, 再百度找了下别人的配置解决方案
https://community.bitnami.com/t/accessing-phpmyadmin-remotely-i-get-this-security-error-for-security-reasons-this-url-is-only-accesible-using-localhost-127-0-0-1-as-the-hostname/6718
把下面标记红色的修改一下
<IfVersion < 2.3 >
Order allow,deny
Allow from 127.0.0.1
Satisfy all
</IfVersion>
<IfVersion >= 2.3>
Require local
</IfVersion>
ErrorDocument 403 "For security reasons, this URL is only accessible using localhost (127.0.0.1) as the hostname."
Order allow,deny
Allow from all
Satisfy all
</IfVersion>
<IfVersion >= 2.3>
Require all granted
</IfVersion>
ErrorDocument 403 "For security reasons, this URL is only accessible using localhost (127.0.0.1) as the hostname."
然后重启一下apache就可以访问了
root@test-team-server:/opt/testlink-1.9.20-6# ./ctlscript.sh restart apache
Syntax OK
/opt/testlink-1.9.20-6/apache2/scripts/ctl.sh : httpd stopped
Syntax OK
/opt/testlink-1.9.20-6/apache2/scripts/ctl.sh : httpd started at port 81