为什么要安装elasticsearch-head?
ElasticSearch-head是一个H5编写的ElasticSearch集群操作和初级管理工具,可以对集群进行傻瓜式操作。
下载
elasticsearch-head 在这里下载: https://github.com/mobz/elasticsearch-head
法1:从官网手动下到本地,文件下载到这个目录:/home/liusiyi/下载/elasticsearch-head-master.zip
法2:命令下载:wget https://github.com/mobz/elasticsearch-head/archive/master.zip
解压
unzip master.zip 或 unzip elasticsearch-head-master.zip
因为github强烈反对把elasticsearch-head当作插件来运行,(原话:Running as a plugin of Elasticsearch(deprecated), for Elasticsearch 5.x, 6.x, and 7.x: site plugins are not supported. Run as a standalone server)。我目前机器上是elasticsearch-6.3.2,所以我不会把它当作ES的插件来安装或运行;还句话说,即不放在elasticsearch目录或它的plugins/modules目录下,也不使用elasticsearch-plugin install。
重命名
解压后的目录名,放在用户es的home目录下
mv elasticsearch-head-master /home/es
安装nodeJS
为后面的安装作准备,参考https://www.cnblogs.com/happyliusiyi/p/11684019.html
安装grunt
grunt是基于Node.js的项目构建工具,可以进行打包压缩、测试、执行等等工作,elasticsearch-head插件就是通过grunt启动的。
[root@bogon elasticsearch-head-master]# npm install grunt --save-dev
npm WARN deprecated coffee-script@1.10.0: CoffeeScript on NPM has moved to "coffeescript" (no hyphen)
npm notice created a lockfile as package-lock.json. You should commit this file.
npm WARN elasticsearch-head@0.0.0 license should be a valid SPDX license expression

+ grunt@1.0.1
added 94 packages from 65 contributors and audited 162 packages in 13.303s
found 9 vulnerabilities (2 low, 2 moderate, 5 high)
  run `npm audit fix` to fix them, or `npm audit` for details
这里用-save-dev的原因是grunt是用于开发和测试中需要用到,项目开发完成后,执行时不依赖于它。
关于npm install/ npm install --save/ npm install --save-dev的区别,我觉得这两篇比较中肯:
https://www.cnblogs.com/merray/p/7766172.html
https://baijiahao.baidu.com/s?id=1637471064122396966&wfr=spider&for=pc
安装 npm i
[root@bogon elasticsearch-head-master]# npm install
npm WARN deprecated phantomjs-prebuilt@2.1.16: this package is now deprecated
npm WARN deprecated http2@3.3.7: Use the built-in module in node 9.0.0 or newer, instead
npm WARN deprecated json3@3.3.2: Please use the native JSON object instead of JSON 3
npm WARN deprecated json3@3.2.6: Please use the native JSON object instead of JSON 3

> phantomjs-prebuilt@2.1.16 install /home/es/elasticsearch-head-master/node_modules/phantomjs-prebuilt
> node install.js

PhantomJS not found on PATH
Downloading https://github.com/Medium/phantomjs/releases/download/v2.1.1/phantomjs-2.1.1-linux-x86_64.tar.bz2
Saving to /tmp/phantomjs/phantomjs-2.1.1-linux-x86_64.tar.bz2
Receiving...
  [========================================] 100%
Received 22866K total.
Extracting tar contents (via spawned process)
Removing /home/es/elasticsearch-head-master/node_modules/phantomjs-prebuilt/lib/phantom
Copying extracted folder /tmp/phantomjs/phantomjs-2.1.1-linux-x86_64.tar.bz2-extract-1571214793258/phantomjs-2.1.1-linux-x86_64 -> /home/es/elasticsearch-head-master/node_modules/phantomjs-prebuilt/lib/phantom
chmod failed: phantomjs was not successfully copied to /home/es/elasticsearch-head-master/node_modules/phantomjs-prebuilt/lib/phantom/bin/phantomjs
npm WARN elasticsearch-head@0.0.0 license should be a valid SPDX license expression
npm WARN optional SKIPPING OPTIONAL DEPENDENCY: fsevents@1.2.9 (node_modules/fsevents):
npm WARN notsup SKIPPING OPTIONAL DEPENDENCY: Unsupported platform for fsevents@1.2.9: wanted {"os":"darwin","arch":"any"} (current: {"os":"linux","arch":"x64"})

npm ERR! code ELIFECYCLE
npm ERR! errno 1
npm ERR! phantomjs-prebuilt@2.1.16 install: `node install.js`
npm ERR! Exit status 1
npm ERR!
npm ERR! Failed at the phantomjs-prebuilt@2.1.16 install script.
npm ERR! This is probably not a problem with npm. There is likely additional logging output above.

npm ERR! A complete log of this run can be found in:
npm ERR!     /root/.npm/_logs/2019-10-16T08_33_15_264Z-debug.log
这里copy phantomjs的时候报错了,可能是因为权限问题,把目标路径的权限改为root,然后手动copy过去即可。
安装 grunt-cli
Grunt-cli 只是一个命令行工具,用来执行,而不是 Grunt 这个工具本身
[root@bogon elasticsearch-head-master]# npm install -g grunt-cli
/usr/local/nodejs/bin/grunt -> /usr/local/nodejs/lib/node_modules/grunt-cli/bin/grunt
+ grunt-cli@1.3.2
added 150 packages from 121 contributors in 6.181s
检测,安装成功!
[root@bogon elasticsearch-head-master]# grunt -version
grunt-cli v1.3.2
grunt v1.0.1
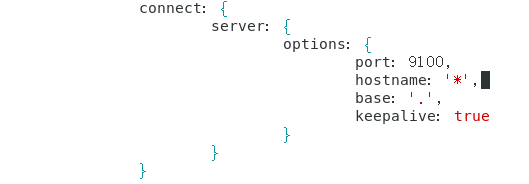
修改配置文件1
修改elasticsearch-head安装目录下的配置文件Gruntfile.js ,增加hostname属性,设置为*,注意冒号后面要空一格!
修改配置文件2
修改elasticsearch-head安装目录下的配置文件_site/app.js,这个文件挺长。
文件有一段代码,默认用"http://localhost:9200",我们需要做的是,先确认这个http是否和Elasticsearch目录下的配置文件config/elasticsearch.yml 中的network.host 的值是否一致?如果人家是具体的IP地址,就把elasticsearch-head-master/_site/app.js文件里面的这行做个替换;如果人家没有任何设置,就不需要替换,默认用localhost。
#备份一下app.js文件是有必要的
[es@bogon ~]$ cp -a elasticsearch-head-master/_site/app.js{,_$(date +%F)}

#查看备份文件
[es@bogon ~]$ ls elasticsearch-head-master/_site
app.css  app.js  app.js_2019-10-18  app.js_F%  background.js  base  fonts  i18n.js  index.html  lang  manifest.json  vendor.css  vendor.js


#把   this.base_uri = this.config.base_uri || this.prefs.get("app-base_uri") || "http://localhost:9200";
#改为  this.base_uri = this.config.base_uri || this.prefs.get("app-base_uri") || "http://192.168.1.101:9200"; #这里用我的ip来演示!


#在app.js文件中先找到需要被替换的行
[es@bogon ~]$ cat elasticsearch-head-master/_site/app.js | grep "this.base_uri = this.config.base_uri || this.prefs.get"
            this.base_uri = this.config.base_uri || this.prefs.get("app-base_uri") || "http://localhost:9200";

#替换
[es@bogon ~]$ sed -i 's/this.base_uri = this.config.base_uri || this.prefs.get("app-base_uri") || "http://localhost:9200";/this.base_uri = this.config.base_uri || this.prefs.get("app-base_uri") || "http://192.168.89.66:9200";/g' elasticsearch-head-master/_site/app.js

# 验证一下,已改好
[es@bogon ~]$ cat elasticsearch-head-master/_site/app.js | grep "this.base_uri = this.config.base_uri || this.prefs.get"
            this.base_uri = this.config.base_uri || this.prefs.get("app-base_uri") || "http://192.168.89.66:9200";
启动elasticsearch服务
切换到es用户,进入elasticsearch的安装目录,执行bin/elasticsearch
在浏览器输入 http://localhost:9200/_cluster/health?pretty ;如果elasticsearch目录下的配置文件config/elasticsearch.yml 中的“network.host”已经设置了具体的ip地址,那么就需要用http://<具体的ip地址>:9200/_cluster/health?pretty ;原则就是让插件的host和elasticsearch一一对应。
运行elasticsearch-head
#用es用户,进入elasticsearch-head-master目录
[es@bogon ~]$ cd elasticsearch-head-master

#启动 - 前台运行
[es@bogon elasticsearch-head-master]$ grunt server
>> Local Npm module "grunt-contrib-jasmine" not found. Is it installed?

Running "connect:server" (connect) task
Waiting forever...
Started connect web server on http://localhost:9100
#或者启动 - 后台运行
[es@bogon elasticsearch-head-master]$ grunt server &
#查看进程
[es@bogon elasticsearch-head-master]$ ps -ef |grep grunt
es       31898 29760  0 20:54 pts/0    00:00:00 grunt
es       32057 31986  0 20:58 pts/1    00:00:00 grep --color=auto grunt
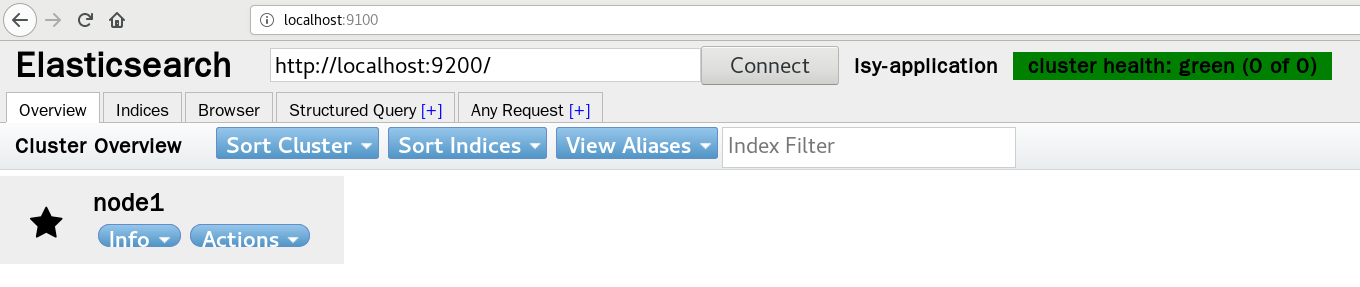
通过web访问插件
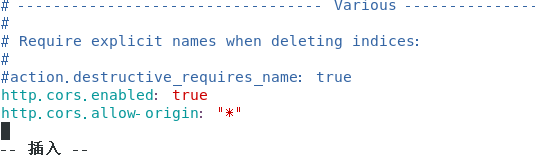
浏览器输入 http://localhost:9100/ 或 http://<上面定义的ip>:910 看到cluster health: not connected了吗?集群不健康,需要在Elasticsearch中启用CORS,在elasticsearch.yml添加两行:
http.cors.enabled: true
http.cors.allow-origin: "*"
[es@bogon ~]$ vim elasticsearch-6.4.1/config/elasticsearch.yml
保存后重启es服务
#重启三步骤

#1 查找进程
[es@bogon ~]$ ps -af | grep elastic

#2 杀掉进程,填自己的进程号
[es@bogon ~]$ kill -9 30306 30281

#后台启动
[es@bogon ~]$ elasticsearch-6.4.1/bin/elasticsearch -d
刷新页面,cluster health成了绿色,开薰!