制作新闻详情页
1.实现:点击新闻实现跳转至详情页面
(1)news.wxml中利用bindtag实现跳转至执行函数


<block wx:for="{{ news }}" wx:for-index="idx" wx:for-item="item" wx:key="{{ idx }}">
  <view bindtap="detailsHandler" data-newsid="{{ item.id }}">
    <template is="newsTemplate" data="{{ ...item }}"></template>
  </view>
</block>
代码解析:1、因为template标签上不能添加跳转,所以采取view标签方式
2、传递的newsid 为自定义属性(利用data-声明),用来传递点击的新闻id
(2)news.js中利用函数detailsHandler实现跳转至详情页面
detailsHandler(event){
    var currentId = event.currentTarget.dataset.newsid;
    wx.navigateTo({
      url: './news-details/news-details?id='+currentId,
    })
  }
代码解析:1、利用event.currentTarget.dataset.newsid 获取传入的id值
2、将id值作为url的一部分,搜寻具体的页面信息
2.实现:制作详情页面(wxml+css)
(1)news-details.wxml
<!--pages/news/news-details/news-details.wxml-->
<view class="news-detail-container">
  <image class="head-img" src="../{{ currentNews.image }}"></image>
  <view class="author-time">
    <image class="author-avatar" src="../{{currentNews.icon}}"></image>
    <text class="author-name">{{ currentNews.author }}</text>
    <text class="const-text">发表于</text>
    <text class="time">{{ currentNews.time }}</text>
  </view>
  <text class="title">{{ currentNews.title }}</text>
  <view class="tool">
    <view class="circle-img">
      <image src="../../../image/sch.png" ></image>
      <image src="../../../image/sc.png" ></image>
      <image class="share-img" src="../../../image/fx.png"></image>
    </view>
    <view class="horizon"></view>
    <text class="detail">{{ currentNews.desc }}</text>
  </view>
</view>
(2)news-details.wxss
/* pages/news/news-details/news-details.wxss */
.news-detail-container{
  display: flex;
  flex-direction: column;
}

.head-img{
  width: 100%;
}

.author-time{
  flex-direction: row;
  margin-left: 30rpx;
  margin-top: 20rpx;
}

.author-avatar{
  height: 64rpx;
  width: 64rpx;
  border-radius: 50%;
  vertical-align: middle;
}

.author-name{
  font-size: 30rpx;
  font-weight: 700;
  margin-left: 20rpx;
  vertical-align: middle;
  color:#666;
}

.const-text{
  font-size: 24rpx;
  color:#999;
  margin-left: 20rpx;
}

.time{
  font-size: 24rpx;
  margin-left: 30rpx;
  vertical-align: middle;
  color: #999;
}

.title{
  margin-left: 40rpx;
  font-size: 36rpx;
  font-weight: 700;
  margin-top: 30rpx;
  letter-spacing: 2px;
  color: #4b556c;
}

.tool{
  margin-top: 20rpx;
}

.circle-img{
  float: right;
  margin-right: 40rpx;
  vertical-align: middle;
}

.circle-img image{
  width: 50rpx;
  height: 50rpx;
}

.share-img{
  margin-left: 30rpx;
}

.horizon{
  width: 660rpx;
  height: 1px;
  background-color: #e5e5e5;
  vertical-align: middle;
  position: relative;
  top: 46rpx;
  margin: 0 auto;
  z-index: -99;
}

.detail{
  color:#666;
  margin-top: 20rpx;
  margin-right: 30rpx;
  margin-left: 30rpx;
  line-height: 44rpx;
  letter-spacing: 2px;
  font-size: 24rpx;
}

.playermusic{
  width: 60rpx;
  height: 60rpx;
  vertical-align: middle;
  margin-left: 40rpx;
}
3.实现:js文件中数据接收,达到动态页面效果
news-details.js
// pages/news/news-details/news-details.js
var data = require("../../../data/data.js");
Page({

  /**
   * 页面的初始数据
   */
  data: {
      currentNews:{}
  },

  /**
   * 生命周期函数--监听页面加载
   */
  onLoad: function (options) {
      this.setData({
        currentNews:data[options.id]
      });
  },

})
代码解析:1、首先导入数据至data变量( require)
2、其次声明currentNews对象
3、最后在onLoad中实现对象赋值
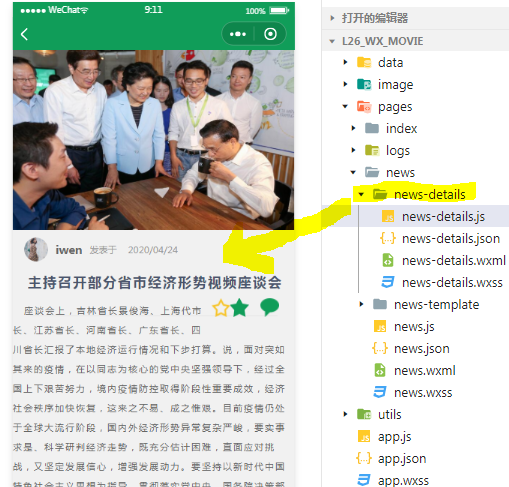
4.呈现出来的效果图: