Linux系统(X64)安装Oracle11g完整安装图文教程另附基本操作

一:查看本地ssh服务
Linux系统下安装启动ssh服务,下面以CentOS版本Linux系统为例:
1.检查是否装了SSH包
rpm -qa |grep ssh
2.没有安装SSH直接YUM安装
yum install openssh-server
3.检查SSH服务是否为开机启动
chkconfig --list sshd
4.设置开机启动SSH服务
chkconfig --level 2345 sshd on
5.重新启动下SSH服务
service sshd restart
6.验证是否启动了22端口
netstat -antp |grep sshd
#22端口为ssh默认端口,确认SSH服务开启状态
 
 
二:查看本地IP
终端中,输入ifconfig命令
 
 
1 安装系统  都选英文
2 去掉火墙 和 selinux
chkconfig  iptables off
chkconfig ip6tables off
chkconfig abrt-ccpp off
chkconfig auditd off
chkconfig certmonger off  ----未执行成功
chkconfig cups off
chkconfig postfix off
 
修改配置文件需要重启机器:
修改/etc/selinux/config 文件
将SELINUX=enforcing改为SELINUX=disabled
 
3 安装 yum
  系统安装yum  在/home/soft/ 下建立 yum 文件夹,把系统光盘都copy到此目录
  --先安装三个包
  cd /home/soft/yum/Packages
rpm -ivh deltarpm-3.5-0.5.20090913git.el6.x86_64.rpm
rpm -ivh python-deltarpm-3.5-0.5.20090913git.el6.x86_64.rpm
rpm -ivh createrepo-0.9.9-17.el6.noarch.rpm
 
 
createrepo .  --运行
 cd /etc/yum.repos.d
 cp rhel-source.repo  /etc/yum.repos.d/zj.repo
 --将原来的repo文件改名字
mv rhel-source.repo rhel-source.repo111
 vi zj.repo
 
[rhel-source]
name=Red Hat Enterprise Linux $releasever - $basearch - Source
baseurl=file:///home/soft/yum/
enabled=1
gpgcheck=1
gpgkey=file:///etc/pki/rpm-gpg/RPM-GPG-KEY-redhat-release
 
[rhel-source-beta]
name=Red Hat Enterprise Linux $releasever Beta - $basearch - Source
baseurl=file:///home/soft/yum/
enabled=1
gpgcheck=1
gpgkey=file:///etc/pki/rpm-gpg/RPM-GPG-KEY-redhat-beta,file:///etc/pki/rpm-gpg/RPM-GPG-KEY-redhat-release
--清楚yum缓存
yum clean all


3 安装ftp 
rpm -ivh vsftpd-2.2.2-11.el6.x86_64.rpm  或者 yum install vsftpd
 
chkconfig vsftpd on
 
service vsftpd restart
 
--修改 etc/vsftpd 目录下
 
 ftpuser  user_list  把root 去掉
 vsftpd.conf  把匿名去掉
#anonymous_enable=YES
 
 -- passive mode  被动模式
 4 安装vnc rpm -qa |grep vnc 
 --vnc 服务 端口是 1
 
rpm -ivh tigervnc-server-1.1.0-5.el6.x86_64.rpm  --需要先安装下面的包
xorg-x11-fonts-misc is needed by tigervnc-server-1.1.0-5.el6.x86_64
 
rpm -ivh xorg-x11-fonts-misc-7.2-9.1.el6.noarch.rpm
--或者直接yum安装
yum install tigervnc-server
 
--修改配置文件将用户名称加入到配置文件:
 
(注:这里的“用户名”是指linux系统用户的名称)
 
[gavin@centos ~]# vi /etc/sysconfig/vncservers
 
#
 
# Uncomment the line below to start a VNC server on display :1
 
# as my 'myusername' (adjust this to your own). You will also
 
# need to set a VNC password; run 'man vncpasswd' to see how
 
# to do that.
 
#
 
# DO NOT RUN THIS SERVICE if your local area network is
 
# untrusted! For a secure way of using VNC, see
 
# http://www.uk.research.att.com/vnc/sshvnc.html>.
 
 
# VNCSERVERS="1:myusername"
 
 
# VNCSERVERS="1:gavin 2:john" # use the method for more user
 
VNCSERVERS="1:root 2:root 3:root"
 
 
# VNCSERVERARGS[1]="-geometry 800x600"
 
VNCSERVERARGS[1]="-geometry 1024x768"
 
--设置口令
vncpasswd
 
 4.93  bjsqrac1  4.94  bjsqrac2
 
 --启动服务
 启动VNC服务
 
[gavin@centos ~]# /sbin/service vncserver start
 
 --修改桌面系统
 cd /root 
 
 cd ~/.vnc/
 
[gavin@centos .vnc]$ vi xstartup
 
#!/bin/sh
 
 
# Uncomment the following two lines for normal desktop:
 
#unset SESSION_MANAGER
 
#exec /etc/X11/xinit/xinitrc
 
 
[ -x /etc/vnc/xstartup ] && exec /etc/vnc/xstartup
 
[ -r $HOME/.Xresources ] && xrdb $HOME/.Xresources
 
xsetroot -solid grey
 
vncconfig -iconic &
 
#xterm -geometry 80x24+10+10 -ls -title "$VNCDESKTOP Desktop" &
 
gnome-session & #set starting GNOME desktop
 
#startkde & #kde desktop
 
#twm & #Text interface
 
编辑 /root/.vnc/xstartup
[root@localhost ~]# vi /root/.vnc/xstartup   
 
去掉下面一行的注释:
unset SESSION_MANAGER 
 
执行下面的命令重启vnc server:
[root@localhost ~]# vncserver -kill :1 
[root@localhost ~]# vncserver :1
 
--重启vncserver
 
[gavin@centos ~]# /sbin/service vncserver restart
 
chkconfig vncserver on --vnc自动启动


2 关闭linux防火墙

--修改/etc/selinux/config,确保SELINUX设置为DISABLED
--关闭IPTABLES:
service iptables stop
service ip6tables stop
/sbin/chkconfig iptables off
/sbin/chkconfig ip6tables off
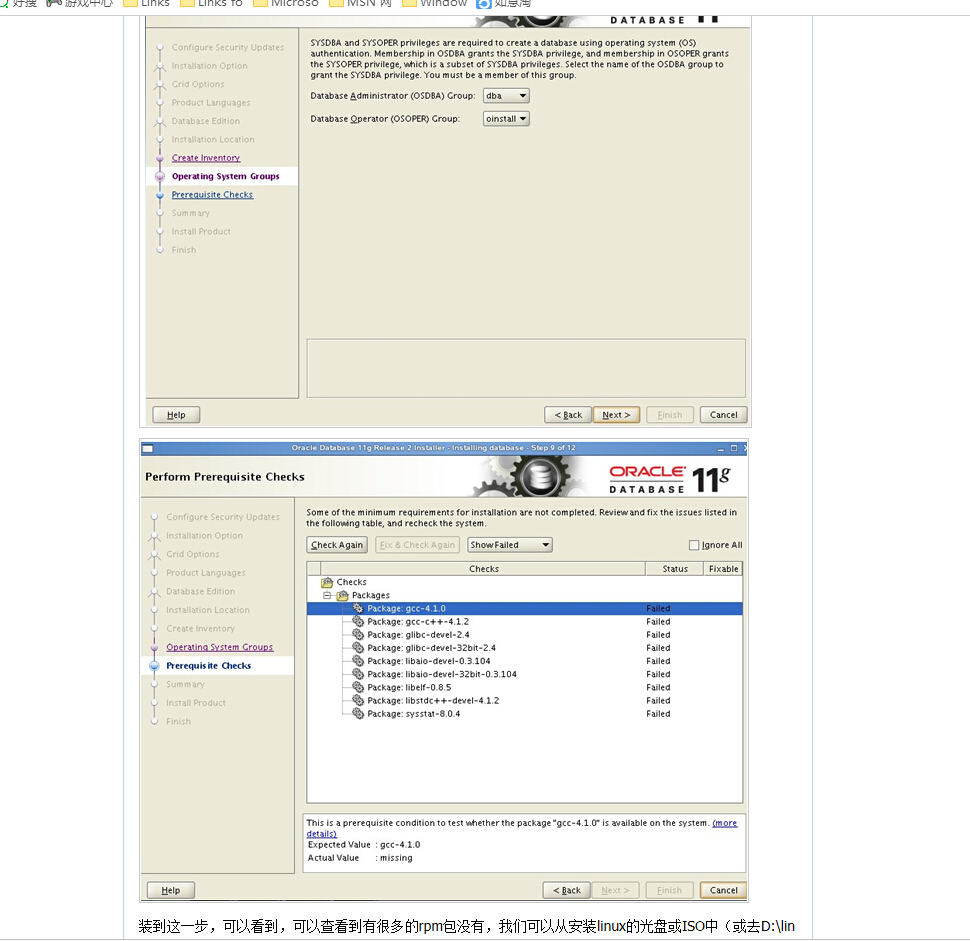
2 检查包安装情况

rpm -q binutils compat-libstdc++-33 elfutils-libelf elfutils-libelf-devel gcc gcc-c++ glibc glibc-common glibc-devel glibc-headers libaio libaio-devel libgcc libstdc++ libstdc++-devel ksh make libXp openmotif22 sysstat smartmontools unixODBC unixODBC-devel


--系统安装包
yum install compat-libstdc++-33
yum install elfutils-libelf-devel
--下面用 yum安装
yum install gcc
yum install gcc-c++
yum install glibc-devel
yum install glibc-headers
yum install libaio-devel
yum install libstdc++-devel
yum install ksh
yum install libXp
yum install unixODBC
yum install openmotif22


yum install unixODBC-devel

--安装和libcap 所有有关的包
yum install libcap.i686
yum install libcap-devel.x86_64
yum install libcap-devel.i686
yum install libcap-ng.i686
yum install libcap-ng-devel.i686

--linux 6 检查的时候一些 i386的包需要安装,但是安装i386 的时候提示有高版本存在,不能安装,我采取忽略,继续安装,但是要保证高版本的包一定要安装上

一、修改操作系统核心参数

在Root用户下执行以下步骤:

1)修改用户的SHELL的限制,修改/etc/security/limits.conf文件

输入命令:vi /etc/security/limits.conf,按i键进入编辑模式,将下列内容加入该文件。

oracle soft nproc 2047
 
oracle hard nproc 16384
 
oracle soft nofile 1024
 
oracle hard nofile 65536
 

编辑完成后按Esc键,输入“:wq”存盘退出

2)修改/etc/pam.d/login 文件,输入命令:vi /etc/pam.d/login,按i键进入编辑模式,将下列内容加入该文件。

session required /lib/security/pam_limits.so
 
session required pam_limits.so
 

编辑完成后按Esc键,输入“:wq”存盘退出

3)修改linux内核,修改/etc/sysctl.conf文件,输入命令: vi /etc/sysctl.conf ,按i键进入编辑模式,将下列内容加入该文件

fs.file-max = 6815744
 
fs.aio-max-nr = 1048576
 
kernel.shmall = 2097152
 
kernel.shmmax = 2147483648
 
kernel.shmmni = 4096
 
kernel.sem = 250 32000 100 128
 
net.ipv4.ip_local_port_range = 9000 65500
 
net.core.rmem_default = 4194304
 
net.core.rmem_max = 4194304
 
net.core.wmem_default = 262144
 
net.core.wmem_max = 1048576
 

编辑完成后按Esc键,输入“:wq”存盘退出

4)要使 /etc/sysctl.conf 更改立即生效,执行以下命令。 输入:sysctl -p 显示如下:

 
linux:~ # sysctl -p
 
net.ipv4.icmp_echo_ignore_broadcasts = 1
 
net.ipv4.conf.all.rp_filter = 1
 
fs.file-max = 6815744
 
fs.aio-max-nr = 1048576
 
kernel.shmall = 2097152
 
kernel.shmmax = 2147483648
 
kernel.shmmni = 4096
 
kernel.sem = 250 32000 100 128
 
net.ipv4.ip_local_port_range = 9000 65500
 
net.core.rmem_default = 4194304
 
net.core.rmem_max = 4194304
 
net.core.wmem_default = 262144
 
net.core.wmem_max = 1048576
 

5)编辑 /etc/profile ,输入命令:vi /etc/profile,按i键进入编辑模式,将下列内容加入该文件。

if [ $USER = "oracle" ]; then
 
if [ $SHELL = "/bin/ksh" ]; then
 
ulimit -p 16384
 
ulimit -n 65536
 
else
 
ulimit -u 16384 -n 65536
 
fi
 
fi

编辑完成后按Esc键,输入“:wq”存盘退出

6)创建相关用户和组,作为软件安装和支持组的拥有者。

创建Oracle用户和密码,输入命令:

/usr/sbin/groupadd -g 501 oinstall
/usr/sbin/groupadd -g 502 dba

useradd -g oinstall -g dba -m oracle
 
passwd oracle
 

然后会让你输入密码,密码任意输入2次,但必须保持一致,回车确认。

7)创建数据库软件目录和数据文件存放目录,目录的位置,根据自己的情况来定,注意磁盘空间即可,这里我把其放到oracle用户下,例如:

输入命令:

mkdir /home/oracle/app
 
mkdir /home/oracle/app/oracle
 
mkdir /home/oracle/app/oradata
 
mkdir /home/oracle/app/oracle/product
 

8)更改目录属主为Oracle用户所有,输入命令:

chown -R oracle:oinstall /home/oracle/app

9)配置oracle用户的环境变量,首先,切换到新创建的oracle用户下,

输入:su – oracle ,然后直接在输入 : vi .bash_profile

按i编辑 .bash_profile,进入编辑模式,增加以下内容:

export ORACLE_BASE=/home/oracle/app
 
export ORACLE_HOME=$ORACLE_BASE/oracle/product/11.2.0/dbhome_1
 
export ORACLE_SID=orcl
 
export PATH=$PATH:$HOME/bin:$ORACLE_HOME/bin
 
export LD_LIBRARY_PATH=$ORACLE_HOME/lib:/usr/lib


编辑完成后按Esc键,输入“:wq”存盘退出

二、安装过程

1)当上述系统要求操作全部完成后,注销系统,在图形界面以Oracle用户登陆。首先将下载的Oracle安装包复制到linux中,用SSH其他ftp工具拷贝。

打开一个终端,运行unzip命令解压oracle安装文件,如:

输入命令:

解压完成后 cd 进入其解压后的目录database

输入命令:

cd database

使用ls命令可以查看解压后database所包含的文件,如下图:

2)执行安装,输入命令:./runInstaller

安装完成后,系统会提示你需要用root权限执行2个shell脚本。按照其提示的路径,找到其所在的位置,如:我的就在/home/oracle/app/oracle/product/11.2.0/dbhome_1/root.sh

和 /home/oracle/oraInventory/orainstRoot.sh 新开启一个终端,输入命令:

su – root
 
cd /home/oracle/app/oracle/product/11.2.0/dbhome_1
 
sh root.sh
 
cd /home/oracle/oraInventory
 
sh orainstRoot.sh
 
原文地址:https://www.cnblogs.com/haofaner/p/5474654.html