目录
- 消息队列
- redis
1.消息队列
RabbitMQ安装
http://www.cnblogs.com/shanyou/p/4067250.html
- 安装erlang http://www.erlang.org/
- 安装rabbitmq http://www.rabbitmq.com/download.html
- 安装 pika https://pika.readthedocs.io/en/0.10.0/


 1 #!/usr/bin/env python
 2 import pika
 3 connection = pika.BlockingConnection(pika.ConnectionParameters('localhost'))
 4 channel = connection.channel()
 5 channel.queue_declare(queue='hello')
 6 channel.basic_publish(exchange='',
 7                       routing_key='hello',
 8                       body='Hello World'
 9                       )
10 print("[x] sent 'Hello World!'")
11 connection.close()
 1 #!/usr/bin/env python
 2 __author__ = 'han'
 3 import pika
 4 connection = pika.BlockingConnection(pika.ConnectionParameters('localhost'))
 5 channel = connection.channel()
 6 channel.queue_declare(queue='hello')
 7 def callback(ch,method,properties,body):
 8     print("[x]Received %r"% body)
 9 channel.basic_consume(callback,
10                       queue='hello',
11                       )   #no_ack=True 不和服务端确认
12 print('[*]Waiting for messages.to exit press CTRL+C')
13 channel.start_consuming()
-
持久化
 1 import pika
 2 #建立连接
 3 connection = pika.BlockingConnection(pika.ConnectionParameters('127.0.0.1'))  #建立连接
 4 #建立管道
 5 channel = connection.channel()
 6 #建立消息队列,durable=True 开启持久化
 7 channel.queue_declare(queue='hello1',durable=True)
 8 channel.basic_publish(exchange='',
 9                       routing_key='hello1',   #指定消息队列
10                       body='Hello World',     #发送消息
11                       properties=pika.BasicProperties(   #消息持久化
12                           delivery_mode=2,
13                       )
14                       )
15 print("[x] sent 'Hello World!'")
16 connection.close()
 1 import pika
 2 #建立连接
 3 connection = pika.BlockingConnection(pika.ConnectionParameters('127.0.0.1'))
 4 #建立管道
 5 channel = connection.channel()
 6 #建立消息队列,durable=True开启持久化
 7 channel.queue_declare(queue='hello1',durable=True)
 8 def callback(ch,method,properties,body):
 9     print("[x]Received %r"% body)
10     ch.basic_ack(delivery_tag=method.delivery_tag)  #收到消息回复生产者
11 channel.basic_qos(prefetch_count=1)   #负载均衡(处理完一个消息在发送下一个)
12 channel.basic_consume(callback,
13                       queue='hello1',
14                       )   #no_ack=True  不回复生产者
15 print('[*]Waiting for messages.to exit press CTRL+C')
16 channel.start_consuming()
查看消息持久化
cmd
D:Program FilesRabbitMQ Server
abbitmq_server-3.6.11sbin>rabbitmqctl.bat list_queues
Listing queues
-
广播
- fanout: 所有bind到此exchange的queue都可以接收消息
- direct: 通过routingKey和exchange决定的那个唯一的queue可以接收消息
- topic:所有符合routingKey(此时可以是一个表达式)的routingKey所bind的queue可以接收消息
fanout
 1 #!/usr/bin/env python
 2 # _*_ encoding:utf-8 _*_
 3 import pika
 4 import sys
 5 connection = pika.BlockingConnection(pika.ConnectionParameters(host='127.0.0.1'))
 6 channel = connection.channel()
 7 channel.exchange_declare(exchange='logs',
 8                          exchange_type="fanout")  #指定广播模式,不同版本可能是type="fanout"
 9 message = ' '.join(sys.argv[1:]) or "info:Hello World!"  #发送的内容 argv1 或者 "info:Hello World!"
10 channel.basic_publish(exchange='logs',
11                       routing_key='',
12                       body=message)
13 print("[x] Sent %r" % message)
14 connection.close()
 1 #!/usr/bin/env python
 2 # _*_ encoding:utf-8 _*_
 3 import pika
 4 __author__ ='han'
 5 connection = pika.BlockingConnection(pika.ConnectionParameters(host='127.0.0.1'))
 6 channel = connection.channel()
 7 channel.exchange_declare(exchange='logs',
 8                          exchange_type='fanout')   #指定广播模式,不同版本可能是type="fanout"
 9 result = channel.queue_declare(exclusive=True) #不指定queue名字,rabbit会随机分配一个名字,exclusive=True会在使用此queue的消费者断开后,自动将queue删除
10 queue_name = result.method.queue  #消息队列的名称
11 channel.queue_bind(exchange='logs',
12                    queue=queue_name)    #制定消息队列的名称
13 print(' [*] Waiting for logs. To exit press CTRL+C')
14 def callback(ch, method, properties,body):
15     print(" [x] %r" % body)
16 channel.basic_consume(callback,
17                       queue=queue_name,
18                       no_ack=True)
19 channel.start_consuming()
direct
 1 #接收指定的内容
 2
 3 #!/usr/bin/ebv python
 4 # _*_ coding:utf-8 _*_
 5 import pika
 6 import sys
 7 connection = pika.BlockingConnection(pika.ConnectionParameters(host="127.0.0.1"))
 8 channel = connection.channel()
 9 channel.exchange_declare(exchange='direct_logs',   #设置direct模式
10                          exchange_type='direct')
11 severity = sys.argv[1] if len(sys.argv) > 1 else 'info' #设置默认info
12 message = ' '.join(sys.argv[2:]) or 'Hello World!'
13 channel.basic_publish(exchange='direct_logs',   #调用direct模式
14                       routing_key=severity,      #调用severity
15                       body=message)
16 print(" [x] Sent %r:%r" % (severity,message))
17 connection.close()
 1 #!/usr/bin/env python
 2 # _*_ encoding:utf-8 _*_
 3 import pika
 4 import sys
 5 connection = pika.BlockingConnection(pika.ConnectionParameters(
 6       host='127.0.0.1'))
 7 channel = connection.channel()
 8 channel.exchange_declare(exchange='direct_logs',  #设置direct模式
 9                          exchange_type='direct')
10 result = channel.queue_declare(exclusive=True)
11 queue_name = result.method.queue
12 severities = sys.argv[1:]
13 if not severities:
14     sys.stderr.write("usege: %s [info] [warning][reeor]
"%sys.argv[0])
15     sys.exit(1)
16 for severity in severities:
17     channel.queue_bind(exchange='direct_logs', #调用direct模式
18                        queue=queue_name,
19                        routing_key=severity)  #调用severities
20 print(' [*] Waiting for logs. To exit press CTRL+C')
21 def callback(ch,method,properties,body):
22     print(" [x] %r:%r" % (method.routing_key, body))
23 channel.basic_consume(callback,
24                       queue=queue_name,
25                       no_ack=True)
26 channel.start_consuming()
topic
 1 #过滤模式
 2
 3  import pika
 4   import sys
 5   connection = pika.BlockingConnection(pika.ConnectionParameters(
 6       host='localhost'))
 7   channel = connection.channel()
 8   channel.exchange_declare(exchange='topic_logs',
 9                            exchange_type='topic')
10   routing_key = sys.argv[1] if len(sys.argv) > 1 else 'anonymous.info'
11   message = ' '.join(sys.argv[2:]) or 'Hello World!'
12   channel.basic_publish(exchange='topic_logs',
13                         routing_key=routing_key,
14                         body=message)
15   print(" [x] Sent %r:%r" % (routing_key, message))
16   connection.close()
 1   import pika
 2   import sys
 3   connection = pika.BlockingConnection(pika.ConnectionParameters(
 4       host='localhost'))
 5   channel = connection.channel()
 6   channel.exchange_declare(exchange='topic_logs',
 7                            exchange_type='topic')
 8   result = channel.queue_declare(exclusive=True)
 9   queue_name = result.method.queue
10   binding_keys = sys.argv[1:]
11   if not binding_keys:
12       sys.stderr.write("Usage: %s [binding_key]...
" % sys.argv[0])
13       sys.exit(1)
14   for binding_key in binding_keys:
15       channel.queue_bind(exchange='topic_logs',
16                          queue=queue_name,
17                          routing_key=binding_key)
18   print(' [*] Waiting for logs. To exit press CTRL+C')
19   def callback(ch, method, properties, body):
20       print(" [x] %r:%r" % (method.routing_key, body))
21   channel.basic_consume(callback,
22                         queue=queue_name,
23                         no_ack=True)
24   channel.start_consuming()
  1. To receive all the logs run:
  python receive_logs_topic.py "#"

  2. To receive all logs from the facility "kern":
  python receive_logs_topic.py "kern.*"

  3. Or if you want to hear only about "critical" logs:
  python receive_logs_topic.py "*.critical"

  4. You can create multiple bindings:
  python receive_logs_topic.py "kern.*" "*.critical"

  5. And to emit a log with a routing key "kern.critical" type:
  python emit_log_topic.py "kern.critical" "A critical kernel error"
rpc
 1 #!/usr/bin/env python
 2 # _*_ encoding:utf-8 _*_
 3 import pika
 4 import sys
 5 connection = pika.BlockingConnection(pika.ConnectionParameters(
 6                                      host='127.0.0.1'))
 7 channel = connection.channel()
 8 channel.queue_declare(queue='rpc_queue') #设置rpc模式
 9 #斐波那契
10 def fib(n):
11     if n == 0:
12         return 0
13     elif n == 1:
14         return 1
15     else:
16         return fib(n-1) + fib(n-2)
17 #2.
18 def on_request(ch,method,props,body):
19     n = int(body) #斐波那契
20     print("[.]fib(%s)"%n)
21     response = fib(n)
22     #3.发送
23     ch.basic_publish(exchange='',
24                      routing_key=props.reply_to,  #接收到的随机queue
25                      properties=pika.BasicProperties(correlation_id=    #接收到的uuid
26                                                      props.correlation_id),
27                      body = str(response)) #发送消息
28     ch.basic_ack(delivery_tag = method.delivery_tag)  #等待确认
29 #1.开始接收
30 channel.basic_consume(on_request,queue='rpc_queue')
31 print("[x] Awaiting RPC requests")
32 channel.start_consuming()
 1 #!/usr/bin/env python
 2 # _*_ encoding:utf-8 _*_
 3 import pika
 4 import sys
 5 import uuid
 6 class FibonacCiRpcClient(object):
 7     def __init__(self):
 8         self.connection = pika.BlockingConnection(pika.ConnectionParameters(
 9                                                   host = '127.0.0.1'))
10         self.channel= self.connection.channel()
11         result = self.channel.queue_declare(exclusive=True)   #设置随机queue
12         self.callback_queue = result.method.queue
13         self.channel.basic_consume(self.on_response,no_ack=True,   #设置接收
14                                    queue=self.callback_queue)
15     def on_response(self,ch,method,props,body):
16         if self.corr_id == props.correlation_id:   #确认server和clinet的uuid是否相等
17             self.response = body
18     #1.发送
19     def call(self,n):
20         self.response = None
21         self.corr_id = str(uuid.uuid4())
22         self.channel.basic_publish(exchange='',
23                                    routing_key='rpc_queue',     #设置rpc模式
24                                    properties=pika.BasicProperties(
25                                          reply_to = self.callback_queue,  #指定随机queue
26                                           correlation_id= self.corr_id), #uuid
27                                    body=str(n))                          #发送消息
28         #2.没有数据开始接收
29         while self.response is None:
30             self.connection.process_data_events()  #设置非堵塞模式
31         return int(self.response)                 #返回结果
32 fibonacci_rpc =  FibonacCiRpcClient()
33 print(" [x] Requesting fib(5)")
34 response = fibonacci_rpc.call(5)
35 print('[.]Got%r'%response)
2.redis
http://www.cnblogs.com/wupeiqi/articles/5132791.html
redis安装
yum install epel-release
yum install redis
redis-server /etc/redis.conf
redis-cli -h 192.168.80.11
-
python执行rerdis命令
redis-py提供两个类Redis和StrictRedis用于实现Redis的命令,StrictRedis用于实现大部分官方的命令,并使用官方的语法和命令,Redis是StrictRedis的子类,用于向后兼容旧版本的redis-py。
#!/usr/bin/env python
# _*_ encoding:utf-8 _*_
__author__ = 'han'
import redis
r = redis.Redis(host='192.168.80.12',port=6379)
r.set('foo','Bar')  #设置一个字典
print(r.get('foo'))
-
链接池
redis-py使用connection pool来管理对一个redis server的所有连接,避免每次建立、释放连接的开销。默认,每个Redis实例都会维护一个自己的连接池。可以直接建立一个连接池,然后作为参数Redis,这样就可以实现多个Redis实例共享一个连接池。
#!/usr/bin/env python
# _*_ encoding:utf-8 _*_
__author__ = 'han'
import redis
pool = redis.ConnectionPool(host='192.168.80.12',port=6379)
r = redis.Redis(connection_pool=pool)
r.set('foo','bar')
print(r.get('foo'))
-
字典
查看修改等..
set name han  #设置一个字典

mset naem8 zhang name9 li  #设置多个


192.168.80.12:6379> keys *  #查看所有
1) "naem"
2) "aeg"
3) "name"
4) "foo"


set test2 100 ex 5  #设置5秒

setex name4 3 alex  #设置alex3秒


set 2b alex nx         #不存在设置

set 2b abc xx   #存在设置

getset name9 jack  #设置新值并获取原来的值

getrange name9 0 2 #切片

setrange name9 0 l  #修改
 1 1.set naem11 alex
 2  ord('a')
 3 97
 4
 5  bin(97)
 6 '0b1100001'
 7
 8    127 64 32 16 8 4 2 1
 9    0  97 1  1  0  0 0 0 1
10
11  192.168.80.12:6379> setbit naem11 6 1
12 (integer) 0
13
14 192.168.80.12:6379> get naem11
15 "clex"
setbit
模拟用户在线
192.168.80.12:6379> setbit n5 1000 1
(integer) 0
192.168.80.12:6379> setbit n5 55 1
(integer) 0
192.168.80.12:6379> setbit n5 600 1
(integer) 0
192.168.80.12:6379> bitcount n5
(integer) 3                         共3
192.168.80.12:6379> getbit n5 55  查看
(integer) 1
incrbyfloat
1 #支持小数
2
3 192.168.80.12:6379> set n6 1.0
4 OK
5 192.168.80.12:6379> incrbyfloat n6 1.2
6 "2.2"
7 192.168.80.12:6379> incrbyfloat n6 1.4
8 "3.6"
incr
模拟用户在线
192.168.80.12:6379> incr name8
(integer) 1
192.168.80.12:6379> incr name8
(integer) 2
192.168.80.12:6379> incr name8  加
(integer) 3
192.168.80.12:6379> decr name8  减
(integer) 2
192.168.80.12:6379> decr name8
(integer) 1
append
#追加

192.168.80.12:6379> set name9 zhang 设置字典
OK
192.168.80.12:6379> append name9 san   追加为zhangsan
(integer) 8
192.168.80.12:6379> get name9
"zhangsan"
-
Hash
#设置
127.0.0.1:6379> hset ni name li
(integer) 1

#长度
127.0.0.1:6379> hlen ni   (integer) 1
192.168.80.12:6379> hset info id 999
(integer) 1

#设置
192.168.80.12:6379> hset info name alex
(integer) 1
192.168.80.12:6379> hget info name
"alex"

#查看keys
192.168.80.12:6379> hkeys info
1) "id"
2) "name"

 查看values
192.168.80.12:6379> hvals info
1) "999"
2) "alex"
hmset
#设置多个
192.168.80.12:6379> hmset info2 k1 1 k2 2
OK

#查看keys
192.168.80.12:6379> keys info2
1) "info2"

#查看所有
192.168.80.12:6379> hgetall info2
1) "k1"
2) "1"
hmget
#查看多个
1) "1"
192.168.80.12:6379> hmget info2 k1 k2
2) "2"
hexists
#判断一个keys是否存在
192.168.80.12:6379> hexists info2 k3
(integer) 0

192.168.80.12:6379> hexists info2 k2
(integer) 1
hscan
#过滤查看
192.168.80.12:6379> hscan info2 0 match k*
1) "0"
2) 1) "k1"
   2) "1"
   3) "k2"
   4) "2"
-
列表
设置列表
192.168.80.12:6379> lpush names alex hanyan zhuangyang
(integer) 3

#从右查看
192.168.80.12:6379> lrange names 0 -1
1) "zhuangyang"
2) "hanyan"
3) "alex"


192.168.80.12:6379> rpush names wangsen zouyi
(integer) 5

#从左查看
192.168.80.12:6379> lrange names 0 -1
1) "zhuangyang"
2) "hanyan"
3) "alex"
4) "wangsen"
5) "zouyi"

#查看长度
127.0.0.1:6379> lpush n1 zhang
(integer) 1
127.0.0.1:6379> llen n1
(integer) 1
lrem
#删除
127.0.0.1:6379> lrem n1 1 zhang
(integer) 1

#从左删除
127.0.0.1:6379> lpop n1
"han"

#从右删除
127.0.0.1:6379> rpop n1
"zhang"
index
#获取index
127.0.0.1:6379> lindex n1 0
"wang"
插入
#插入前面
192.168.80.12:6379> linsert names before alex TEST
(integer) 6
192.168.80.12:6379> lrange names 0 -1
1) "zhuangyang"
2) "hanyan"
3) "TEST"
4) "alex"
5) "wangsen"
6) "zouyi"

#插入后面
192.168.80.12:6379> linsert names after alex TEST
(integer) 7
192.168.80.12:6379> lrange names 0 -1
1) "zhuangyang"
2) "hanyan"
3) "TEST"
4) "alex"
5) "TEST"
6) "wangsen"
7) "zouyi"
修改
修改
192.168.80.12:6379> lset names 3 ALEX
OK
192.168.80.12:6379> lrange names 0 -1
1) "zhuangyang"
2) "hanyan"
3) "TEST"
4) "ALEX"
5) "TEST"
6) "wangsen"
7) "zouyi"
删除多个
192.168.80.12:6379> lrem names 2 TEST
(integer) 2
192.168.80.12:6379> lrange names 0 -1
1) "zhuangyang"
2) "hanyan"
3) "ALEX"
4) "wangsen"
5) "zouyi"
rpoplpush
#从name2 中删除一个值 如果name2为空就等待10秒
192.168.80.12:6379> blpop names2 10
1) "names2"
2) "wangsen"
192.168.80.12:6379> blpop names2 10
(nil)
(10.02s)
-
集合
#添加集合
192.168.80.12:6379> sadd names3 alex alex jack jack 3 3
(integer) 3
#查看集合
192.168.80.12:6379> smembers names3
1) "alex"
2) "3"
3) "jack"
并集
192.168.80.12:6379> sinter names3 names4
1) "alex"
2) "jack"
差集
#a 中存在b中不存在的
127.0.0.1:6379> sdiff names3 names4
1) "jack"
sdiffstore
#把差集加入names2中
127.0.0.1:6379> sdiffstore names2 names3 names4
(integer) 1
查看集合
127.0.0.1:6379> smembers names4
1) "zhang"
2) "san"
3) "han"
4) "wei"
5) "alex"
移动,删除
#把names4的han移到names2
smove names4 names2 han
#删除
srem names4 abc
并集
sunion names4 names3
sismember
#查看一个name是否是集合的成员
192.168.80.12:6379> sismember names3 alex
(integer) 1
192.168.80.12:6379> sismember names3 ale
(integer) 0
-
有序集合
#添加一个有序集合
192.168.80.12:6379> zadd z1 10 alex 5 jack 88 hanyang
(integer) 3

#查看集合
192.168.80.12:6379> zrange z1 0 -1
1) "jack"
2) "alex"
3) "hanyang"
zrank
#查看一个vlaues是否存在
192.168.80.12:6379> zrank z1 alex
(integer) 1
192.168.80.12:6379> zrank z1 ajan
(nil)
zcount
#查看从1-9
zcount z1 1 9
zrank
获取一个值index
127.0.0.1:6379> zrank z1 han
(integer) 1
删除
127.0.0.1:6379> zrank z1 han
(integer) 1
查看并显示编号
127.0.0.1:6379> zrange z9 0 -1 withscores
1) "han"
2) "8"
3) "zhang"
4) "9"
5) "alex"
6) "10"
7) "zxc"
8) "88"
9) "abc"
10) "100"
-
其他
包括 字典 列表 集合
筛选
127.0.0.1:6379> keys na*
1) "name"
2) "names3"
3) "names2"
4) "name2"
5) "names4"
删除
del name4

#删除设置时间2秒
expire z8 2
select
切换列表
select 3
move
#移动位置
127.0.0.1:6379[1]> move name6 2
(integer) 1
rename
#改名
127.0.0.1:6379[2]> rename name6 name
OK
-
管道
redis-py默认在执行每次请求都会创建(连接池申请连接)和断开(归还连接池)一次连接操作,如果想要在一次请求中指定多个命令,则可以使用pipline实现一次请求指定多个命令,并且默认情况下一次pipline 是原子性操作。
#!/usr/bin/env python
# _*_ encoding:utf-8 _*_
import redis,time

pool = redis.ConnectionPool(host='192.168.1.82',port=6379)

r = redis.Redis(connection_pool=pool)

pipe = r.pipeline()

pipe.set('name','alex')
time.sleep(20)
pipe.set('role','abc')

pipe.execute()


#centos查看
192.168.1.82:6379> get role
"abc"


192.168.1.82:6379> get name
"alex"
-
发布订阅
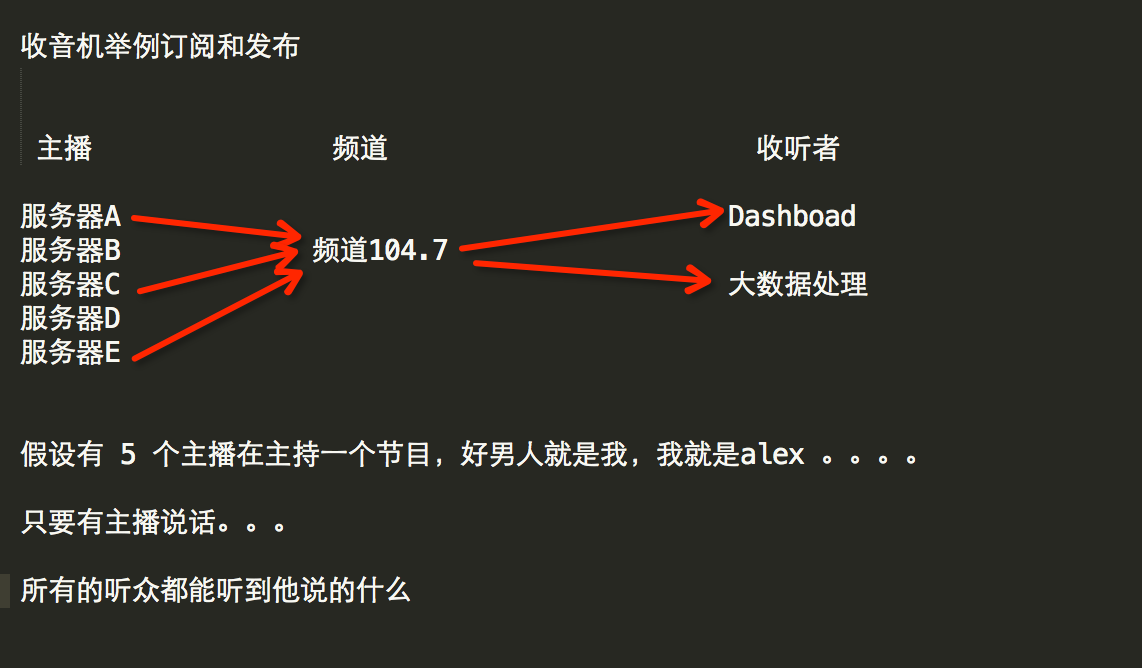
发布服务器
 1 #!/usr/bin/env python
 2 # _*_ encoding:utf-8 _*_
 3
 4 import redis
 5
 6
 7 class RedisHelper(object):
 8     def __init__(self):
 9         self.__conn = redis.Redis(host='192.168.1.82')
10         self.chan_sub = 'fm104.5'
11         self.chan_pub = 'fm104.5'
12
13     def public(self, msg):
14         self.__conn.publish(self.chan_pub,msg)
15         return True
16
17     def subscribe(self):
18         pub = self.__conn.pubsub()
19         pub.subscribe(self.chan_sub)
20         pub.parse_response()
21         return pub
22
23
24 obj = RedisHelper()
25 obj.public('hello')
订阅服务器
 1 # _*_coding:utf-8_*_
 2 __author__ = 'Alex Li'
 3
 4 import sys,os
 5
 6 BASE_DIR = os.path.dirname(os.path.dirname(os.path.abspath(__file__)))
 7 sys.path.append(BASE_DIR)
 8
 9 from day2.monitor import RedisHelper
10
11 obj = RedisHelper()
12 redis_sub = obj.subscribe()
13
14 while True:
15     msg = redis_sub.parse_response()
16     print(msg)