通过之前的了解,我们知道postman是基于javascript语言编写的,而导出的json格式的postman脚本也无法直接在服务器运行,它需要在newman中执行(可以把newman看做postman脚本的运行环境)
所以要实现在windows的cmd窗口或者linux系统中直接以命令的方式执行脚本,我们需要安装node.js,然后再在此基础上安装newman
了解newman:https://learning.getpostman.com/docs/postman/collection_runs/command_line_integration_with_newman/
一.windows下安装
1.安装node.js
到官网下载最新的windows版node.js,直接安装即可(不用自己去配置环境变量,安装完成后会自动配好)

安装完成后,打开cmd窗口,输入 node -v,如下出现版本号表示安装成功

2.安装newman
可以通过npm来安装newman,npm 是 JavaScript 的包管理工具,并且是 Node.js 平台的默认包管理工具。通过 npm 可以安装、共享、分发代码,管理项目依赖关系。
一般安装好node.js后会默认安装好npm的,直接使用即可
打开cmd窗口,执行以下命令
npm -g install newman
安装完成后,输入newman -v,如下出现版本号表示安装成功

3.如果想生成html格式的测试报告,还需要安装 newman-reporter-html
npm install -g newman-reporter-html

二.linux系统下安装
安装node.js
1.下载linux版本安装包,因为后缀为.tar.xz,需要分两步解压
[root@localhost hanmk]# xz -d node-v10.15.1-linux-x64.tar.xz
[root@localhost hanmk]# tar -xvf node-v10.15.1-linux-x64.tar
2.在环境变量中添加node.js路径
打开/etc/profile文件,添加如下两行
export NODE_HOME=/hanmk/node-v10.15.1-linux-x64
export PATH=$NODE_HOME/bin:$PATH
更新文件
[root@localhost node-v10.15.1-linux-x64]# source /etc/profile
3.查看是否安装成功
[root@localhost node-v10.15.1-linux-x64]# node -v
v10.15.1
安装newman
[root@localhost node-v10.15.1-linux-x64]# npm -g install newman
[root@localhost node-v10.15.1-linux-x64]# newman -v
4.3.1
安装newman-reporter-html
[root@localhost postman_script]# npm install -g newman-reporter-html
npm WARN newman-reporter-html@1.0.2 requires a peer of newman@4 but none is installed. You must install peer dependencies yourself.
+ newman-reporter-html@1.0.2
added 29 packages from 66 contributors in 13.266s
newman的常用命令
官方的文档介绍如下:https://learning.getpostman.com/docs/postman/collection_runs/command_line_integration_with_newman/
使用newman run 来执行脚本,先看下有哪些可选参数
[root@localhost bin]# newman run -h
Usage: run <collection> [options]

URL or path to a Postman Collection.

Options:
-e, --environment <path> Specify a URL or Path to a Postman Environment.
-g, --globals <path> Specify a URL or Path to a file containing Postman Globals.
--folder <path> Specify folder to run from a collection. Can be specified multiple times to run multiple folders (default: [])
-r, --reporters [reporters] Specify the reporters to use for this run. (default: ["cli"])
-n, --iteration-count <n> Define the number of iterations to run.
-d, --iteration-data <path> Specify a data file to use for iterations (either json or csv).
--export-environment <path> Exports the environment to a file after completing the run.
--export-globals <path> Specify an output file to dump Globals before exiting.
--export-collection <path> Specify an output file to save the executed collection
--postman-api-key <apiKey> API Key used to load the resources from the Postman API.
--delay-request [n] Specify the extent of delay between requests (milliseconds) (default: 0)
--bail [modifiers] Specify whether or not to gracefully stop a collection run on encountering an errorand whether to end the run with an error based on the optional modifier.
-x , --suppress-exit-code Specify whether or not to override the default exit code for the current run.
--silent Prevents newman from showing output to CLI.
--disable-unicode Forces unicode compliant symbols to be replaced by their plain text equivalents
--global-var <value> Allows the specification of global variables via the command line, in a key=value format (default: [])
--color <value> Enable/Disable colored output. (auto|on|off) (default: "auto")
--timeout [n] Specify a timeout for collection run (in milliseconds) (default: 0)
--timeout-request [n] Specify a timeout for requests (in milliseconds). (default: 0)
--timeout-script [n] Specify a timeout for script (in milliseconds). (default: 0)
--ignore-redirects If present, Newman will not follow HTTP Redirects.
-k, --insecure Disables SSL validations.
--ssl-client-cert <path> Specify the path to the Client SSL certificate. Supports .cert and .pfx files.
--ssl-client-key <path> Specify the path to the Client SSL key (not needed for .pfx files)
--ssl-client-passphrase <path> Specify the Client SSL passphrase (optional, needed for passphrase protected keys).
-h, --help output usage information

<collection>是指单个请求或者从postman导出的集合文件(也就是json格式的脚本)
options是一些组合参数,介绍下我用到的几个参数
(1) -e 指定环境变量,把在postman中设置的环境变量导出,然后再把路径填写到这里即可
(2) -g 指定全局变量,把在postman中设置的全局变量导出,然后再把路径填写到这里即可
(3) -n 指定迭代次数,即运行n次脚本
(4) --timeout-request 指定请求的超时时间
(5) -r 指定运行报告的格式,可以为json格式、html格式,默认为cli格式,即在命令行展示运行结果
实例1:
把接口测试脚本和环境变量脚本导出放到一个目录中,在cmd窗口中切换到该目录,执行如下命令
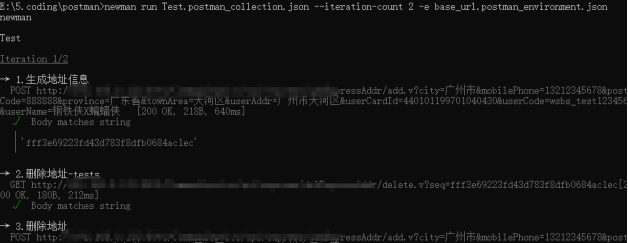
E:5.codingpostman>newman run Test.postman_collection.json -n 2 -e base_url.postman_environment.json
Test.postman_collection.json -- 接口测试脚本文件
base_url.postman_environment.json -- 环境变量文件
-n 2表示迭代2次
执行过程如下
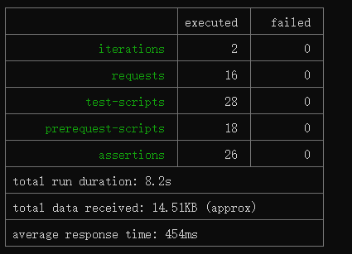
执行完成后,会出现一个类似报表的东西,显示整体运行结果
实例2:
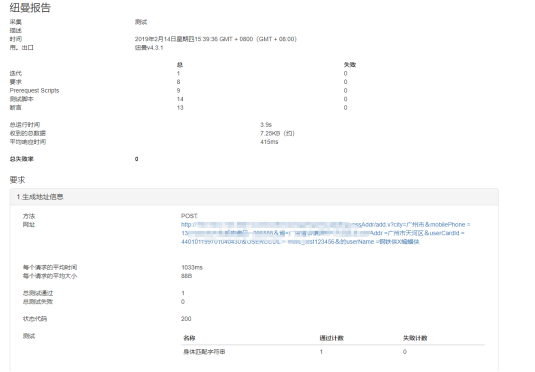
E:5.codingpostman>newman run Test.postman_collection.json -e base_url.postman_environment.json --reporters cli,json,html --reporter-json-export report-json.json --reporter-html-export report-html.html
--reporters cli,json,html --reporter-json-export report-json.json --reporter-html-export report-html.html
表示生成json和html格式的报告
html格式的报告长下面这个样子,还是蛮难看的。