Angular Metadata 等基础知识
http://www.jianshu.com/p/aeb11061b82c
Metadata告诉Angular如何处理一个类,只有我们将它通告给Angular,它才算一个组件。
我们通过将metadata附属到类来告诉Angular HeroListComponent是一个组件。
用TypeScript附加metadata的简单方法是使用一个decorator
@Component({- selector 插入组件的标签名
- templateUrl 组件模板地址
- directives 一个当前模板需要的组件和指令的数组。
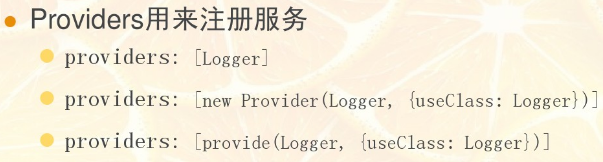
- providers 一个组件需要的服务(依赖注入)的数组。
指令是包含指令元数据的一个类。
第一类指令:显然一个组件就是包含模板的一个指令@Component其实是使用面向模板特性扩展的@Directive decorator
第二类指令:NgFor是典型的结构指令,通过添加、删除和替换DOM来改变布局。
第三类指令:属性指令改变已有元素的表现和行为。在模板中它们看起来就像普通的HTML属性。ngModel指令就是一个属性指令,它实现了双向数据绑定。
<input [(ngModel)]="hero.name">它通过设置元素的显示值属性和响应change事件来改变已有元素的行为。
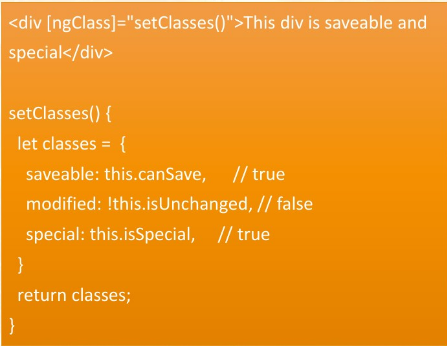
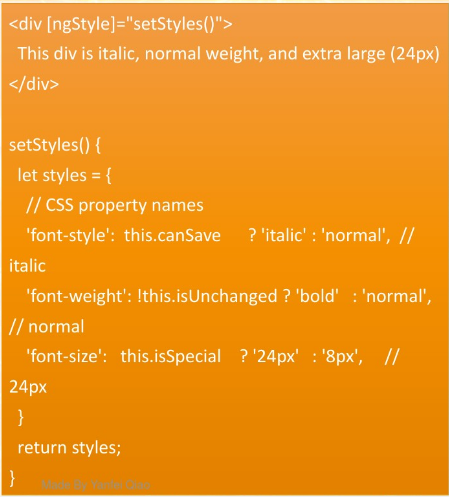
Angular自带一些改变布局结构(例如ngSwitch)或者改变DOM元素和组件方面(例如ngStyle和ngClass)的指令。
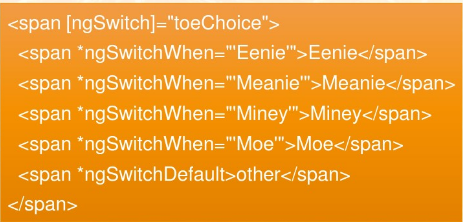
都是判断boolean真值决定显示哪一个class:
当然我们也可以编写自己的指令。
数据绑定图

三种数据绑定的方法:
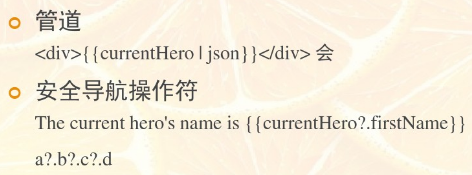
<div>{{hero.name}}</div>
<hero-detail [hero]="selectedHero"></hero-detail>
<div (click)="selectHero(hero)"></div>- 插值 将组件的hero.name属性值显示到<div>标签中
- 属性绑定 将父组件的selectedHero属性传递给子组件的hero属性中
- 事件绑定 当用户点击hero的名字时调用组件的selectHero方法
这些都不是双向数据绑定,下面这第四种才是双向的:
<input [(ngModel)]="hero.name">在双向数据绑定中,一个数据属性值通过属性绑定从组件流入到输入框中。
用户对数据的改变通过数据绑定又流回到组件中,将属性设为最新值(因此也就用户交互表单比较有用)。
组件之间的通信?共享数据的方法?
http://blog.csdn.net/qq_15096707/article/details/52859110
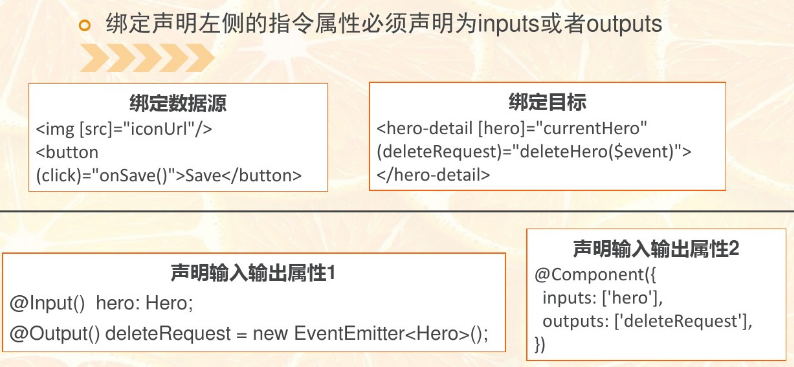
父->子 input 方式
import {Component,Input} from 'angular2/core';
@Component({
    selector: 'child',
    template: `
        <h2>child {{content}}</h2>
    `
})
class Child {
    @Input() content:string;
}
@Component({
    selector: 'App',
    directives: [Child],
    template: `
        <h1>App</h1>
        <child [content]="i"></child>
    `
})
export class App {
    i:number = 0;
    constructor() {
        setInterval(()=> {
            this.i++;
        }, 1000)
    }
}
子->父 output 方式
import {Output,EventEmitter,Component} from 'angular2/core';
@Component({
    selector: 'child',
    template: `
        <h2>child</h2>
    `
})
class Child {
    @Output() updateNumberI:EventEmitter<number> = new EventEmitter();
    i:number = 0;
    constructor() {
        setInterval(()=> {
            this.updateNumberI.emit(++this.i);
        }, 1000)
    }
}
@Component({
    selector: 'App',
    directives: [Child],
    template: `
        <h1>App {{i}}</h1>
        <child (updateNumberI)="numberIChange($event)"></child>
    `
})
export class App {
    i:number = 0;
    numberIChange(i:number){
        this.i = i;
    }
}
子获得父实例
如果不了解forwardRef用处的的可以看 #11
@Host 表示这个Injector必须是host element在这里可以理解为 parent
import {Host,Component,forwardRef} from 'angular2/core';
@Component({
    selector: 'child',
    template: `
        <h2>child</h2>
    `
})
class Child {
    constructor(@Host() @Inject(forwardRef(()=> App)) app:App) {
        setInterval(()=> {
           app.i++;
        }, 1000);
    }
}
@Component({
    selector: 'App',
    directives: [Child],
    template: `
        <h1>App {{i}}</h1>
        <child></child>
    `
})
export class App {
    i:number = 0;
}
父获得子实例
子元素指令在父constructor时是获取不到的,所以必须在组件的ngAfterViewInit生命周期钩子后才能获取,如果对组件生命周期不了解的话,可以参考 #56
import {ViewChild,Component} from 'angular2/core';
@Component({
    selector: 'child',
    template: `
        <h2>child {{i}}</h2>
    `
})
class Child {
    i:number = 0;
}
@Component({
    selector: 'App',
    directives: [Child],
    template: `
        <h1>App {{i}}</h1>

        <child></child>

    `
})
export class App {
    @ViewChild(Child) child:Child;
    ngAfterViewInit() {
        setInterval(()=> {
            this.child.i++;
        }, 1000)
    }
}
service 方式
import {Component,Injectable} from 'angular2/core';
@Injectable();
class KittencupService {
    i:number = 0;
}
@Component({
    selector: 'child',
    template: `
        <h2>child {{service.i}}</h2>
    `
})
class Child {
    constructor(public service:KittencupService){}
}
@Component({
    selector: 'App',
    directives: [Child],
    providers: [KittencupService],
    template: `
        <h1>App {{i}}</h1>
        <child></child>
    `
})
export class App {
    constructor(service:KittencupService) {
        setInterval(()=> {
            service.i++;
        }, 1000)
    }
}
service EventEmitter方式
import {Component,Injectable,EventEmitter} from 'angular2/core';
@Injectable()
class KittencupService {
    change: EventEmitter<number>;
    constructor(){
        this.change = new EventEmitter();
    }
}
@Component({
    selector: 'child',
    template: `
<h2>child {{i}}</h2>
`
})
class Child {
    public i:number = 0;
    constructor(public service:KittencupService){
       service.change.subscribe((value:number)=>{
            this.i = value;
        })
    }
}
@Component({
    selector: 'App',
    directives: [Child],
    providers: [KittencupService],
    template: `
<h1>App {{i}}</h1>
<child></child>
`
})
export class App {
    i:number = 0;
    constructor(service:KittencupService) {
        setInterval(()=> {
            service.change.emit(++this.i);
        }, 1000)
    }
}
Angular 2 Components and Providers: Classes, Factories & Values
https://www.sitepoint.com/angular-2-components-providers-classes-factories-values/
http://blog.thoughtram.io/angular/2015/05/18/dependency-injection-in-angular-2.html
HOST AND VISIBILITY IN ANGULAR'S DEPENDENCY INJECTION
开发工具看到的页面的DOM里有大量类似_ngcontent-qka-4的属性,
Angular2就是通过这些属性来实现各个组件的样式之间的隔离。
因为每个组件都会根据一定的规则分配一个属性,然后在样式上,也是通过属性加class的方式来设置这个组件的某一个class的样式,从而达到的样式隔离的效果。
这就是Angular2的视图封装。
实际上,Angular2提供了3种视图封装的方式,我们上面看到的效果,也就是默认的方式,我们可以在组件上添加 encapsulation 属性来设置。
@Component({
   selector: 'todo-item',
   templateUrl: 'app/todo/item/item.component.html',
   styleUrls: ['app/todo/item/item.component.css'],
   styles: ['.completed { background: lightblue; }'],
   encapsulation: ViewEncapsulation.Emulated }) exportclassTodoItemComponent{ ... }
selector 是组件的自定义标签名,用来在父模板中使用。
默认的默认的封装方式是
1.ViewEncapsulation.Emulated :用模拟的方式实现组件之间的隔离。
另外两种封装方式:
2.ViewEncapsulation.None :不实现什么隔离,如果你的两个组件中,有同一个class的定义,那个这两个定义就会冲突,后面的那个就会覆盖前面的。
3.ViewEncapsulation.Native :修改组件的封装方式会出现了一个 shadow-root ,所有的样式和模板都在这个 shadow-root 里面。在头部,只有2个 style 元素,没有这个 TodoItemComponent 组件的样式了。
shadow-root 是一个 Shadow DOM ,它就是把html、样式,甚至脚本都封装在一个 Shadow DOM ,插入到这个组件所在的位置,然后,它里面的样式、甚至脚本都只能够在这个 Shadow DOM 里面起作用。
[Angular2 Router] Lazy Load Angular 2 Modules with the Router
http://www.cnblogs.com/Answer1215/p/5904813.html
Angular2之旅【开源项目】
https://github.com/hacking-with-angular/angular2-travel
NgModule的主要属性
http://www.cnblogs.com/dojo-lzz/p/5878073.html
- declarations:模块内部Components/Directives/Pipes的列表,声明一下这个模块内部成员
- providers:指定应用程序的根级别需要使用的service。(Angular2中没有模块级别的service,所有在NgModule中声明的Provider都是注册在根级别的Dependency Injector中)
- imports:导入其他module,其它module暴露的出的Components、Directives、Pipes等可以在本module的组件中被使用。比如导入CommonModule后就可以使用NgIf、NgFor等指令。
- exports:用来控制将哪些内部成员暴露给外部使用。导入一个module并不意味着会自动导入这个module内部导入的module所暴露出的公共成员。除非导入的这个module把它内部导入的module写到exports中。
- bootstrap:通常是app启动的根组件,一般只有一个component。bootstrap中的组件会自动被放入到entryComponents中。
- entryCompoenents: 不会再模板中被引用到的组件。这个属性一般情况下只有ng自己使用,一般是bootstrap组件或者路由组件,ng会自动把bootstrap、路由组件放入其中。 除非不通过路由动态将component加入到dom中,否则不会用到这个属性。