第1章 vim主要模式介绍,vim命令模式。
1.1 确保系统已经安装了VIM工具
[root@panda ~]# rpm -qf `which vim`
[root@panda ~]# rpm -qf `which vi`
扩展:
问:vi和vim是同一个软件包安装的吗?
答:NO,vim是vi的增加版,最明显的区别就是vim可以语法加亮,它完全兼容vi
1.2 vim编辑器

1.2.1 模式切换
首次进入文件 ---- 命令模式
出现 “Insert” ---- 编辑模式
输入: ---- 命令行模式
A:从编辑模式到命令行模式怎样切换?
编辑模式->esc->命令模式->: ->命令行模式
B:字符操作(怎样进入编辑模式?)
进入编辑模式 a i o A I O
说明:
q i 当前字符之前插入 (光标前)
q I 行首插入 (行首)
q a 当前字符之后插入 (光标后)
q A 行尾插入(行尾)
q o下一行插入 (另起一行)
q O上一行插入(上一行插入)
q x 向后删除一个字符 等同于delete
q X 向前删除一个字符
q u 撤销一步 每按一次就撤销一次
q r 替换
================================================
1.2.2 在命令模式下做的操作:
1、 光标定位
hjkl 左下上右
0 和 home键表示切换到行首, $和end键表示切换到行尾
gg 定位到首行 , G定位到未行
3gg 或者 3G 快速定位到第3行
/string(字符串) -----找到或定位你要找的单词或内容,如果相符内容比较多,我们可以通过N、n来进行向上向下查找,并且vi会对查找到的内容进行高亮显示,取消用 :noh
/^d ----^意思表示以什么开头 ,,查找以字母d开头的内容
/t$ -----$意思表示以什么结尾,,查找以字母t结尾的内容
vim + a.txt 打开文件后,光标会自动位于文件的最后一行
2、 如何对文本进行编辑
删除、复制、粘贴、撤销
y 复制(以字符为单位) :表示对单个字符进行复制,如果要复制整行,用yy(以行为单位)
ð y$:从光标所在位置复制到行尾
ð y^:从光标所在位置复制到行首
dd(删除,以行为单位,删除当前光标所在行)
ð d0:删至行首
ð d$:删至行尾
p 、P粘贴
x 删除光标所在位置的字符
D 从光标处删除到行尾
u 撤销操作
ctrl+r 还原撤销过的操作,将做过的撤销操作再还原回去,也就是说撤销前是什么样,再还原成什么样
r 替换,或者说用来修改一个字符
3、 如何进入其它模式
a A o O i I 都是可以进行插入,编辑模式
: 进入命令行模式
v 进入可视模式
ctrl+v 进入可视块模式
V 进入可视行模式
R 擦除、改写,进入替换模式
你进入以上模式后,想要退出 ,按esc
4、 插入模式中的操作
ctrl+p可以进行补全操作,所需要的内容必须是在当前打开的文件内存在的,它只针对当前文件
1.2.3 V模式(列)
进入v模式 移动光标选择区域、
编程的时候需要进行多行注释:
1)、ctrl+v 进入列编辑模式
2)、向下或向上移动光标
3)、把需要注释、编辑的行的开头标记起来
4)、然后按大写的I
5)、再插入注释符或者你需要插入的符号,比如"#"
6)、再按Esc,就会全部注释或添加了
删除:再按ctrl+v 进入列编辑模式;向下或向上移动光标 ;选中注释部分,然后按d, 就会删除注释符号。
1.2.4 命令行模式操作
- :w 保存 save
- :w! 强制保存
- :q 没有进行任何修改,退出 quit
- :q! 修改了,不保存,强制退出
- :wq 保存并退出
- :wq! 强制保存并退出
- :x 保存退出
1.2.5 调用外部文件或命令
假设:我想要编辑写入我的网卡地址,但是我忘记了,我要查看一下,当前在vim编辑文档
怎么办呢? 要退出文档吗? 这样好麻烦.
在命令行模式下操作:
- :!ifconfig 调用系统命令
- !+命令
读取其他文件
:r /etc/hosts
1.2.7 命令行模式
格式 : 范围(其中%所有内容) s分隔符 旧的内容 分隔符 新的内容 (分隔符可以自定义)
默认是每一行的第一个符合要求的词 (/g全部)
:1,3s/bin/xuegod 替换第1到3行中出现的第一个bin进行替换为xuegod
:1,3s/bin/xuegod/g 替换第1到3行中查找到所有的bin进行替换为xuegod
:3s/bin/xuegod --->注意特殊符号的使用
:% s/do/xuegod/gi 将文本中所有的do替换成xuegod,并且忽略do的大小写
:% s@a@b@g 将文本中所有的a替换成b
1.2.8 设置环境
临时设置
:set nu 设置行号
:set ic 不区分大小写
:set list 显示控制字符
:set nonu 取消设置行号
:set noic 取消
:set ai 自动缩进,比如换行操作,设置这个功能后,可以在下次操作时进行自动换行
:noh 取消高亮显示
永久设置环境
/etc/vimrc 设置后会影响到系统所有的用户
~/.vimrc 只影响到某一个用户,没有自己建一个
1.2.9 vim打开多个文件
[root@panda ~]# vim -o /etc/passwd /etc/hosts
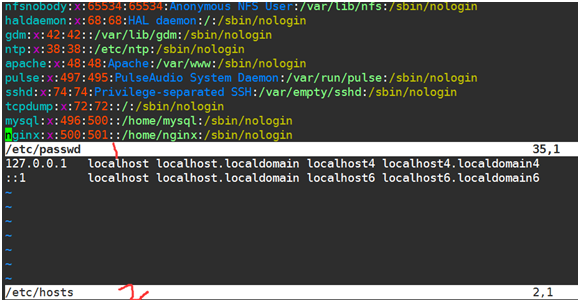
[root@panda ~]# vim -O /etc/passwd /etc/hosts
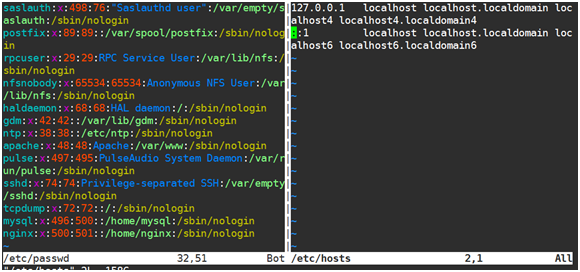
ctrl+ww 在文件之间进行切换
大写O左右分屏,小写的o上下分屏
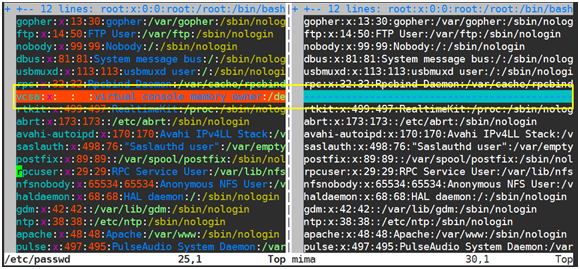
1.2.10 比较文件内容
[root@xuegod63 ~]# diff /etc/passwd mima
[root@panda mnt]# vimdiff /etc/passwd mima
1.3其它编辑器
1.3.1 nano编辑器
默认安装的,使用方法:
nano a.txt
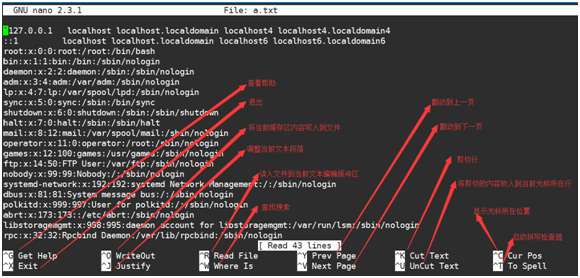
注意:脱字符(^)表示Ctrl键,比如^X表示的就是ctrl+x;Alt-键被表示为一个M,因此Alt+W 被写成了M-W,后面跟的大小字母都没有问题
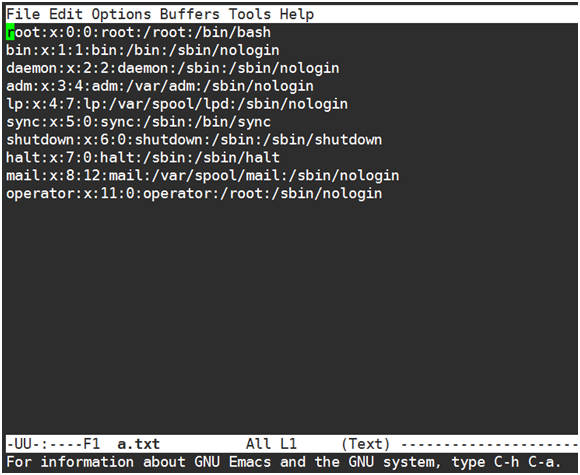
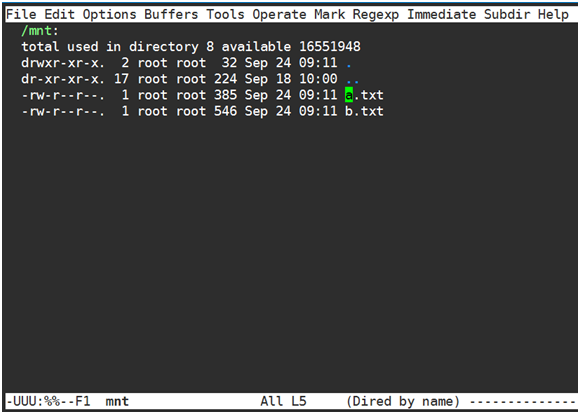
1.3.2 emacs编辑器
默认没有安装,它支持图形和控制台模式
[root@panda mnt]# yum list emacs
[root@panda mnt]# yum -y install emacs
[root@panda mnt]# which emacs
/usr/bin/emacs
在控制台使用
[root@panda mnt]# emacs a.txt
说明:
保存当前缓冲区到文件 C-x C-s
退出emacs并停止程序 C-x C-c
将新文件添加到缓冲区 C-x C-f (如果你不知道文件名称,可以按下回车,会启动一个文件浏览器)
上面的命令需要键入两次
其它一些操作命令:
C-p 上移一行
C-b 左移一字符
C-f 右移一字符
C-n 下移一行
M-a 移到当前句首
M-e 移到当前句尾
M-v 上翻页
C-v 下翻页
M-< 移动到文本的首行
M-> 移动到文本的尾行
M-d 剪切光标当前所在位置之后的单词
C-k 剪切光标当前所在位置至行尾的文本
M-k 剪切光标当前所在位置至句尾的文本
C+空格 选中你要的文本,可以连续选择一块区域。结束选择用C-w
C-y 粘贴 (如果你做了多次的剪切,那么在粘贴时,可以通过M-y进行选择)
C-s 从缓存区域中从光标当前位置到尾部执行前向查找
C-r 从缓存区域中从光标当前位置到尾部执行后向查找
C-x 2 将窗口水平拆分成两个
C-x 3 将窗口竖向拆分成两个
C-x o(字母o) 切换窗口
C-x 0(数字0) 关闭当前所在窗口
C-x 1(数字1) 关闭除当前所在窗口之外的所有窗口
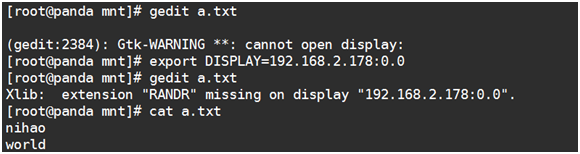
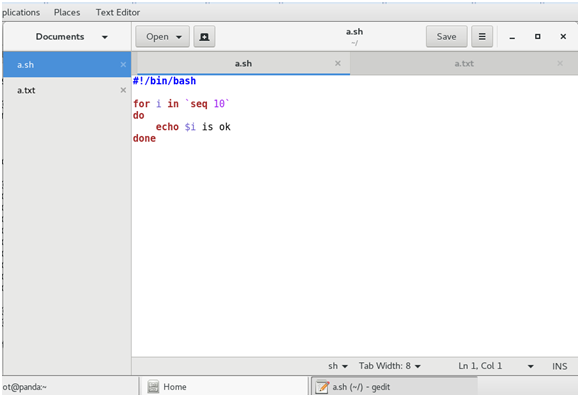
1.3.3 GHOME编辑器gedit
[root@panda mnt]# gedit a.txt /mnt/a.txt
第2章 恢复Linux下误删除的文件
删除文件和文件夹
rm -rf 文件名或目录名
q -r 递归删除(可以删除目录和目录里面的东西)
q -f 强行删除
ext4文件系统上删除文件,可以恢复: extundelete
windows恢复误删除的文件: final data v2.0 汉化版 和 easyrecovery
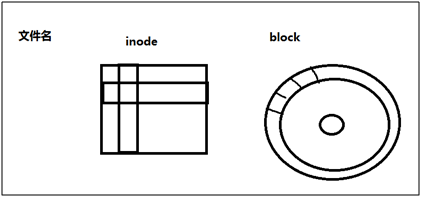
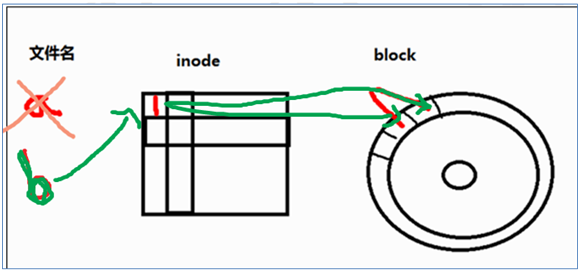
Linux文件由三部分组成:文件名,inode(索引节点),block(块)
a.txt à inode à block
文件名 存放文件元数据信息 真正存放数据
inode表,包含的一些经常使用的重要信息:
inode编号
文件类型
文件的链接数量,有多少文件名指向这个INODE
属主的UID
属主的组ID
文件的大小
文件所使用的磁盘的块的实际数量
文件数据block的位置
最近一次修改的时间
最近一次访问的时间
最近一次更改的时间
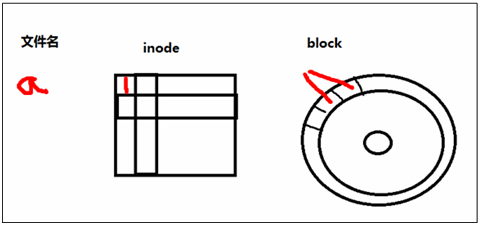
在LINUX中,它内部不是通过文件名来识别文件的,而是通过inode号码,对于linux系统,文件名就是给inode号码起的一个绰号或乳名
我们操作一个文件/etc/passwd,比如打开一个文件,系统内部总的来说要经过三个过程:
1、 首先找到这个文件名对应的inode号码
2、 通过这个inode号码,获取inode信息
3、 根据inode信息,找到这个文件的数据在物理存储上的block的位置,并把它提取出来
2.1 查看inode号:
常识: 每个文件,最少有一个inode号。
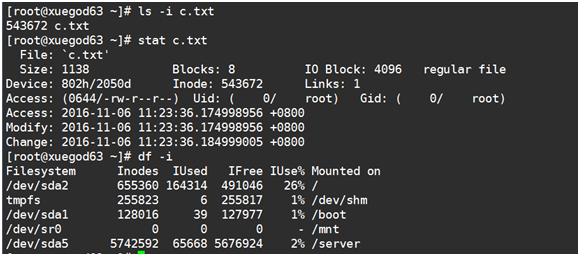
[root@xuegod63 ~]# dumpe2fs /dev/sda5
2.2 块-block
block块:真正存储数据的地方
块大小是可以改变的
假设我们的块大小为 2M,而我们现在的数据为101M ,那么我们需要多少个块呢?
101/2 需要50还是51个块
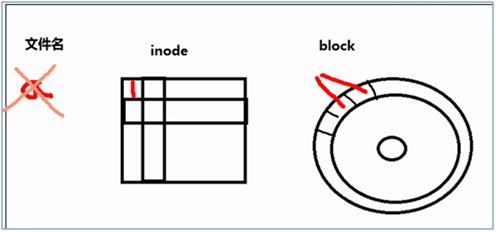
为什么删除比复制快?
创建一个文件a
删除的操作
又新建了一个文件
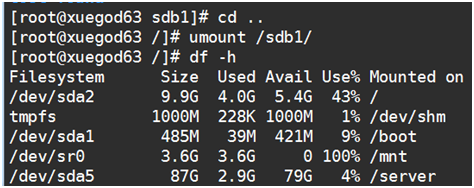
UMOUNT
如何避免误删除的文件内容被覆盖???
卸载需要恢复文件的分区:或以只读的方式挂载
2.3 实战:在RHEL6上恢复被误删除的文件
下载extundelete
http://sourceforge.net/ 开源软件发布中心
2.3.1 准备测试分区:
添加硬盘,并查看
分区硬盘
[root@xuegod63 ~]# fdisk /dev/sdb
Device contains neither a valid DOS partition table, nor Sun, SGI or OSF disklabel
Building a new DOS disklabel with disk identifier 0xb8cb07c0.
Changes will remain in memory only, until you decide to write them.
After that, of course, the previous content won't be recoverable.
Warning: invalid flag 0x0000 of partition table 4 will be corrected by w(rite)
WARNING: DOS-compatible mode is deprecated. It's strongly recommended to
switch off the mode (command 'c') and change display units to
sectors (command 'u').
Command (m for help): n
Command action
e extended
p primary partition (1-4)
p
Partition number (1-4): 1
First cylinder (1-652, default 1):
Using default value 1
Last cylinder, +cylinders or +size{K,M,G} (1-652, default 652):
Using default value 652
Command (m for help): p
Disk /dev/sdb: 5368 MB, 5368709120 bytes
255 heads, 63 sectors/track, 652 cylinders
Units = cylinders of 16065 * 512 = 8225280 bytes
Sector size (logical/physical): 512 bytes / 512 bytes
I/O size (minimum/optimal): 512 bytes / 512 bytes
Disk identifier: 0xb8cb07c0
Device Boot Start End Blocks Id System
/dev/sdb1 1 652 5237158+ 83 Linux
Command (m for help): w
The partition table has been altered!
Calling ioctl() to re-read partition table.
Syncing disks.
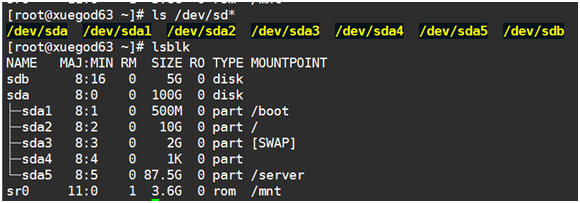
[root@xuegod63 ~]# ls /dev/sd*
/dev/sda /dev/sda1 /dev/sda2 /dev/sda3 /dev/sda4 /dev/sda5 /dev/sdb /dev/sdb1
格式化硬盘
[root@xuegod63 ~]# mkfs.ext4 /dev/sdb1
mke2fs 1.41.12 (17-May-2010)
Filesystem label=
OS type: Linux
Block size=4096 (log=2)
Fragment size=4096 (log=2)
Stride=0 blocks, Stripe width=0 blocks
327680 inodes, 1309289 blocks
65464 blocks (5.00%) reserved for the super user
First data block=0
Maximum filesystem blocks=1342177280
40 block groups
32768 blocks per group, 32768 fragments per group
8192 inodes per group
Superblock backups stored on blocks:
32768, 98304, 163840, 229376, 294912, 819200, 884736
Writing inode tables: done
Creating journal (32768 blocks): done
Writing superblocks and filesystem accounting information: done
This filesystem will be automatically checked every 38 mounts or
180 days, whichever comes first. Use tune2fs -c or -i to override.
创建挂载点,并进行挂载
[root@xuegod63 ~]# mkdir /sdb1
[root@xuegod63 ~]# mount /dev/sdb1 /sdb1/
[root@xuegod63 ~]# df |tail -1
/dev/sdb1 5154852 141304 4751692 3% /sdb1
复制一些测试文件,然后把这些文件再删除:
安装tree命令:
[root@localhost Packages]# rpm -ivh tree-1.5.3-2.el6.x86_64.rpm
warning: tree-1.5.3-2.el6.x86_64.rpm: Header V3 RSA/SHA256 Signature, key ID fd431d51: NOKEY
Preparing... ########################################### [100%]
1:tree ########################################### [100%]
[root@xuegod63 b]# tree /sdb1/
/sdb1/
├── a
│ └── b
│ ├── aa.txt ---这是一个空文件
│ └── c
│ └── a.txt
├── a.txt
├── hosts
├── lost+found
└── passwd
3.3.4 删除文件并卸载分区:
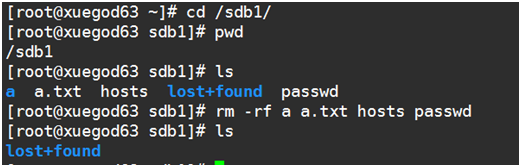
如何避免误删除的文件内容被覆盖???
卸载需要恢复文件的分区(卸载当前目录必须退出当前才行):或以只读的方式挂载
3.3.5 上传extundelete到linux中:
从windows上传extundelete文件到linux,安装xmanager或者CRT
[root@xuegod63 ~]# ls
anaconda-ks.cfg Downloads mia.txt Pictures xuegod.txt
c.txt extundelete-0.2.4.tar.bz2 mima Public
Desktop install.log Music Templates
Documents install.log.syslog new1.txt Videos
[root@xuegod63 ~]# tar jxf extundelete-0.2.4.tar.bz2
[root@xuegod63 ~]# ls
anaconda-ks.cfg Documents extundelete-0.2.4.tar.bz2 mia.txt new1.txt Templates
c.txt Downloads install.log mima Pictures Videos
Desktop extundelete-0.2.4 install.log.syslog Music Public xuegod.txt
[root@xuegod63 ~]# cd extundelete-0.2.4
[root@xuegod63 extundelete-0.2.4]# ls
acinclude.m4 autogen.sh configure depcomp LICENSE Makefile.in README
aclocal.m4 config.h.in configure.ac install-sh Makefile.am missing src
[root@localhost extundelete-0.2.4]# ./configure
Configuring extundelete 0.2.4
configure: error: Can't find ext2fs library
解决:
[root@localhost extundelete-0.2.4]# rpm -ivh /mnt/Packages/e2fsprogs-devel-1.41.12-18.el6.x86_64.rpm
warning: /media/RHEL_6.5 x86_64 Disc 1/Packages/e2fsprogs-devel-1.41.12-18.el6.x86_64.rpm: Header V3 RSA/SHA256 Signature, key ID fd431d51: NOKEY
Preparing... ########################################### [100%]
1:e2fsprogs-devel ########################################### [100%]
现在重新编译安装
[root@localhost extundelete-0.2.4]# ./configure
Configuring extundelete 0.2.4
Writing generated files to disk
[root@localhost extundelete-0.2.4]# make && make install
q make:编译,把源代码编译成可执行的二进制文件
q make install 安装
make -s all-recursive
Making all in src
extundelete.cc:571: 警告:未使用的参数‘flags’
Making install in src
/usr/bin/install -c extundelete '/usr/local/bin'
3.3.6 开始恢复
可以通过以下几种方法来进行恢复:
q 通过inode节点恢复
q 通过文件名恢复
q 恢复某个目录,如目录a下的所有文件:
q 恢复所有的文件
[root@localhost ~]# mkdir /test #创建一个目录用来存放恢复的数据和目录
[root@localhost ~]# cd /test/
首先先查看一下删除文件的节点号
[root@xuegod63 test]# extundelete /dev/sdb1 --inode 2

由此可知,根目录的inode值为2
NOTICE: Extended attributes are not restored.
Loading filesystem metadata ... 40 groups loaded.
Group: 0
Contents of inode 2:
0000 | ed 41 00 00 00 10 00 00 cd b5 1e 58 cc b5 1e 58 | .A.........X...X
0010 | cc b5 1e 58 00 00 00 00 00 00 03 00 08 00 00 00 | ...X............
0020 | 00 00 00 00 08 00 00 00 61 21 00 00 00 00 00 00 | ........a!......
0030 | 00 00 00 00 00 00 00 00 00 00 00 00 00 00 00 00 | ................
0040 | 00 00 00 00 00 00 00 00 00 00 00 00 00 00 00 00 | ................
0050 | 00 00 00 00 00 00 00 00 00 00 00 00 00 00 00 00 | ................
0060 | 00 00 00 00 00 00 00 00 00 00 00 00 00 00 00 00 | ................
0070 | 00 00 00 00 00 00 00 00 00 00 00 00 00 00 00 00 | ................
0080 | 1c 00 00 00 80 d5 79 00 80 d5 79 00 2c e7 b2 5d | ......y...y.,..]
0090 | 74 b4 1e 58 00 00 00 00 00 00 00 00 00 00 00 00 | t..X............
00a0 | 00 00 00 00 00 00 00 00 00 00 00 00 00 00 00 00 | ................
00b0 | 00 00 00 00 00 00 00 00 00 00 00 00 00 00 00 00 | ................
00c0 | 00 00 00 00 00 00 00 00 00 00 00 00 00 00 00 00 | ................
00d0 | 00 00 00 00 00 00 00 00 00 00 00 00 00 00 00 00 | ................
00e0 | 00 00 00 00 00 00 00 00 00 00 00 00 00 00 00 00 | ................
00f0 | 00 00 00 00 00 00 00 00 00 00 00 00 00 00 00 00 | ................
Inode is Allocated
File mode: 16877
Low 16 bits of Owner Uid: 0
Size in bytes: 4096
Access time: 1478407629
Creation time: 1478407628
Modification time: 1478407628
Deletion Time: 0
Low 16 bits of Group Id: 0
Links count: 3
Blocks count: 8
File flags: 0
File version (for NFS): 0
File ACL: 0
Directory ACL: 0
Fragment address: 0
Direct blocks: 8545, 0, 0, 0, 0, 0, 0, 0, 0, 0, 0, 0
Indirect block: 0
Double indirect block: 0
Triple indirect block: 0
File name | Inode number | Deleted status
. 2
.. 2
lost+found 11
passwd 12 Deleted
hosts 13 Deleted
a.txt 14 Deleted
a 131073 Deleted
方法1:通过inode节点恢复
[root@xuegod63 test]# extundelete --restore-inode 12 /dev/sdb1
NOTICE: Extended attributes are not restored.
Loading filesystem metadata ... 40 groups loaded.
Loading journal descriptors ... 66 descriptors loaded.
[root@xuegod63 test]# ls
RECOVERED_FILES
[root@xuegod63 test]# cd RECOVERED_FILES/
[root@xuegod63 RECOVERED_FILES]# ls
file.12
[root@xuegod63 RECOVERED_FILES]# ll
total 4
-rw-r--r-- 1 root root 1664 Nov 6 13:00 file.12
[root@xuegod63 RECOVERED_FILES]# diff file.12 /etc/passwd
# 没有任何输出,说明结果一样
[root@xuegod63 RECOVERED_FILES]# vi file.12
[root@xuegod63 RECOVERED_FILES]# mv file.12 passwd
[root@xuegod63 RECOVERED_FILES]# ls
passwd
方法二,通过文件名恢复
[root@xuegod63 test]# extundelete --restore-file hosts /dev/sdb1
NOTICE: Extended attributes are not restored.
Loading filesystem metadata ... 40 groups loaded.
Loading journal descriptors ... 66 descriptors loaded.
Successfully restored file hosts
[root@xuegod63 test]# cd RECOVERED_FILES/
[root@xuegod63 RECOVERED_FILES]# ls
hosts passwd
[root@xuegod63 RECOVERED_FILES]# diff hosts /etc/hosts
方法三:恢复某个目录,如目录a下的所有文件
[root@xuegod63 test]# extundelete --restore-directory a /dev/sdb1
NOTICE: Extended attributes are not restored.
Loading filesystem metadata ... 40 groups loaded.
Loading journal descriptors ... 66 descriptors loaded.
Searching for recoverable inodes in directory a ...
7 recoverable inodes found.
Looking through the directory structure for deleted files ...
4 recoverable inodes still lost.
[root@xuegod63 test]# ls
RECOVERED_FILES
[root@xuegod63 test]# cd RECOVERED_FILES/
[root@xuegod63 RECOVERED_FILES]# ls
a hosts passwd
[root@xuegod63 RECOVERED_FILES]# tree a
a
└── b
└── c
└── a.txt
2 directories, 1 file
注意:不支持恢复空文件
方法四:恢复所有的文件
[root@xuegod63 test]# extundelete --restore-all /dev/sdb1
NOTICE: Extended attributes are not restored.
Loading filesystem metadata ... 40 groups loaded.
Loading journal descriptors ... 66 descriptors loaded.
Searching for recoverable inodes in directory / ...
7 recoverable inodes found.
Looking through the directory structure for deleted files ...
0 recoverable inodes still lost.
[root@xuegod63 test]# ls
RECOVERED_FILES
[root@xuegod63 test]# cd RECOVERED_FILES/
[root@xuegod63 RECOVERED_FILES]# ls
a a.txt hosts passwd
删除前后的数据:
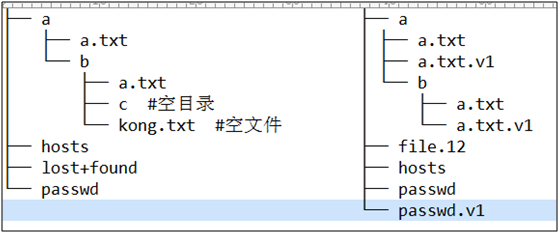
extundelete在恢复文件的时候能不能自动创建空文件和目录?
答:不能。
REHL7 xfs系统 可以的
版本6不支持xfs,只有ext4,所以用extundelet