我们在进行Android方面的开发时,追求的是个性化,自由化,所以一些控件都有自定义类型,ListView的三要素是listview控件本身,数据,适配器,下面展示ListView的使用方法还有在使用的时候出现的一些问题(本案例中使用的是web方式存储数据):
首先在你需要使用ListView的xml页面加入该控件:
  <ListView

    android:layout_width="match_parent"

    android:layout_height="wrap_content"

    android:id="@+id/mlistView"

    android:layout_gravity="center_horizontal" />
第二,我们需要做数据,本案例使用web存储数据,所以接下来展示web方向的代码(因为web只是获取数据,所以不过多注解):
1.链接数据库的类在这里省略(DbUtils)
2添加Java bean 对象
public class Hospital {
private int id,age;
private String name,birthplace;
public int getId() {
return id;
}
public void setId(int id) {
this.id = id;
}
public int getAge() {
return age;
}
public void setAge(int age) {
this.age = age;
}
public String getName() {
return name;
}
public void setName(String name) {
this.name = name;
}
public String getBirthplace() {
return birthplace;
}
public void setBirthplace(String birthplace) {
this.birthplace = birthplace;
}
}
3.接下来在做一些逻辑层代码
package com.scme.dao;
import java.sql.Connection;
import java.sql.PreparedStatement;
import java.sql.ResultSet;
import java.sql.SQLException;
import java.util.ArrayList;
import java.util.List;
import com.scme.pojo.Hospital;
import com.scme.utils.DbUtils;
public class HostpitalDao {
private static Connection conn;
private static PreparedStatement ps;
private static ResultSet rs;
private static List<Hospital> cList;
public List<Hospital> queryAll(){
cList = new ArrayList<Hospital>();
try {
conn = DbUtils.getConnection();
String sql = "select * from demo";
ps = conn.prepareStatement(sql);
rs = ps.executeQuery();
while(rs.next()){
Hospital n = new Hospital();
n.setId(rs.getInt(1));
n.setName(rs.getString(2));
n.setBirthplace(rs.getString(3));
n.setAge(rs.getInt(4));
cList.add(n);
}
} catch (ClassNotFoundException e) {
// TODO Auto-generated catch block
e.printStackTrace();
} catch (SQLException e) {
// TODO Auto-generated catch block
e.printStackTrace();
}
return cList;
}
}
4.最后在servlet 操作
public void doPost(HttpServletRequest request, HttpServletResponse response)
throws ServletException, IOException {
request.setCharacterEncoding("utf-8");
response.setCharacterEncoding("utf-8");
response.setContentType("text/html");
PrintWriter out = response.getWriter();
HostpitalDao dao = new HostpitalDao();
List<Hospital> mlist = dao.queryAll();
Gson gson = new Gson();
String str = gson.toJson(mlist);
System.out.println(str);
out.write(str);
out.flush();
out.close();
}
在添加数据后,需要在Android端获取数据
package com.example.haichao.listviewdemo;
import android.app.Activity;
import android.os.Bundle;
import android.os.Handler;
import android.os.Message;
import android.widget.ListView;
import android.widget.Toast;
import org.json.JSONArray;
import org.json.JSONException;
import org.json.JSONObject;
import java.io.BufferedReader;
import java.io.IOException;
import java.io.InputStreamReader;
import java.net.HttpURLConnection;
import java.net.URL;
import java.util.ArrayList;
import java.util.List;
/**
* Created by Administrator on 2017/3/31.
*/
public class ShowHostpital extends Activity {
private ListView listView ;
@Override
protected
void onCreate(Bundle
savedInstanceState) {
super.onCreate(savedInstanceState);
setContentView(R.layout.main_doctor);
//绑定控件
listView = (ListView) findViewById(R.id.mlistView);
//从web端接受数据。
getURLJsonData();
}
//使用Handler做异步任务
Handler mHandler
= new Handler(){
public void handleMessage(Message msg) {
if(msg.what == 99) {
String jsonStr = String.valueOf(msg.obj);
List <Hostptial>
list = new ArrayList<Hostptial>();
try {
JSONArray array = new JSONArray(jsonStr);
for(int i=0; i<array.length(); i++) {
JSONObject json =
new JSONObject(array.getJSONObject(i).toString());
//在获取数据后添加到实体类中
Hostptial info = new Hostptial();
info.setId(Integer.parseInt(json.getString("id")));
info.setName(json.getString("name"));
info.setBirthplace(json.getString("birthplace"));
info.setAge(Integer.parseInt(json.getString("age")));
list.add(info);
}
//
Toast.makeText(ShowHostpital.this, "共有" + list.size() + "行", Toast.LENGTH_SHORT).show();
listView.setAdapter(new
Adptor( ShowHostpital.this,list));
} catch (JSONException e) {
// TODO Auto-generated catch block
e.printStackTrace();
}
}
};
};
/**
* 使用URL方式从web端取json数据
*/
private void getURLJsonData() {
new Thread(new Runnable() {
@Override
public void run() {
// TODO Auto-generated method stub
try {
URL url = new URL("http://192.168.155.7:8080/DoctorApp/HospitalServlet");
HttpURLConnection
conn = (HttpURLConnection) url.openConnection();
if(conn.getResponseCode()
== 200) {
BufferedReader br
= new BufferedReader(new InputStreamReader(conn.getInputStream()));
String
responseText = br.readLine();
Message msg = new Message();
msg.what = 99;
msg.obj = responseText;
mHandler.sendMessage(msg);
}
} catch (IOException e) {
// TODO Auto-generated catch block
e.printStackTrace();
}
}
}).start();
}
}
还需要在你的另一个xml页面设置其中的子布局,使用布局可以按照所需要的布局进行罗列,这个布局在listview显示的只是其中的一行。(为了方便每一行的图片定义死了)
<LinearLayout xmlns:android="http://schemas.android.com/apk/res/android"
android:layout_width="match_parent"
android:layout_height="match_parent"
android:orientation="horizontal"
>
<ImageView
android:id="@+id/mpic"
android:layout_width="wrap_content"
android:layout_height="wrap_content"
android:background="@mipmap/hospital_img"
/>
<LinearLayout
android:layout_width="wrap_content"
android:layout_height="wrap_content"
android:orientation="vertical"
android:layout_weight="3"
>
<TextView
android:id="@+id/a"
android:layout_width="match_parent"
android:layout_height="wrap_content"
android:layout_weight="1"/>
<TextView
android:id="@+id/b"
android:layout_width="match_parent"
android:layout_height="wrap_content"
android:layout_weight="1"/>
<TextView
android:id="@+id/c"
android:layout_width="match_parent"
android:layout_height="wrap_content"
android:layout_weight="1"/>
</LinearLayout>
</LinearLayout>
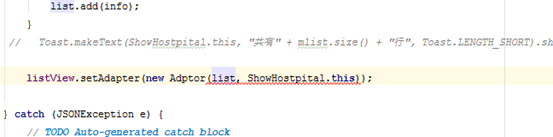
接下来就是使用适配器进行绑定了:
package com.example.haichao.listviewdemo;
import android.content.Context;
import android.view.LayoutInflater;
import android.view.View;
import android.view.ViewGroup;
import android.widget.BaseAdapter;
import android.widget.TextView;
import java.util.List;
/**
* Created by haichao on 2017/4/5.
*/
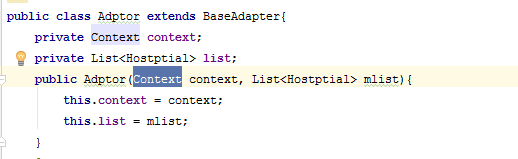
public class Adptor extends BaseAdapter {
private Context context;
private List<Hostptial> list;
public Adptor(Context
context, List<Hostptial> mlist){
this.context = context;
this.list = mlist;
}
@Override
public int getCount() {
return list.size();
}
@Override
public Object
getItem(int i) {
return null;
}
@Override
public long getItemId(int i) {
return 0;
}
@Override
public View
getView(int i, View v, ViewGroup viewGroup) {
v = LayoutInflater.from(context).inflate(R.layout.bottom_bar2,null);
((TextView)v.findViewById(R.id.c)).setText(String.valueOf(list.get(i).getAge()));
((TextView)v.findViewById(R.id.a)).setText(list.get(i).getName());
((TextView)v.findViewById(R.id.b)).setText(list.get(i).getBirthplace());
return v;
}
}
最后完成的效果就是:
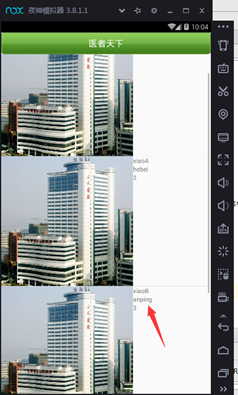
效果特别丑,凑活看
所出现的问题:
- 在适配器绑定数据的地方位置搞错了(如图):
在最后控制台报错:

这个问题归根结底是太马虎了
2.在控制台没有报错,但是在打开项目的时候,很抱歉项目已停止运行(如图):

原因:
在Android中对于编码比较苛刻,在适配器中,的settext中只能加入string类型的,因为没有转型所以在项目中报错。加String.valueOf就完事了、
注:本人只是一个Android初学者,如果所写文字有不恰当,或者不对的地方请留言