一般情况下,一个APP的数据都需要等待接口人员开发完对应的接口才可以获取到,这样子的效率有点低。最好是我们可以自己模拟接口数据,进行页面的数据填充,打通所有关节,之后等接口开发好了,改下接口地址就好了。
我们今天所要讲的工具:json-server就能实现这样的功能。
1、安装json-server
首先我们的电脑要安装有nodejs,然后使用npm命令来安装:sudo npm install -g json-server(windows系统的不需要加sudo)
MeWifi:~ cjy$ npm install -g json-server
/usr/local/bin/json-server -> /usr/local/lib/node_modules/json-server/bin/index.js
- ms@0.7.1 node_modules/json-server/node_modules/compression/node_modules/ms
/usr/local/lib
└─┬ json-server@0.11.2
  ├─┬ compression@1.7.0
  │ ├── bytes@2.5.0
  │ └── debug@2.6.8
  ├── cors@2.8.4
  ├─┬ express-urlrewrite@1.2.0
  │ └─┬ path-to-regexp@1.7.0
  │   └── isarray@0.0.1
  ├── please-upgrade-node@1.0.1
  ├─┬ update-notifier@1.0.3
  │ └─┬ latest-version@2.0.0
  │   └─┬ package-json@2.4.0
  │     └─┬ got@5.7.1
  │       └─┬ readable-stream@2.3.3
  │         └── isarray@1.0.0
  └─┬ yargs@6.6.0
    └─┬ read-pkg-up@1.0.1
      └─┬ read-pkg@1.1.0
        └─┬ normalize-package-data@2.4.0
          └── hosted-git-info@2.5.0
检验是否安装成功,查看json-server配置项:json-server -h
MeWifi:~ cjy$ json-server -h
/usr/local/bin/json-server [options] <source>

选项:
  --config, -c               Path to config file    [默认值: "json-server.json"]
  --port, -p                 Set port                             [默认值: 3000]
  --host, -H                 Set host                        [默认值: "0.0.0.0"]
  --watch, -w                Watch file(s)                                [布尔]
  --routes, -r               Path to routes file
  --middlewares, -m          Paths to middleware files                    [数组]
  --static, -s               Set static files directory
  --read-only, --ro          Allow only GET requests                      [布尔]
  --no-cors, --nc            Disable Cross-Origin Resource Sharing        [布尔]
  --no-gzip, --ng            Disable GZIP Content-Encoding                [布尔]
  --snapshots, -S            Set snapshots directory               [默认值: "."]
  --delay, -d                Add delay to responses (ms)
  --id, -i                   Set database id property (e.g. _id)  [默认值: "id"]
  --foreignKeySuffix, --fks  Set foreign key suffix (e.g. _id as in post_id)
                                                                  [默认值: "Id"]
  --quiet, -q                Suppress log messages from output            [布尔]
  --help, -h                 显示帮助信息                                 [布尔]
  --version, -v              显示版本号                                   [布尔]

示例:
  /usr/local/bin/json-server db.json
  /usr/local/bin/json-server file.js
  /usr/local/bin/json-server
  http://example.com/db.json

https://github.com/typicode/json-server
2、运行
在任意的目录创建一个json文件,例如在json目录创建data.json文件,写入以下内容,并在json目录下执行json-server data.json
{
    "list": {
        "news": [
            {
          "newsId": 1,
                "title": "标题1",
                "content": "私服大师傅放声大哭"
            },
            {
          "newsId": 2,
                "title": "标题2",
                "content": "怎么可能"
            }
        ]
    },
    "detail": {
        "object": {
            "name": "我是大锤",
            "sex": 1,
            "isComplete": true
        }
    }
}
成功的话会出现如下内容
MeWifi:~ cjy$ cd /工作/json/
MeWifi:json cjy$ json-server data.json

  {^_^}/ hi!

  Loading data.json
  Done

  Resources
  http://localhost:3000/list
  http://localhost:3000/detail

  Home
  http://localhost:3000

  Type s + enter at any time to create a snapshot of the database
接下去就可以访问了:

3、常用操作
json-server支持GET, POST, PUT, PATCH 和 DELETE 方法,更提供了一系列的查询方法,如limit,order等。
这里主要介绍下它的强大的过滤功能。
示例数据源:
[
    {
        "newsId": 1,
        "title": "标题1",
        "content": "私服大师傅放声大哭"
    },
    {
        "newsId": 2,
        "title": "标题2",
        "content": "怎么可能"
    }
]
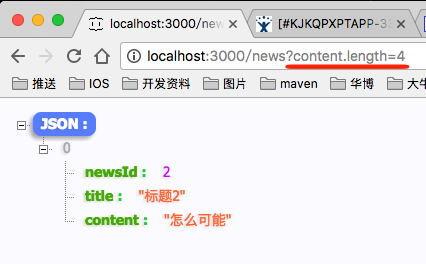
属性值(Filter)
使用 . 操作对象属性值
//获取content的长度为4的数据
排序(Sort)
使用 _sort 和 _order (默认使用升序(ASC))
//按照newsId降序排列

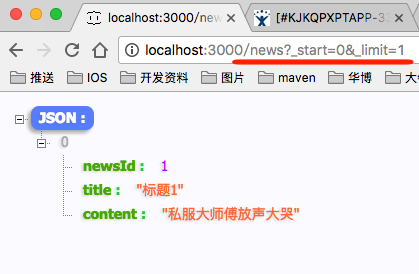
分割(Slice)
使用 _start 和 _end 或者 _limit
//从下标0(第一个对象)开始,获取1条数据
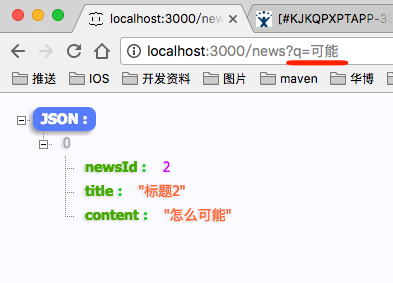
全文检索
使用 q,在对象全部value中遍历查找包含指定值的数据
//查找全部字段包含“可能”的数据
使用 _like 进行模糊查找 (支持正则表达式)
//查找content中含有“大哭”字样的数据

还有一些操作,可以参考这篇文章:json-server说明