一、事件监听介绍
原理: 观察者模式
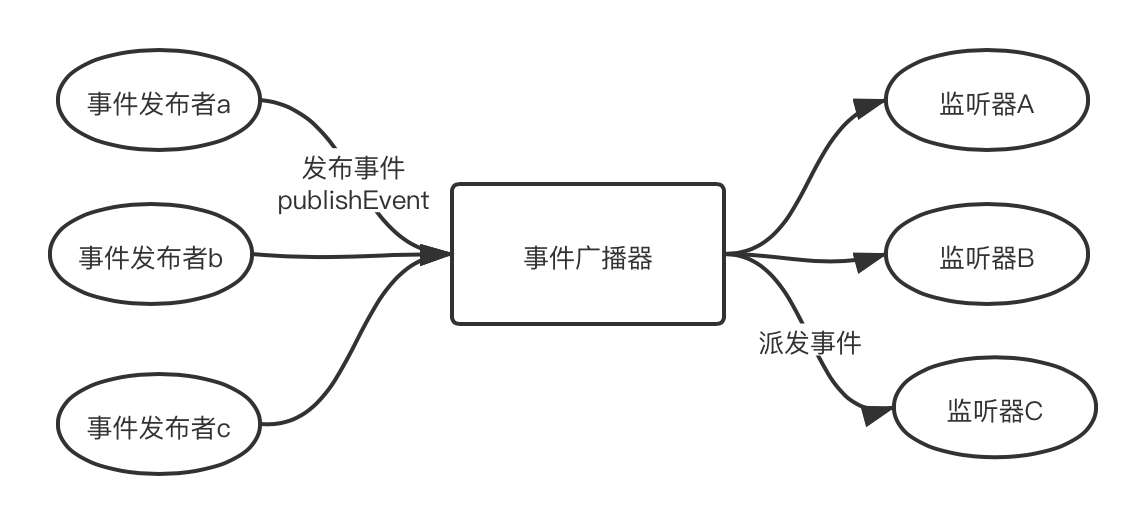
spring的事件监听有三个部分组成:
-
事件(ApplicationEvent) 负责对应相应监听器 事件源发生某事件是特定事件监听器被触发的原因。
-
监听器(ApplicationListener) 对应于观察者模式中的观察者。监听器监听特定事件,并在内部定义了事件发生后的响应逻辑。
-
事件发布器(ApplicationEventMulticaster )对应于观察者模式中的被观察者/主题, 负责通知观察者 对外提供发布事件和增删事件监听器的接口,维护事件和事件监听 器之间的映射关系,并在事件发生时负责通知相关监听器。
二、事件监听使用
1、事件
 1 public class MyApplicationEvent extends ApplicationEvent {
 2
 3     private String msg;
 4
 5     public MyApplicationEvent(Object source) {
 6         super(source);
 7     }
 8
 9     public MyApplicationEvent(Object source, String msg) {
10         super(source);
11         this.msg = msg;
12     }
13
14     public String getMsg() {
15         return msg;
16     }
17
18     public void setMsg(String msg) {
19         this.msg = msg;
20     }
21 }
2、监听器-接口模式
 1 @Component
 2 public class MyApplicationListener implements ApplicationListener {
 3     @Override
 4     public void onApplicationEvent(ApplicationEvent event) {
 5         System.out.println("MyApplicationListener: " +  "正在处理器事件");
 6         System.out.println("MyApplicationListener-事件源:" + event.getSource());
 7         if(event instanceof MyApplicationEvent) {
 8             System.out.println("MyApplicationListener-事件msg:" + ((MyApplicationEvent) event).getMsg());
 9         }
10     }
11 }
监听器-注解模式


 1 @Component
 2 public class MyCustomListener {
 3
 4     @EventListener
 5     public void processEvent(ApplicationEvent event){
 6         System.out.println("MyCustomListener: " +  "正在处理器事件");
 7         System.out.println("MyCustomListener-事件源:" + event.getSource());
 8         if(event instanceof MyApplicationEvent) {
 9             System.out.println("MyCustomListener-事件msg:" + ((MyApplicationEvent) event).getMsg());
10         }
11     }
12
13 }
3、事件发布器,使用Spring内置的,配置类
1 @Configuration
2 @ComponentScan("com.test.listener.component")
3 public class MainConfig {
4     public MainConfig(){
5         System.out.println("MainConfig 构造方法");
6     }
7 }
4、主方法启动
 1 public class MainStarter {
 2
 3     public static void main(String[] args) {
 4         AnnotationConfigApplicationContext context = new AnnotationConfigApplicationContext(MainConfig.class);
 5         // 1、创建一个事件
 6         MyApplicationEvent myApplicationEvent = new MyApplicationEvent(new Object(), "这是一个的新事件");
 7         // 2、发布事件
 8         context.publishEvent(myApplicationEvent);
 9         // 3、监听器处理
10         // .....
11         context.close();
12     }
13
14 }
三、原理图
1、事件监听相关类图

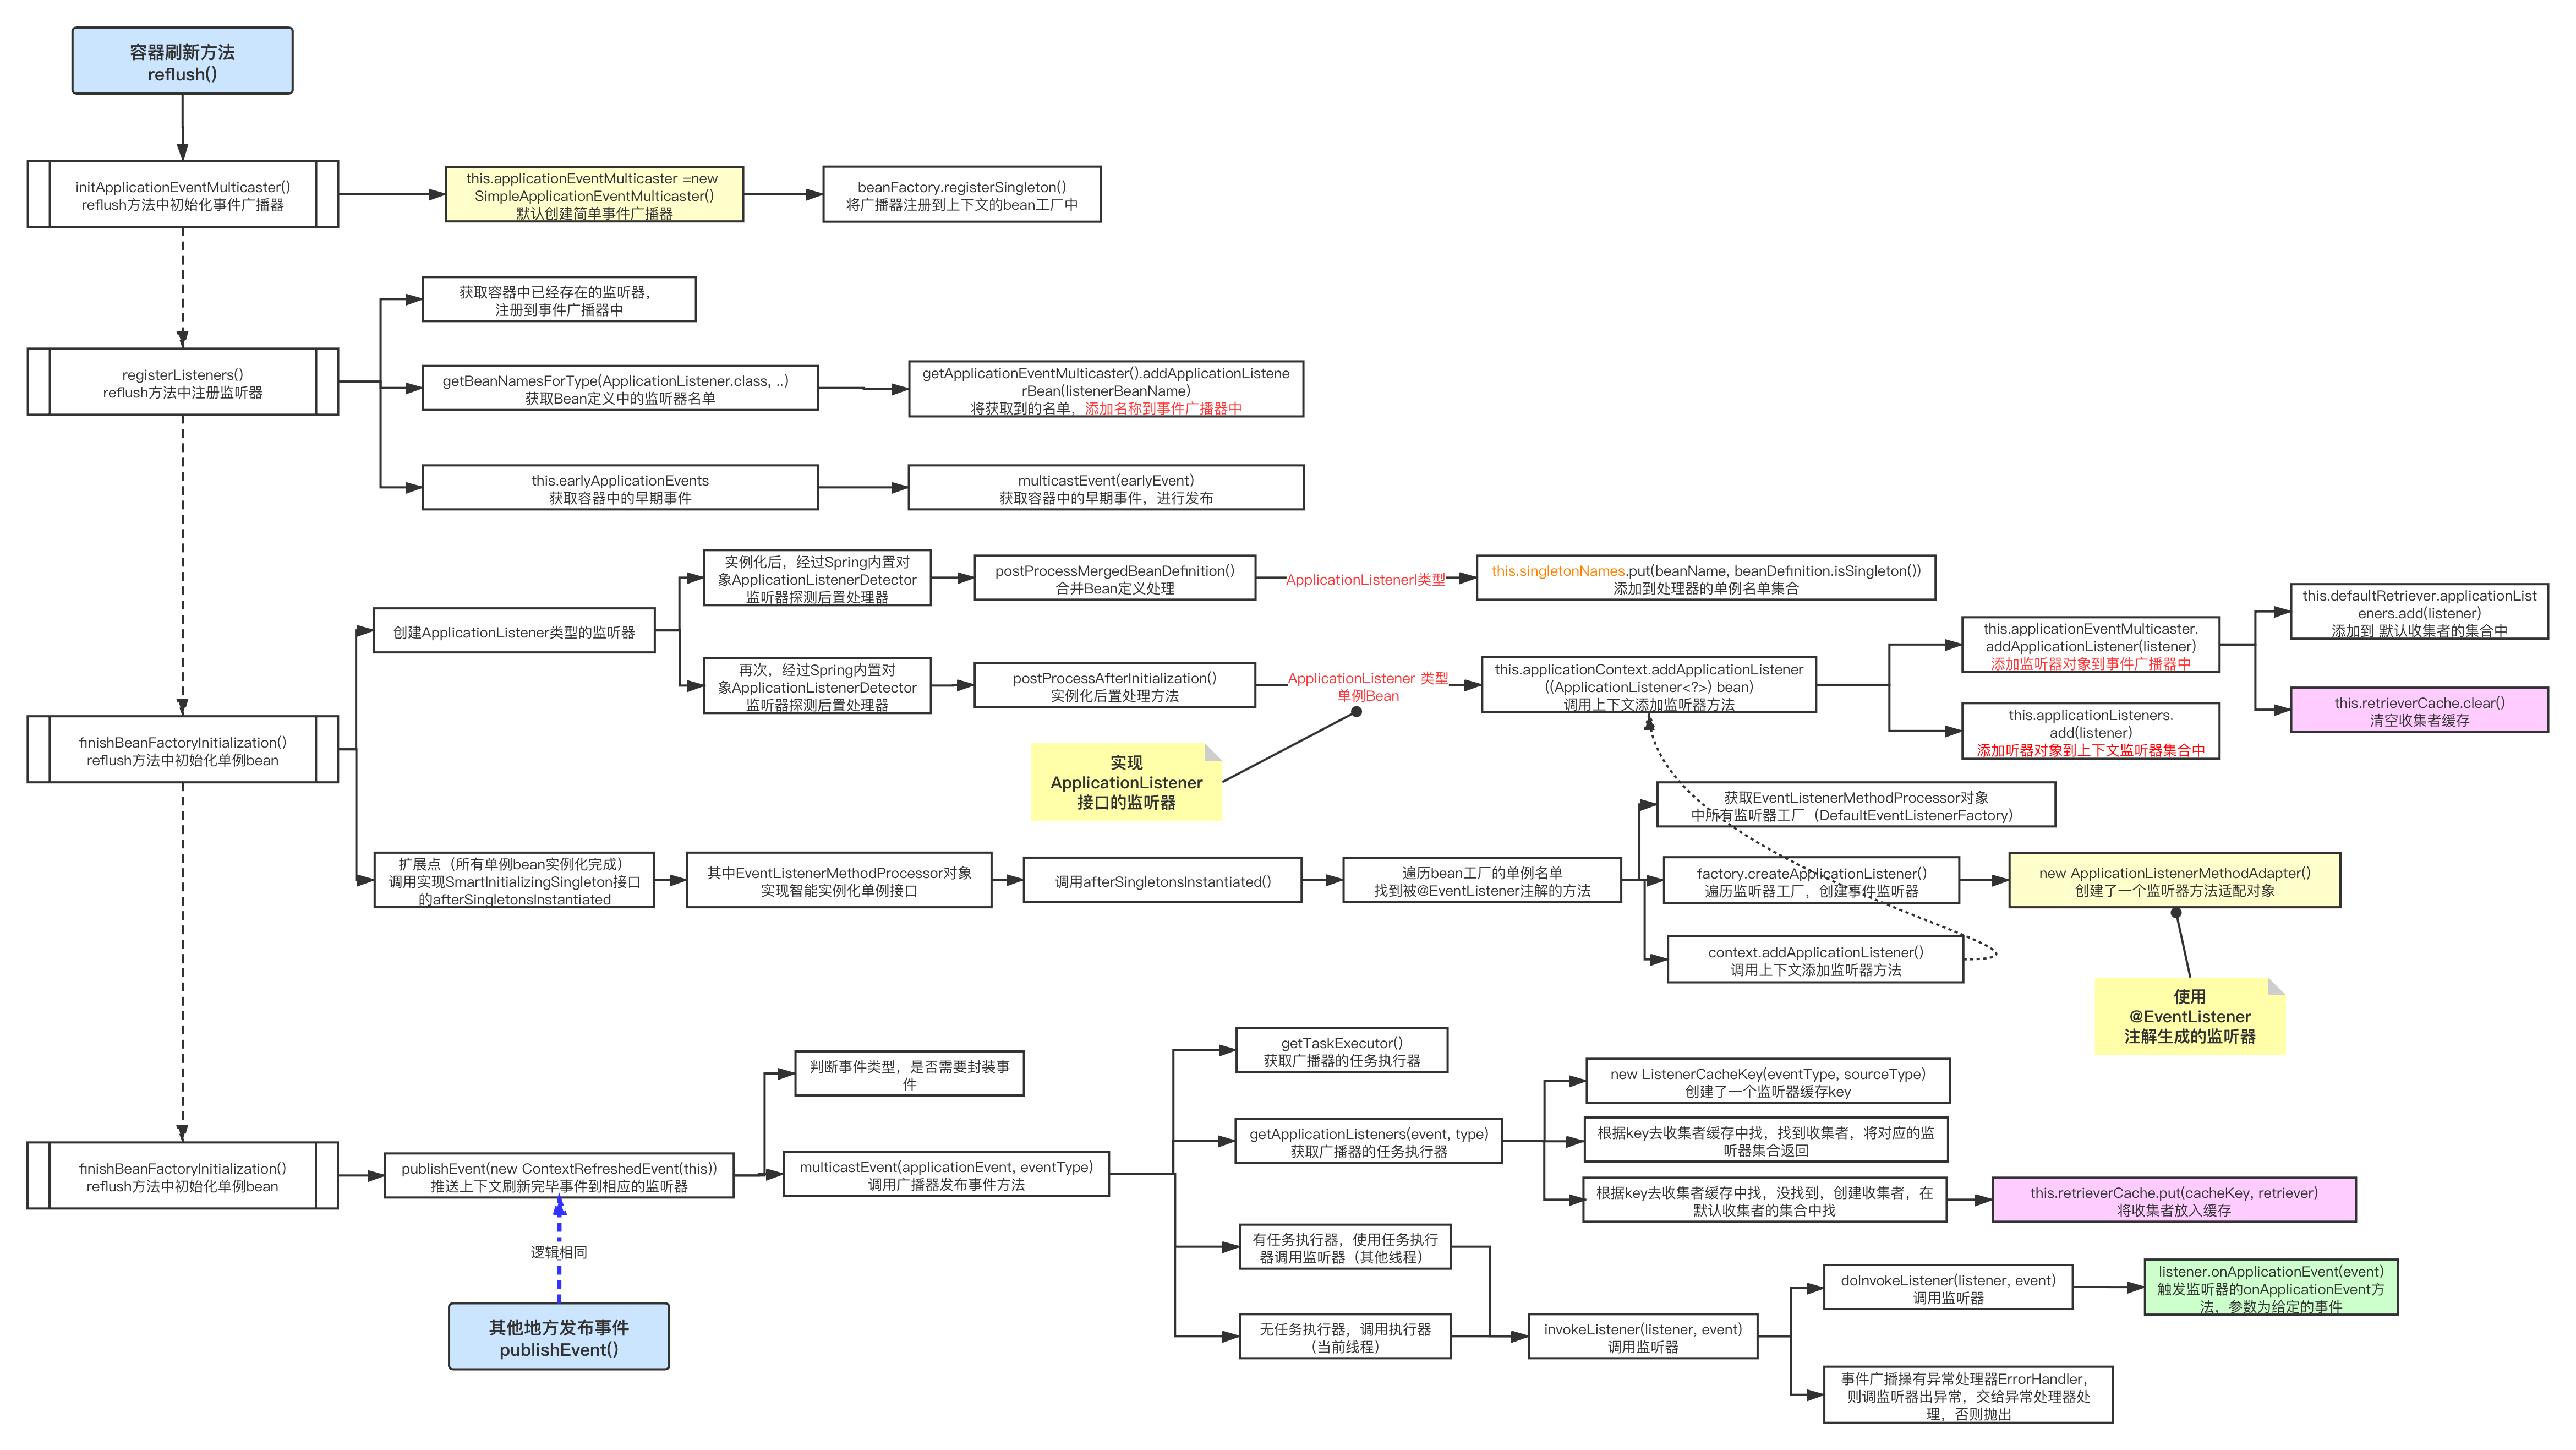
2、执行流程图
四、Spring事件监听源码分析
1、在reflush(),方法中调用 initApplicationEventMulticaster() 初始化事件广播器
 1 protected void initApplicationEventMulticaster() {
 2     ConfigurableListableBeanFactory beanFactory = getBeanFactory();
 3     // 判断Bean工厂中是有没有applicationEventMulticaster 应用广播器组件
 4     if (beanFactory.containsLocalBean(APPLICATION_EVENT_MULTICASTER_BEAN_NAME)) {
 5         // 直接显示的调用getBean获取出来赋值给的applicationContext对象
 6         this.applicationEventMulticaster =
 7                 beanFactory.getBean(APPLICATION_EVENT_MULTICASTER_BEAN_NAME, ApplicationEventMulticaster.class);
 8         if (logger.isTraceEnabled()) {
 9             logger.trace("Using ApplicationEventMulticaster [" + this.applicationEventMulticaster + "]");
10         }
11     }
12     // Bean工厂中没有的话
13     else {
14         // new 一个SimpleApplicationEventMulticaster对象
15         this.applicationEventMulticaster = new SimpleApplicationEventMulticaster(beanFactory);
16         // 并且注入到容器中
17         beanFactory.registerSingleton(APPLICATION_EVENT_MULTICASTER_BEAN_NAME, this.applicationEventMulticaster);
18         if (logger.isTraceEnabled()) {
19             logger.trace("No '" + APPLICATION_EVENT_MULTICASTER_BEAN_NAME + "' bean, using " +
20                     "[" + this.applicationEventMulticaster.getClass().getSimpleName() + "]");
21         }
22     }
23 }
2、在reflush(),方法中调用registerListeners() 注册监听器
 1 protected void registerListeners() {
 2     // Register statically specified listeners first.
 3     // 获取容器中所有的监听器对象(成品对象)
 4     for (ApplicationListener<?> listener : getApplicationListeners()) {
 5         // 把监听器的注册到事件广播器上去
 6         getApplicationEventMulticaster().addApplicationListener(listener);
 7     }
 8
 9     // Do not initialize FactoryBeans here: We need to leave all regular beans
10     // uninitialized to let post-processors apply to them!
11     // 根据类型从bean工厂的bean定义中,获取bean定义名单
12     String[] listenerBeanNames = getBeanNamesForType(ApplicationListener.class, true, false);
13     for (String listenerBeanName : listenerBeanNames) {
14         // 把监听器的注册到事件广播器上去,只是注册的名单
15         getApplicationEventMulticaster().addApplicationListenerBean(listenerBeanName);
16     }
17
18     // Publish early application events now that we finally have a multicaster...
19     // 获取早期事件
20     Set<ApplicationEvent> earlyEventsToProcess = this.earlyApplicationEvents;
21     this.earlyApplicationEvents = null;
22     if (earlyEventsToProcess != null) {
23         for (ApplicationEvent earlyEvent : earlyEventsToProcess) {
24             // 获取事件广播器,发布早期事件
25             getApplicationEventMulticaster().multicastEvent(earlyEvent);
26         }
27     }
28 }
3、发布事件方法 publishEvent()
 1 protected void publishEvent(Object event, @Nullable ResolvableType eventType) {
 2     Assert.notNull(event, "Event must not be null");
 3
 4     // Decorate event as an ApplicationEvent if necessary
 5     // 1、如有必要,将事件装饰为ApplicationEvent
 6     ApplicationEvent applicationEvent;
 7     if (event instanceof ApplicationEvent) {
 8         applicationEvent = (ApplicationEvent) event;
 9     }
10     else {
11         applicationEvent = new PayloadApplicationEvent<>(this, event);
12         if (eventType == null) {
13             eventType = ((PayloadApplicationEvent<?>) applicationEvent).getResolvableType();
14         }
15     }
16
17     // Multicast right now if possible - or lazily once the multicaster is initialized
18     if (this.earlyApplicationEvents != null) {
19         this.earlyApplicationEvents.add(applicationEvent);
20     }
21     else {
22         //  2、使用事件广播器广播事件到相应的监听器
23         getApplicationEventMulticaster().multicastEvent(applicationEvent, eventType);
24     }
25
26     // Publish event via parent context as well...
27     // 3、如果有父容器
28     if (this.parent != null) {
29         if (this.parent instanceof AbstractApplicationContext) {
30             // 使用父容器,带事件类型参数的,    发布事件
31             ((AbstractApplicationContext) this.parent).publishEvent(event, eventType);
32         }
33         else {
34             // 使用父容器发布事件
35             this.parent.publishEvent(event);
36         }
37     }
38 }
4、广播器广播事件方法 multicastEvent()
 1 @Override
 2 public void multicastEvent(final ApplicationEvent event, @Nullable ResolvableType eventType) {
 3     ResolvableType type = (eventType != null ? eventType : resolveDefaultEventType(event));
 4     // 1、返回此广播器的当前任务执行器
 5     Executor executor = getTaskExecutor();
 6     // 2、、getApplicationListeners:返回与给定事件类型匹配的应用监听器集合
 7     for (ApplicationListener<?> listener : getApplicationListeners(event, type)) {
 8         // 3.1 executor不为null,则使用executor调用监听器
 9         if (executor != null) {
10             executor.execute(() -> invokeListener(listener, event));
11         }
12         // 3.2 否则,直接调用监听器
13         else {
14             invokeListener(listener, event);
15         }
16     }
17 }
5、广播器广播事件方法 multicastEvent() , 其中 doInvokeListener() 就去调用了监听器的处理事件方法
 1 protected void invokeListener(ApplicationListener<?> listener, ApplicationEvent event) {
 2     // 1.返回此广播器的当前错误处理器
 3     ErrorHandler errorHandler = getErrorHandler();
 4     if (errorHandler != null) {
 5         try {
 6             // 2.1 如果errorHandler不为null,则使用带错误处理的方式调用给定的监听器
 7             doInvokeListener(listener, event);
 8         }
 9         catch (Throwable err) {
10             errorHandler.handleError(err);
11         }
12     }
13     else {
14         // 2.2 否则,直接调用调用给定的监听器
15         doInvokeListener(listener, event);
16     }
17 }