一、IO流基本概念
1.1、比特(Bit)、字节(Byte)、字符(Char)
-
Bit 位,是计算机最小的二进制单位 ,取0或1,主要用于计算机操作。
-
Byte 字节,是数据的最小单位,由8位bit组成,取值(-128-127),主要用于计算机操作数据。
-
Char 字符,是用户可读写的最小单位,由16位bit(2个byte)组成,取值(0-65535),主要用于用户操数数据。
1.2、IO流的概念
-
它是指数据从源头 流到 目的地,所以常把这种数据流叫做IO流。
-
I/O是Input/Output的缩写, I/O技术是非常实用的技术,用于 处理设备之间的数据传输。如读/写文件,网络通讯等。
-
Java程序中,对于数据的输入/输出操作以“流(stream)” 的 方式进行。
-
java.io包下提供了各种“流”类和接口,用以获取不同种类的 数据,并通过标准的方法输入或输出数据。
-
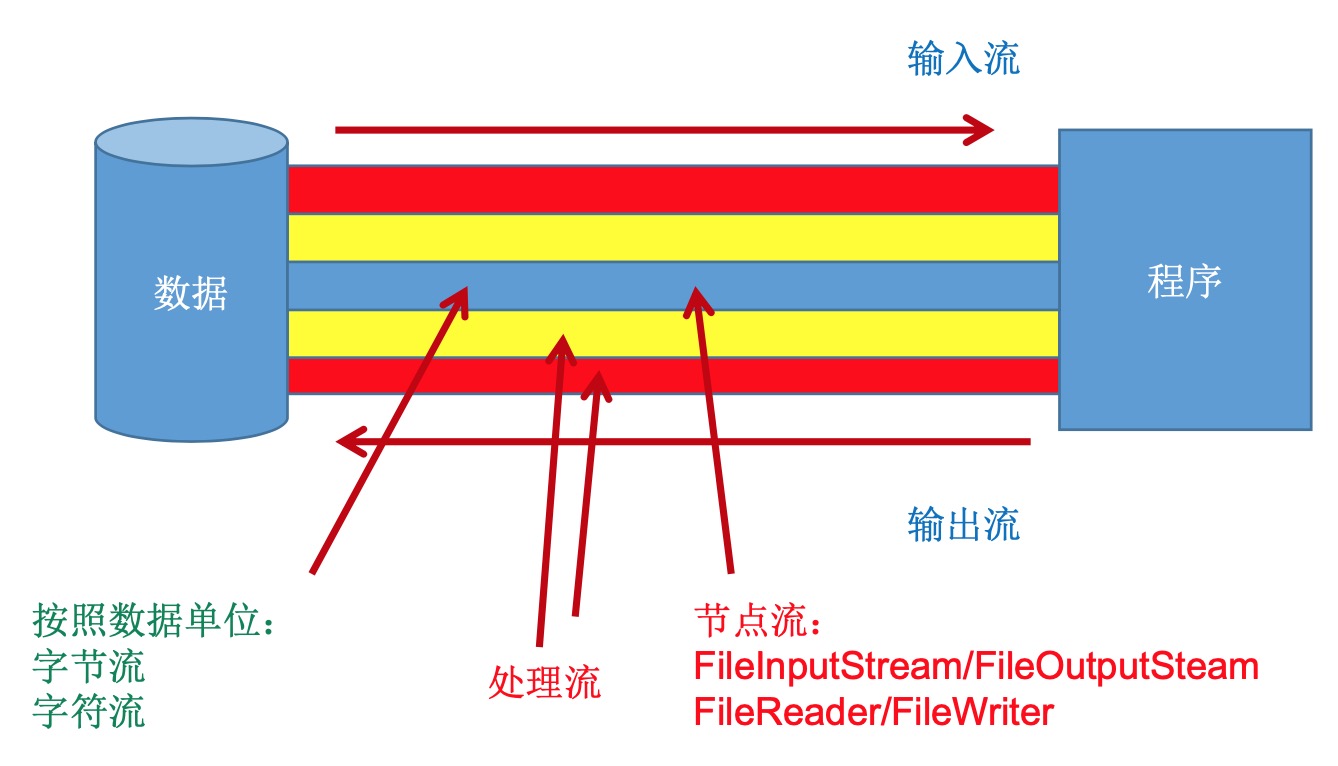
输入input: 读取外部数据(磁 盘、光盘等存储设备的数据)到 程序(内存)中。
-
输出output: 将程序(内存) 数据输出到磁盘、光盘等存储设 备中。
1.3、流的分类
-
按操作数据单位不同分为: 字节流(8 bit),字符流(16 bit)
-
按数据流的流向不同分为: 输入流,输出流
-
按流的角色的不同分为: 节点流,处理流
1.4、IO 流体系
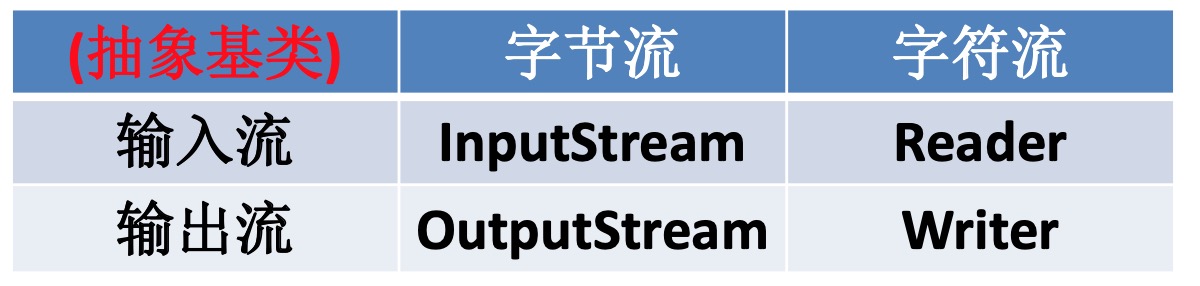
1、Java的IO流共涉及40多个类,实际上非常规则,都是从如下4个 抽象基类派生的。
2、由这四个类派生出来的子类名称都是以其父类名作为子类名后缀。
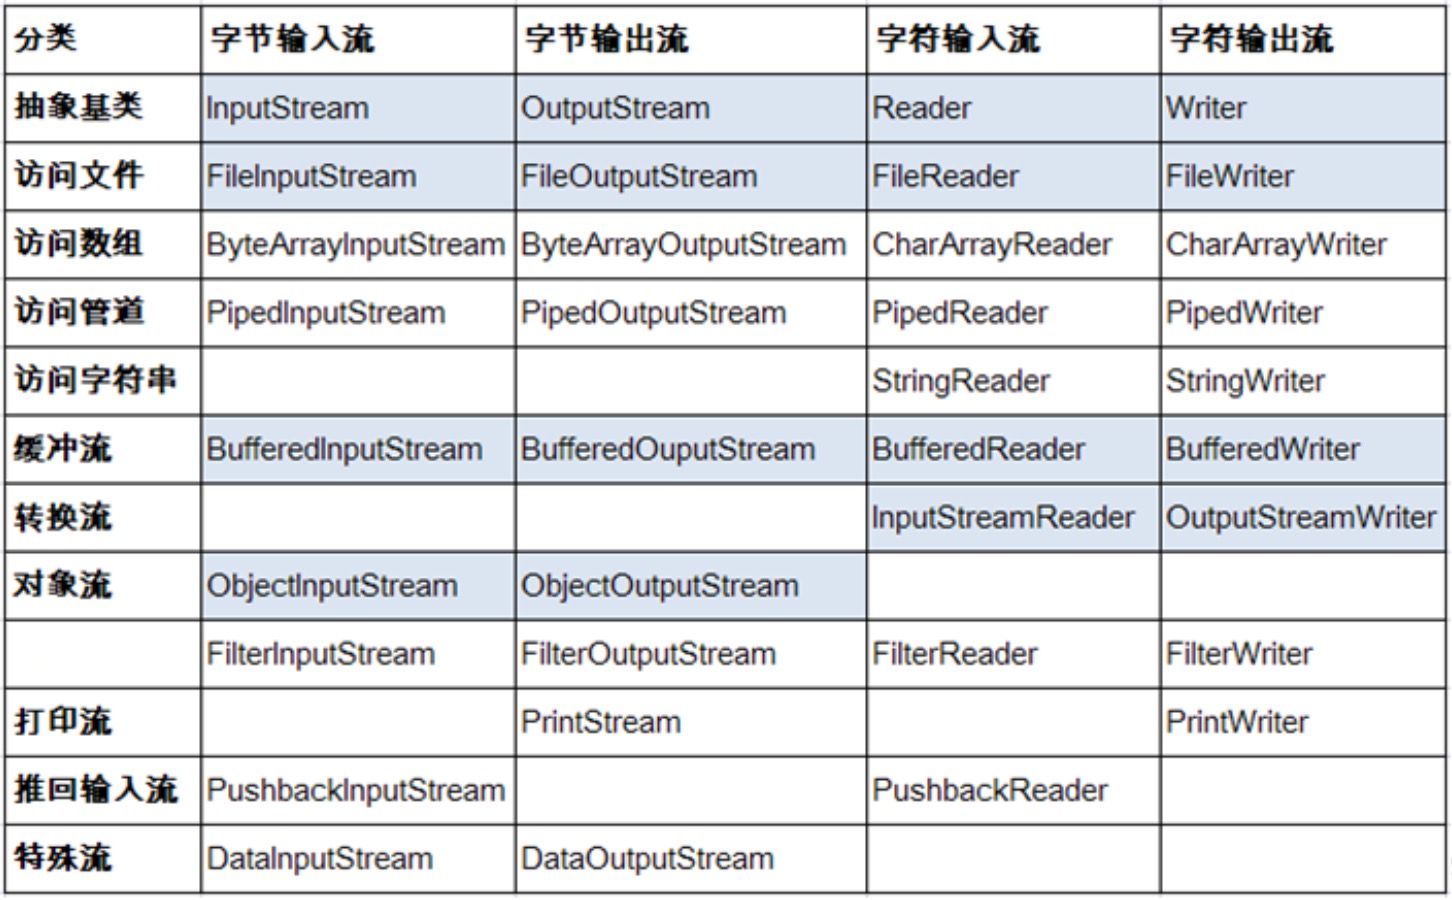
IO流继承体系

二、字节流
2.1、Inpustream
InputStream有read方法,一次读取一个字节,OutputStream的write方法一次写一个int。这两个类都是抽象类。意味着不能创建对象,那么需要找到具体的子类来使用。操作流的步骤都是:
第一步:1:实例化File类对象
第二步:2:打开流(即创建流)
第三步:3:通过流读取内容
第四步:4:用完后,关闭流资源
案例一:使用 read()方法,一次读取一个字节,读到文件末尾返回-1.


 1 public void testFileInputStream() {
 2     // 1、实例化File类对象
 3     File file = new File("hello.txt");
 4     // 2、提供具体流
 5     FileInputStream fis = null;
 6     try {
 7         fis = new FileInputStream(file);
 8         // 3、数据读取
 9         // read():返回读入的一个字符。如果达到文件末尾了,返回-1
10         int data;
11         while ( (data=fis.read()) != -1) {
12             System.out.print((char) data);
13         }
14
15     } catch (IOException e) {
16         e.printStackTrace();
17
18     } finally {
19         // 4、关闭流
20         if (fis != null) {
21             try {
22                 fis.close();
23             } catch (IOException e) {
24                 e.printStackTrace();
25             }
26         }
27     }
28 }
案例二(推荐使用):使用read()方法的时候,可以将读到的数据装入到字节数组中,相当于缓冲(提高效率),并循环读取(读完所有内容).
 1 public void testFileInputStream() {
 2     // 1、造文件
 3     File file = new File("hello.txt");
 4
 5     // 2、造输入流
 6     FileInputStream fileInputStream = null;
 7     try {
 8         fileInputStream = new FileInputStream(file);
 9
10         // 3、读数据
11         byte[] buffer = new byte[5];
12         int len;
13         while ((len = fileInputStream.read(buffer)) != -1) {
14             System.out.print(new String(buffer, 0, len));
15         }
16
17     } catch (FileNotFoundException e) {
18         e.printStackTrace();
19     } catch (IOException e) {
20         e.printStackTrace();
21     } finally {
22         // 4、关闭流资源
23         if (fileInputStream != null) {
24             try {
25                 fileInputStream.close();
26             } catch (IOException e) {
27                 e.printStackTrace();
28             }
29         }
30     }
31 }
2.2、OutputStream
OutputStram 的write方法,一次只能写一个字节。成功的向文件中写入了内容。但是并不高效,如何提高效率呢?可以使用缓冲,在OutputStram类中有write(byte[] b)方法,将 b.length个字节从指定的 byte 数组写入此输出流中。
操作步骤与读取类似
 1 public void testFileOutputStream() {
 2     // 1、提供File类对象,并指明写出的文件
 3     File file = new File("hello2.txt");
 4
 5     // 2、提供FileOutputStream的对象,用于数据的写出
 6     FileOutputStream fos = null;
 7     try {
 8         // 第二个参数,是否在原文件上追加内容,默认为false
 9         fos = new FileOutputStream(file, true);
10
11         // 3、写出的操作
12         fos.write("I have a Dream".getBytes());
13
14     } catch (IOException e) {
15         e.printStackTrace();
16     } finally {
17         // 4、流资源的关闭
18         if (fos != null) {
19             try {
20                 fos.close();
21             } catch (IOException e) {
22                 e.printStackTrace();
23             }
24         }
25     }
26
27 }
2.3、输入输出流综合使用——文件拷贝实现
可以根据拷贝的需求调整数组的大小,一般是1024的整数倍。使用缓冲后效率大大提高。目前我们是抛出处理,一旦出现了异常,close就没有执行,也就没有释放资源。那么为了保证close的执行该如何处理呢。那么就需要使用try{} catch(){}finally{}语句。try中放入可能出现异常的语句,catch是捕获异常对象,fianlly是一定要执行的代码。
 1 public void testFileInputOutputStream() {
 2     // 1、创建File类的对象,指明读入和写出的文件
 3     File srcFile = new File("tomcat.png");
 4     File destFile = new File("tomcat2.png");
 5
 6
 7     // 2、创建输入流和输出流的对象
 8     FileInputStream fileInputStream = null;
 9     FileOutputStream fileOutputStream = null;
10     try {
11         fileInputStream = new FileInputStream(srcFile);
12         fileOutputStream = new FileOutputStream(destFile);
13
14         // 3、数据的读入和写出操作
15         byte[] cbuf = new byte[1024];
16         int len;
17         while ((len = fileInputStream.read(cbuf)) != -1) {
18             fileOutputStream.write(cbuf, 0, len);
19         }
20     } catch (FileNotFoundException e) {
21         e.printStackTrace();
22     } catch (IOException e) {
23         e.printStackTrace();
24     } finally {
25
26         // 4、关闭流资源
27         if (fileOutputStream != null) {
28             try {
29                 fileOutputStream.close();
30             } catch (IOException e) {
31                 e.printStackTrace();
32             }
33         }
34         if (fileInputStream != null) {
35             try {
36                 fileInputStream.close();
37             } catch (IOException e) {
38                 e.printStackTrace();
39             }
40         }
41
42     }
43 }
三、字符流
计算机并不区分二进制文件与文本文件。所有的文件都是以二进制形式来存储的,因此,从本质上说,所有的文件都是二进制文件。所以字符流是建立在字节流之上的,它能够提供字符层次的编码和解码。可以说字符流就是:字节流 + 编码表,为了更便于操作文字数据。字符流的抽象基类:Reader , Writer。由这些类派生出来的子类名称都是以其父类名作为子类名的后缀,如FileReader、FileWriter。
 1 public void testFileReaderFileWriter() {
 2     // 1、创建File类的对象,指明读入和写出的文件
 3     File srcFile = new File("hello.txt");
 4     File destFile = new File("hello2.txt");
 5
 6     // 2、创建输入流和输出流的对象
 7     FileReader fileReader = null;
 8     FileWriter fileWriter = null;
 9     try {
10         fileReader = new FileReader(srcFile);
11         fileWriter = new FileWriter(destFile);
12
13         // 3、数据的读入和写出操作
14         char[] cbuf = new char[5];
15         int len;
16         while ((len = fileReader.read(cbuf)) != -1) {
17             fileWriter.write(cbuf, 0, len);
18         }
19     } catch (FileNotFoundException e) {
20         e.printStackTrace();
21     } catch (IOException e) {
22         e.printStackTrace();
23     } finally {
24
25         // 4、关闭流资源
26         if(fileWriter != null ){
27             try {
28                 fileWriter.close();
29             } catch (IOException e) {
30                 e.printStackTrace();
31             }
32         }
33         if (fileReader != null) {
34             try {
35                 fileReader.close();
36             } catch (IOException e) {
37                 e.printStackTrace();
38             }
39         }
40
41     }
42 }
* 结论:
* 1、对于文本文件(.txt,.java,.c,.cpp),使用字符流处理
* 2、对于非文本文件(.jpg,.mp3,.mp4,.avi,.doc,.ppt),使用字节流文件
四、缓冲流
Java其实提供了专门的字节流缓冲来提高效率。BufferedInputStream 和 BufferedOutputStream。BufferedOutputStream和BufferedOutputStream类可以通过减少读写次数来提高输入和输出的速度。它们内部有一个缓冲区,用来提高处理效率。查看API文档,发现可以指定缓冲区的大小。其实内部也是封装了字节数组。没有指定缓冲区大小,默认的字节是8192。显然缓冲区输入流和缓冲区输出流要配合使用。首先缓冲区输入流会将读取到的数据读入缓冲区,当缓冲区满时,或者调用flush方法,缓冲输出流会将数据写出。
注意:当然使用缓冲流来进行提高效率时,对于小文件可能看不到性能的提升。但是文件稍微大一些的话,就可以看到实质的性能提升了。
文件拷贝实现示例
 1 public void bufferedStreamTest(){
 2     // 1、造文件
 3     File srcFile = new File("hello.txt");
 4     File destFile = new File("hello2.txt");
 5
 6     // 2、造流
 7     // 2.1、造节点流
 8     FileInputStream fis = null;
 9     FileOutputStream fos = null;
10     BufferedInputStream bis = null;
11     BufferedOutputStream bos = null;
12     try {
13         fis = new FileInputStream(srcFile);
14         fos = new FileOutputStream(destFile);
15
16         // 2.2、造缓冲流
17         bis = new BufferedInputStream(fis);
18         bos = new BufferedOutputStream(fos);
19
20         // 3、复制的细节:读取、写入
21         byte[] buffer = new byte[1024];
22         int len;
23         while ((len = bis.read(buffer)) != -1) {
24             bos.write(buffer, 0, len);
25
26             // 刷新缓冲区,手动将buffer中的数据写入文件
27 //                bos.flush();
28         }
29     } catch (FileNotFoundException e) {
30         e.printStackTrace();
31     } catch (IOException e) {
32         e.printStackTrace();
33     } finally {
34
35         // 4、资源关闭
36         // 要求:先关闭外层的流,在关闭内层的流
37         if(bos != null) {
38             try {
39                 bos.close();
40             } catch (IOException e) {
41                 e.printStackTrace();
42             }
43         }
44         if(bis != null) {
45             try {
46                 bis.close();
47             } catch (IOException e) {
48                 e.printStackTrace();
49             }
50         }
51         // 说明:在关闭外层流的同时,内层流也会自动的进行关闭
52         // 关闭内层流的操作,可以忽略
53 //        fos.close();
54 //        fis.close();
55     }
56 }
五、转换流
1、转换流提供了在字节流和字符流之间的转换2、Java API提供了两个转换流:
1)InputStreamReader:将InputStream转换为Reader
2)OutputStreamWriter:将Writer转换为OutputStream
3、字节流中的数据都是字符时,转成字符流操作更高效。
4、很多时候我们使用转换流来处理文件乱码问题。实现编码和 解码的功能。

示例代码如下:
 1 public void test2() {
 2     InputStreamReader isr = null;
 3     OutputStreamWriter osw = null;
 4
 5     try {
 6         FileInputStream fis = new FileInputStream("hello.txt");
 7         FileOutputStream fos = new FileOutputStream("hello2.txt");
 8
 9         isr = new InputStreamReader(fis, "utf-8");
10         osw = new OutputStreamWriter(fos, "gbk");
11
12         char[] cbuf = new char[5];
13         int len;
14         while ((len = isr.read(cbuf)) != -1) {
15             String str = new String(cbuf, 0, len);
16             System.out.print(str);
17             osw.write(str);
18         }
19
20     } catch (FileNotFoundException e) {
21         e.printStackTrace();
22     } catch (UnsupportedEncodingException e) {
23         e.printStackTrace();
24     } catch (IOException e) {
25         e.printStackTrace();
26     } finally {
27         if(osw != null){
28             try {
29                 osw.close();
30             } catch (IOException e) {
31                 e.printStackTrace();
32             }
33         }
34         if (isr != null) {
35             try {
36                 isr.close();
37             } catch (IOException e) {
38                 e.printStackTrace();
39             }
40
41         }
42     }
43 }
六、其他流介绍
6.1、标准输入、输出流(了解)
-
System.in和System.out分别代表了系统标准的输入和输出设备
-
默认输入设备是:键盘,输出设备是:显示器
-
System.in的类型是InputStream
-
System.out的类型是PrintStream,其是OutputStream的子类FilterOutputStream 的子类
-
重定向:通过System类的setIn,setOut方法对默认设备进行改变。
public static void setIn(InputStream in)
public static void setOut(PrintStream out)
6.2、打印流(了解)
实现将基本数据类型的数据格式转化为字符串输出
打印流:PrintStream和PrintWriter
-
提供了一系列重载的print()和println()方法,用于多种数据类型的输出
-
PrintStream和PrintWriter的输出不会抛出IOException异常
-
PrintStream和PrintWriter有自动flush功能
-
PrintStream 打印的所有字符都使用平台的默认字符编码转换为字节。
在需要写入字符而不是写入字节的情况下,应该使用 PrintWriter 类。
-
System.out返回的是PrintStream的实例
6.3、数据流(了解)
1、为了方便地操作Java语言的基本数据类型和String的数据,可以使用数据流
2、数据流有两个类:(用于读取和写出基本数据类型、String类的数据)
DataInputStream 和 DataOutputStream
分别“套接”在 InputStream 和 OutputStream 子类的流上
3、DataInputStream中的方法
-
- boolean readBoolean()
- char readChar()
- double readDouble()
- long readLong()
- String readUTF()
- byte readByte()
- float readFloat()
- short readShort()
- int readInt()
- void readFully(byte[] b)
4、DataOutputStream中的方法
将上述的方法的read改为相应的write即可。
 1 /**
 2  * 数据流 DataInputStream 和 DataOutputStream
 3  * 作用:用于读取和写出基本数据类型的变量或字符串
 4  *
 5  */
 6 public void testDataOutputStream(){
 7     DataOutputStream dos = null;
 8     try {
 9         dos = new DataOutputStream(new FileOutputStream("d.txt"));
10
11         dos.writeUTF("中国人");
12         dos.flush(); // 刷新操作,一定执行就会将数据写入文件
13         dos.writeInt(12);
14         dos.writeDouble(1.1);
15         dos.writeBoolean(true);
16     } catch (FileNotFoundException e) {
17         e.printStackTrace();
18     } catch (IOException e) {
19         e.printStackTrace();
20     } finally {
21         if(dos != null) {
22             try {
23                 dos.close();
24             } catch (IOException e) {
25                 e.printStackTrace();
26             }
27         }
28     }
29
30 }
31
32 public void testDataInputStream(){
33     DataInputStream dis = null;
34     try {
35         dis = new DataInputStream(new FileInputStream("d.txt"));
36
37         String str = dis.readUTF();
38         System.out.println(str);
39         int num = dis.readInt();
40         System.out.println(num);
41         double dou = dis.readDouble();
42         System.out.println(dou);
43         boolean b = dis.readBoolean();
44         System.out.println(b);
45     } catch (FileNotFoundException e) {
46         e.printStackTrace();
47     } catch (IOException e) {
48         e.printStackTrace();
49     } finally {
50         if(dis != null) {
51             try {
52                 dis.close();
53             } catch (IOException e) {
54                 e.printStackTrace();
55             }
56         }
57     }
58
59 }
6.4、对象流
ObjectInputStream和OjbectOutputSteam
用于存储和读取基本数据类型数据或对象的处理流。它的强大之处就是可以把Java中的对象写入到数据源中,也能把对象从数据源中还原回来。
序列化:用ObjectOutputStream类保存基本类型数据或对象的机制
反序列化:用ObjectInputStream类读取基本类型数据或对象的机制
ObjectOutputStream和ObjectInputStream不能序列化static和transient修 饰的成员变量
6.5、随机存取文件流
RandomAccessFile 类
RandomAccessFile 声明在java.io包下,但直接继承于java.lang.Object类。并且它实现了DataInput、DataOutput这两个接口,也就意味着这个类既可以读也 可以写。
RandomAccessFile 类支持 “随机访问” 的方式,程序可以直接跳到文件的任意 地方来读、写文件
> 支持只访问文件的部分内容
> 可以向已存在的文件后追加内容
RandomAccessFile 对象包含一个记录指针,用以标示当前读写处的位置
RandomAccessFile 类对象可以自由移动记录指针
> long getFilePointer():获取文件记录指针的当前位置
> void seek(long pos):将文件记录指针定位到 pos 位置
代码示例
  1 /**
  2  * RandomAccessFile的使用
  3  * 1、RandomAccessFile直接继承与Java.lang.Object类,实现类DataInput和Output两个接口
  4  * 2、RandomAccessFile既可以作为一个输入流,又可以作为一个输出流
  5  * 3、如果RandomAccessFile作为输出流时,写出到的文件如果不存在,则在执行过程中自动创建
  6  * 如果写出到的文件存在,则会对原有文件内容进行覆盖。(默认情况下,从头开始)
  7  */
  8 public class RandomAccessFileTest {
  9
 10     public static void main(String[] args) {
 11         RandomAccessFileTest test = new RandomAccessFileTest();
 12         test.test3();
 13     }
 14
 15
 16     public void test1() {
 17         RandomAccessFile raf1 = null;
 18         RandomAccessFile raf2 = null;
 19         try {
 20             raf1 = new RandomAccessFile("hello.txt", "r");
 21             raf2 = new RandomAccessFile("hello2.txt", "rw");
 22
 23             byte[] buff = new byte[5];
 24             int len;
 25             while ((len = raf1.read(buff)) != -1) {
 26                 raf2.write(buff, 0, len);
 27                 System.out.print(new String(buff, 0, len));
 28             }
 29         } catch (FileNotFoundException e) {
 30             e.printStackTrace();
 31         } catch (IOException e) {
 32             e.printStackTrace();
 33         } finally {
 34             if (raf2 != null) {
 35                 try {
 36                     raf2.close();
 37                 } catch (IOException e) {
 38                     e.printStackTrace();
 39                 }
 40             }
 41
 42             if (raf1 != null) {
 43                 try {
 44                     raf1.close();
 45                 } catch (IOException e) {
 46                     e.printStackTrace();
 47                 }
 48             }
 49
 50         }
 51     }
 52
 53
 54     public void test2() {
 55         RandomAccessFile raf2 = null;
 56         try {
 57             raf2 = new RandomAccessFile("hello2.txt", "rw");
 58             // 将指针调到角标为3的位置
 59             raf2.seek(3);
 60             raf2.write("xyz".getBytes());
 61         } catch (FileNotFoundException e) {
 62             e.printStackTrace();
 63         } catch (IOException e) {
 64             e.printStackTrace();
 65         } finally {
 66             if (raf2 != null) {
 67                 try {
 68                     raf2.close();
 69                 } catch (IOException e) {
 70                     e.printStackTrace();
 71                 }
 72             }
 73         }
 74     }
 75
 76
 77     /**
 78      * 使用RandomAccessFile实现插入效果
 79      */
 80     public void test3() {
 81         RandomAccessFile raf2 = null;
 82         ByteArrayOutputStream bos =null;
 83         try {
 84             raf2 = new RandomAccessFile("hello2.txt", "rw");
 85             // 将指针调到角标为3的位置
 86             raf2.seek(3);
 87
 88 //            // 方式一,使用StringBuilder
 89 //            StringBuilder sb =new StringBuilder("NBA");
 90 //            byte[] buff = new byte[5];
 91 //            int len;
 92 //            while ((len = raf2.read(buff)) != -1) {
 93 //                sb.append(new String(buff, 0, len));
 94 //            }
 95
 96             // 方式二,使用ByteArrayOutputStream
 97             bos = new ByteArrayOutputStream();
 98             bos.write("CBA".getBytes());
 99             byte[] buff = new byte[5];
100             int len;
101             while ((len = raf2.read(buff)) != -1) {
102                 bos.write(buff, 0, len);
103             }
104
105             // 指针指回插入位置
106             raf2.seek(3);
107             raf2.write(bos.toByteArray());
108
109         } catch (FileNotFoundException e) {
110             e.printStackTrace();
111         } catch (IOException e) {
112             e.printStackTrace();
113         } finally {
114             if (bos != null) {
115                 try {
116                     bos.close();
117                 } catch (IOException e) {
118                     e.printStackTrace();
119                 }
120             }
121             if (raf2 != null) {
122                 try {
123                     raf2.close();
124                 } catch (IOException e) {
125                     e.printStackTrace();
126                 }
127             }
128         }
129     }
130 }