准备工作
1、安装RabbitMQ,参考【RabbitMQ】 RabbitMQ安装
2、新建Java项目,引入RabbitMQ的Maven依赖
1 <dependency>
2     <groupId>com.rabbitmq</groupId>
3     <artifactId>amqp-client</artifactId>
4     <version>5.5.0</version>
5 </dependency>
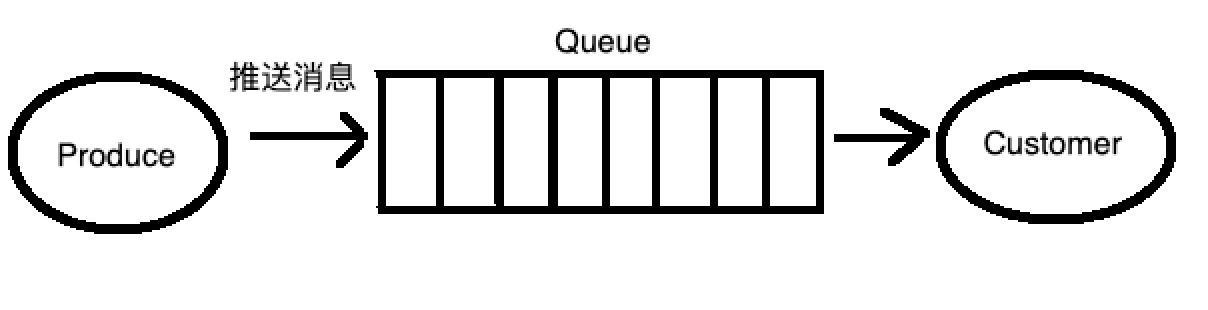
单生产者消费者
流程图:
1、创建生产者Producer1
 1 public class Producer1 {
 2
 3     private final static String QUEUE_NAME = "rabbitMQ.test.queue";
 4
 5     public static void main(String[] args) throws IOException, TimeoutException {
 6
 7         // 创建连接工厂
 8         ConnectionFactory factory = new ConnectionFactory();
 9         // 设置RabbitMQ相关信息
10         factory.setHost("localhost");
11         factory.setUsername("guest");
12         factory.setPassword("guest");
13         factory.setPort(5672);
14         // 创建一个新的连接
15         Connection connection = factory.newConnection();
16         // 创建一个通道
17         Channel channel = connection.createChannel();
18
19         // 声明一个队列
20         // queueDeclare(队列名称,是否持久化(true表示是,队列将在服务器重启时生存),是否是独占队列(创建者可以使用的私有队列,断开后自动删除),
21         //                        当所有消费者客户端连接断开时是否自动删除队列,队列的其他参数)
22         channel.queueDeclare(QUEUE_NAME, false, false, false, null);
23         String message = "Hello RabbitMQ ~";
24
25         // 发送消息到队列中
26         // basicPublish(交换机名称,队列映射的路由key,消息的其他属性,发送信息的主体)
27         channel.basicPublish("", QUEUE_NAME, null, message.getBytes("UTF-8"));
28          System.out.println("Producer Send +'" + message + "'");
29         // 关闭通道和连接
30         channel.close();
31         connection.close();
32
33     }
34
35 }
2、创建消费者Customer1
 1 public class Customer1 {
 2
 3     private final static String QUEUE_NAME = "rabbitMQ.test.queue";
 4
 5     public static void main(String[] args) throws IOException, TimeoutException {
 6         // 创建连接工厂
 7         ConnectionFactory factory = new ConnectionFactory();
 8         // 设置RabbitMQ地址
 9         factory.setHost("localhost");
10         factory.setUsername("guest");
11         factory.setPassword("guest");
12         factory.setPort(5672);
13         // 创建一个新的连接
14         Connection connection = factory.newConnection();
15         // 创建一个通道
16         final Channel channel = connection.createChannel();
17         // 声明要关注的队列
18         channel.queueDeclare(QUEUE_NAME, false, false, false, null);
19         channel.basicQos(1);//保证一次只分发一个
20         System.out.println("Customer Waiting Received messages");
21
22         // DefaultConsumer类实现了Consumer接口,通过传入一个频道,
23         // 告诉服务器我们需要那个频道的消息,如果频道中有消息,就会执行回调函数handleDelivery
24         Consumer consumer = new DefaultConsumer(channel) {
25             @Override
26             public void handleDelivery(String consumerTag, Envelope envelope, AMQP.BasicProperties properties,
27                     byte[] body) throws IOException {
28                 String message = new String(body, "UTF-8");
29                 System.out.println("Customer Received '" + message + "'");
30             }
31         };
32
33         // 自动回复队列应答 -- RabbitMQ中的消息确认机制
34         channel.basicConsume(QUEUE_NAME, true, consumer);
35     }
36
37 }
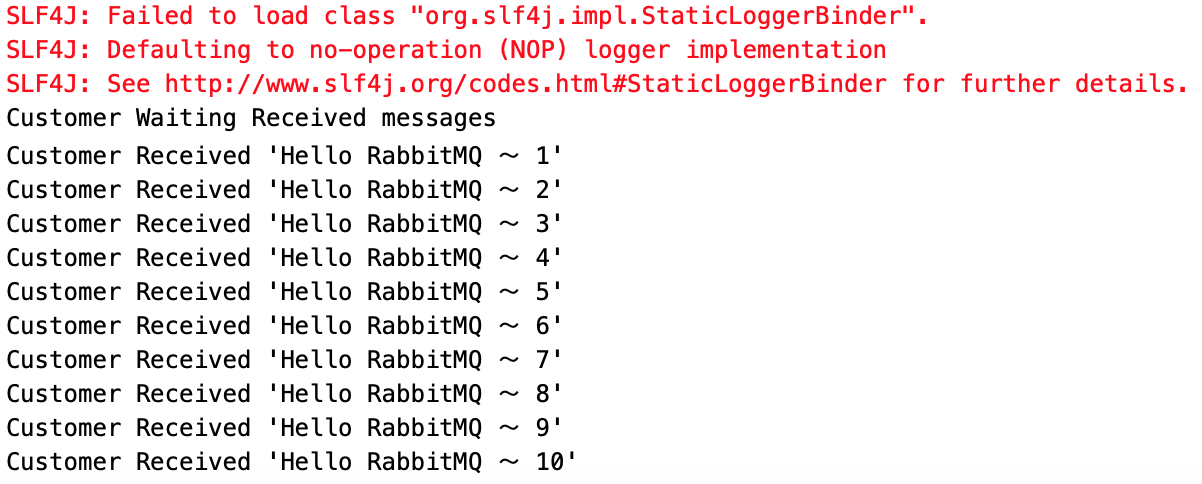
3、运行结果
a、生产者

b、消费者

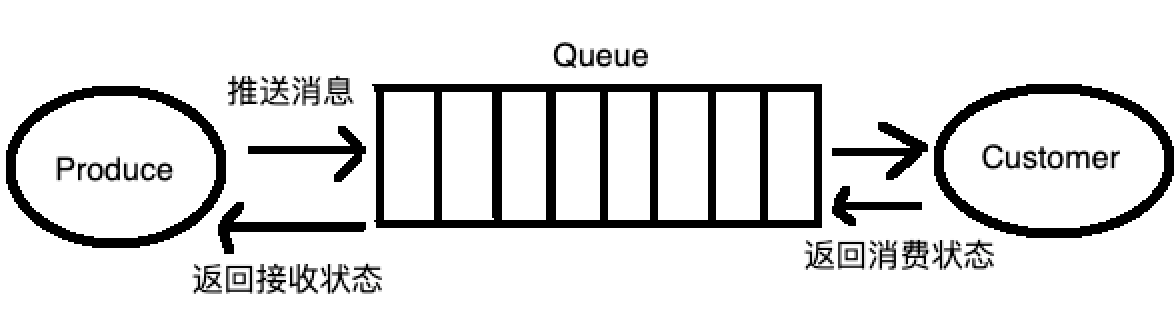
推送确认和消费应答
流程图
1、创建推送确认生产者Producer2
 1 public class Producer2 {
 2
 3     private final static String QUEUE_NAME = "rabbitMQ.test.queue";
 4
 5     public static void main(String[] args) throws IOException, TimeoutException {
 6
 7         // 创建连接工厂
 8         ConnectionFactory factory = new ConnectionFactory();
 9         // 设置RabbitMQ相关信息
10         factory.setHost("localhost");
11         factory.setUsername("guest");
12         factory.setPassword("guest");
13         factory.setPort(5672);
14         // 创建一个新的连接
15         Connection connection = factory.newConnection();
16         // 创建一个通道
17         Channel channel = connection.createChannel();
18
19         // 声明一个队列
20         // queueDeclare(队列名称,是否持久化(true表示是,队列将在服务器重启时生存),是否是独占队列(创建者可以使用的私有队列,断开后自动删除),
21         // 当所有消费者客户端连接断开时是否自动删除队列,队列的其他参数)
22         channel.queueDeclare(QUEUE_NAME, false, false, false, null);
23
24         // 开启发送方确认模式
25         channel.confirmSelect();
26
27         // 存储未确认的消息标识tag
28         final SortedSet<Long> confirmSet = Collections.synchronizedNavigableSet(new TreeSet<Long>());
29
30         // 异步监听确认和未确认的消息
31         channel.addConfirmListener(new ConfirmListener() {
32
33             /**
34              * 处理返回确认成功
35              *
36              * @param deliveryTag 如果是多条,这个就是最后一条消息的tag
37              * @param multiple    是否多条
38              * @throws IOException
39              */
40             public void handleAck(long deliveryTag, boolean multiple) throws IOException {
41                 System.out.println("消息发送成功,    deliveryTag:" + deliveryTag + "        multiple:" + multiple + "");
42                 if (multiple) {
43                     // 移除发送成功的多条消息标识tag
44                     confirmSet.headSet(deliveryTag + 1).clear();
45                 } else {
46                     // 移除发送成功的一条消息标识tag
47                     confirmSet.remove(deliveryTag);
48                 }
49             }
50
51             /**
52              * 处理返回确认失败
53              *
54              * @param deliveryTag 如果是多条,这个就是最后一条消息的tag
55              * @param multiple    是否多条
56              * @throws IOException
57              */
58             public void handleNack(long deliveryTag, boolean multiple) throws IOException {
59                 System.out.println("失败,deliveryTag:" + deliveryTag + "multiple:" + multiple + "");
60                 if (multiple) {
61                     confirmSet.headSet(deliveryTag + 1).clear();
62                 } else {
63                     confirmSet.remove(deliveryTag);
64                 }
65             }
66
67         });
68
69         String message = "Hello RabbitMQ ~ ";
70
71         // 发送消息到队列中
72         // basicPublish(交换机名称,队列映射的路由key,消息的其他属性,发送信息的主体)
73         for (int i = 1; i <= 10; i++) {
74             String msg = message + i;
75             long tag = channel.getNextPublishSeqNo();
76             confirmSet.add(tag);
77             System.out.println("tag:" + tag);
78
79             channel.basicPublish("", QUEUE_NAME, null, msg.getBytes("UTF-8"));
80             System.out.println("Producer Send +'" + msg + "'");
81
82         }
83
84         System.out.println("============================");
85         // 关闭通道和连接
86         // channel.close();
87         // connection.close();
88
89     }
90 }
2、创建消费应答消费者Customer2
 1 public class Customer2 {
 2
 3     private final static String QUEUE_NAME = "rabbitMQ.test.queue";
 4
 5     public static void main(String[] args) throws IOException, TimeoutException {
 6         // 创建连接工厂
 7         ConnectionFactory factory = new ConnectionFactory();
 8         // 设置RabbitMQ地址
 9         factory.setHost("localhost");
10         factory.setUsername("guest");
11         factory.setPassword("guest");
12         factory.setPort(5672);
13         // 创建一个新的连接
14         Connection connection = factory.newConnection();
15         // 创建一个通道
16         final Channel channel = connection.createChannel();
17         // 声明要关注的队列
18         channel.queueDeclare(QUEUE_NAME, false, false, false, null);
19         channel.basicQos(1);// 保证一次只分发一个
20         System.out.println("Customer Waiting Received messages");
21
22         // DefaultConsumer类实现了Consumer接口,通过传入一个频道,
23         // 告诉服务器我们需要那个频道的消息,如果频道中有消息,就会执行回调函数handleDelivery
24         Consumer consumer = new DefaultConsumer(channel) {
25             @Override
26             public void handleDelivery(String consumerTag, Envelope envelope, AMQP.BasicProperties properties,
27                     byte[] body) throws IOException {
28                 String message = new String(body, "UTF-8");
29                 System.out.println("Customer Received '" + message + "'");
30
31                 // 返回消费确认状态
32                 channel.basicAck(envelope.getDeliveryTag(), false);
33             }
34         };
35
36         // 消费手动确认 -- RabbitMQ中的消息确认机制
37         channel.basicConsume(QUEUE_NAME, false, consumer);
38     }
39
40 }
3、运行结果
生产者:

消费者:
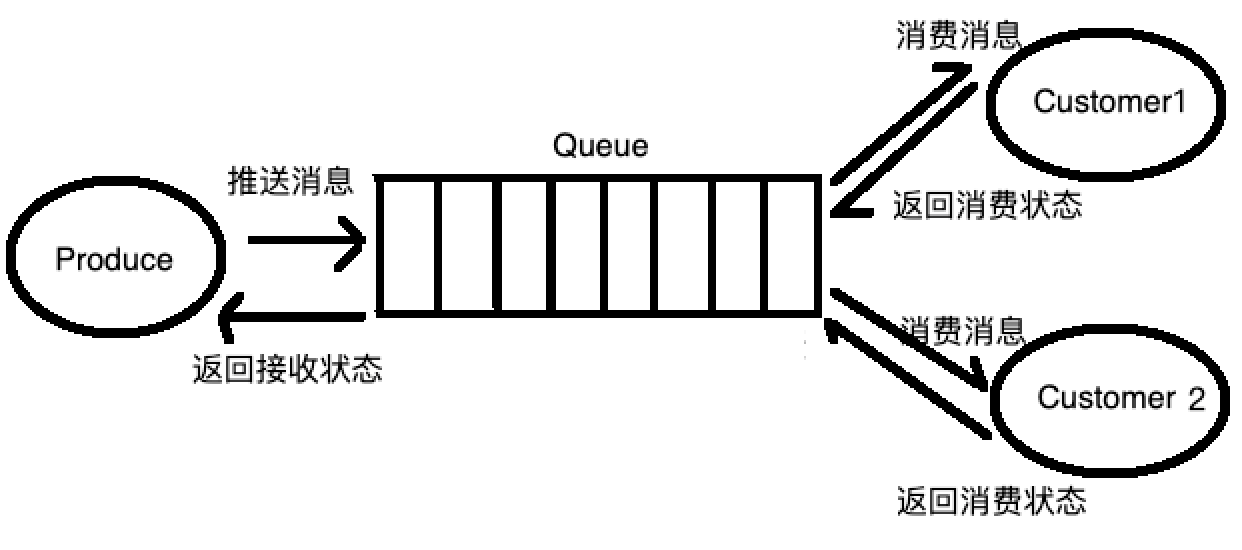
多消费者
流程图
1、创建推送确认生产者Producer3(与示例Producer2一样)
2、创建消费应答消费者Customer3
 1 public class Customer3 {
 2
 3     private final static String QUEUE_NAME = "rabbitMQ.test.queue";
 4
 5     public static void main(String[] args) throws IOException, TimeoutException {
 6         Customer3 customer3 = new Customer3();
 7         customer3.createCustomer("customer1");
 8         customer3.createCustomer("customer2");
 9     }
10
11     public void createCustomer(final String customerName) throws IOException, TimeoutException{
12
13         // 创建连接工厂
14         ConnectionFactory factory = new ConnectionFactory();
15         // 设置RabbitMQ地址
16         factory.setHost("localhost");
17         factory.setUsername("guest");
18         factory.setPassword("guest");
19         factory.setPort(5672);
20         // 创建一个新的连接
21         Connection connection = factory.newConnection();
22         // 创建一个通道
23         final Channel channel = connection.createChannel();
24         // 声明要关注的队列
25         channel.queueDeclare(QUEUE_NAME, false, false, false, null);
26         channel.basicQos(1);// 保证一次只分发一个
27         System.out.println(customerName + " Waiting Received messages");
28
29         // DefaultConsumer类实现了Consumer接口,通过传入一个频道,
30         // 告诉服务器我们需要那个频道的消息,如果频道中有消息,就会执行回调函数handleDelivery
31         Consumer consumer = new DefaultConsumer(channel) {
32             @Override
33             public void handleDelivery(String consumerTag, Envelope envelope, AMQP.BasicProperties properties,
34                     byte[] body) throws IOException {
35                 String message = new String(body, "UTF-8");
36                 System.out.println(customerName + " Received '" + message + "'");
37
38                 // doWork处理任务
39                 doWork(customerName);
40
41                 // 返回消费确认状态
42                 channel.basicAck(envelope.getDeliveryTag(), false);
43             }
44         };
45
46         // 消费手动确认 -- RabbitMQ中的消息确认机制
47         channel.basicConsume(QUEUE_NAME, false, consumer);
48     }
49
50
51     private void doWork(String customer) {
52         try {
53             Thread.sleep(2000); // 暂停2秒钟
54             System.out.println(customer + ": completion of the job!");
55         } catch (InterruptedException _ignored) {
56             Thread.currentThread().interrupt();
57         }
58     }
59 }
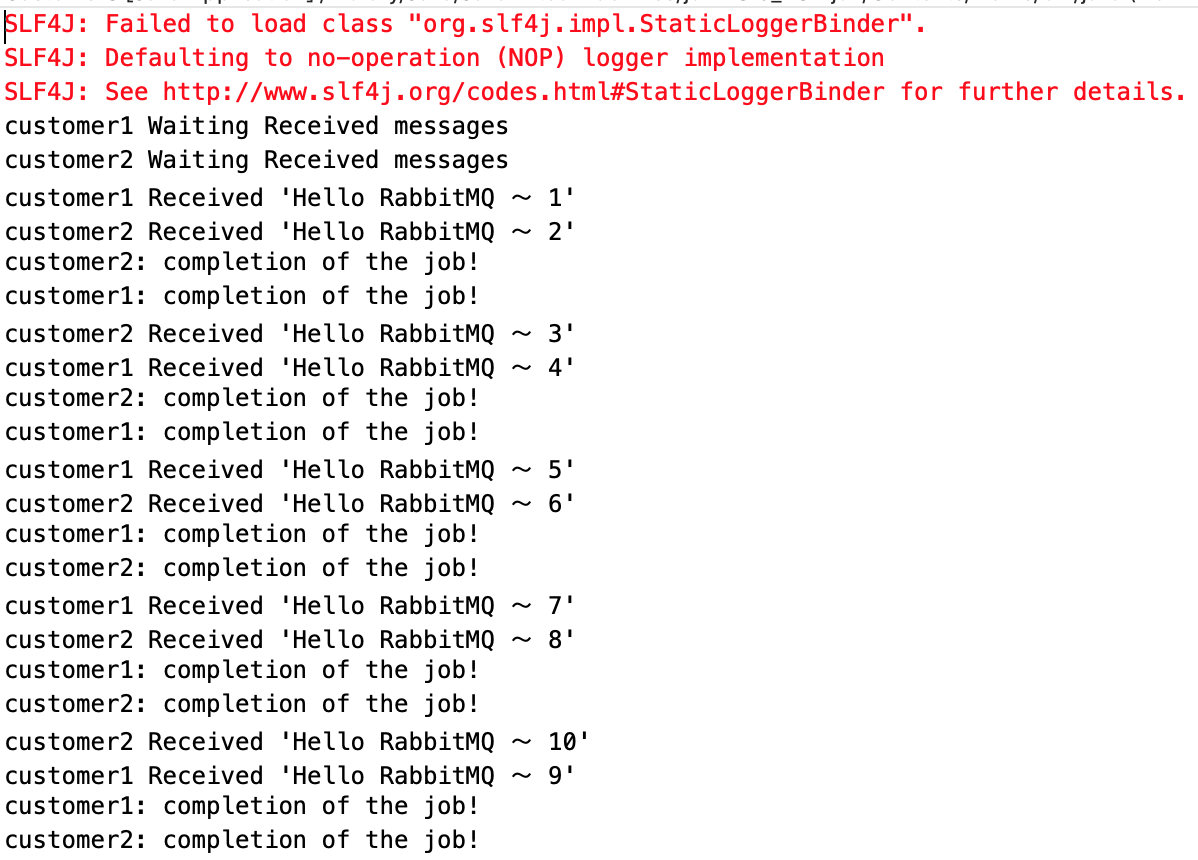
3、运行结果
生产者与前面相同
消费者