python中难以理解的最常见的特性是:
迭代器(iterator),生成器(generator),装饰器(decorator),上下文管理器(context manager)
迭代器
迭代器只不过是一个实现了迭代器协议的容器对象。它基于以下两个方法:
- __next__:返回容器的下一个元素
- __iter__:返回迭代器本身
迭代器可以利用内置的iter函数和一个序列来创建,如:
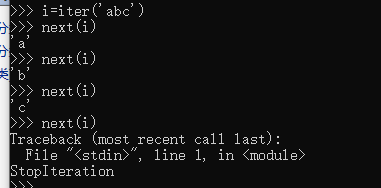
当遍历完成时会引发一个StopIteration异常。这样迭代器就可以与循环兼容,因为可以捕获这个异常并停止循环。
创建自定义的迭代器,可以编写一个具有__next__方法的类,只有这个类提供返回迭代器实例的__iter__特殊方法:
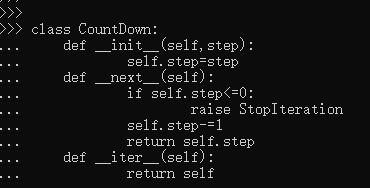
下面时这个迭代器的用法实例:
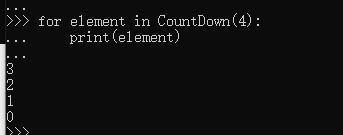
迭代器本身是一个底层的特性和概念,在程序中可以不用它。但它为生成器这一更有趣的特性提供了基础
迭代器详解参考:https://blog.csdn.net/weixin_40907382/article/details/80234743,https://www.cnblogs.com/leohahah/p/10189281.html
生成器(yield语句)
基于yield语句,生成器可以暂停函数并返回一个中间结果。该函数会保存执行上下文,方便在下个yield语句前使用这个上下文
举个列子,斐波那契数列可以用生气器语法来实现。
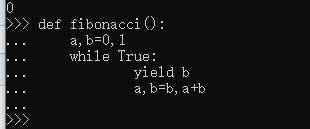
可以用next()函数或for循环从生成器中获取新的元素,就像迭代器一样:
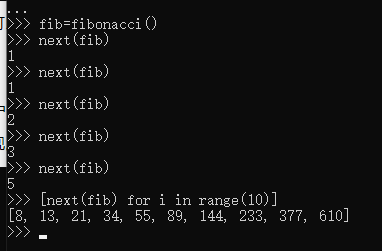
这个函数返回一个generator对象,是特殊的迭代器,可以被无限次调用,每次都会生成序列的下一个元素,不必提供使函数停止的方法。
生成器还有一个好处就是,可以节省内存空间,不是像列表一样,遍历列表时一次性把所有数据都加载到内存中,再遍历,而生成器是用一个生成一个,很大程度上节省了内存空间。
生产器时python中协程,异步并发等其他概念的基础
生成器详解参考:http://python.jobbole.com/88677/
装饰器
常见装饰器;内置装饰器;类装饰器、函数装饰器、带参数的函数装饰器
装饰器作用:
装饰器本质上是一个Python函数,它可以让其他函数在不需要做任何代码变动的前提下增加额外功能,装饰器的返回值也是一个函数对象。它经常用于有切面需求的场景,比如:插入日志、性能测试、事务处理、缓存、权限校验等场景。装饰器是解决这类问题的绝佳设计,有了装饰器,我们就可以抽离出大量与函数功能本身无关的雷同代码并继续重用。概括的讲,装饰器的作用就是为已经存在的对象添加额外的功能
装饰器的实现原理:
在说装饰器之前,我们有必要先了解函数的特性,以及闭包和闭包是如何利用函数的特性
函数特性有四点:
- 函数作为变量传递
def add(x): return x + 1 a = add - 函数作为参数传递
def add(x): return x + 1 def excute(f): return f(3) excute(add) - 函数作为返回值
def add(x): return x + 1 def get_add(): return add - 函数嵌套及跨域访问
def outer():
    x = 1
    def inner():
        print(x)
    inner()

outer()
闭包的实现
Python中的装饰器是通过闭包实现的,简单地讲,闭包就是引用了外部变量的内部函数,而闭包的实现正是利用了以上函数特性,下面我们来看看闭包是如何实现的:
def outer(x):
    def inner():                  # 函数嵌套
        return x                  # 跨域访问,引用了外部变量x

    return inner                  # 函数作为返回值

closure = outer('外部变量')        # 函数作为变量赋给closure
print(closure())                  # 执行闭包

#结果
外部变量
在这个流程中,outer接收到'外部变量',传给inner,作为它return的参数,最后outer返回inner函数,返回的inner函数作为变量传递给closure,最后执行closure这个函数对象,实际上是执行了inner这个函数,返回了 '外部变量',这样就实现了一个简单的闭包
上面这个闭包例子只用到了之前说的三个函数特性,函数作为参数这个特性好像并没有用上,下面做一下延伸,把outer的参数x用一个函数对象替代
def func():
    return '函数func'

def outer(x):
    def inner():                              # 函数嵌套
        return '戴了inner牌帽子的 ' + x()       # 跨域访问,引用了外部变量x

    return inner                              # 函数作为返回值

closure = outer(func)                         # 函数func作为outer的参数;函数作为变量赋给closure

print(func())                                 # 执行原始函数
print(closure())                              # 执行闭包

# 结果
函数func
戴了inner牌帽子的 函数func
closure实际上是outer(func),func作为参数传进outer,outer的子函数inner对func返回的结果进行了一番装饰,返回了一个装饰后的结果,最后outer返回inner,可以说inner就是装饰后的func,这就是一个函数被装饰的过程,重点在于执行 outer(func) 这个步骤
装饰器语法糖@
Python给我们提供了语法糖 @,我们想执行 outer(func) 的时候,只需要把outer函数@到func函数的上面就可以了
def outer(x):
    def inner():
        return '戴了inner牌帽子的 ' + x()

    return inner

@outer
def func():
    return '函数func'

print(func())


#结果
戴了inner牌帽子的 函数func
打印的结果跟我们执行closure()的结果是一样的,也就说明 加了outer装饰器的func 等价于 outer(func),所以我们很清楚地知道装饰器@的作用是什么了,就是拿来把被装饰的函数作为参数传递到装饰器函数里面加工的,最后执行被装饰函数的时候,就相当于执行了一个加工后的函数。
以上就是Python中装饰器的实现原理
装饰器类型
- 函数装饰器
def use_logging(func): def wrapper(*args, **kwargs): logging.warn("%s is running" % func.__name__) return func(*args, **kwargs) return wrapper def bar(): print('i am bar') bar = use_logging(bar) bar() 输出: WARNING:root:bar is running i am bar - 带参数的装饰器
def use_logging(level): def decorator(func): def wrapper(*args, **kwargs): if level == "warn": logging.warn("%s is running" % func.__name__) return func(*args) return wrapper return decorator @use_logging(level="warn") def foo(name='foo'): print("i am %s" % name) foo() 输出: WARNING:root:foo is running i am foo - 类装饰器
相比函数装饰器,类装饰器具有灵活度大、高内聚、封装性等优点。使用类装饰器还可以依靠类内部的 __call__方法,当使用 @ 形式将装饰器附加到函数上时,就会调用此方法
class Foo(object):
    def __init__(self, func):
        self._func = func
    def __call__(self):
        print ('class decorator runing')
        self._func()
        print ('class decorator ending')

@Foo
def bar():
    print ('bar')

bar()

输出:
class decorator runing
bar
class decorator ending
- 函数装饰器
- functools.wraps
使用装饰器极大地复用了代码,但是他有一个缺点就是原函数的元信息不见了,比如函数的docstring、__name__、参数列表,例如:
装饰器 声明
def logged(func):
    def with_logging(*args, **kwargs):
        print func.__name__ + " was called"
        return func(*args, **kwargs)
    return with_logging
函数 使用装饰器
@logged
def f(x):
   """does some math"""
   return x + x * x
该函数完成等价于
def f(x):
    """does some math"""
    return x + x * x
f = logged(f)
不难发现,函数f被with_logging取代了,当然它的docstring,__name__就是变成了with_logging函数的信息了。
  print f.__name__    # prints 'with_logging'
  print f.__doc__     # prints None
好在我们有functools.wraps,wraps本身也是一个装饰器,它能把原函数的元信息拷贝到装饰器函数中,这使得装饰器函数也有和原函数一样的元信息了
from functools import wraps
def logged(func):
    @wraps(func)
    def with_logging(*args, **kwargs):
        print func.__name__ + " was called"
        return func(*args, **kwargs)
    return with_logging

@logged
def f(x):
    """does some math"""
    return x + x * x

print f.__name__  # prints 'f'
print f.__doc__   # prints 'does some math'
6.内置装饰器
@property 的用法参见:把类方法变成属性,可以通过类直接调用
class Student(object):
    def __init__(self, name, score):
        self.name = name
        self.__score = score
    @property
    def score(self):
        return self.__score
    @score.setter
    def score(self, score):
        if score < 0 or score > 100:
            raise ValueError('invalid score')
        self.__score = score
注意: 第一个score(self)是get方法,用@property装饰,第二个score(self, score)是set方法,用@score.setter装饰,@score.setter是前一个@property装饰后的副产品。 现在,就可以像使用属性一样设置score了:
>>> s = Student('Bob', 59)
>>> s.score = 60
>>> print s.score
http://www.cnblogs.com/superxuezhazha/p/5793450.html
@staticmethod :静态方法
@classmethod : 类方法
参考:http://www.cnblogs.com/taceywong/p/5813166.html
Python其实有3类方法:
- 静态方法(staticmethod)
- 类方法(classmethod)
- 实例方法(instance method) 实例:
def foo(x): print "executing foo(%s)" %(x) class A(object): def foo(self,x): print "executing foo(%s,%s)" %(self,x) @classmethod def class_foo(cls,x): print "executing class_foo(%s,%s)" %(cls,x) @staticmethod def static_foo(x): print "executing static_foo(%s)" %x a = A()在示例代码中,先理解下函数里面的self和cls。这个self和cls是对类或者实例的绑定,对于一般的函数来说我们可以这么调用
foo(x),这个函数就是最常用的,它的工作和任何东西(类、实例)无关。对于实例方法,我们知道在类里每次定义方法的时候都需要绑定这个实例,就是foo(self,x),为什么要这么做呢?因为实例方法的调用离不开实例,我们需要把实例自己传给函数,调用的时候是这样的a.foo(x)(其实是foo(a,x))。类方法一样,只不过它传递的是类而不是实例,A.class_foo(x)。注意这里的self和cls可以替换别的参数,但是python的约定是这两个,尽量不要更改。对于静态方法其实和普通的方法一样,不需要对谁进行绑定,唯一的区别是调用时候需要使用
a.static_foo(x)或A.static_foo()来调用。实例方法 类方法 静态方法 a = A() a.foo(x) a.class_foo(x) a.static_foo(x) A 不可用 A.clas_foo(x) A.static_foo(x) >>> a=A() >>> a.foo(3) executing foo(<__main__.A object at 0x108117790>,3) >>> a.class_foo(3) executing class_foo(<class '__main__.A'>,3) >>> A.class_foo(3) executing class_foo(<class '__main__.A'>,3) >>> a.static_foo(3) executing static_foo(3) >>> A.static_foo(3) executing static_foo(3) >>> A.foo(3) Traceback (most recent call last): File "<stdin>", line 1, in <module> TypeError: unbound method foo() must be called with A instance as first argument (got int instance instead) >>>
装饰器的顺序
@a
@b
@c
def f (): 等同于f = a(b(c(f)))
python的__call__、__str__、__repr__、__init__、__class__、__name___、__all__、__doc__、__del__等魔术方法的作用