1.自定义事件
1.1 事件名
v-on事件监听器在 DOM 模板中会被自动转换为全小写(因为 HTML 是大小写不敏感的),所以v-on:myEvent将会变成v-on:myevent——导致myEvent不可能被监听到。
因此,我们推荐你使用短横线分隔命名的事件名。
1.2 自定义组件的v-model
一个组件上的v-model默认会利用名为value的prop和名为input的事件。例如:
<!DOCTYPE html>
<html>
    <head>
        <meta charset="utf-8">
        <style>

        </style>
        <script src="https://cdn.staticfile.org/vue/2.4.2/vue.min.js"></script>
    </head>
    <body>
		<div id="app">
			<!-- <input v-model="searchText"> -->
			<input v-bind:value="searchText" v-on:input="searchText = $event.target.value">
			<p>{{ searchText }}</p>
		</div>
        <script>
			new Vue({
				el: '#app',
				data: {
					searchText: ''
				}
			});
        </script>
    </body>
</html>
但是像单选框、复选框等类型的输入控件可能会将value特性用于不同的目的。model选项可以用来避免这样的冲突。
<!DOCTYPE html>
<html>
<head>
    <meta charset="utf-8">
    <style>

    </style>
    <script type="text/javascript" src="https://cdn.staticfile.org/vue/2.4.2/vue.min.js"></script>
</head>
<body>
<div id="app">
<!--
    <base-checkbox v-model="lovingVue"></base-checkbox>
	-->
	<base-checkbox v-bind:checked1="lovingVue" v-on:change="lovingVue = $event" />

</div>
<script>
    Vue.component('base-checkbox', {
        model: {
            prop: 'checked1',
            event: 'change'
            /*
            prop: 'value',
            event: 'change'
            */
        },
        props: {
            checked1: Boolean
        },
        template: `<input type="checkbox" v-bind:checked="checked1"
                        v-on:change="$emit('change', $event.target.checked)">`
    });

    new Vue({
        el: '#app',
        data: {
            lovingVue: true
        },
        watch: {
            lovingVue: function(newValue) {
                  console.log(newValue)
            }
        }
    });
</script>
</body>
</html>
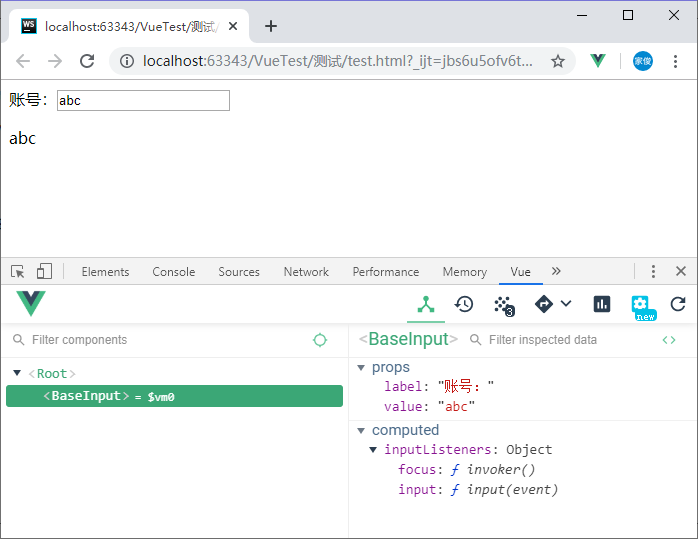
1.3 将原生事件绑定到组件
当我们在一个组件的根元素上直接监听一个原生事件时,可以使用v-on的.native修饰符。但是监听<input>时使用.native会失效。
为了解决这个问题,Vue 提供了一个$listeners属性,它是一个对象,里面包含了作用在这个组件上的所有监听器。
<!DOCTYPE html>
<html>
<head>
    <meta charset="utf-8">
    <style>

    </style>
    <script type="text/javascript" src="https://cdn.staticfile.org/vue/2.4.2/vue.min.js"></script>
</head>
<body>
<div id="app">
    <base-input v-on:focus="onFocus" label="账号:" v-bind:value="account" v-on:input="account = $event"></base-input>
    <p>{{ account }}</p>
</div>
<script>
    Vue.component('base-input', {
        inheritAttrs: false,
        props: ['label', 'value'],
        computed: {
            inputListeners: function () {
                let vm = this;
                // `Object.assign` 将所有的对象合并为一个新对象
                return Object.assign({},
                    // 我们从父级添加所有的监听器
                    this.$listeners,
                    // 然后我们添加自定义监听器,
                    // 或覆写一些监听器的行为
                    {
                        // 这里确保组件配合 `v-model` 的工作
                        input: function (event) {
                            vm.$emit('input', event.target.value)
                        }
                    }
                )
            }
        },
        template: `<label>{{ label }}<input v-bind="$attrs" v-bind:value="value" v-on="inputListeners"></label>`
    });

    new Vue({
        el: '#app',
        data: {
            account: ''
        },
        methods: {
            onFocus: function () {
                console.log('获取焦点!');
            }
        },
        watch: {
            account: function(newValue) {
                console.log(newValue);
            }
        }
    });
</script>
</body>
</html>
1.4 .sync修饰符
<!DOCTYPE html>
<html>
<head>
    <meta charset="utf-8">
    <style>

    </style>
    <script src="https://cdn.staticfile.org/vue/2.4.2/vue.min.js"></script>
</head>
<body>
<div id="app">
    <!-- <text-document v-bind:title="doc.title" v-on:update:title="doc.title = $event"></text-document> -->
	<text-document v-bind:title.sync="doc.title"></text-document>
</div>
<script>
	Vue.component('text-document', {
		props: ['title'],
		template: `<div><h3>{{ title }}</h3><button @click="$emit('update:title', '标题2')">更新标题</button></div>`
	});

    new Vue({
        el: '#app',
        data: {
            doc: {
				title: '标题1'
			}
        }
    });
</script>
</body>
</html>
通过update:title模式触发事件以实现子组件修改父组件的prop。注意到.sync修饰符是这种模式的简写形式。
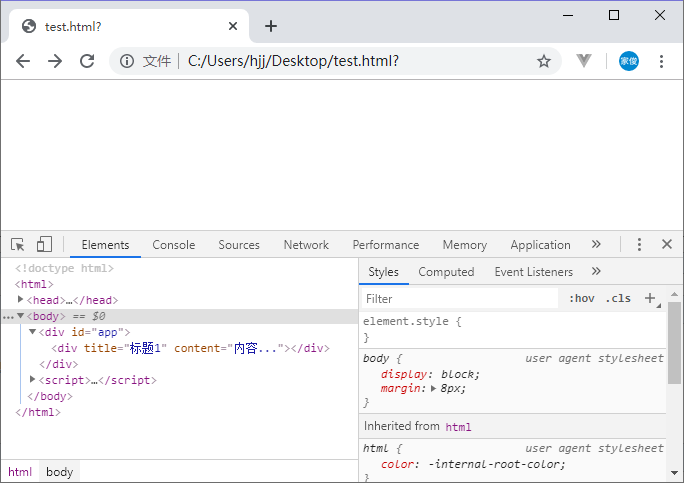
我们可以用一个对象同时设置多个prop。
<!DOCTYPE html>
<html>
<head>
    <meta charset="utf-8">
    <style>

    </style>
    <script src="https://cdn.staticfile.org/vue/2.4.2/vue.min.js"></script>
</head>
<body>
<div id="app">
	<text-document v-bind.sync="doc"></text-document>
</div>
<script>
	Vue.component('text-document', {
		props: {
			doc: Object
		},
		template: `<div><button @click="$emit('update:title', '标题2')">更新标题</button></div>`
	});

    new Vue({
        el: '#app',
        data: {
            doc: {
				title: '标题1',
				content: '内容...'
			}
        }
    });
</script>
</body>
</html>
参考: