一、创建Event类 Trade
import java.util.concurrent.atomic.AtomicInteger;

public class Trade {

    private String id;
    private String name;
    private double price;
    private AtomicInteger count = new AtomicInteger(0);

    public String getId() {
        return id;
    }

    public void setId(String id) {
        this.id = id;
    }

    public String getName() {
        return name;
    }

    public void setName(String name) {
        this.name = name;
    }

    public double getPrice() {
        return price;
    }

    public void setPrice(double price) {
        this.price = price;
    }

    public AtomicInteger getCount() {
        return count;
    }

    public void setCount(AtomicInteger count) {
        this.count = count;
    }
}
二、构建 Disruptor
1.创建测试类并构建Disruptor
import com.lmax.disruptor.BusySpinWaitStrategy;
import com.lmax.disruptor.EventFactory;
import com.lmax.disruptor.RingBuffer;
import com.lmax.disruptor.dsl.Disruptor;
import com.lmax.disruptor.dsl.ProducerType;

import java.util.concurrent.CountDownLatch;
import java.util.concurrent.ExecutorService;
import java.util.concurrent.Executors;

public class TestMain {
    public static void main(String[] args) throws Exception{

        //构建一个线程池用于提交任务
        ExecutorService es = Executors.newFixedThreadPool(4);
        ExecutorService es2 = Executors.newFixedThreadPool(5);

        //1 构建disruptor
        Disruptor<Trade> disruptor = new Disruptor<Trade>(new EventFactory<Trade>() {
                    @Override
                    public Trade newInstance() {
                        return new Trade();
                    }
                },
                1024 * 1024,
                es2,
                ProducerType.SINGLE,
                new BusySpinWaitStrategy());

        //2 把消费者设置到Disruptor中HandleEventsWtith

        //2.1 串行操作
//        disruptor.handleEventsWith(new Handler1())
//                .handleEventsWith(new Handler2())
//                .handleEventsWith(new Handler3());


        //2.2 并行操作
//        disruptor.handleEventsWith(new Handler1());
//        disruptor.handleEventsWith(new Handler2());
//        disruptor.handleEventsWith(new Handler3());
        //或者
//        disruptor.handleEventsWith(new Handler1(), new Handler2(), new Handler3());

        //2.3 菱形操作 一,即并行加串行执行 此处是 handler1 和 handler2执行完之后再执行handler3
//        disruptor.handleEventsWith(new Handler1(), new Handler2())
//                .handleEventsWith(new Handler3());

        //2.3 菱形操作 二
//        EventHandlerGroup<Trade> ehGrop = disruptor.handleEventsWith(new Handler1(), new Handler2());
//        ehGrop.then(new Handler3());

        //2.4 六边形操作 由于此处使用了5个Handler需要启动5个线程,此时需要修改disruptor的线程池es2的大小为5
        Handler1 h1 = new Handler1();
        Handler2 h2 = new Handler2();
        Handler3 h3 = new Handler3();
        Handler4 h4 = new Handler4();
        Handler5 h5 = new Handler5();
        disruptor.handleEventsWith(h1, h4);
        disruptor.after(h1).handleEventsWith(h2);
        disruptor.after(h4).handleEventsWith(h5);
        disruptor.after(h2, h5).handleEventsWith(h3);

        //3 启动disruptor
        RingBuffer<Trade> ringBuffer = disruptor.start();

        long begin = System.currentTimeMillis();
        //异步提交
        CountDownLatch latch = new CountDownLatch(1);
        es.submit(new TradePushlisher(disruptor, latch));

        // 异步代码执行完毕 向下进行
        latch.await();

         disruptor.shutdown();
         es.shutdown();
         es2.shutdown();

         System.out.println("总耗时:"+ (System.currentTimeMillis() - begin));
    }
}
2.创建异步提交类
import com.lmax.disruptor.EventTranslator;
import com.lmax.disruptor.dsl.Disruptor;

import java.util.Random;
import java.util.concurrent.CountDownLatch;

public class TradePushlisher implements Runnable{

    private Disruptor<Trade> disruptor;
    private CountDownLatch latch;
    private static int PUBLISH_COUNT = 10;

    public TradePushlisher(Disruptor<Trade> disruptor, CountDownLatch latch) {
        this.disruptor = disruptor;
        this.latch = latch;
    }

    @Override
    public void run() {
        TradeEventTranslator tradeEventTranslator =  new TradeEventTranslator();
        // 使用disruptor提交任务
        disruptor.publishEvent(tradeEventTranslator);
        latch.countDown();
    }
}

class TradeEventTranslator implements EventTranslator<Trade> {

    private Random random = new Random();

    @Override
    public void translateTo(Trade event, long sequence) {
        generateTrade(event);
    }

    private void generateTrade(Trade trade) {
        trade.setPrice(random.nextDouble() * 9999);
    }
}
三、链路讲解
1.创建5个Handler
import com.lmax.disruptor.EventHandler;
import com.lmax.disruptor.WorkHandler;

public class Handler1 implements EventHandler<Trade>, WorkHandler<Trade> {

    //EventHandler
    @Override
    public void onEvent(Trade event, long sequence, boolean endOfBatch) throws Exception {
        this.onEvent(event);
    }

    //WorkHandler
    @Override
    public void onEvent(Trade event) throws Exception {
        System.out.println("handler 1 : SET NAME");
        event.setName("H1");
        Thread.sleep(1000);
    }
}
import com.lmax.disruptor.EventHandler;

import java.util.UUID;

public class Handler2 implements EventHandler<Trade> {

    @Override
    public void onEvent(Trade event, long sequence, boolean endOfBatch) throws Exception {
        System.out.println("handler 2 : SET ID");
        Thread.sleep(1000);
        event.setId(UUID.randomUUID().toString());
    }
}
import com.lmax.disruptor.EventHandler;

public class Handler3 implements EventHandler<Trade> {
    @Override
    public void onEvent(Trade event, long sequence, boolean endOfBatch) throws Exception {
        System.out.println("handler 3 : Name:"+ event.getName() + ", ID:" + event.getId() + ",price:" + event.getPrice());
    }
}
import com.lmax.disruptor.EventHandler;

public class Handler4 implements EventHandler<Trade> {
    @Override
    public void onEvent(Trade event, long sequence, boolean endOfBatch) throws Exception {
        System.out.println("handler 4 : SET PRICE");
        event.setPrice(17.0);
    }
}
import com.lmax.disruptor.EventHandler;

public class Handler5 implements EventHandler<Trade> {
    @Override
    public void onEvent(Trade event, long sequence, boolean endOfBatch) throws Exception {
        System.out.println("handler 5 : GET PRICE: " + event.getPrice());
        event.setPrice(event.getPrice() + 3.0);
    }
}
2.消费者链路说明 上面测试类中已经包含有代码了,此处画个图做个说明
① 串行操作
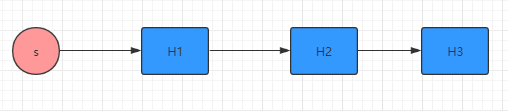
disruptor.handleEventsWith(new Handler1())
                .handleEventsWith(new Handler2())
                .handleEventsWith(new Handler3());
② 并行操作
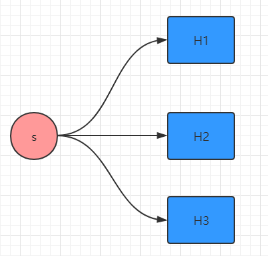
disruptor.handleEventsWith(new Handler1());
        disruptor.handleEventsWith(new Handler2());
        disruptor.handleEventsWith(new Handler3());
//        或者
        disruptor.handleEventsWith(new Handler1(), new Handler2(), new Handler3());
③ 菱形操作
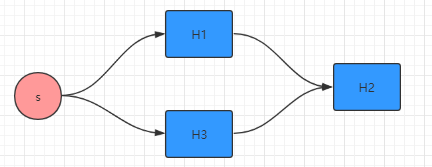
disruptor.handleEventsWith(new Handler1(), new Handler2())
                .handleEventsWith(new Handler3());
//或者
EventHandlerGroup<Trade> ehGrop = disruptor.handleEventsWith(new Handler1(), new Handler2());
ehGrop.then(new Handler3());
④ 六边形操作
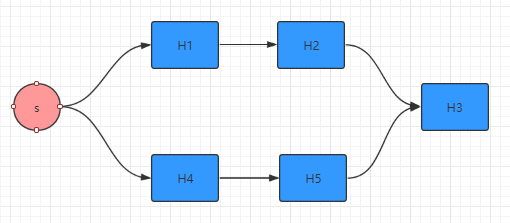
Handler1 h1 = new Handler1();
        Handler2 h2 = new Handler2();
        Handler3 h3 = new Handler3();
        Handler4 h4 = new Handler4();
        Handler5 h5 = new Handler5();
        disruptor.handleEventsWith(h1, h4);
        disruptor.after(h1).handleEventsWith(h2);
        disruptor.after(h4).handleEventsWith(h5);
        disruptor.after(h2, h5).handleEventsWith(h3);