一、springboot整合servlet与filter
spring原始的方式是在web.xml中配置servlet的配置配置方式参考spring(配置好servlet-mappiing与servlet标签)餐参考链接https://www.cnblogs.com/whluan/p/12145756.html,springboot整合servlet有两种方式。
1.1 通过注解扫描完成Servlet与Filter组件注册
1.1.1、首先新建一个类,继承HttpServlet类
新建类上使用注解:@WebServlet(name="FirstServlet",urlPatterns="/first"),其中name是指定servlet的名称,如果不指定默认为类名的全限定名。
@WebServlet(name="FirstServlet",urlPatterns="/first")
public class FirstServlet extends HttpServlet {

    @Override
    protected void doGet(HttpServletRequest req, HttpServletResponse resp) throws ServletException, IOException {
        System.out.println("FirstServlet............");
    }
}
如果是filter就是新建一个filter类,实现Filter接口
新建类上使用注解@WebFilter(filterName="FirstFilter",urlPatterns="/first"),其中urlPatterns可以使用*拦截某一类url
//@WebFilter(filterName="FirstFilter",urlPatterns={"*.do","*.jsp"})
@WebFilter(filterName="FirstFilter",urlPatterns="/first")
public class FirstFilter implements Filter {

    @Override
    public void destroy() {
    }
    @Override
    public void doFilter(ServletRequest arg0, ServletResponse arg1, FilterChain arg2)
            throws IOException, ServletException {
        System.out.println("进入Filter");
        arg2.doFilter(arg0, arg1);
        System.out.println("离开Filter");
    }

    @Override
    public void init(FilterConfig arg0) throws ServletException {
    }
}
1.1.2、编写启动类
@SpringBootApplication
@ServletComponentScan //在springBoot启动时会扫描@WebServlet,并将该类实例化 也会扫描@WebFilter注解
public class App {

    public static void main(String[] args) {
        SpringApplication.run(App.class, args);
    }

}
以上就能通过:http://localhost:8080/first 访问servlet了,并且filter也可以拦截访问了。
1.2、 通过方法完成servlet与filter的组件的注册
1.2.1 编写servlet类继承HttpServet类,但是不写WebServletet注解,通过启动类中的方法注册,Filter类似,不列举代码了
public class SecondServlet extends HttpServlet {

    @Override
    protected void doGet(HttpServletRequest req, HttpServletResponse resp) throws ServletException, IOException {
        System.out.println("SecondServlet..........");
    }

}
1.2.2 编写启动类,由于filter与servlet组件的注册方法一样,这里就把filter也一并列举
@SpringBootApplication
public class App2 {

    public static void main(String[] args) {
        SpringApplication.run(App2.class, args);
    }

    /**
     * 注册Servlet
     * @return
     */
    @Bean
    public ServletRegistrationBean getServletRegistrationBean(){
        ServletRegistrationBean bean = new ServletRegistrationBean(new SecondServlet());
        bean.addUrlMappings("/second");
        return bean;
    }


    /**
     * 注册Filter
     */
    @Bean
    public FilterRegistrationBean getFilterRegistrationBean(){
        FilterRegistrationBean bean = new FilterRegistrationBean(new SecondFilter());
        //bean.addUrlPatterns(new String[]{"*.do","*.jsp"});
        bean.addUrlPatterns("/second");
        return bean;
    }
}
二、springboot整合Listener
这里只介绍通过注解完成Listener组件的注册,方法的这里暂不介绍。监听器有多个监听器,都是监听某个事件触发该监听器。下面的例子是ServletContext的监听器。
首先新建Listener类实现ServletContenxtListener接口,使用注解@WebListener
@WebListener
public class FirstListener implements ServletContextListener{
    @Override
    public void contextDestroyed(ServletContextEvent arg0) {
        // TODO Auto-generated method stub

    }
    @Override
    public void contextInitialized(ServletContextEvent arg0) {
        // TODO Auto-generated method stub
        System.out.println("Listener...init......");
    }
}
同Servlet与Filter一样,启动类中也只需要@SpringBootApplication@ServletComponentScan就可。
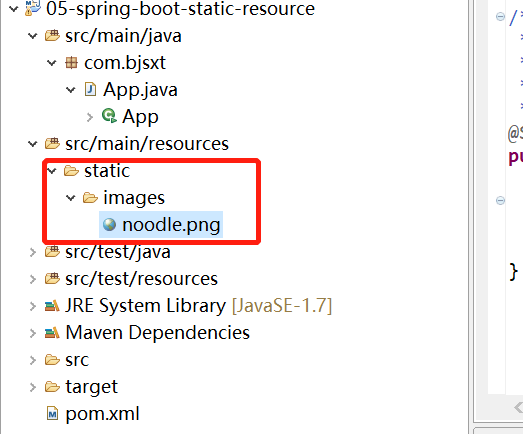
三、springboot访问静态资源
访问静态资源有两种方法
3.1 springboot从classpath/static 目录下取
如下图增加了images目录,则访问url则为: http://localhost:8080/images/noodle.png 其中static是新建的Folder,static名称不能为其它。
3.2 springboot从src/main/webapp 目录下取
如下图增加了images2目录,则访问url则为: http://localhost:8080/images2/noodle.png 其中webapp是新建的Folder,webapp名称不能改为其它。

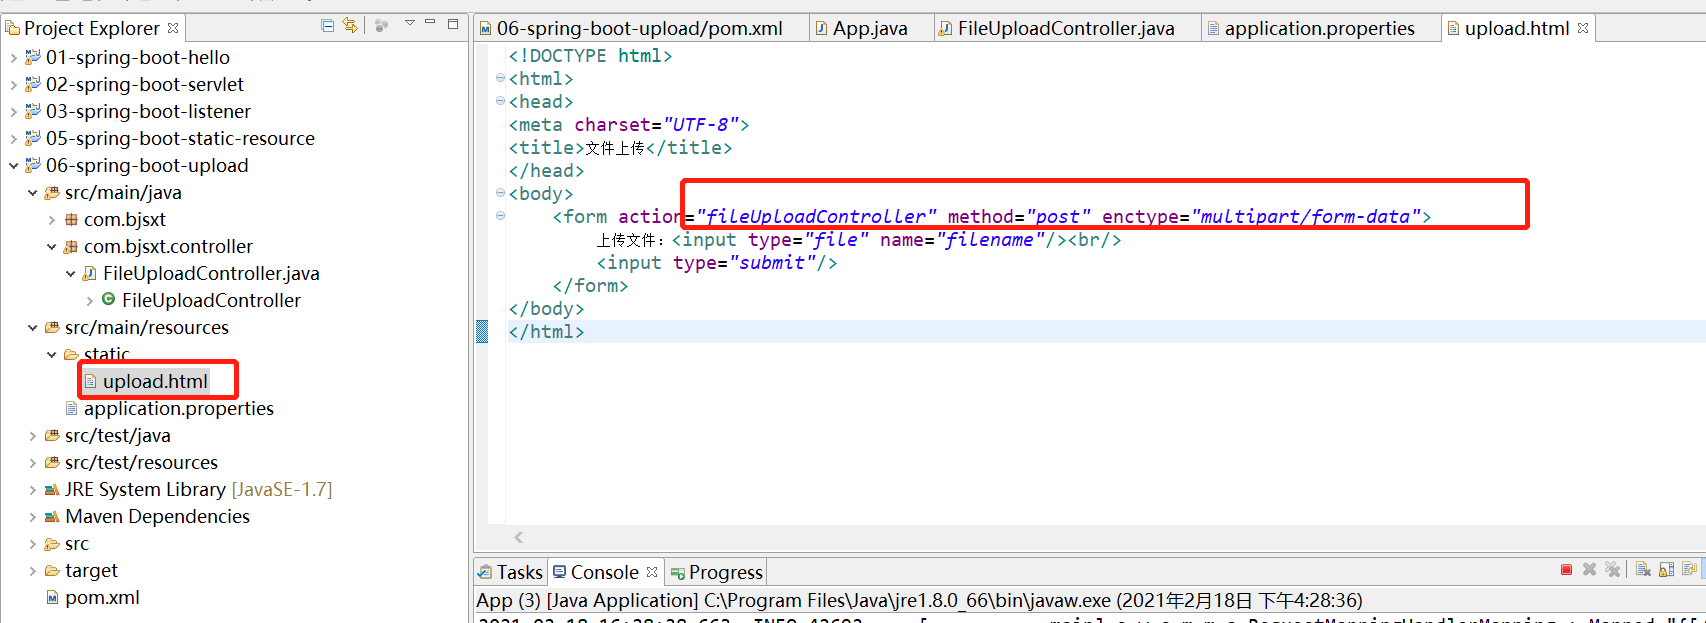
四、springboot文件上传
4.1 首先编写Controller
//@Controller
@RestController //表示该类下的方法的返回值会自动做json格式的转换
public class FileUploadController {

    /*
     * 处理文件上传
     */
    @RequestMapping("/fileUploadController")
    public Map<String, Object> fileUpload(MultipartFile filename)throws Exception{
        System.out.println(filename.getOriginalFilename());
        filename.transferTo(new File("e:/"+filename.getOriginalFilename()));
        Map<String, Object> map = new HashMap<>();
        map.put("msg", "ok");
        return map;
    }
}
4.2 其它静态文件的位置
把upload.html放在static中,表单如下书写; 在application.properties中可设置上传文件的大小
spring.http.multipart.maxFileSize=200MB 表示的单个上传文件的大小
spring.http.multipart.maxRequestSize=200MB 表示一次请求上传文件的总大小