以管理员身份打开CMD窗口:
C:Userszouqj>e:

E:>cd E:Redis-x64-3.2.100

E:Redis-x64-3.2.100>redis-server --service-install redis.windows.conf --loglevel verbose --service-name redis --port 6379
运行之后,记得启动redis服务,我这里redis没有设置密码。
启动服务命令:net start redis
修改pom.xml,添加redis的依赖

        <!--redis-->
        <dependency>
            <groupId>org.springframework.boot</groupId>
            <artifactId>spring-boot-starter-redis</artifactId>
            <version>1.3.8.RELEASE</version>
        </dependency>
        <!--JSON-->
        <dependency>
            <groupId>com.alibaba</groupId>
            <artifactId>fastjson</artifactId>
            <version>1.1.23</version>
        </dependency>
修改项目配置文件,添加如下配置节点
    redis:
      database: 0
      host: 127.0.0.1
      port: 6379
      pool:
        max-active: 100
        max-idle: 10
        max-wait: 100000
      timeout: 0
最终配置如下:

redis配置项说明:
# REDIS (RedisProperties)
# Redis数据库索引(默认为0)
spring.redis.database=0
# Redis服务器地址
spring.redis.host=127.0.0.1
# Redis服务器连接端口
spring.redis.port=6379
# Redis服务器连接密码(默认为空)
spring.redis.password=
# 连接池最大连接数(使用负值表示没有限制)
spring.redis.pool.max-active=8
# 连接池最大阻塞等待时间(使用负值表示没有限制)
spring.redis.pool.max-wait=-1
# 连接池中的最大空闲连接
spring.redis.pool.max-idle=8
# 连接池中的最小空闲连接
spring.redis.pool.min-idle=0
# 连接超时时间(毫秒)
spring.redis.timeout=0
新建一个redis的配置类RedisConfig,因为是配置类,所以要在类上面添加注解@Configuration
@EnableAutoConfiguration注解我们看下它的源码,发现它是一个组合注解
@Target({ElementType.TYPE})
@Retention(RetentionPolicy.RUNTIME)
@Documented
@Inherited
@AutoConfigurationPackage
@Import({EnableAutoConfigurationImportSelector.class})
public @interface EnableAutoConfiguration {
    String ENABLED_OVERRIDE_PROPERTY = "spring.boot.enableautoconfiguration";

    Class<?>[] exclude() default {};

    String[] excludeName() default {};
}
@EnableAutoConfiguration注解大致处理流程就是:
1、先去扫描已经被@Component所注释的类,当然会先判断有没有@Condition相关的注解。
2、然后递归的取扫描该类中的@ImportResource,@PropertySource,@ComponentScan,@Bean,@Import。一直处理完。
@Configuration
@EnableAutoConfiguration
public class RedisConfig {
    @Bean
    @ConfigurationProperties(prefix = "spring.redis.pool")
    public JedisPoolConfig getRedisConfig() {
        JedisPoolConfig config = new JedisPoolConfig();
        return config;
    }

    @Bean
    @ConfigurationProperties(prefix = "spring.redis")
    public JedisConnectionFactory getConnectionFactory() {
        JedisConnectionFactory factory = new JedisConnectionFactory();
        factory.setUsePool(true);
        JedisPoolConfig config = getRedisConfig();
        factory.setPoolConfig(config);
        return factory;
    }

    @Bean
    public RedisTemplate<?, ?> getRedisTemplate() {
        JedisConnectionFactory factory = getConnectionFactory();
        RedisTemplate<?, ?> template = new StringRedisTemplate(factory);
        return template;
    }
}
添加一个redis的接口服务RedisService
package com.yujie.service;

public interface RedisService {
    /**
     * set存数据 * @param key * @param value * @return
     */
    boolean set(String key, String value);

    /**
     * get获取数据 * @param key * @return
     */
    String get(String key);

    /**
     * 设置有效天数 * @param key * @param expire * @return
     */
    boolean expire(String key, long expire);

    /**
     * 移除数据 * @param key * @return
     */
    boolean remove(String key);

}
添加redis实现类RedisServiceImpl,注意下面代码中标红了的代码,这里设置redis的key和value以字符串的方式进行存储,如果不配置的话,默认是以16进制的形式进行存储,到时候我们读取的时候,就会看着很乱。
@Service("redisService")
public class RedisServiceImpl implements RedisService {
    @Resource
    private RedisTemplate<String, ?> redisTemplate;

    @Override
    public boolean set(final String key, final String value) {
        boolean result = redisTemplate.execute(new RedisCallback<Boolean>() {
            @Override
            public Boolean doInRedis(RedisConnection connection) throws DataAccessException {
                RedisSerializer<String> serializer = redisTemplate.getStringSerializer();
                connection.set(serializer.serialize(key), serializer.serialize(value));
                return true;
            }
        });
        return result;
    }

    @Override
    public String get(final String key) {
        String result = redisTemplate.execute(new RedisCallback<String>() {
            @Override
            public String doInRedis(RedisConnection connection) throws DataAccessException {
                RedisSerializer<String> serializer = redisTemplate.getStringSerializer();
                byte[] value = connection.get(serializer.serialize(key));
                return serializer.deserialize(value);
            }
        });
        return result;
    }

    @Override
    public boolean expire(final String key, long expire) {
        return redisTemplate.expire(key, expire, TimeUnit.SECONDS);
    }

    @Override
    public boolean remove(final String key) {
        boolean result = redisTemplate.execute(new RedisCallback<Boolean>() {
            @Override
            public Boolean doInRedis(RedisConnection connection) throws DataAccessException {
                RedisSerializer<String> serializer = redisTemplate.getStringSerializer();
                connection.del(key.getBytes());
                return true;
            }
        });
        return result;
    }
}
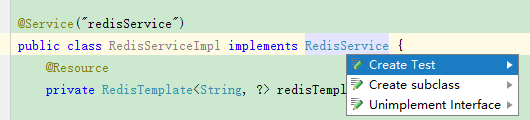
由于项目中引入了spring-boot-starter-test的依赖,也就是集成了spring boot的单元测试框架。给redis实现类,添加单元测试,将光标移动到RedisService接口位置处,然后按Alt+Enter,如下图所示:
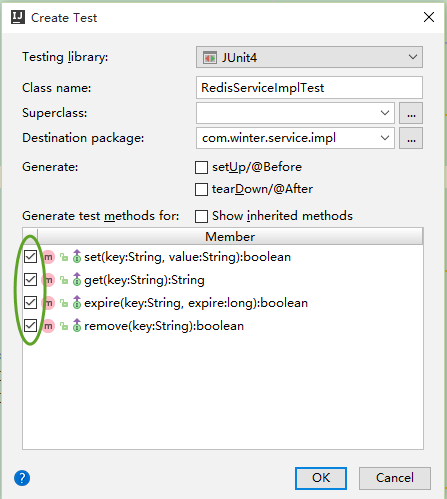
全选所有方法
在model包中,添加一个实体类Person
public class Person {
    private String name;
    private String sex;

    public Person() {
    }

    public Person(String name, String sex) {
        this.name = name;
        this.sex = sex;
    }

    public String getName() {
        return name;
    }

    public void setName(String name) {
        this.name = name;
    }

    public String getSex() {
        return sex;
    }

    public void setSex(String sex) {
        this.sex = sex;
    }
}
接下来,我们再修改一下单元测试

@RunWith(SpringRunner.class)
@SpringBootTest
public class RedisServiceImplTest {
private JSONObject json = new JSONObject();
@Autowired
private RedisService redisService;
@Test
public void contextLoads() throws Exception {
}
/**
* 插入字符串
*/
@Test
public void setString() {
redisService.set("redis_string_test", "springboot redis test");
}
/**
* 获取字符串
*/
@Test
public void getString() {
String result = redisService.get("redis_string_test");
System.out.println(result);
}
/**
* 插入对象
*/
@Test
public void setObject() {
Person person = new Person("person", "male");
redisService.set("redis_obj_test", json.toJSONString(person));
}
/**
* 获取对象
*/
@Test
public void getObject() {
String result = redisService.get("redis_obj_test");
Person person = json.parseObject(result, Person.class);
System.out.println(json.toJSONString(person));
}
/**
* 插入对象List
*/
@Test
public void setList() {
Person person1 = new Person("person1", "male");
Person person2 = new Person("person2", "female");
Person person3 = new Person("person3", "male");
List<Person> list = new ArrayList<>();
list.add(person1);
list.add(person2);
list.add(person3);
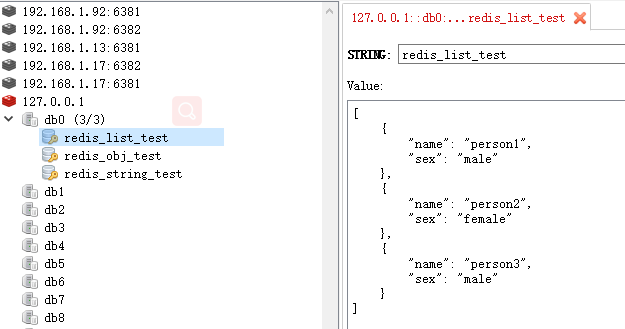
redisService.set("redis_list_test", json.toJSONString(list));
}
/**
* 获取list
*/
@Test
public void getList() {
String result = redisService.get("redis_list_test");
List<String> list = json.parseArray(result, String.class);
System.out.println(list);
}
@Test
public void remove() {
redisService.remove("redis_test");
}
}
我们发现,在单元测试类上面自动添加了2个注解,@SpringBootTest和@RunWith(SpringRunner.class)
@SpringBootTest注解是SpringBoot自1.4.0版本开始引入的一个用于测试的注解。
@RunWith就是一个运行器
@RunWith(SpringRunner.class)就是指用SpringRunner来运行
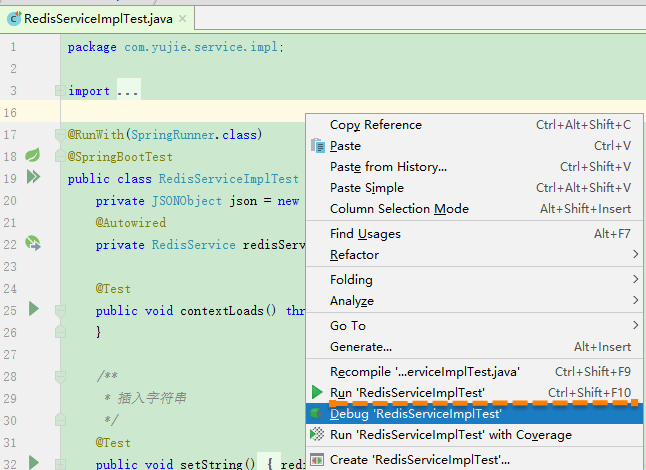
运行单元测试:
查看redis中的结果,这里用到一个可视化的redis管理工具:RedisDesktopManager