最近大约15天左右,自己想整理设计模式方面的问题,毕竟在研发过程中,对书写代码的质量还是有很大的提高的。本篇将讲述23中设计模式中的第一种----单例模式。读下来大约10-15分钟,前面讲述单例模式的创建方式,后面讲述项目中的实际用处,欢迎大家指正。
单例模式
一、定义
所谓的单例模式,就是一个单例类,在整个应用程序中都只有一个实例,在其中,并且提供一个类方法来供全局调用,在编译期间,会一直存储在内存中,直到App程序退出,系统自动释放此内存。
二、生命周期
在应用程序中,一个单例类在应用程序中就只能初始化一次,为了达到在使用过程中一直存在该单例,所以单例是存储在存储器的全局局域,在编译分配内存,在应用程序退出结束后由系统本身释放这部分内存。
下面是关于不同变量在手机中的存储位置
栈:临时变量(由编译器自动管理创建,分配以及释放的,栈中的内存被调用是处于存储空间中,调用完毕后会有系统自动的释放内存)
堆:通过calloc,malloc,alloc以及new来申请内存,释放也由开发者手动调用free或者delete来释放,在ARC模式下,是由系统自动管理的。
全局区域:静态变量(是由编译时来分配,App结束后由系统本身释放)
常量:常量(是由编译时分配,app结束由系统本身释放)
代码区:存放代码
三、创建方式
3.1 GCD方式(dispatch_once_t)苹果官方推荐使用(保证线程和数据安全)
#import "Upload_Image.h"

static Upload_Image *uploadImage = nil;

@implementation Upload_Image
//单例方法
+ (Upload_Image *)shareUploadImage{
    static dispatch_once_t onceToken;
    dispatch_once(&onceToken, ^{
        uploadImage = [[Upload_Image alloc]init];
    });
    return uploadImage;
}
3.2 线程锁
#import "ViewController.h"

static ViewController * _singletonVC ;

@interface ViewController ()

@end

@implementation ViewController

+ (instancetype)allocWithZone:(struct _NSZone *)zone{
    @synchronized (self){
        if (_singletonVC) {
            _singletonVC = [super allocWithZone:zone];
        }
    }
    return _singletonVC;
}

+ (instancetype)share{

    return  [[self alloc] init];
}
发现一个项目可能会有很多单例,不能每个类都手动的写一遍代码,因此可以把单例的创建写成宏,如下:
#define DJ_SINGLETON_DEF(_type_) + (_type_ *)sharedInstance;
+(instancetype) alloc __attribute__((unavailable("call sharedInstance instead")));
+(instancetype) new __attribute__((unavailable("call sharedInstance instead")));
-(instancetype) copy __attribute__((unavailable("call sharedInstance instead")));
-(instancetype) mutableCopy __attribute__((unavailable("call sharedInstance instead")));
#define DJ_SINGLETON_IMP(_type_) + (_type_ *)sharedInstance{
static _type_ *theSharedInstance = nil;
static dispatch_once_t onceToken;
dispatch_once(&onceToken, ^{
theSharedInstance = [[super alloc] init];
});
return theSharedInstance;
}
我们可以按照下面使用方法使用如下:
@interface DJSingleton : NSObject
    DJ_SINGLETON_DEF(DJSingleton);
@end
@implementation DJSingleton
    DJ_SINGLETON_IMP(DJSingleton);
@end
四、项目使用
我们下面以我公司的上传图片和拍照的工具类为主,介绍一下单例模式的使用(也可以直接拿走用于拍照选择图片上传)直接导入Upload_Image这个类,具体demo会上传到github中

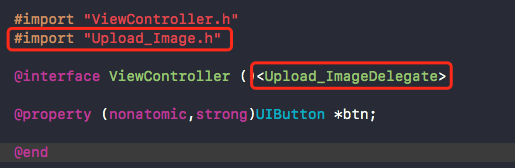
4.1 我们看一下Upload_Image.h
#import <Foundation/Foundation.h>
#import <UIKit/UIKit.h>

/**
 定义一个单例,方便外部使用
 */
#define UPLOAD_IMAGE [Upload_Image shareUploadImage]

/**
 代理方法
 */
@protocol Upload_ImageDelegate<NSObject>

//将图片上传到阿里云服务器
- (void)uploadImageToServerWithImage:(UIImage *)image;

@optional
- (void)uploadImageDidClickCancel;

@end

@interface Upload_Image : NSObject<UIActionSheetDelegate,UINavigationControllerDelegate,UIImagePickerControllerDelegate,UIAlertViewDelegate>

@property (nonatomic,weak)id<Upload_ImageDelegate> delegate;

@property (nonatomic,strong)UIViewController *fatherViewController;

//单例方法
+ (Upload_Image *)shareUploadImage;

//弹出选择项窗口的方法
- (void)showActionSheetInFatherViewController:(UIViewController *)fatherVC delegate:(id<Upload_ImageDelegate>)aDelegate;


@end
我们看一下实现方法
#import "Upload_Image.h"

#define WS(weakSelf)  __weak __typeof(&*self)weakSelf = self

static Upload_Image *uploadImage = nil;

@implementation Upload_Image
//单例方法
+ (Upload_Image *)shareUploadImage{
    static dispatch_once_t onceToken;
    dispatch_once(&onceToken, ^{
        uploadImage = [[Upload_Image alloc]init];
    });
    return uploadImage;
}

//显示ActionSheet方法
- (void)showActionSheetInFatherViewController:(UIViewController *)fatherVC delegate:(id<Upload_ImageDelegate>)aDelegate{
    uploadImage.delegate = aDelegate;
    self.fatherViewController = fatherVC;

    UIAlertController* alert = [UIAlertController alertControllerWithTitle:nil message:nil preferredStyle:UIAlertControllerStyleActionSheet];
    WS(weakSelf);
    UIAlertAction* cancelAction = [UIAlertAction actionWithTitle:@"取消" style:UIAlertActionStyleCancel handler:^(UIAlertAction * _Nonnull action) {
        [fatherVC dismissViewControllerAnimated:YES completion:nil];
        weakSelf.fatherViewController = nil;
    }];
    UIAlertAction* firstAction = [UIAlertAction actionWithTitle:@"使用相机拍照" style:UIAlertActionStyleDefault handler:^(UIAlertAction * _Nonnull action) {
        [fatherVC dismissViewControllerAnimated:YES completion:nil];
        [self createPhotoView];

    }];
    UIAlertAction* secondAction = [UIAlertAction actionWithTitle:@"使用相册照片" style:UIAlertActionStyleDefault handler:^(UIAlertAction * _Nonnull action) {
        [fatherVC dismissViewControllerAnimated:YES completion:nil];
         [self fromPhotos];
    }];
    [alert addAction:cancelAction];
    [alert addAction:firstAction];
    [alert addAction:secondAction];
    [fatherVC presentViewController:alert animated:YES completion:^{
        nil;
    }];
}

#pragma mark - 头像图片(从相机中选择得到)
- (void)createPhotoView {
    // ** 设置相机模式
    if ([UIImagePickerController isSourceTypeAvailable:UIImagePickerControllerSourceTypeCamera]) {
        UIImagePickerController *imagePC = [[UIImagePickerController alloc] init];
        imagePC.sourceType  = UIImagePickerControllerSourceTypeCamera;
        imagePC.delegate = self;
        imagePC.allowsEditing = YES;
        [_fatherViewController presentViewController:imagePC animated:YES completion:nil];
    } else {
        UIAlertView * alert = [[UIAlertView alloc] initWithTitle:@"提示"
                                                         message:@"该设备没有照相机"
                                                        delegate:nil
                                               cancelButtonTitle:@"确定"
                                               otherButtonTitles:nil];
        [alert show];
    }
}

#pragma mark - 图片库方法(从手机的图片库中查找图片)
- (void)fromPhotos {
    UIImagePickerController *imagePC = [[UIImagePickerController alloc] init];
    imagePC.sourceType = UIImagePickerControllerSourceTypePhotoLibrary;
    imagePC.delegate = self;
    imagePC.allowsEditing = YES;
    [_fatherViewController presentViewController:imagePC animated:YES completion:nil];
}

#pragma mark - UIImagePickerControllerDelegate
- (void)imagePickerController:(UIImagePickerController *)picker didFinishPickingMediaWithInfo:(NSDictionary *)info {
    [picker dismissViewControllerAnimated:YES completion:nil];
    UIImage *image = [info objectForKey:UIImagePickerControllerEditedImage];
/**开始上传图片*/
    if (self.delegate && [self.delegate respondsToSelector:@selector(uploadImageToServerWithImage:)]) {
        [self.delegate uploadImageToServerWithImage:image];
    }
    self.fatherViewController = nil;
}

- (void)imagePickerControllerDidCancel:(UIImagePickerController *)picker {
    [picker dismissViewControllerAnimated:YES completion:nil];
//    if (self.delegate && [self.delegate respondsToSelector:@selector(uploadImageDidClickCancel)]) {
//        [self.delegate uploadImageDidClickCancel];
//    }
    self.fatherViewController = nil;
}

//- (void)imagePickerController:(UIImagePickerController *)picker didFinishPickingImage:(UIImage *)image editingInfo:(nullable NSDictionary<NSString *,id> *)editingInfo NS_DEPRECATED_IOS(2_0, 3_0);


//- (void)imagePickerController:(UIImagePickerController *)picker didFinishPickingImage:(UIImage *)image editingInfo:(NSDictionary<NSString *,id> *)editingInfo{
//    [picker dismissViewControllerAnimated:YES completion:nil];
//}

@end
4.2 具体使用
倒入头文件,遵守代理
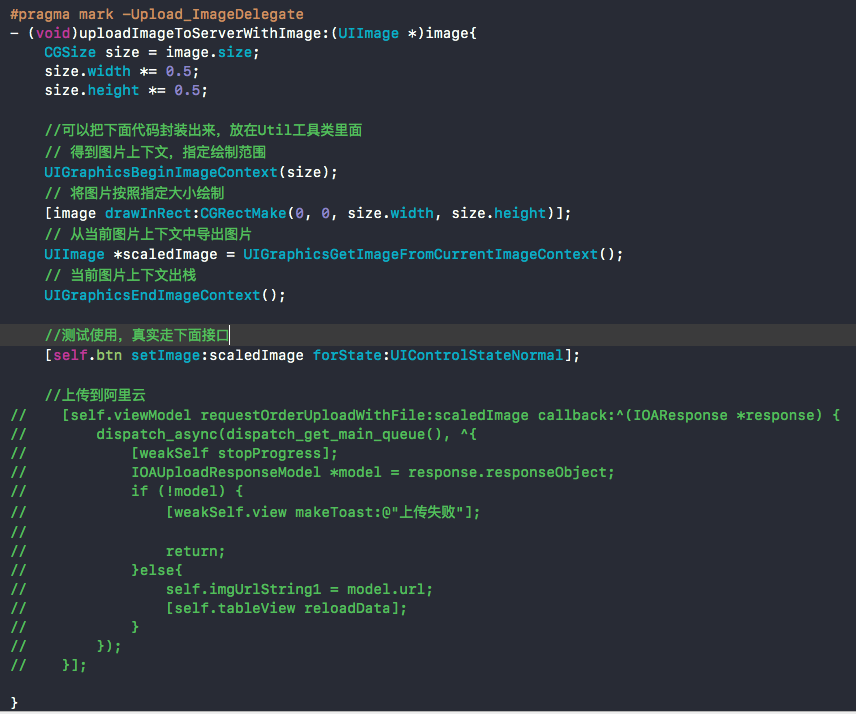
在使用地方拉起弹框

选择好图片之后,然后就上传到阿里云服务器
大家可以下载demo github地址:https://github.com/zxy1829760/uploadImageSingleton
五、单例模式存在的问题
5.1 内存问题
从上面知道,单例对象在程序的整个生命周期都会存在,如果单例比较大时,就会存在占据更多的内存。还有如果单例引用了另外的对象,也是个问题,别的对象引用因为单例对象不能释放从而不能释放。参看上面4.1中代码里面标红处。
对于这个问题,我们可以这样,在需要的时候加载出来,使用完之后再释放,从而不会有强引用现象,如果再次需要,下次再重新加载回来即可。
5.2 循环依赖
在我们实际开发中,单例对象可能会有属性,这些属性都是在init的时候创建以及初始化。一个单例M的m属性依赖于单例N,而单例N的属性n又依赖于单例M,就这样在初始化会出现一种情况-循环依赖问题,问题出现在dispatch_once中:如下面:
@interface DJSingletonM : NSObject
DJ_SINGLETON_DEF(DJSingletonM);
@end
@interface DJSingletonN : NSObject
DJ_SINGLETON_DEF(DJSingletonN);
@end
@interface DJSingletonM()
@property(nonatomic, strong) id someObj;
@end
@implementation DJSingletonM
DJ_SINGLETON_IMP(DJSingletonM);
-(id)init{
    if (self = [super init]) {
        _someObj = [DJSingletonN sharedInstance];
    }
    return self;
}
@end
@interface DJSingletonN()
@property(nonatomic, strong) id someObj;
@end
@implementation DJSingletonN
DJ_SINGLETON_IMP(DJSingletonN);
-(id)init{
    if (self = [super init]) {
        _someObj = [DJSingletonM sharedInstance];
    }
    return self;
}
@end
//---------------------------------------
DJSingletonM * s1 = [DJSingletonM sharedInstance];
如果这样写会报错误,EXC_BREAKPOINT()错误
对于可能 这样的错误,我们在设计的时候,就要考虑清楚,初始化的过程中,不依赖其它对象。如果必须要依赖,我们可以考虑异步初始化的方式,或者在内部做个标识也可。
上面就是23中设计模式的一种--单例模式,赋有变量内存,项目demo使用,以及潜在的问题讲解等,希望可以帮助大家对单例模式的使用和理解有个更好的理解,欢迎大家指正!!!
上面的demo地址:https://github.com/zxy1829760/uploadImageSingleton