概述
我们经常会遇到这样的需求:到数据库里查找一些关键字,把带这些关键字的记录返回显示在客户端上。但如果仅仅是单纯地把文本显示出来,那很不直观,用户不能很轻易地看到他们想找的内容,所以通常我们还要做到“高亮显示”。
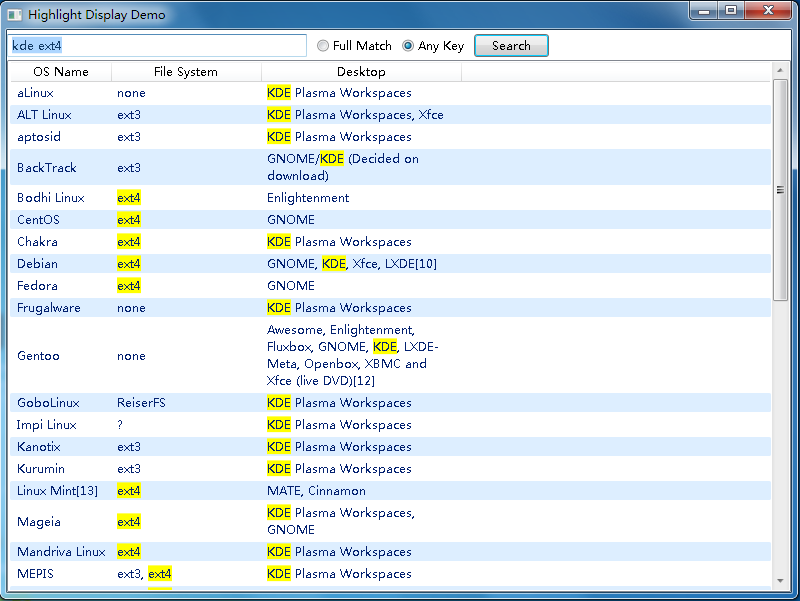
如果是用BS架构去实现,应该很简单,把相应的关键字加上一些label,然后给label定样式即可,或者直接用js在客户端渲染,减少服务器的负担,但CS架构就相对麻烦一点,我这里用WPF写了一个demo,实现了这个功能的演示:
另外本demo还包括了一些非常有用的wpf的小技巧。
功能介绍
由于这只是一个简单的DEMO,我和以往的风格一样,把它做成了“零配置”,我用一个csv文件和LINQ to Object来取代DBMS,执行一些简单的查询操作。
查询方式分为两种,一种是Full Match,表示全字符匹配,另一种是Any Key,表示用空格断开查询字符串,逐个关键字查询。
这个程序的显示区域使用了ListView控件,之所以使用ListView而不是DataGrid,主要是ListView能很轻易地自适应行高,而DataGrid的行高是固定的,但如果你要换DataGrid去做的话,应该也是同一个道理。
高亮显示功能分析与实现
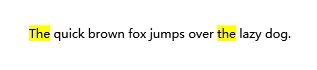
要实现高亮显示,我们可以这么做:在界面上放置一个TextBlock,叫tbTest,然后执行下面的代码:
tbTest.Inlines.Clear();
tbTest.Inlines.Add( new Run("The"){ Background = Brushes.Yellow });
tbTest.Inlines.Add( " quick brown fox jumps over ");
tbTest.Inlines.Add( new Run("the") { Background = Brushes.Yellow });
tbTest.Inlines.Add( new Run(" lazy dog."));
就能看到这样的“高亮”效果:
遗憾的是Inlines这个属性并非“依赖属性”(Dependency Property),你不能轻易把一个字符串或对象“绑定”给它。我的做法是创建一个用户控件,其中只包含一个TextBlock:
<UserControl x:class="HighlightDispDemo.HighlightTextBlock"
             xmlns="http://schemas.microsoft.com/winfx/2006/xaml/presentation"
             xmlns:x="http://schemas.microsoft.com/winfx/2006/xaml"
             xmlns:mc="http://schemas.openxmlformats.org/markup-compatibility/2006"
             xmlns:d="http://schemas.microsoft.com/expression/blend/2008"
             mc:Ignorable="d"
             d:DesignHeight="300" d:DesignWidth="300">
    <TextBlock Name="innerTextBlock" TextWrapping="Wrap">
    </TextBlock>
</UserControl>
再给它增加一个叫“HlContent”的依赖属性,其类型为自定义的HighlightContent:
        public static readonly DependencyProperty HighlightContentProperty = DependencyProperty .Register( "HlContent",
      typeof(HighlightContent),
      typeof( HighlightTextBlock),
      new FrameworkPropertyMetadata( null, OnHtContentChanged));

        [ Description("获取或设置高亮显示的内容")]
        [ Category("Common Properties")]
        public HighlightContent HlContent
        {
            get { return(HighlightContent)GetValue( HighlightContentProperty); }
            set { SetValue( HighlightContentProperty, value); }
        }
HighlightContent的定义如下:
    public enum HighlightContentMode
    {
        FullMatch,
        AnyKey
    };

    public class HighlightContent
    {
        public string Content { get; set; }
        public static string ToHighlight { get; set; }
        public static HighlightContentMode Mode { get; set; }
    }
其中ToHighlight属性表示要高亮显示的“键”,而Mode属性则用来指明用“Full Match”还是“Any Key”模式,考虑到同一时间只有一种高亮显示,我把这两个属性定义为static。
“HlContent”的内容变更通知回调函数:
        private static void OnHtContentChanged(DependencyObject sender, DependencyPropertyChangedEventArgs arg)
        {
            if(sender is HighlightTextBlock)
            {
                HighlightTextBlock ctrl = sender as HighlightTextBlock ;
                HighlightContent content = ctrl.HlContent ;
                ctrl.innerTextBlock.Inlines.Clear();
                if(content != null)
                {
                    ctrl.innerTextBlock.Inlines.AddRange(MakeRunsFromContent( content));
                }
            }
        }

        private static IEnumerable<Run> MakeRunsFromContent(HighlightContent content)
        {
             //此函数功能是:将要显示的字符串根据key及mode,拆分成不同的Run片段
             //代码较多,从略
        }
这样一来,我们就可以用自定义的HighlightTextBlock来取代Textblock实现绑定了。
绑定到ListView
ListView的默认的Column是肯定不支持“高亮”显示的了,现在我们来自定义Template:
        <ListView ItemContainerStyle="{DynamicResource CustomListViewItemStyle}" Grid.Row="2" HorizontalAlignment="Stretch" VerticalAlignment="Stretch" Name="lvContent" AlternationCount="2">
            <ListView.View>
                <GridView>
                    <GridView.Columns>
                        <GridViewColumn Header="OS Name" Width="100">
                            <GridViewColumn.CellTemplate>
                                <DataTemplate>
                                    <hld:HighlightTextBlock HlContent="{Binding Path=OsName,Converter={StaticResource converterHlContent}}"></hld:HighlightTextBlock>
                                </DataTemplate>
                            </GridViewColumn.CellTemplate>
                        </GridViewColumn>
                        <GridViewColumn Header="File System" Width="150">
                            <GridViewColumn.CellTemplate>
                                <DataTemplate>
                                    <hld:HighlightTextBlock HlContent="{Binding Path=FileSystem,Converter={StaticResource converterHlContent}}"></hld:HighlightTextBlock>
                                </DataTemplate>
                            </GridViewColumn.CellTemplate>
                        </GridViewColumn>
                        <GridViewColumn Header="Desktop" Width="200">
                            <GridViewColumn.CellTemplate>
                                <DataTemplate>
                                    <hld:HighlightTextBlock HlContent="{Binding Path=Desktop,Converter={StaticResource converterHlContent}}"></hld:HighlightTextBlock>
                                </DataTemplate>
                            </GridViewColumn.CellTemplate>
                        </GridViewColumn>
                    </GridView.Columns>
                </GridView>
            </ListView.View>
        </ListView>
可以看到,Template中使用了前面我们自定义的HighlightTextBlock控件,它们绑定的Path分别是OsName,FileSystem和Desktop,其实这都是string,而HlContent需要的是HighlightContent类型,所以我们还得指定一个转换器,转换器代码如下:
    [ValueConversion(typeof(string), typeof(HighlightContent))]
    public class HlContentConverter : IValueConverter
    {
        public object Convert(object value, Type targetType, object parameter, System.Globalization.CultureInfo culture)
        {
            return new HighlightContent {Content = (string)value};
        }

        public object ConvertBack(object value, Type targetType, object parameter, System.Globalization.CultureInfo culture)
        {
            throw new NotImplementedException();
        }
    }
杂七杂八
使用CsvHelper来读取CSV文件
这次我没有使用DBMS,其实DEMO项目能不用DBMS就不用了,否则部署困难,不利于问题分析。CsvHelper可以从github上获取,地址是:https://github.com/JoshClose/CsvHelper
它的帮助写得稍微有点潦草(个人感觉),我这里稍稍补充说明下:CsvHelper的思路就是把csv文件转为一个可枚举的集合,其中的一行转为集合中的一个对象,那么一列就对应到这个对象的一个属性,那么究竟哪一列转为那个属性呢?我们得告诉它,这就是“Map”,了解了这个之后看一下下面的代码,一切都清楚了。
    public class LinuxInfo
    {
        public string OsName { get; set; }
        public string FileSystem { get; set; }
        public string Desktop { get; set; }
    }

    public class LinuxMap : CsvClassMap<LinuxInfo>
    {
        public override void CreateMap()
        {
            Map(m => m.OsName).Index(0);
            Map(m => m.FileSystem).Index(1);
            Map(m => m.Desktop).Index(2);
        }
    }
上面代码是对象及Map定义。下面是执行读取和转换的操作。
     TextReader tr = new StreamReader("linux.csv", Encoding.UTF8);
     CsvReader csv = new CsvReader(tr);
     csv.Configuration.RegisterClassMap<LinuxMap>();
     csv.Configuration.HasHeaderRecord = false; //表示csv文件不带header行
     _listData = csv.GetRecords<LinuxInfo>().ToList();
ListView的隔行背景样式
把ListView的AlternationCount属性设为2,并指定ItemContainerStyle="{DynamicResource CustomListViewItemStyle}"。Style这样定义:
     <Style x:Key="CustomListViewItemStyle" TargetType="{x:Type ListViewItem}">
          <Style.Triggers>
               <Trigger Property="ItemsControl.AlternationIndex" Value="1">
                    <Setter Property="Background" Value="#DDEEFF"></Setter>
               </Trigger>
          </Style.Triggers>
     </Style>
让TextBox获得焦点时全选文本
这个功能得在App.xml.cs中做一些全局处理:
        protected override void OnStartup(StartupEventArgs e)
        {
            base.OnStartup(e);

            //为了让TextBox能够在获得焦点的时候自动选中其中文本,特意添加此全局事件处理
            EventManager.RegisterClassHandler(typeof(TextBox), UIElement.PreviewMouseLeftButtonDownEvent, new MouseButtonEventHandler(SelectivelyHandleMouseButton), true);
            EventManager.RegisterClassHandler(typeof(TextBox), UIElement.GotKeyboardFocusEvent, new RoutedEventHandler(SelectAllText), true);
        }

        private static void SelectivelyHandleMouseButton(object sender, MouseButtonEventArgs e)
        {
            var textbox = (sender as TextBox);
            if (textbox != null && !textbox.IsKeyboardFocusWithin)
            {
                if (e.OriginalSource.GetType().Name == "TextBoxView")
                {
                    e.Handled = true;
                    textbox.Focus();
                }
            }
        }

        private static void SelectAllText(object sender, RoutedEventArgs e)
        {
            var textBox = e.OriginalSource as TextBox;
            if (textBox != null)
                textBox.SelectAll();
        }
完整代码下载
HighlightDispDemo.7z(Visual Studio 2010)