linux创建rpm仓库
环境说明:
centos 7.7
简要说明:
第一步:首先配置本地可以安装的rpm仓库
第二步:然后安装apache将仓库export出去,
第三步:让局域网上其他计算机其他计算机可以使用自己创建的rpm仓库,也可以称为yum源。
第四步:如果能让internet上其他计算机可以访问该yum源,需要公网IP,如果方便用户记忆需要配置dns解析。(本文由于资源受限,不讲解此步骤)
配置本地RPM仓库
安装工具createrepo
检查是否以及createrepo,这是配置本地rpm仓库唯一需要安装的工具,其作用是创建rpm仓库的元数据,创建元数据的目的是让包管理器客户端比如yum能方便的获得rpm仓库的索引,以及rpm包之间的依赖关系, 而不必扫描整个仓库获得rpm包信息,及分析依赖。
检查是否以及安装
$rpm -q createrepo
package createrepo is not installed
如果没有,执行以下命令安装 createrepo 工具
$sudo yum install -y createrepo
检查是否安装成功
$rpm -q createrepo
createrepo-0.9.9-28.el7.noarch

$createrepo --version
createrepo 0.9.9
查看帮助
$createrepo --help
Usage: genpkgmetadata.py [options]

Options:
  --version             show program's version number and exit
  -h, --help            show this help message and exit
  -q, --quiet           output nothing except for serious errors
  -v, --verbose         output more debugging info.
  --profile             output timing/profile info.
..............
..............
创建RPM仓库
$sudo mkdir -pv /rpm/centos/{6,7}/os/x86_64mkdir: created directory ‘/rpm’
mkdir: created directory ‘/rpm/centos’
mkdir: created directory ‘/rpm/centos/6’
mkdir: created directory ‘/rpm/centos/6/os’
mkdir: created directory ‘/rpm/centos/6/os/x86_64’
mkdir: created directory ‘/rpm/centos/7’
mkdir: created directory ‘/rpm/centos/7/os’
mkdir: created directory ‘/rpm/centos/7/os/x86_64’
拷贝RPM包到RPM仓库
cp /root/vsftpd-2.2.2-24.el6.x86_64.rpm /rpm/centos/6/os/x86_64
cp/root/tomcat-7.0.76-2.el7.noarch.rpm/rpm/centos/7/os/x86_64
创建元数据
$sudo createrepo /rpm/centos/6/os/x86_64/
$sudo createrepo /rpm/centos/7/os/x86_64/
注:通过执行以上命令, createrepo将会在以上目录下分别根据目录下的rpm生成元数据并保存在repodata下;
如果rpm包有更新,需要运行 以下命令更新元数据
$sudo createrepo --update /rpm/centos/6/os/x86_64/
$sudo createrepo --update /rpm/centos/7/os/x86_64/
完成以上配置,一个本地yum源已经配置成功,下面对本地yum源进行测试
测试本地yum源
添加本地yum源
$sudo vi /etc/yum.repos.d/CentOS-Local.repo
# 文件内容如下
# CentOS-7-localRepo.repo

[local_base]
name=CentOS-$releasever-localRepo - Base
baseurl=file:///rpm/centos/$releasever/os/$basearch
gpgcheck=0
说明:
第一个【】中括号里表示仓库的名字,通常这个名字可以自己决定,以方便记忆和理解为原则,但是一般不建议里面带空格,
name:表示仓库的简要说明,
baseurl= 表示仓库的路径,也就是repodata所在的目录的父目录,
gpgcheck=0表示不检查包的gpg验证,若gpgcheck=1表示要验证。
添加以上内容我们客户端就可以根据以上定义的baseurl去服务器仓库里找相应的包。
清除yum缓存,查看仓库列表
#清除yum缓存
$ sudo yum clean all
#查看yum源列表
$yum repolist
Loaded plugins: fastestmirror
Determining fastest mirrors
* base: mirrors.cqu.edu.cn
* extras: mirrors.tuna.tsinghua.edu.cn
* updates: mirrors.cqu.edu.cn
base | 3.6 kB 00:00:00

extras | 2.9 kB 00:00:00

my_base | 2.9 kB 00:00:00

updates | 2.9 kB 00:00:00

(1/5): my_base/7/x86_64/primary_db | 3.1 kB 00:00:00
安装软rpm
$yum install vsftpd
Loaded plugins: fastestmirror, security
Setting up Install Process
Loading mirror speeds from cached hostfile
Resolving Dependencies
--> Running transaction check
---> Package vsftpd.x86_64 0:2.2.2-24.el6 will be installed
--> Finished Dependency Resolution
搭建局域网rpm仓库
安装apache web服务器
#检查是否以及安装httpd
$rpm -q httpd
package httpd is not installed
#如果没有安装, 则执行以下命令安装
$sudo yum -y install httpd
说明:httpd默认工作路径在/var/www/html/ 下,也就是放html网页代码的地方。
配置apache web 服务器
#创建软连接指向,之前安装的yum repo:/rpm/centos
$sudo ln -s  /rpm/centos /var/www/html/centos
由于我的80端口以及被另一个进程占用,所以我需要修改 apache的配置让其监听在另一个端口上
$sudo vi /etc/httpd/conf/httpd.conf
Listen 8085
启动apach web 服务
$systemctl start httpd

$systemctl status httpd
● httpd.service - The Apache HTTP Server
   Loaded: loaded (/usr/lib/systemd/system/httpd.service; disabled; vendor preset: disabled)
   Active: active (running) since Fri 2021-02-05 20:12:27 CST; 1min 53s ago
     Docs: man:httpd(8)
           man:apachectl(8)

#设置为开机启动
$systemctl enable httpd
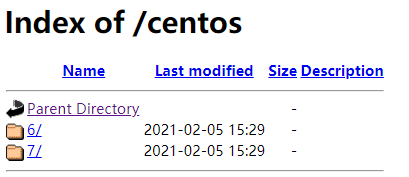
打开浏览器访问 http://192.168.x.x:8085/centos/ 这里的 ip 替换成自己的服务器ip
修改或添加yum源测试
$sudo vi /etc/yum.repos.d/CentOS-Local.repo
# 文件内容如下
# CentOS-7-localRepo.repo

[local_base]
name=CentOS-$releasever-localRepo - Base
baseurl=http://192.168.x.x:8085/centos/$releasever/os/$basearch
gpgcheck=0
修改之前创建的CentOS-Local.repo 中的baseurl为http://192.168.x.x:8085/centos/$releasever/os/$basearch
清空缓存 yum clean all
这样就可以使用局域网yum源了,可以在局域网内的任意一台centos, fedora 或redhat上使用此 yum源了
参考文档
https://www.cnblogs.com/qiuhom-1874/archive/2019/09/08/11487456.html