# 交换机链路聚合配置:
terface Bridge-Aggregation 1  #创建聚合口1
link-aggregation mode dynamic
port link-type trunk #聚合口设置为trunk模式
port link-type trunk #聚合口设置为trunk模式

# 进入接口,绑定聚合口
interface Ten-GigabitEthernet 1/0/17
port link-type trunk
port trunk permit vlan all
port link-aggregation group 1#绑定刚刚创建的聚合口1

interface Ten-GigabitEthernet 1/0/18
port link-type trunk
port trunk permit vlan all
port link-aggregation group 1#绑定刚刚创建的聚合口1

# 客户都与服务端口
interface Ten-GigabitEthernet 1/0/15
port link-type trunk
port trunk permit vlan 55
dis cur interface Ten-GigabitEthernet 1/0/15
qu
int Bridge-Aggregation 1
link-aggregation mode dynamic
qu

[H3C]display history-command
dis link-aggr verbose

display interface Bridge-Aggregation 1  #命令查看聚合口信息
display interface brief   #查看接口状态


#Linux创建链路聚合:
什么是网卡聚合
网卡的链路聚合一般常用的有"bond"和"team"两种模式,"bond"模式最多可以添加两块网卡,"team"模式最多可以添加八块网卡.
bond聚合
Red Hat Enterprise Linux 允许管理员使用 bonding 内核模块和称为通道绑定接口的特殊网络接口将多个网络接口绑定到一个通道
根据选择的绑定模式 , 通道绑定使两个或更多个网络接口作为一个网络接口 , 从而增加带宽和 / 提供冗余性
利用 nmcli 命令管理 bond
yum install NetworkManager-tui
systemctl start NetworkManager
nmcli connection show


(2)添加bond聚合的接口
nmcli connection add con-name bond1 ifname bond1 type bond mode active-backup ip4 2.2.2.2/24
添加两块网卡
nmcli connection add con-name team1-2 ifname eth2 type bond-slave master bond1
nmcli connection add con-name team1-3 ifname eth3 type bond-slave master bond1
nmcli connection show  #看聚和网卡是否添加成功

采用聚合方式当网卡坏了客户不会有任何感觉

(2)添加team聚合口
链路聚合的优势:
team 聚合连接(也称为链路聚合):
  由多块网卡(team-slave)一起组建而成的虚拟网卡,即组队。

作用1:轮询式的流量负载均衡
作用2:热备份连接冗余

实现链路聚合的条件:
  2块或2块以上的物理网卡

步骤如下:
1.创建虚拟网卡team1  【为聚合连接提供配置(类型,连接名,运行器,IP地址)】
# nmcli connection add type team con-name team1 ifname team1 autoconnect yes config '{"runner": {"name": "activebackup"}}'
解释 numcli connection 添加  类型 team 配置文件名称 team1 ifconfig显示的名字为team1 每次开机自动启动配置 热备份方式


2.添加成员【为成员网卡提供配置(类型,连接名,主连接)】
# nmcli connection add type team-slave con-name team1-1 ifname eth2 master team1
# nmcli connection add type team-slave con-name team1-2 ifname eth3 master team1

3.配置IP地址
# nmcli connection modify team1 ipv4.method manual ipv4.addresses 2.2.2.2/24 connection.autoconnect yes

4.激活 【分别激活聚合连接,成语连接】
# nmcli connection up team1
# nmcli connection up team1-1
# nmcli connection up team1-2

5.验证查看【检查聚合连接状态】
# teamdctl team1 state
# ifconfig eth2 down
# teamdctl team1 state

cat /proc/net/bonding/bond1


# 如果敲错误: nmcli connection delete team1
# 如果敲错误: nmcli connection delete team1-1
# 如果激活失败
# nmcli connection delete team1
# nmcli connection delete team1-1
# nmcli connection delete team1-2


示例:
team工作模式:
   roundrobin模式也称为轮询模式,它基于每一个包服务器发出的数据包,就会在两个物理网卡上进行轮询,
即第一个数据包走一张网卡,第二个数据包走第二张网卡,依次轮询,相当于 bond 中的 mode 0。在交换机上需要配置链路聚合。

  注意:
        (1)roundrobin具有容错性,当一张网卡down掉,数据包依然发送成功。
        (2)在使用roundrobin模式必须要在交换机上做以太通道,不然会出现网络无法连通。

  activebackup模式  主备模式, 相当于 bond 中的 mode 1.    在交换机上不需要做链路聚合配置。

二、基础环境
  系统:centos 7  全新安装的系统。

三、配置

  1、查看物理网卡信息:#nmcli dev sh
    可以看em2 没有连接

2、查看网卡链接信息。#nmcli con sh

3、创建team接口,根据自己的业务需求,配置工作模式。
  #nmcli con add type team con-name team0 ifname team0 config '{"runner":{"name": "roundrobin"}}'    (模式:根据业务需求进行配置工作模式)

4、给接口配置IP地址
  #nmcli con modify team0 ipv4.address '192.168.1.10/24' ipv4.gateway '192.168.1.1' ipv4.dns '114.114.114.114'

5、设置接口模式为手动模式,取消DHCP
  #nmcli con modify team0 ipv4.method manual

6、将物理网卡添加到team中
  #nmcli con add type team-slave ifname em1 master team0
    #nmcli con add type team-slave ifname em2 master team0

7、重启网卡  #service network restart

8、查看team0 状态   #teamdctl team0 state

注:如果喜欢使用图形化界面进行配置的可以使用命令


四、后期维护操作
  1、启用team0 接口中的网卡:
    #nmcli connection up team-slave-em1
    #nmcli connection up team-slave-em2
  2、
    # teamnl team0 ports
    现实网卡em2 down,原因没有接线。
  3、
     # teamnl team0 options
  4、删除网卡连接信息  #nmcli con del  team-slave-em2
   5、删除team0     #nmcli dev del team0
注意:
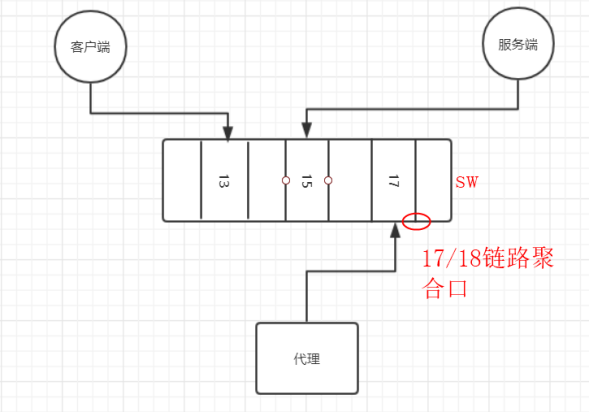
设备上的聚合口与交换机上的聚合口需要一致,设置上链路聚合只有两个成员口(eth2/eth3),故交换机上也是两个(17/18),
另外,创建链路聚合口之后,不能在成员口中添加ip地址,否则会不通;
拓扑模式如下:
配置网卡为vlan trunk:https://www.shuzhiduo.com/A/Vx5Mb19YdN/

1,安装vlan(vconfig)和加载8021q 模块
# modprobe 8021q
# lsmod | grep 8021q

yum -y install epel-release
yum -y install vconfig -y
yum install net-tools -y

ls /porc/net/vlan

2,在ens5,ens6接口上配置VLAN
vconfig add ens5 55
vconfig add ens6 66

ls /proc/net/vlan

# ifconfig ens5.55 2.2.2.2 netmask 255.255.255.0 broadcast 2.2.2.255 up
# ifconfig ens6.66 3.3.3.3 netmask 255.255.255.0 broadcast 3.3.3.255 up

# 删除vlan
# ifconfig ens6.66 down
# vconfig rem ens6.66

# 通过ip
# ip link add link ens6 name ens6.55 type vlan id 55
# ip link
# ip -d link show ens6.55

# ip addr add 2.2.2.2/24 brd 2.2.2.255 dev ens6.55
# ip link set dev ens6.55 up

# 删除
# ip link set dev ens6.55 down
# ip link delete ens6.55


示例:
vconfig命令是VLAN配置命令。
1,安装vlan(vconfig)和加载8021q模块
[root@test0001~]#yum install vconfig
[root@test0001~]#modprobe 8021q
[root@test0001~]#lsmod |grep -i 8021q
2,在eth0接口上配置两个VLAN
[root@test0001~]#vconfig add eth0 100
[root@test0001~]#vconfig add eth0 200
3,设置VLAN的REORDER_HDR参数,默认就行了
[root@test0001~]#vconfig set_flag eth0.100 1 1
[root@test0001~]#vconfig set_flag eth0.200 1 1
4,配置网络信息
[root@test0001~]#ifconfig eth0 0.0.0.0
[root@test0001~]#ifconfig eth0.100 172.16.1.8 netmask 255.255.255.0 up
[root@test0001~]#ifconfig eth0.200 172.16.2.8 netmask 255.255.255.0 up
5,删除VLAN命令
[root@test0001~]#vconfig rem eth0.100
[root@test0001~]#vconfig rem eth0.200