简介——矢量动画2种方式与流程
矢量动画有一些不一样的细节,这里需要提前了解,否则容易在后续使用的时候困惑。
group动画
使用group包裹后的动画,为什么要使用它来包裹path?因为属性动画要改变绘制的图片属性来实现动画,可是path标签中并没有translateX和translateY属性,因此,VectorDrawable要想使用属性,就需要用group标签来封装path标签,将属性动画作用在group标签中,这里使用group标签将vector图片分成了两组,如果图片比较复杂,会将其分成多组。但是group不支持直接操作path的属性。所以这种动画形式是直接移动整个path或者矢量图,它不能根据矢量图参数来变化动画。另外它的添加和启动动画方式与path的name的动画不同。
path动画
直接使用path的name的动画,这个动画支持trimPathStart、trimPathEnd、pathData,fillColor,fillAlpha这几种与path有关的属性,这种动画形式可以直接看懂,trimPathStart与trimPathEnd是绘制步骤动画、pathData是改变参数动画(变形动画)。另外它的添加和启动动画方式与group包裹后的动画不同。
基本流程:
- 创建矢量图
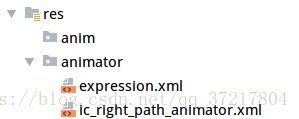
- 创建animator目录(注意!是animator目录。不是anim目录。)
- 在animator里添加动画xml
- 在drawable目录里创建 animated-vector 组合器文件,组合动画xml与矢量图xml
- 在View 添加这个组合器
属性说明
set
一个set中可以有多个objectAnimator,通过ordering属性控制执行顺序。ordering:取值["sequentially"|"together"], sequentially(默认)。
- <set android:ordering="sequentially"> 顺序执行objectAnimator
- <set android:ordering="together"> 同时执行objectAnimator
objectAnimator
objectAnimator中一下这些属性
- propertyName 动画属性名称
- valueType 值的类型
- valueFrom 动画的起始值
- valueTo 动画的结束值
- repeatCount 重复次数
- repeatMode 重复模式
- duration 动画时长
- interpolator 动画插值
- startOffset 动画延迟开始时间
propertyName属性(属性名)
propertyName:指定动作属性如下:
- translateX X轴移动
- translateY Y轴移动
- trimPathStart 路径开始
- trimPathEnd 路径结束
- scaleX X轴放大或者缩小比例
- scaleY Y轴放大或者缩小比例
- rotation 旋转
- fillAlpha 透明度
- fillColor 颜色
Vector里面的属性基本上都可以(需要注意target里面绑定的是group就只能使用当前group的属性,下级group或path等不能使用,绑定的path就只能使用当前path的属性,clip-path一样)。
valueType属性(属性值类型)
valueType:PropertyName指定属性值的类型,共有四种类型,分别是:["intType"|"floatType"|"colorType"|pathType]。
valueFrom、valueTo属性(动画初始和结束值)
valueFrom:PropertyName指定属性的初始值,值的类型为ValueType(如位置、颜色、透明、PathData等)。
valueTo:PropertyName指定属性的结束值,值的类型为ValueType。
repeatCount、repeatMode属性(动画重复次数和样式)
repeatCount:定义动画重复次数,["infinite"]为无限次。
repeatMode:定义重复的行为 ["restart"|"reverse"], restart:直接跳到起始位置重新开始;reverse:倒退到起始位置重新开始。
duration属性(动画时间)
duration:动画执行一次的时间,单位ms。
interpolator属性(动画过程控制)
interpolator:控制动画的运行过程。Interpolator 定义了动画的变化速度,可以实现匀速、正加速、负加速、无规则变加速等。可以自己定义,也可以使用默认的,列如:
Accelerate:加速,共有下面四种模式
["@android:interpolator/accelerate_decelerate"|"@android:interpolator/accelerate_cubic"|
"@android:interpolator/accelerate_quad"|"@android:interpolator/accelerate_ quint "]
accelerate_decelerate:在动画开始与结束的地方速率改变比较慢,在中间的时候加速;
accelerate_cubic:拟合立方缓和函数的曲线加速。
accelerate_quad:曲线匹配的quadtratic缓解功能加速。
accelerate_ quint:曲线匹配功能昆特缓解加速。
Decelerate:减速,共有四种模式,同Accelerate。
["@android:interpolator/accelerate_decelerate"|"@android:interpolator/decelerate_cubic"|
"@android:interpolator/decelerate_quad"|"@android:interpolator/decelerate_ quint "]。
Anticipate:开始的时候向后然后向前甩["@android:interpolator/accelerate_decelerate"] 。
AnticipateOvershoot:开始的时候向后然后向前甩一定值后返回最后的值["@android:interpolator/anticipate_overshoot"] 。
Bounce:动画结束的时候弹起["@android:interpolator/bounce"] 。
Cycle:动画循环播放特定的次数,速率改变沿着正弦曲线["@android:interpolator/cycle"] 。
Linear:以常量速率改变["@android:interpolator/linear"] 。
Overshoot:向前甩一定值后再回到原来位置["@android:interpolator/overshoot"]。
startOffset属性(延时)
延迟播放的时间,单位ms,只延时第一次播放,重复播放时不延时。
实现动画
group 包裹动画:
例子1
效果图:
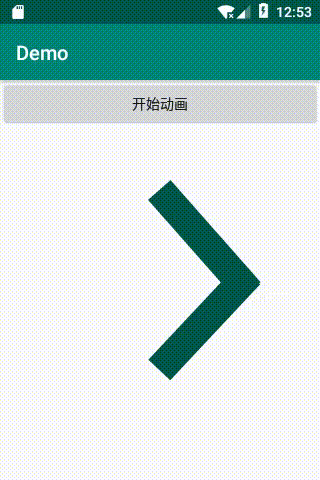
步骤一 创建矢量图
在drawable目录
my_svg.xml
<?xml version="1.0" encoding="utf-8"?>
<vector xmlns:android="http://schemas.android.com/apk/res/android"
    android:width="50dp"
    android:height="50dp"
    android:viewportWidth="50.0"
    android:viewportHeight="50.0">

    <group
        android:name="ic_right_path">

    <path
        android:strokeColor="@color/colorPrimaryDark"
        android:strokeWidth="5"
        android:pathData="M20,10 L35,27 M20,40 L35,24"/>

    </group>

</vector>
步骤二 创建动画xml
在animator目录
<?xml version="1.0" encoding="utf-8"?>
<objectAnimator xmlns:android="http://schemas.android.com/apk/res/android"
    android:interpolator="@android:interpolator/decelerate_cubic"
    android:duration="3000"
    android:repeatMode="reverse"
    android:repeatCount="infinite"
    android:propertyName="translateX"
    android:valueFrom="0"
    android:valueTo="10"
    android:valueType="floatType">

</objectAnimator>
虽然上面已经说明过属性了,但是我还是在啰嗦解释一下:
动画插补器:android:interpolator="@android:interpolator/decelerate_cubic" 这里使用的是快到最后动画减速的属性
动画持续时间:android:duration="3000" 这里设置的是3秒
动画重复模式:android:repeatMode="reverse" 这里设置的是倒退到起始位置重新开始动画
动画属性:android:propertyName="translateX" 这里设置的是X轴移动
动画开始值: android:valueFrom="0"
动画完成值:android:valueTo="10"
参数属性:android:valueType="floatType" 这里设置的是浮点值
步骤三 创建组合器
在drawable目录
arrow_anim.xml
<?xml version="1.0" encoding="utf-8"?>
<animated-vector xmlns:android="http://schemas.android.com/apk/res/android"
    android:drawable="@drawable/my_svg">

    <target
        android:animation="@animator/ic_right_path_animator"
        android:name="ic_right_path"/>

</animated-vector>
步骤四 在布局xml上的ImageView里添加组合器 arrow_anim.xml
 <ImageView
        android:id="@+id/ic_anim"
        android:layout_width="300dp"
        android:layout_height="300dp"
        android:src="@drawable/arrow_anim"
        android:layout_centerInParent="true" />
步骤五 启动动画
mIcAnim = (ImageView)findViewById(R.id.ic_anim);
        mBtnStart.setOnClickListener(new View.OnClickListener() {
            @Override
            public void onClick(View view) {
                Drawable drawable = mIcAnim.getDrawable();
                if (drawable instanceof Animatable) {
                    ((Animatable) drawable).start();

                }
            }
        });
直接使用path name的动画:
trimPathStart属性
例子1:
效果图

步骤一 创建矢量图
<?xml version="1.0" encoding="utf-8"?>
<vector xmlns:android="http://schemas.android.com/apk/res/android"
    android:width="50dp"
    android:height="50dp"
    android:viewportWidth="50.0"
    android:viewportHeight="50.0">

    <path
        android:name="ic_right_path"
        android:strokeColor="@color/colorPrimaryDark"
        android:strokeWidth="5"
        android:pathData="M20,10 L35,27 L20,40"/>

</vector>
步骤二 创建动画xml
<?xml version="1.0" encoding="utf-8"?>
<objectAnimator xmlns:android="http://schemas.android.com/apk/res/android"
    android:interpolator="@android:interpolator/decelerate_cubic"
    android:duration="3000"
    android:repeatMode="reverse"
    android:repeatCount="infinite"
    android:propertyName="trimPathStart"
    android:valueFrom="0"
    android:valueTo="1"
    android:valueType="floatType">

</objectAnimator>
步骤三 创建组合器
<?xml version="1.0" encoding="utf-8"?>
<animated-vector xmlns:android="http://schemas.android.com/apk/res/android"
    android:drawable="@drawable/my_svg">

    <target
        android:animation="@animator/ic_right_path_animator"
        android:name="ic_right_path"/>

</animated-vector>
步骤四 添加组合器和启动动画
这里可以使用2种形式,别问我为什么可以使用两种。我也不知道为什么。。。
第一种就是上面使用group包裹的动画的形式
第二种在代码上添加,注意这里使用的是AnimatedVectorDrawable,这很重要。因为下面的pathData属性必须使用它
mIcAnim = (ImageView)findViewById(R.id.ic_anim);
        mBtnStart.setOnClickListener(new View.OnClickListener() {
            @Override
            public void onClick(View view) {
                AnimatedVectorDrawable drawable = (AnimatedVectorDrawable)getDrawable(R.drawable.arrow_anim);
                mIcAnim.setImageDrawable(drawable);
                if (drawable != null){
                    drawable.start();
                }
            }
        });
pathData属性
例子1:
效果图:

步骤一 创建矢量图
在drawable目录
my_svg.xml
<?xml version="1.0" encoding="utf-8"?>
<vector xmlns:android="http://schemas.android.com/apk/res/android"
    android:width="50dp"
    android:height="50dp"
    android:viewportWidth="50.0"
    android:viewportHeight="50.0">

    <path
        android:name="ic_right_path"
        android:strokeColor="@color/colorPrimaryDark"
        android:strokeWidth="5"
        android:pathData="M20,10 L35,27 M0,25 L34,25 M20,40 L35,24"/>

</vector>
步骤二 在animator目录创建动画xml
ic_right_path_animator.xml
<?xml version="1.0" encoding="utf-8"?>
<objectAnimator xmlns:android="http://schemas.android.com/apk/res/android"
    android:interpolator="@android:interpolator/decelerate_cubic"
    android:duration="3000"
    android:repeatMode="reverse"
    android:repeatCount="infinite"
    android:propertyName="pathData"
    android:valueFrom="M20,10 L35,27 M0,25 L34,25 M20,40 L35,24"
    android:valueTo="M0,15 L40,15 M0,25 L40,25 M0,35 L40,35"
    android:valueType="pathType">

</objectAnimator>
属性已经在上面有说明了,请对着理解就行了,这里需要注意2点!注意2点!注意2点! 重要事情说三遍!
- 第一点 android:valueType="pathType" 这里使用的参数格式是pathType
- 第二点 矢量动画要求初始帧的路径命令序列(valueFrom)与结束帧的路径命令序列(valueTo)内的命令必须一一对应,只有参数值可以不同,这样才能插值,从而矢量动画才能执行。否则编译后运行时就崩溃了。
步骤三 创建组合器

arrow_anim.xml
<?xml version="1.0" encoding="utf-8"?>
<animated-vector xmlns:android="http://schemas.android.com/apk/res/android"
    android:drawable="@drawable/my_svg">

    <target
        android:animation="@animator/ic_right_path_animator"
        android:name="ic_right_path"/>

</animated-vector>
添加动画(这里的动画输入的时候没有联想输入,属于正常请手动敲完)与path名称
步骤四 给ImageView添加arrow_anim 在启动动画
        mIcAnim = (ImageView)findViewById(R.id.ic_anim);
        mBtnStart.setOnClickListener(new View.OnClickListener() {
            @Override
            public void onClick(View view) {
           AnimatedVectorDrawable drawable =(AnimatedVectorDrawable)getDrawable(R.drawable.arrow_anim);
                mIcAnim.setImageDrawable(drawable);
                if (drawable != null){
                    drawable.start();
                }
            }
        });
注意!注意!注意!
1.请不要把arrow_anim组合器直接添加到View xml属性里,必须在代码上添加才可以,如果直接添加会报错。
2.这里使用的是AnimatedVectorDrawable类型,添加到View和启动动画,请不要弄错了。
例子2

步骤一 创建矢量图
<vector xmlns:android="http://schemas.android.com/apk/res/android"
        android:width="24dp"
        android:height="24dp"
        android:viewportWidth="24.0"
        android:viewportHeight="24.0">

    <path
        android:fillColor="#FF000000"
        android:pathData="M15.5,9.5m-1.5,0a1.5,1.5 0,1 1,3 0a1.5,1.5 0,1 1,-3 0"/>

    <path
        android:fillColor="#FF000000"
        android:pathData="M8.5,9.5m-1.5,0a1.5,1.5 0,1 1,3 0a1.5,1.5 0,1 1,-3 0"/>

    <path
        android:fillColor="#FF000000"
        android:pathData="M11.99,2
        C6.47,2 2,6.48 2,12
        s4.47,10 9.99,10
        C17.52,22 22,17.52 22,12S17.52,2 11.99,2z
        M12,20
        c-4.42,0 -8,-3.58 -8,-8
        s3.58,-8 8,-8 8,3.58 8,8 -3.58,8 -8,8z"/>

    <path
        android:name="expression"
        android:strokeColor="#FF000000"
        android:strokeWidth="1.5"
        android:pathData="M8,17 C 10,14 14,14 16,17"/>

</vector>
说明一下,这里我使用的笑脸是Android studio自带的,一开始的想法是找一个哭脸和笑脸,然后直接找到嘴巴的属性就行了。但是,坑大了,最后发现哭脸和笑脸的嘴巴属性根本不一样。没有办法最后我只能自己直接用三次贝赛曲线画了一个嘴巴。使用各位大神如果想直接使用Android studio的矢量图来做path值变化,请一定检查清楚属性是否一样(只要有一个字母不同就不行!)
步骤二 创建动画xml
<?xml version="1.0" encoding="utf-8"?>
<objectAnimator xmlns:android="http://schemas.android.com/apk/res/android"
    android:interpolator="@android:interpolator/decelerate_cubic"
    android:duration="3000"
    android:repeatMode="reverse"
    android:repeatCount="infinite"
    android:propertyName="pathData"
    android:valueFrom="M8,17 C 10,14 14,14 16,17"
    android:valueTo="M8,15 C 10,18 14,18 16,15"
    android:valueType="pathType">

</objectAnimator>
步骤三 创建组合器
<?xml version="1.0" encoding="utf-8"?>
<animated-vector xmlns:android="http://schemas.android.com/apk/res/android"
    android:drawable="@drawable/ic_sentiment_satisfied_black_24dp">

    <target
        android:animation="@animator/expression"
        android:name="expression"/>

</animated-vector>
步骤四 向View添加组合器、启动动画
mIcAnim = (ImageView)findViewById(R.id.ic_anim);
        mBtnStart.setOnClickListener(new View.OnClickListener() {
            @Override
            public void onClick(View view) {
                AnimatedVectorDrawable drawable = (AnimatedVectorDrawable)getDrawable(R.drawable.arrow_anim2);
                mIcAnim.setImageDrawable(drawable);
                if (drawable != null){
                    drawable.start();
                }
            }
        });
例子3
效果图:
步骤一 创建矢量图
<vector xmlns:android="http://schemas.android.com/apk/res/android"
        android:width="100dp"
        android:height="100dp"
        android:viewportWidth="100.0"
        android:viewportHeight="100.0">
    <!--头-->
    <path
        android:fillColor="@color/colorPrimaryDark"
        android:pathData="M40,20 C 40,6.5 60,6.5 60,20
                          M40,20 C 40,33.5 60,33.5 60,20  "/>
    <!--躯干-->
    <path
        android:strokeColor="@color/colorPrimaryDark"
        android:strokeWidth="16"
        android:pathData="M48.5,32 L45,60"/>
    <!--左手-->
    <path
        android:strokeColor="@color/colorPrimaryDark"
        android:strokeWidth="10"
        android:pathData="M43,35 L25,45 25,55 "/>
    <!--右手-->
    <path
        android:strokeColor="@color/colorPrimaryDark"
        android:strokeWidth="10"
        android:pathData="M50,36.3 L75,57"/>
    <!--左腿 M43,55 L30,70 L15,65-->
    <path
        android:name="left_leg"
        android:strokeColor="@color/colorPrimaryDark"
        android:strokeWidth="10"
        android:pathData="M43,55 L30,70 L15,65"/>
    <!--右腿 -->
    <path
        android:name="right_leg"
        android:strokeColor="@color/colorPrimaryDark"
        android:strokeWidth="10"
        android:pathData="M47,55 L55,70 L60,90"/>

</vector>
预览效果:

步骤 二 创建对应的动画xml文件
创建左腿动画 step_left.xml
<?xml version="1.0" encoding="utf-8"?>
<set android:ordering="sequentially"
    xmlns:android="http://schemas.android.com/apk/res/android">
    <objectAnimator xmlns:android="http://schemas.android.com/apk/res/android"
        android:duration="1500"
        android:propertyName="pathData"
        android:valueFrom="M43,55 L30,70 L15,65"
        android:valueTo="M43,55 L45,70 L35,85"
        android:valueType="pathType">

    </objectAnimator>
    <objectAnimator xmlns:android="http://schemas.android.com/apk/res/android"
        android:duration="1500"
        android:propertyName="pathData"
        android:valueFrom="M43,55 L45,70 L35,85"
        android:valueTo="M47,55 L55 70 L60 90"
        android:valueType="pathType">

    </objectAnimator>
</set>
注意!这里为了让腿部动的不那么尴尬,所以我添加了一个中间值动画。所以这里使用的是组合动画,在set包裹下的objectAnimator 会使用 android:ordering="sequentially"属性按顺序运行动画。注意,我取消了android:repeatMode="reverse"
android:repeatCount="infinite" 这两个属性,并且使用默认的插补器,所以没有配置插补器。
创建右腿动画 step_right.xml
<?xml version="1.0" encoding="utf-8"?>
<set android:ordering="sequentially"
    xmlns:android="http://schemas.android.com/apk/res/android">
    <objectAnimator xmlns:android="http://schemas.android.com/apk/res/android"
        android:duration="1500"
        android:propertyName="pathData"
        android:valueFrom="M43,55 L30,70 L15,65"
        android:valueTo="M43,55 L45,70 L35,85"
        android:valueType="pathType">

    </objectAnimator>
    <objectAnimator xmlns:android="http://schemas.android.com/apk/res/android"
        android:duration="1500"
        android:propertyName="pathData"
        android:valueFrom="M43,55 L45,70 L35,85"
        android:valueTo="M47,55 L55 70 L60 90"
        android:valueType="pathType">

    </objectAnimator>
</set>
步骤三 创建组合器
<?xml version="1.0" encoding="utf-8"?>
<animated-vector xmlns:android="http://schemas.android.com/apk/res/android"
    android:drawable="@drawable/ic_step">

    <target
        android:animation="@animator/step_left"
        android:name="left_leg"/>

    <target
        android:animation="@animator/step_right"
        android:name="right_leg"/>

</animated-vector>
步骤四 启动动画
mIcAnim = (ImageView)findViewById(R.id.ic_anim);
        mBtnStart.setOnClickListener(new View.OnClickListener() {
            @Override
            public void onClick(View view) {
                AnimatedVectorDrawable drawable = (AnimatedVectorDrawable)getDrawable(R.drawable.arrow_anim3);
                mIcAnim.setImageDrawable(drawable);
                if (drawable != null){
                    drawable.start();
                }
            }
        });