三个配置应用的位置:
1、conf目录下的server.xml文件:此方式为Eclipse默认配置方法,同时也是三种方式中优先级最高的。
<?xml version="1.0" encoding="UTF-8"?> <!-- Licensed to the Apache Software Foundation (ASF) under one or more contributor license agreements. See the NOTICE file distributed with this work for additional information regarding copyright ownership. The ASF licenses this file to You under the Apache License, Version 2.0 (the "License"); you may not use this file except in compliance with the License. You may obtain a copy of the License at http://www.apache.org/licenses/LICENSE-2.0 Unless required by applicable law or agreed to in writing, software distributed under the License is distributed on an "AS IS" BASIS, WITHOUT WARRANTIES OR CONDITIONS OF ANY KIND, either express or implied. See the License for the specific language governing permissions and limitations under the License. --><!-- Note: A "Server" is not itself a "Container", so you may not define subcomponents such as "Valves" at this level. Documentation at /docs/config/server.html --><Server port="8005" shutdown="SHUTDOWN"> <Listener className="org.apache.catalina.startup.VersionLoggerListener"/> <!-- Security listener. Documentation at /docs/config/listeners.html <Listener className="org.apache.catalina.security.SecurityListener" /> --> <!--APR library loader. Documentation at /docs/apr.html --> <Listener SSLEngine="on" className="org.apache.catalina.core.AprLifecycleListener"/> <!-- Prevent memory leaks due to use of particular java/javax APIs--> <Listener className="org.apache.catalina.core.JreMemoryLeakPreventionListener"/> <Listener className="org.apache.catalina.mbeans.GlobalResourcesLifecycleListener"/> <Listener className="org.apache.catalina.core.ThreadLocalLeakPreventionListener"/> <!-- Global JNDI resources Documentation at /docs/jndi-resources-howto.html --> <GlobalNamingResources> <!-- Editable user database that can also be used by UserDatabaseRealm to authenticate users --> <Resource auth="Container" description="User database that can be updated and saved" factory="org.apache.catalina.users.MemoryUserDatabaseFactory" name="UserDatabase" pathname="conf/tomcat-users.xml" type="org.apache.catalina.UserDatabase"/> </GlobalNamingResources> <!-- A "Service" is a collection of one or more "Connectors" that share a single "Container" Note: A "Service" is not itself a "Container", so you may not define subcomponents such as "Valves" at this level. Documentation at /docs/config/service.html --> <Service name="Catalina"> <!--The connectors can use a shared executor, you can define one or more named thread pools--> <!-- <Executor name="tomcatThreadPool" namePrefix="catalina-exec-" maxThreads="150" minSpareThreads="4"/> --> <!-- A "Connector" represents an endpoint by which requests are received and responses are returned. Documentation at : Java HTTP Connector: /docs/config/http.html (blocking & non-blocking) Java AJP Connector: /docs/config/ajp.html APR (HTTP/AJP) Connector: /docs/apr.html Define a non-SSL HTTP/1.1 Connector on port 8080 --> <Connector connectionTimeout="20000" port="8081" protocol="HTTP/1.1" redirectPort="8443"/> <!-- A "Connector" using the shared thread pool--> <!-- <Connector executor="tomcatThreadPool" port="8080" protocol="HTTP/1.1" connectionTimeout="20000" redirectPort="8443" /> --> <!-- Define a SSL HTTP/1.1 Connector on port 8443 This connector uses the NIO implementation that requires the JSSE style configuration. When using the APR/native implementation, the OpenSSL style configuration is required as described in the APR/native documentation --> <!-- <Connector port="8443" protocol="org.apache.coyote.http11.Http11NioProtocol" maxThreads="150" SSLEnabled="true" scheme="https" secure="true" clientAuth="false" sslProtocol="TLS" /> --> <!-- Define an AJP 1.3 Connector on port 8009 --> <Connector port="8009" protocol="AJP/1.3" redirectPort="8443"/> <!-- An Engine represents the entry point (within Catalina) that processes every request. The Engine implementation for Tomcat stand alone analyzes the HTTP headers included with the request, and passes them on to the appropriate Host (virtual host). Documentation at /docs/config/engine.html --> <!-- You should set jvmRoute to support load-balancing via AJP ie : <Engine name="Catalina" defaultHost="localhost" jvmRoute="jvm1"> --> <Engine defaultHost="localhost" name="Catalina"> <!--For clustering, please take a look at documentation at: /docs/cluster-howto.html (simple how to) /docs/config/cluster.html (reference documentation) --> <!-- <Cluster className="org.apache.catalina.ha.tcp.SimpleTcpCluster"/> --> <!-- Use the LockOutRealm to prevent attempts to guess user passwords via a brute-force attack --> <Realm className="org.apache.catalina.realm.LockOutRealm"> <!-- This Realm uses the UserDatabase configured in the global JNDI resources under the key "UserDatabase". Any edits that are performed against this UserDatabase are immediately available for use by the Realm. --> <Realm className="org.apache.catalina.realm.UserDatabaseRealm" resourceName="UserDatabase"/> </Realm> <Host appBase="webapps" autoDeploy="true" name="localhost" unpackWARs="true"> <!-- SingleSignOn valve, share authentication between web applications Documentation at: /docs/config/valve.html --> <!-- <Valve className="org.apache.catalina.authenticator.SingleSignOn" /> --> <!-- Access log processes all example. Documentation at: /docs/config/valve.html Note: The pattern used is equivalent to using pattern="common" --> <Valve className="org.apache.catalina.valves.AccessLogValve" directory="logs" pattern="%h %l %u %t "%r" %s %b" prefix="localhost_access_log" suffix=".txt"/> <Context docBase="spring-websocket-portfolio" path="/spring-websocket-portfolio" reloadable="true" source="org.eclipse.jst.jee.server:spring-websocket-portfolio"/></Host> </Engine> </Service> </Server>
多个应用时只需在最后的<Context>标签多写几个即可。docBase为发布目录,Eclipse默认为.metadata.pluginsorg.eclipse.wst.server.core mp0wtpwebapps下,前提为该应用时Eclipse通过tomcat启动的。因为Eclipse里配置了tomcat的启动参数
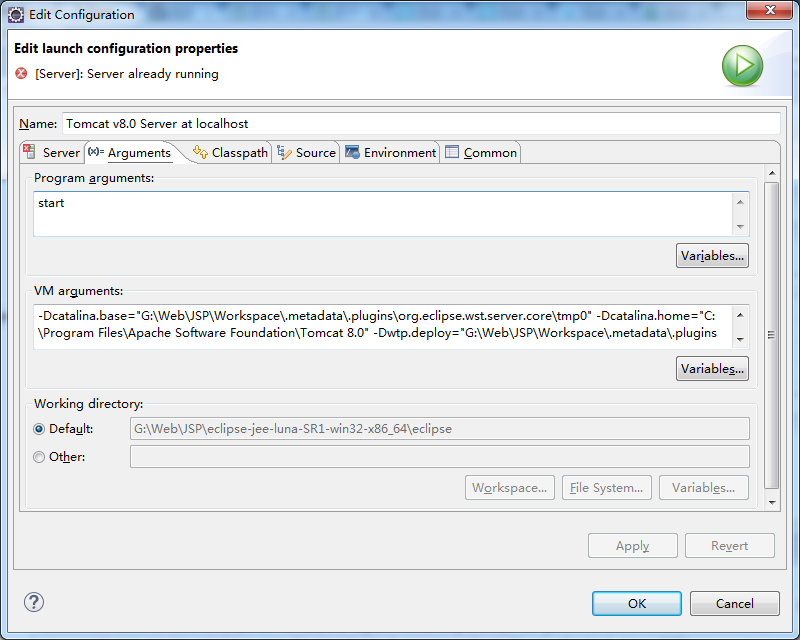
-Dcatalina.base="G:WebJSPWorkspace.metadata.pluginsorg.eclipse.wst.server.core mp0" -Dcatalina.home="C:Program FilesApache Software FoundationTomcat 8.0" -Dwtp.deploy="G:WebJSPWorkspace.metadata.pluginsorg.eclipse.wst.server.core mp0wtpwebapps" -Djava.endorsed.dirs="C:Program FilesApache Software FoundationTomcat 8.0endorsed"
2、confCatalinalocalhost目录下配置一个--目录名.xml文件,文件内容为
<Context docBase="test" path="/test" reloadable="true" />
这个path要和文件名一致,docBase为应用目录,默认在webapps目录下。
启动顺序比1低。
3、直接部署在默认的webapps目录下,tomcat会自动部署该项目。优先级最低。
扫描启动时在org.apache.catalina.startup.HostConfig类中的start()方法中,调用的
deployApps() 方法
 protected void deployApps() {

        File appBase = host.getAppBaseFile();
        File configBase = host.getConfigBaseFile();
        String[] filteredAppPaths = filterAppPaths(appBase.list());
        // Deploy XML descriptors from configBase
        deployDescriptors(configBase, configBase.list());
        // Deploy WARs
        deployWARs(appBase, filteredAppPaths);
        // Deploy expanded folders
        deployDirectories(appBase, filteredAppPaths);

    }
其中,appBase为配置的默认部署目录,默认情况下为webapps目录
configBase为conf/Catalina/localhost目录,deployDescriptors方法:
/**
     * Deploy XML context descriptors.
     */
    protected void deployDescriptors(File configBase, String[] files) {

        if (files == null)
            return;

        ExecutorService es = host.getStartStopExecutor();
        List<Future<?>> results = new ArrayList<>();

        for (int i = 0; i < files.length; i++) {
            File contextXml = new File(configBase, files[i]);

            if (files[i].toLowerCase(Locale.ENGLISH).endsWith(".xml")) {
                ContextName cn = new ContextName(files[i], true);

                if (isServiced(cn.getName()) || deploymentExists(cn.getName()))
                    continue;

                results.add(
                        es.submit(new DeployDescriptor(this, cn, contextXml)));
            }
        }

        for (Future<?> result : results) {
            try {
                result.get();
            } catch (Exception e) {
                log.error(sm.getString(
                        "hostConfig.deployDescriptor.threaded.error"), e);
            }
        }
    }
取该文件夹下的所有xml文件,并取部署目录下同名文件夹,进行部署。最后才是部署默认目录的war包。
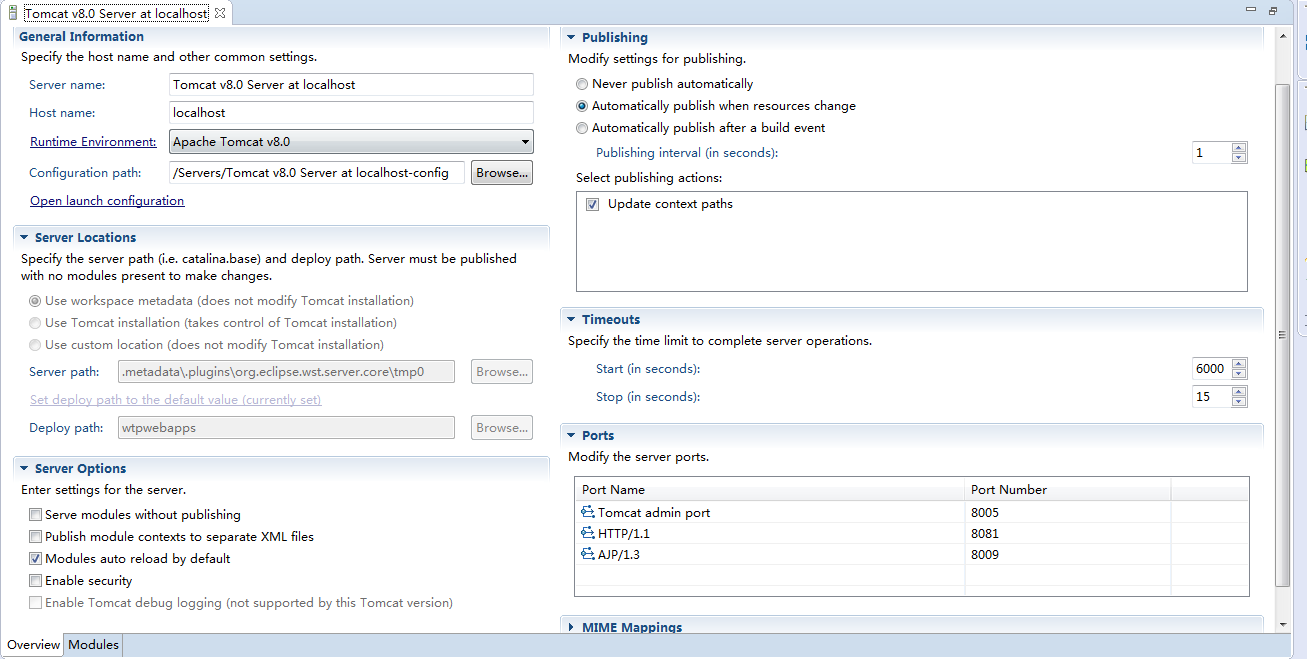
上图为Eclipse下tomcat的配置,General Information为通用信息,Runtime Environment可配置Java的环境等,OpenLaunchConfiguration为配置启动参数等,Configuration即tomcat的conf目录。
server locations为服务器文件放在何处,即配置文件,部署目录等放在哪里,只有移除全部module这里才可以做修改。
server options为服务器选项。第一个是不发布,即不放到target目录(?)。第二个为为每个应用发布到单独的xml文件,即localhost目录下。
第三个是默认重载模块,即做修改便重载。后略。
发布的一些选项,是否修改文件等等。超时选项,端口设置等等。
ps:配置session超时时间为:
1、修改server.xml下的应用配置:
<Context path="/test" docBase="/test"
defaultSessionTimeOut="3600" isWARExpanded="true"
isWARValidated="false" isInvokerEnabled="true"
isWorkDirPersistent="false"/>
2、web.xml下
<session-config>
<session-timeout>20</session-timeout>
</session-config>
3、
在程序中定义:
session.setMaxInactiveInterval(30*60);
设置单位为秒,设置为-1永不过期
不知道这种设置会不会真正地起到作用的哦!
session.setTimeout(你设置的时间); ------>>> 这个也可以,但是和setMaxInactiveInterval有什么差别暂时没有体会。