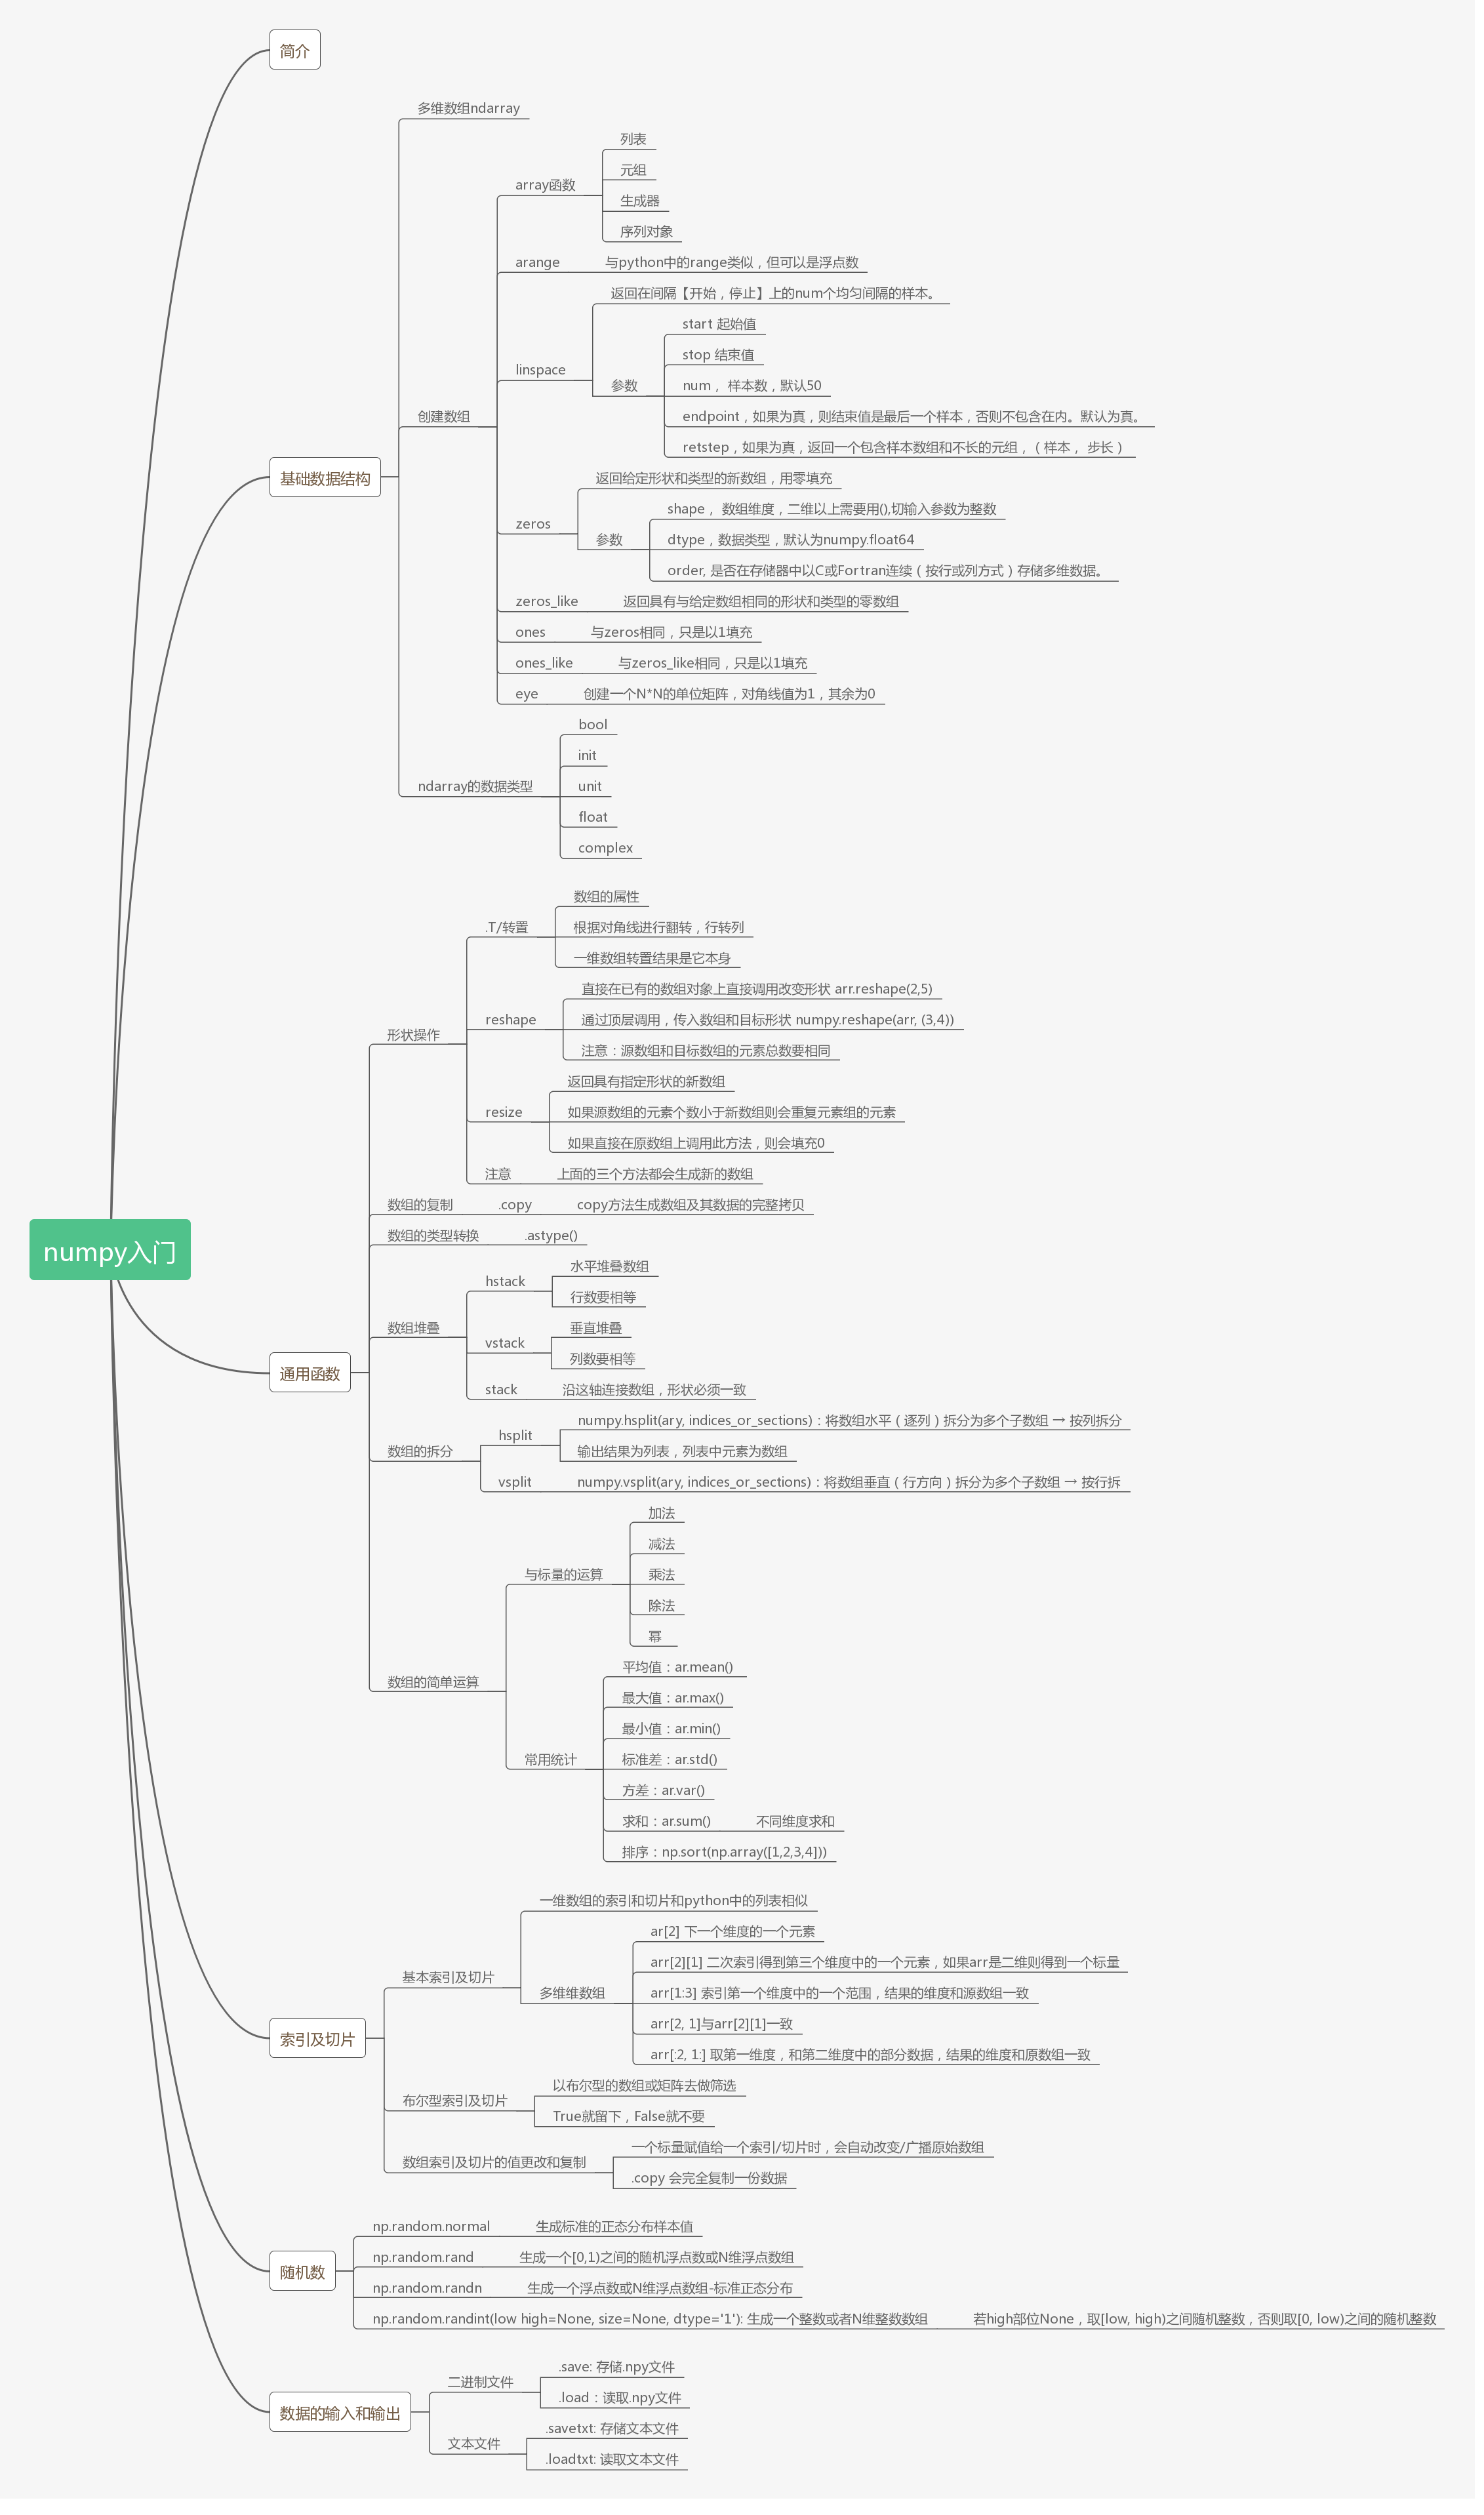
numpy入门
一、numpy的定义
numpy实际上就是数组的运算,多维的数组对象,ndarray。
1,实际数据
2,元数据 描述信息
二、numpy的基本规范信息


 1 # ndarray
 2 # 规范,推荐,复用
 3 import numpy as np
 4
 5 ar = np.array([1,2,3,4,5])
 6 print(ar)
 7 print([1,2,3,4,5]) #打印列表
 8 print(ar.ndim) #打印维度
 9 print(ar.shape) #打印数组形状
10 print(ar.size) #打印数组个数的多少
11 print(ar.dtype) #打印数组的数据类型
12 print(ar.itemsize) #打印数组的内存大小
三、如何创建数组
3.1 创建数组:array()括号中可以包含函数,列表,元祖,数组,生成器,序列等类型
1 arr1 = np.array(range(10))
2 arr2 = np.array([1,2,3,4,5.5])
3 arr3 = np.array([[1,2,3,4],[5,6,7,8]])
4 print(arr3)
5 print(arr3.ndim)
6 print(arr3.shape)
3.2 使用arange()创建,类似于Python range()
1 np.arange(10)
2 np.arange(10.)
3 np.arange(1,10,0.1)
4 np.arange(10000)
3.3 使用linspace()创建:返回在间隔[开始,停止]上num个均匀的样本
1 np.linspace(2.0,3.0, num=5)
2 np.linspace(2.0, 3.0, num=5, endpoint=False) #左闭右开,不包含3.0
3 np.linspace(2.0,3.0, num=5, retstep=True) #显示步长
3.4 使用zeros()/zeros_like()/ones()/ones_like()创建,numpy.zeros(shape,dtype=float,order='c'):返回给定形状和新的数组,用零填充,ones同理。
1 np.zeros(5)
2 np.zeros((2,3,2), dtype=np.int)
3 arr1 = np.array([[1,2,3],[4,5,6]])
4 np.zeros_like(arr1)
5 np.ones(6)
3.5 eye()创建数组,正方形的n*n的单位矩阵,对角线为1,其余为0。
1 np.eye(5)
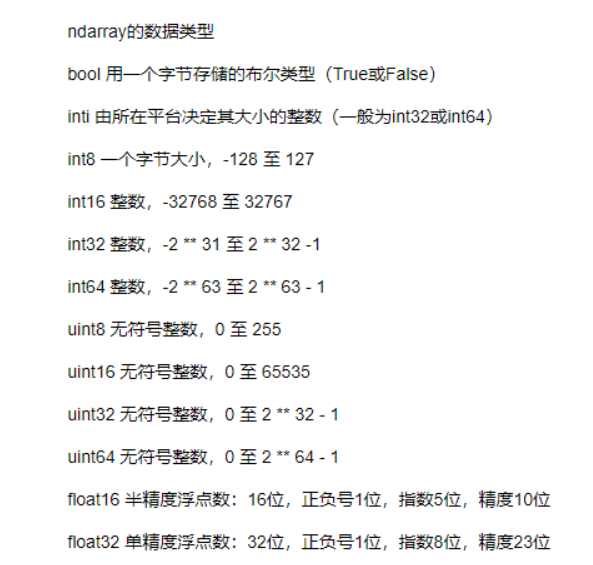
3.6 nadaray的数据类型
四、numpy的通用函数及基本操作
4,1 数组形状 .T/.reshape()/.resize(),转置(2,5)--(5,2)
 1 arr1 = np.arange(10)
 2 arr2 = np.ones((5,2))
 3 arr3 = np.array([[1,2,3],[4,5,6]])
 4
 5 print(arr1,arr1.T)
 6 print('_______')
 7 print(arr2)
 8 print(arr2.T)
 9 print('______')
10 print(arr3)
11 print(arr3.T)
12 # reshape只提供形状的改变,元素数量保持一致
13 arr4 = np.resize(arr2, (3,5))
14 print(arr4)
15 print(np.arange(1,13).reshape(3,4))
16 np.resize(np.arange(1,13).reshape(3,4), (3,5))
17
18 # np.resize 改变形状,如果元素不够,重复填充
4.2 数组的复制
1 arr1 = np.arange(10)
2 arr2 = arr1
3 print(arr1 is arr2)
4 arr3 = arr1.copy()
5 print(arr1 is arr3)
6 # copy 复制一个副本
7 # .T, reshape,resize 返回一个新的数组
4.3 数组类型的转换 .astype() 默认返回一个新的数组
1 ar1 = np.arange(10, dtype=np.float)
2 ar1.astype(np.int32)
4.4 数组的堆叠
 1 a1 = np.arange(5)
 2 a2 = np.arange(4)
 3 #print(a1.shape, a2.shape)
 4 # 水平堆叠
 5 np.hstack((a1, a2))   # 水平堆叠时,行数要一致
 6
 7 ar1 = np.arange(12).reshape((3,4))
 8 ar2 = np.arange(15).reshape((3,5))
 9 print(np.hstack((ar1, ar2)))
10
11 # 垂直堆叠
12 # np.vstack()  # 垂直堆叠,列数要一致
13 # np.stack() 通过指定哪个维度,哪个轴
14 # help(np.stack)
15 ar1 = np.arange(12).reshape((3,4))
16 ar2 = np.ones((3,4))
17 print(ar1)
18 print(ar2)
19 np.stack((ar1,ar2),axis=0).ndim
4.4 数组的拆分
 1 ar = np.arange(16).reshape(4,4)
 2 print(ar)
 3 # 水平拆分 按列拆
 4 ars = np.hsplit(ar,2)
 5 print(ars)
 6 print(ars[0])
 7 print(ars[1])
 8 # 垂直拆分,按行拆
 9
10 ars = np.vsplit(ar,4)
11 print(ars)
12 print(ars[0])
13 print(ars[1])
4.5 数组的简单运算
 1 # 矢量化
 2 ar = np.arange(12).reshape(3,4)
 3 # 与标量的运算
 4 print(ar)
 5 print(ar+1)
 6 print(ar*2)
 7 print(1/(ar+1))
 8 print(ar**0.5)
 9 # 常用的统计函数
10 print(ar.mean())  # 求平均值
11 print(ar.max())  # 求最大值
12 print(ar.min())  # 求最小值
13 print(ar.std())  # 求标准差
14 print(ar.var())  # 求方差
15
16 # 可以在不同维度上进行操作
17 print(ar)
18 np.sum(ar, axis=0)
19 np.sum(ar, axis=1)
20 np.sort(np.array([4,3,2,1]))
五、numpy的索引和切片
5.1 numpy的基本索引
 1 ar = np.arange(20)
 2 print(ar)
 3 print(ar[4])
 4 print(ar[:3])
 5 # 一维的
 6 ar = np.arange(16).reshape(4,4)
 7 print(ar)
 8 print(ar[0])  # 切出一行  切片为下一个维度的一个元素
 9 print(ar[0][-1]) # 二次索引,得到一维中的一个值
10 print(ar[:3])  # 切出多行,
11 print(ar[1,1]) # 类似于二次索引
12 print(ar[:2, 1:])
13 # 二维的
5.2 布尔型索引
 1 ar = np.arange(12).reshape(3,4)
 2 i = np.array([True, False, True])
 3 j = np.array([False, True, False, True])
 4 print(ar)
 5 print(i)
 6 print(j)
 7 print(ar[i])
 8 print(ar[i,:])  # 选行
 9 print(ar[:, j])   # 选列
10 # 基本的布尔型索引
11 ai = ar > 5
12 print(ar)
13 print(ai)
14 print(ar[ar % 2 != 0])  # 选取所有的奇数
15 print(ar[i,j])
六、numpy随机数 numpy.random
6.1 生成标准正态分布的随机数
1 # 生成
2 samples = np.random.normal(size=(4,4)) # 符合标准正态分布的4*4样本值
3 print(samples)
6.2 numpy.random.rand():[0,1)之间的随机样本或N维浮点数组--均匀分布
1 import matplotlib.pyplot as plt
2
3 a = np.random.rand()
4 b = np.random.rand(4)
5 c = np.random.rand(3,4)
6 s1 = np.random.rand(1000)
7 s2 = np.random.rand(1000)
8 plt.scatter(s1, s2)
9 plt.show()
6.3 numpy.random.randn():生成一个浮点数或者N维的浮点数组--正态分布
1 import matplotlib.pyplot as plt
2 s1 = np.random.randn(1000)
3 s2 = np.random.randn(1000)
4 #print(s1)
5 plt.scatter(s1, s2)
6 plt.show()
7 help(np.random.randn)
6.4 numpy.random.randint(low,high=None,sizej=None,dtype='1'):生成一个整数或N维的整数数组。
若high不为None时,取[low,high)之间的随机整数,否则取值[0,low)之间的随机整数,且high必须大于low
dtype参数:只能是INT整数
1 np.random.randint(3)
2 np.random.randint(2, 6, size=5)
3 np.random.randint(1,100, size=[3,5])
七、numpy的输入输出,读写数组数据,文本数据
7.1 二进制文件的存数据和读数据
1 # 二进制文件
2 # 存数据
3 import numpy as np
4 ar = np.random.rand(5,5)
5 np.save('test.npy',ar)
6 #读数据
7 np.load('test.npy')
7.2 文本数据的存和读
#文本数据
import numpy as np
ar = np.random.rand(5,5)
# 存
np.savetxt('test.txt', ar, delimiter=',')
# 读取
np.loadtxt('test.txt', delimiter=',')
八、总结